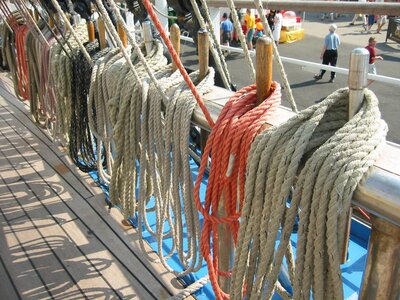
I'm attaching my 1/50 running rigging, and at the moment I am passing the thread through the hole in the pin rail then clamping it in place with the belaying pin with the plan to put coils on later. Once I've finalised the position of the ropes, should I glue them to the pinrail? Does the belaying pin tend to pop out after a while?
You are using an out of date browser. It may not display this or other websites correctly.
You should upgrade or use an alternative browser.
You should upgrade or use an alternative browser.
Running rigging / gunwale pin rails
- Thread starter jimmystratos
- Start date
- Watchers 6
First of all, you're CHEATING by missing out on all the frustration of breaking 25% of you belaying pins by not trying to tie them on properly and accurately and the psychosis which follows, like every one of your model building fellows.I'm attaching my 1/50 running rigging, and at the moment I am passing the thread through the hole in the pin rail then clamping it in place with the belaying pin with the plan to put coils on later. Once I've finalised the position of the ropes, should I glue them to the pinrail? Does the belaying pin tend to pop out after a while?
I salute you.

Second, yes you should drop a small bit of CA glue on the end of a toothpick at the place where the line and pin pass through the pin rail to hold them permanently in place or some of them may pull out under tension or tautness of the line from changes in humidity, then cover the pins with false rope coils.
Don't forget to boast about your cleverness on the forum for extra points.
Last edited:
Right.
Ok.
As it's my first model ship, and it's taken me 32 years to get it to this stage, I am comfortable with a bit of 'cheating', and I am not someone to boast any cleverness on my part, I only pass stuff on in the spirit of education and helpfulness.
Thanks for confirmation that it is better to glue than rely on friction in the longer term.
- Joined
- Feb 20, 2022
- Messages
- 193
- Points
- 88

jimmystratos- hahahaha! Necessity is the mother of invention! You're doing exactly what I've been doing since I got back into shipbuilding! With plastic, this is almost always a necessity. And Darius is spot-on! But only 25%? hahahaha Great stuff!!
I tie off to belaying pins as well. I don't cut the excess line or glue until I have all of the running rigging associated with the mast I am working on installed. It makes for a mess but allows you to make adjustments to line tension as you go along and when all rigging is in place.
Last edited:
To add to the confirmation this is the way I model said rigging as well…run the line through the pin hole…place the pin to hold…dab with a drop of CA to lock in place. I also then do a few figure eights around the pin with the tail of the rigging line which effectively hides the way I ran the rigging through the pin hole. Another small dab of CA. Finally, as you do also, add a false loop of line on the pin to finish off the pin rail. Well done indeed! 
I do the same thing--no one but me knew till now!To add to the confirmation this is the way I model said rigging as well…run the line through the pin hole…place the pin to hold…dab with a drop of CA to lock in place. I also then do a few figure eights around the pin with the tail of the rigging line which effectively hides the way I ran the rigging through the pin hole. Another small dab of CA. Finally, as you do also, add a false loop of line on the pin to finish off the pin rail. Well done indeed!
- Joined
- Jan 15, 2021
- Messages
- 40
- Points
- 93

Running rigging lines through the belaying pin holes then anchoring with the pin and a dot of CA hasn't occurred to me as I fix the pins in position when assembling the racks.
It strikes me that this approach changes the relationship between the line and the pin. My understanding of how running rigging works is that the ropes initially run around the belaying pin under the rack before being belayed to the pin then coiled. This locates the descending line to the inside face of the rack.
If the difference between the two approaches was indistinguishable then I would be OK with either but at 1:75 which is the scale I am working with I think that the difference is noticeable and the line through pin hole approach moves the line route too close to the bulwark.
I will stick to my approach as I think the finished product is more accurate.
Cheers, David.
I am curious what it would look like if the line was brought down around the front of the rail and then up through the pin hole. One would likely need to keep tension on the line as the pin was put into place.Running rigging lines through the belaying pin holes then anchoring with the pin and a dot of CA hasn't occurred to me as I fix the pins in position when assembling the racks.
It strikes me that this approach changes the relationship between the line and the pin. My understanding of how running rigging works is that the ropes initially run around the belaying pin under the rack before being belayed to the pin then coiled. This locates the descending line to the inside face of the rack.
If the difference between the two approaches was indistinguishable then I would be OK with either but at 1:75 which is the scale I am working with I think that the difference is noticeable and the line through pin hole approach moves the line route too close to the bulwark.
I will stick to my approach as I think the finished product is more accurate.
Cheers, David.
- Joined
- Jan 15, 2021
- Messages
- 40
- Points
- 93

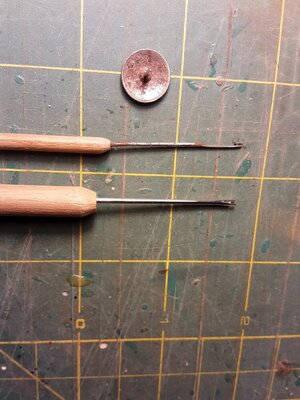
Looping rigging lines around the bottom of belaying pins and then tying them off by a figure 8 around the top of the pin can be pretty fiddly so I made up a couple of tools. I modified largish sewing needles be cutting off the end of the eye of one to make a "push" tool and another by cutting the side out of the eye to make a "pull" tool. Fitting these to a dowel handle enables reaching across the width of the deck. Makes rigging life much easier.
Cheers, David.
Cheers, David.

What you do if you want to use the short cut is feed the line, with the tip stiffened by CA glue, from the BOTTOM of the hole in the pinrail, not from the top. Then wedge the line in the hole with the belaying pin, add a bit of glue to the joint, trim off the excess, then toss a coil over the top of it all.
Same home made tools I use! I tie all my lines the way they are ties aboard ship, because I enjoy a challenge. The shortcut I described above is faster, and looks the same when you're done.Looping rigging lines around the bottom of belaying pins and then tying them off by a figure 8 around the top of the pin can be pretty fiddly so I made up a couple of tools. I modified largish sewing needles be cutting off the end of the eye of one to make a "push" tool and another by cutting the side out of the eye to make a "pull" tool. Fitting these to a dowel handle enables reaching across the width of the deck. Makes rigging life much easier.
Cheers, David.View attachment 310198


