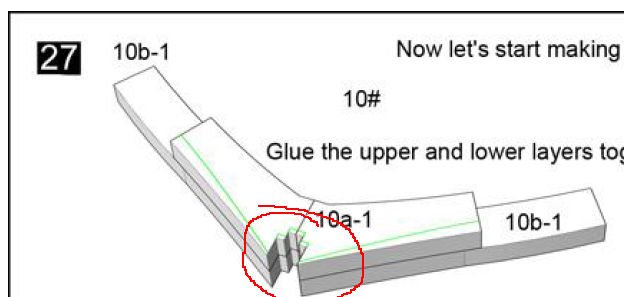
What a simple topic, I feel embarrassed to ask. (I know, no stupid questions, but gee - sanding a groove!) I have a lot of grooves to shape and sand on the frames of the Granado, but have had this problem elsewhere. The grooves are like this on the model

in the area circled. The parts are laser cut, and in many cases, like the one above, the grooves are tapered. So the char has to be removed, and the grooves sanded to size and/or tapered. Dimensions are about 3mm wide for the upper/narrow part of the slot, and 6mm for the lower.
My go-to for this area is one or more needle files. A small square one fits the small groove, and a flat file the step. But needle files are really designed more for metal than they are for wood. I have diamond coated files, and crosscut files a bit coarser, but these fill up with wood shavings, and basically "polish" the wood, rather than sand it. Somehow, files used on external surfaces work better for me, but it's tough getting these internal areas done in a good a reasonable manner. I've ordered some needle file rasps, which I hope will remove more wood without clogging, but was wondering what you all use.
Sanding sticks and blocks are great for larger surfaces, but none of the sanding sticks I've seen have grit on the edges. And the blocks are all too large. And what they sell as "sanding twigs" are so flexible that they are unusable on wood, even if backed up with a wood strip. I could remove the material easily with an end mill on a Dremel, but wouldn't be able to keep it straight and true.
This type of thing has always haunted me, whether it's the grooves on the Granado or gunports though thicker wood. I need to find a better answer, so am hoping someone here has one (or more) for me.


