Kit review Schooner for Port Jackson (1802) - 1:36 by Miniature Arts

Uwek

Administrator
Staff member
Administrator
Forum Moderator
Joined
Dec 25, 2017
Messages
31,127
Points
1,238

Location
Vienna, Austria
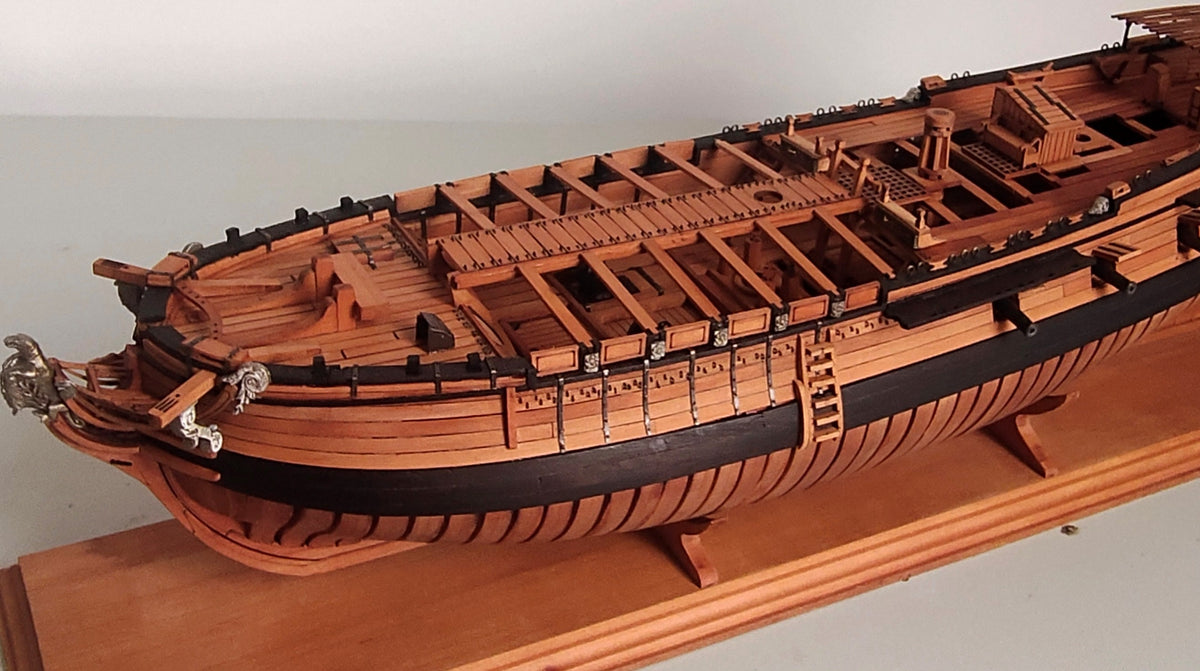
Today I would like to show and describe you the content of a very interesting kit

Schooner for Port Jackson (1802)
in scale 1:36
by Miniature Arts


HISTORY and Plans for an Australian schooner of 1802 /1803

In 1785 the First Fleet arrived in the new British colony of Port Jackson (now Sydney Harbour) in New South Wales and Arthur Phillip was appointed as the first Governor.

In 1790 the governor of Australia asked the Admiralty in London for two vessels of 30 to 40 tons, which should be shipped there in frames, accompanied by some skilled shipwrights to build the ships. His request was partly fulfilled by sending materials of a schooner of 41 tons, that was put together in Sydney and served the colony from 1793 to 1805. In 1802 the Admiralty ordered the Navy Board to produce drawings of two ships according to the governor's specifications and sent a copy of them to Port Jackson (today known as Sydney Harbour). The original drafts of the schooner are still in the National Maritime Museum in Greenwich.

Meanwhile, the NSW Government had already built various other ships before 1803. In 1797 His Majesty’s Dockyard was opened at Port Jackson for building larger vessels.

It can't be ascertained whether actually a ship had been built to the plans at that time, but in 1807 a schooner of similar size named Mercury was launched in 1807 for the Sydney merchant Thomas Reiby. He was an influential trader and former ship's officer and one can assume that he got the plans and some support from the governor.

The Royal Navy’s 1803 design of a ‘Schooner for Port Jackson’ has been recognised on the obverse of Australia’s twenty dollar banknote since 1994. A sketch of the schooner is beside the portrait of Mrs Mary Reibey, who arrived as a convict and rose to become a respected and successful owner of a cargo shipping business. Her fleet included the Mercury, a schooner similar to the 1803 design for the Port Jackson schooner.

new-twenty-banknote.jpg

twenty-dollar-note.jpg

Although the 1803 plans for a ‘Schooner for Port Jackson’ are commonly believed to be used for the first ship built in Australia, no records have been found of any ships being built according to these plans. However, it can be claimed that the plans were the ‘first Royal Navy plans made for a ship for use at Port Jackson, and to be built at Port Jackson, in Australia’.

More details on history and the drawings of the schooner are given in the book by Karl Heinz Marquardt, The Global Schooner, Origins, Development, Design and Construction 1695 - 1845, Conway Maritime Press, London 2003, ISBN 0851779301.


Remark:
So a frame "kit" in 1:1 is basis for our kit in 1:36


Screenshot 2022-12-01 161352.png

and here the contemporary drawings available at the NMM, which were the basis for Marquardts work


j0812.jpg

Unnamed 53ft Schooner (1803)​

Scale: 1:48. A plan showing the body plan, modified sheer lines with some inboard detail, and modified longitudinal half-breadth proposed for an unnamed 53ft Schooner for the use in Port Jackson, Australia. This shows that the vessel was modified from a single-masted vessel to a Schooner. A copy with the modifications was sent to Chatham Dockyard on 3 January 1803 to be forwarded to Calcutta and then to Port Jackson.

Signed by John Henslow [Surveyors of the Navy, 1784-1806] and William Rule [Surveyor of the Navy 1793-1813].


j0813.jpg

Unnamed 53ft Schooner (1803)​

Scale: 1:48. A plan showing the framing disposition, and the deck plan for an unnamed 53ft Schooner to be built at Port Jackson, Australia.


j0814.jpg

Unnamed 53ft Schooner (1803)​

Scale: 1:6. A plan showing the middle and lower pintle and brace for an unnamed 53ft Schooner to be built at Port Jackson, Australia.


You can find these contemporary drawings here:


Schooner-Port-Jackson7.jpg
"Homecoming" - by K.H. Marquardt
 
Last edited:
Now let us take a look at the kit model

The model kit is available for very reasonable price either in Pear wood or also in Cherry wood and can be ordered viw Dry-Docks Models and Parts

Both versions are in scale 1:36

the finished model has a

Length of 71,5cm
Width
of 21,0 cm
and
Height of 53,5cm

The model is prepared as a Partial POF kit , means, that the midship section over the length of the main hatch is prepared as a Plank on Frame model.
The original framing is visible in one of the contemporary drawings in the post before.
The bow and stern part are conventional POB (Plank On Bulkhead)

Screenshot 2023-03-24 113522.png

The concept with mixed POF and POB will be clear looking at this model under construction - the framing and the deck structure with beams, carlings etc. is following the contemporary drawings - really a great idea to combine this. So a partly open and not full y planked hull with visible structure can produce a very attractive model ...... I love this idea

49BC91A4-AC34-4461-AC6D-EF668218E6F5.jpeg


But now let us take a first look at the finished model

Screenshot 2023-03-24 111931.png

Screenshot 2023-03-24 111818.png

Screenshot 2023-03-24 111833.png
 
Kit Packaging

The kit comes in a sturdy cardboard box carefully packed in bubble wrap and taped for further security. Such packaging will ensure accidental drops and other unexpected damages as well as moisture while transportation.

IMG_1537.jpg
(I opened the parcel already before I made the photo)


IMG_1539.jpg


The Kit Content in Overview

IMG_1540.jpg

The main wrapped package with the wooden sheets - the ruler in front is 50cm long

IMG_1542.jpg

The Overview of the wooden parts (from left to right: Plawood of different thickness, templates, pearwood sheets, round material, red sandalwood )

IMG_1564.jpg

IMG_1565.jpg

IMG_1566.jpg

The package included various sheets of high-grade plywood parts for temporary construction jig.

IMG_1567.jpg

IMG_1568.jpg

very accurate laser cut

IMG_1569.jpg

IMG_1570.jpg

The plywood sheets for the bulkheads and deck templates

IMG_1571.jpg

IMG_1572.jpg
 
Pearwood sheets.
The sheets range from 4mm thick to 1mm thick, high-grade timber precisely cut by Laser,

the hull planking

IMG_1573.jpg

beautiful color with very fine grain

IMG_1575.jpg

the frameing

IMG_1576.jpg

accurate laser cut

IMG_1577.jpg

IMG_1581.jpg

IMG_1582.jpg

The deck planking also in pearwood

IMG_1583.jpg

IMG_1589.jpg

detail of the deck planking with prepared correct treenail pattern - in scale 1:36 definitely in scale

IMG_1584.jpg

IMG_1585.jpg

two sheets made out of the expensive red sandalwood - close to black but with visible grain
Sorry for the photo quality, in reality this wood is looking very good - parts for decorative elements, wales and the railing - so no painting necessary

IMG_1590.jpg

IMG_1592.jpg

some more pearwood sheets with the beams, carlings, keelson etc.

IMG_1593.jpg

IMG_1639.jpg

and some sheets with the parts for the barrels and boxes - a nice add on to bring some "life" into the model when you display it with open hatch

IMG_1595.jpg

In addition we have some round material in form of dowels for the masting etc.

IMG_1601.jpg

also in good quality

IMG_1600.jpg
 
Last edited:
Accessories
a small bag with brass rod and also some black fishing line
IMG_1604.jpg

You will ask now - fishing line for what?

IMG_1605.jpg

the treenailing pattern in the deck is laser cut through the wooden sheet - so with the fishing line the modeler can immitate the treenails (some modelers are making thme in this way - nice idea
alternative the holes can be also filled with some brown wood filler to immitate the treenails or even use my tooth-pick method
Defintely a good idea, so mistakes in drilling of the holes can be avoided
IMG_1588.jpg

a bag with different rigging lines

IMG_1606.jpg

in different sizes and colors

IMG_1607.jpg

also in very good quality comparing to most other kits

IMG_1608.jpg

IMG_1614.jpg

IMG_1610.jpg

IMG_1615.jpg

IMG_1611.jpg

IMG_1612.jpg

IMG_1616.jpg


several bags with very good quality blocks are included

IMG_1617.jpg

IMG_1618.jpg

I think here there will be no need to buy extra better blocks from the aftersales market - these blocks are really good

IMG_1619.jpg

IMG_1620.jpg

IMG_1621.jpg

IMG_1622.jpg

IMG_1623.jpg

IMG_1624.jpg

IMG_1625.jpg


in the next post we will see, what is in this box

IMG_1626.jpg
 
The kit sontents also a plastic box with further fittings

IMG_1626.jpg

IMG_1627.jpg

tiny bolts (no nails made on the lathe)

IMG_1628.jpg

these are only 1cm long

IMG_1629.jpg

one photo etched sheet for the rudder hinches and horse shoe

IMG_1630.jpg

two well casted anchors

IMG_1631.jpg

for the parrals

IMG_1632.jpg

brass eyebolts and rings

IMG_1633.jpg

some sheets of some elastic black material which is planned to immitate the caulking - let us see in future how this is working - but definitely the manufacturer is helping the modeler to execute the model with some special solutions

IMG_1634.jpg

IMG_1635.jpg

and one heavy bag

IMG_1636.jpg

with stone material to make the balast in the hold of the model

IMG_1638.jpg

Best quality material - the best stones and absolute in scale -> GREAT
 
Our Kit review journey has almost come to the end, the only part that is left is

Instruction Manual and plans

a ste of drawings in correct size in scale 1:36

IMG_1659.jpg

IMG_1656.jpg

IMG_1657.jpg

IMG_1660.jpg

IMG_1658.jpg

IMG_1660.jpg

IMG_1661.jpg

IMG_1655.jpg

IMG_1662.jpg

and also a belaying plan

IMG_1663.jpg

The drawings are showing everything what is necessary


The Manual is written in english

IMG_1540a.jpg

with a list of content

IMG_1664.jpg

the main information are shown in 3D-sketches and english information (in the following some samples)

IMG_1665.jpg IMG_1666.jpg

IMG_1667.jpg IMG_1668.jpg

also included are here several pages showing every individual frame as a paper template for gluing the frame parts together

IMG_1671.jpg

in addition the manual is including also tow of the laser cut sheets with the onesided adhesive tape for the planking caulking

IMG_1672.jpg

the backside with the protection layer

IMG_1675.jpg

this can be a very clever solution for immitation of caulking

IMG_1674.jpg
 
With this, the Schooner for Port Jackson kit review comes to the end.

My observations while making this kit review

The kit is designed in a new way,
A combination with POF and POB will result in a very attractive model.
With scale 1:36 a very good size for beginners and also internediate modelers with thick fingers.
Maybe also very attractive for beginners with POF modeling, who wants to test this way of ship modeling.
Historical attractive especially for the australian friends.
The quality of wood (I have the pear wood version) is very good and the laser cut, but also all the other parts and fittings are of good quality.
Drawings are showing all necessary information and in combination with the english manual the modeler will be able to build the model without bigger problems.
Clever ideas with the treenailing pattern and the caulking material - the results are looking good.
And a very reasonable price for such a model.

In summary the kit is highly recommended

What I forgot: Sorry - but the model has no Guns
so everybody looking for a "war" ship - No the Port Jackson was a "working horse" - a very attractive one!


Her some more impressions of a finished model

Screenshot 2023-03-24 111931.png

Screenshot 2023-03-24 111947.png

Screenshot 2023-03-24 112004.png

Screenshot 2023-03-24 112022.png

Screenshot 2023-03-24 112058.png

Screenshot 2023-03-24 112041.png

Screenshot 2023-03-24 112116.png

and the model in another series of photos

Screenshot 2023-03-24 111818.png

Screenshot 2023-03-24 111833.png

Screenshot 2023-03-24 111507.png

Screenshot 2023-03-24 111450.png

Screenshot 2023-03-24 111526.png

Screenshot 2023-03-24 111603.png

Screenshot 2023-03-24 111542.png

Screenshot 2023-03-24 111904.png

Screenshot 2023-03-24 111728.png

Screenshot 2023-03-24 111620.png

Screenshot 2023-03-24 111802.png

I like the model very much ......
 
Hi @Uwek. I'm a little confused. Why have POF components that are covered with planking as shown on the completed model? Or is it just left to builder's choice... Sorry for my potentially ignorant question but I like the look of this little boat and might be interested one day...
 
Hi @Uwek. I'm a little confused. Why have POF components that are covered with planking as shown on the completed model? Or is it just left to builder's choice... Sorry for my potentially ignorant question but I like the look of this little boat and might be interested one day...
Hi Paul ,for some reason the manufacturer’s protototype were completely coverd up with planking ,but it is your choice how you finish the model
 
Hi @Uwek. I'm a little confused. Why have POF components that are covered with planking as shown on the completed model? Or is it just left to builder's choice... Sorry for my potentially ignorant question but I like the look of this little boat and might be interested one day...
Not Uwek however, with a little “Artistic license” one could leave the center deck open. Just my two centavos.
I’ve been looking for a “new” project for myself and might jump into this one myself.
 
In summary the kit is highly recommended

What I forgot: Sorry - but the model has no Guns
so everybody looking for a "war" ship - No the Port Jackson was a "working horse" - a very attractive one!

No Guns, no decors :confused:
 
Back
Top