• LUCZORAMA SHIPWRECK SCAVENGER HUNT GIVEAWAY. 4 Weeks of Fun • 1 Legendary Prize ((OcCre’s Fram Ship)) • Global Crew Welcome!
    **VIEW THREAD HERE**

Second planking Polaris, how to start?

  • Thread starter Thread starter ubjs
  • Start date Start date
  • Watchers Watchers 4
Joined
Sep 5, 2018
Messages
138
Points
88

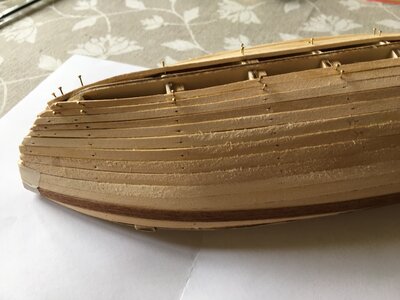
Almost done with the first planking on Polaris, the strips are 2x5 mm so I was able to bend them with soaking and a plank bender.
But the second round I don't know how to do, the strips are 0.5x5 mm and I don't think they are as bendable. I've read most about planking, have several books etc, but how do I do this when you can't even set the first one?

polarisplank.jpg
 
Could I force the strip so its level with the deck?
Could I use water and plank bender on this thin strips, 0,5 mm?
 
but sometimes it is helping also with thin planking vaneer - especially if the wood is very dry (f.e. very old kits)
Water is often making the wood a little bit more flexibel
 
If the problem is that of bending the thin planks sideways then beware: it can make them produce a clinker build effect. (I've just made this mistake over a small part of the Nina hull). It is best to let them follow their natural line closesly - though not necessarily exactly. Use shaped inserts occasionally and possibly taper the planks towards the bow where the bulhead edges get shorter. I see you have done this with the first stage planking. Clamping three or four together when planing a taper is more productive than doing them singly and lets them provide mutual support against splitting.
 
When I've done hulls that don't have severe radius considerations (like the older ship-of-the-line like the HMS Victory and similar), I use the following process for the second planking layer. The half mm thick walnut planking provided for the second layer is very flexible, and I don't soak them because of potential shrinkage when they dry and I'm trying to avoid gaps between the planks. Is this gap issue a real concern? I honestly don't know; I've simply not chosen to test it.

Instead, I use painters tape to hold the strips down. I follow the kit instructions for where the first line should be placed, and then for the remainder, I let the strips lay naturally and trim the ends as required to fit properly against their neighbouring strips. Same as for the first layer, you then also need to cut the wedge strips (stealers) to fit gaps at the bow and stern.

Painters tape does a great job for most locations, and where I need to apply some additional pressure to get the curve to lay in against the hull, I simply use thicker pieces of leftover wood on top of the strip, and then the tape over the thick wood blockage pushes the thinner strip in to where it needs to be.

If you live in a very dry climate, or the kit has been sitting around for years, I add moisture to the wood strips in the following manner (it's not soaking, but rather a slow introduction of moisture in a somewhat enclosed environment): I used a plastic extendable tube that is normally used for transporting drawings or blueprints. The tube is watertight, and completely closed at one end. The other end is closed with a screw on plastic cap. I take a large zip lock bag and fill it with several paper towels and then pour in a cup of water. Leaving the bag open to allow the moisture to escape, I slide the bag down to the bottom of the tube. I then add my wooden strips into the tube, carefully inserting them so the ends don't go into the bag opening, but rather, to lay along the side of the bag and touching the bottom of the tube. I screw on the cap and leave it for several weeks. This is where I store the strips while working on the hull. If I do need to add additional water to assist with bending using a heated plank bending tool, I apply water to the plank directly with a sponge and let it sit for a couple of minutes to soak in. This is typically only something that I need to do with thicker (2mm) walnut strips that are used for the wales. Gradually bending the plank as you apply heat also cooks out the moisture so that when you're done with the bend, the plank is also mostly dried out as well.

Hope this helps...
 
Last edited:
I like to lay the first plank of the second planking down the middle of the ship about where the waterline is. I offset the planks to cover the seams between the first layer of planks which means that the second planking needs to be the same width as the first layer. Then I do the bottom and when that's done I do the top from the fist plank up. You can do it any way you like but you need to place the fist plank somewhere along the sides and go from there. Hope this isn't too confusing.
 
Almost done with the first planking on Polaris, the strips are 2x5 mm so I was able to bend them with soaking and a plank bender.
But the second round I don't know how to do, the strips are 0.5x5 mm and I don't think they are as bendable. I've read most about planking, have several books etc, but how do I do this when you can't even set the first one?
Hallo @ubjs
we wish you all the BEST and a HAPPY BIRTHDAY
Birthday-Cake
 
Thanks, my Polaris build is paused and I hope to pick it up again soon.
Today I am building a station area in scale 1/45. If anyone wants to see some pictures, you can look here https://www.svensktmjforum.se/forum/index.php?topic=26206.msg276990#new
Many of the houses are from a Swedish manufacturer, Winterzone, which makes construction kits in resin, 3d-printed in scale 1/87 and some of them he can print in 1/45.
I don't know if he sells abroad, but there is some info about the role models here that might be fun to look at.


Feedback

Google Översätt​


1708594126985.png
 
Back
Top