Simulate caulking with tinted Timbermate Wood Filler.

Joined
Sep 5, 2021
Messages
131
Points
78

Location
Honolulu Hi.
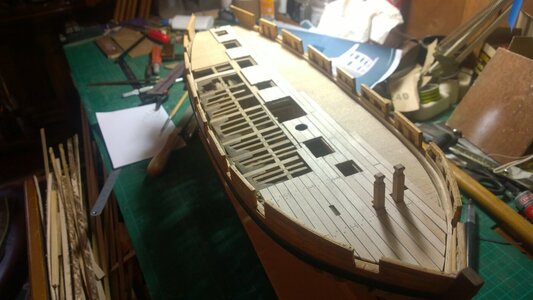
I'm a few days out on starting the hull planking on my first kit. (Port Jackson Schooner.)

Just for fun, I was thinking about taking some Timbermate, adding some dye to darken it a bit, apply that to the first layer of planking, sand it down and then maybe hit it with some tinted shellac, just to see what kind of effect I get. Still plan on applying the second layer of planking, but like I said earlier, this is more just for fun and experimentation.

Just curious if anyone has tried anything like this and whether or not it's worth the trouble.

Thanks
 
Yes, but as I mentioned, this is just more for testing and experimenting.

I mixed up some shellac the other day, played around with some tint on some scrap maple I had just to see what I could come up with.

This is just some of the stuff I do while I'm waiting for glue to dry. :)
 
@Philski;

I ordered a small band saw the other day. One of the things I'm thinking about doing with it is building that steam box you posted a little while back.

That was pretty cool.
 
@Philski;

I ordered a small band saw the other day. One of the things I'm thinking about doing with it is building that steam box you posted a little while back.

That was pretty cool.
Rmember to follow the tune up/setup of the bandsaw. And there are lots of different blades - each with its own use and characteristics. Pay attention to blade tension and tracking.
 
I use a pencil to highlight the edge of the timber for caulking.
I've seen that done on a number of videos, looks like it does a good job.

I tend to overthink things sometimes. No sense making things more complicated than they already are.
 
I really like your attitude of experimentation. Lets try something to see what it looks like, does it work? am I satisfied? is there an easier way? Keep us posted!!!
 
As to your question on simulating caulking, I use the following method which is close to what you describe, and use it on ship's (life/row) boats hull very successfully, simulating the tarring/caulking:

Sand the planking to the desired smoothness/finish
Apply a coat of shellac (orange/amber adds a nice color) to the wood planking, this seals the wood so it doesn't absorb the stain used later
Apply the wood filler so as to fill in the planking gaps & allow to dry
Sand the hull lightly so the wood filler is only in the planking gaps/seams but not so much as to remove the shellac sealer
Wipe the planks with dark/black stain (I use Minwax ebony) and immediately wipe off, the stain should only be absorbed by the wood filler and not the sealed planking
Apply another layer of shellac

This produces a very realistic effect of a tarred/caulked wood hull.

PS, I'm not talking about deck planking, but rather a small boat hull
 
Nice technique Mike.

The kit I'm working on is a double plank hull, but I think I'm going to play around with something like that after I get the first layer done even though it's going to get covered up.

I tinted some shellac the other day, came up with a shade that closely matches the mahogany the kit uses for the second layer planking. Thinking I might mix up some fill with a bit of that tint, then spray on the shellac, see what it does.

I'm going to go out on a limb here and predict it will probably look like crap and in need of covering up. :)
 
I've seen that done on a number of videos, looks like it does a good job.

I tend to overthink things sometimes. No sense making things more complicated than they already are.
Have a look at Kortes' builds, Jacinthe and a Dutch build. He goes to great length with such as caulking to amazing effect. I used his sheet plastic technique as shown on 'Diligence'.
 

Attachments

  • WP_20190403_004.jpg
    WP_20190403_004.jpg
    148.1 KB · Views: 42
Back
Top