
You are using an out of date browser. It may not display this or other websites correctly.
You should upgrade or use an alternative browser.
You should upgrade or use an alternative browser.
Statenjacht PEGASUS circa 1700 [COMPLETED BUILD]
- Thread starter Dematosdg
- Start date
- Watchers 25
-
- Tags
- completed build


Fantastic Daniel! It really is lovely work! I love the finish you have created on the wood - a natural glow while preserving the wood grain and texture...I will now consider finished one of the passengers cabin.
View attachment 205190View attachment 205191View attachment 205192View attachment 205193View attachment 205194
Cheers
Daniel
Fantastic Daniel! It really is lovely work! I love the finish you have created on the wood - a natural glow while preserving the wood grain and texture...
Thank you Paul !!!!
A few months ago I did a circular staircase to practice. Here is the link to my posting on this thread:
Post in thread 'Statenjacht PEGASUS circa 1700' https://shipsofscale.com/sosforums/threads/statenjacht-pegasus-circa-1700.6196/post-138331
Now I did it in wood.
First glued the drawing to scrap pear wood from the frames. Cut them with the scroll saw and then sanded it using the circular sander and the spindle sander. Small finishing/sanding I did it by hand.
To test the stair I kept it in place with a little of tape. The column isn't the one to go. It is just a piece of wood to have an idea of the fitting.
Still needs work. Some adjustments when the time comes and I need to built the column.
Not to bad... what do you think?
Here you have the pictures in order.


The last ones have the plan drawings for you all to get an idea of that section.
Cheers
Daniel
Post in thread 'Statenjacht PEGASUS circa 1700' https://shipsofscale.com/sosforums/threads/statenjacht-pegasus-circa-1700.6196/post-138331
Now I did it in wood.
First glued the drawing to scrap pear wood from the frames. Cut them with the scroll saw and then sanded it using the circular sander and the spindle sander. Small finishing/sanding I did it by hand.
To test the stair I kept it in place with a little of tape. The column isn't the one to go. It is just a piece of wood to have an idea of the fitting.
Still needs work. Some adjustments when the time comes and I need to built the column.
Not to bad... what do you think?
Here you have the pictures in order.
The last ones have the plan drawings for you all to get an idea of that section.
Cheers
Daniel
Very good Daniel! Eyes are afraid, but hands are doing! 
Fantastic Daniel! You have outdone yourself!Very good Daniel! Eyes are afraid, but hands are doing!
Very good Daniel! Eyes are afraid, but hands are doing!
Fantastic Daniel! You have outdone yourself!
Thank you guys!!! This gives me energy to move on....
")
If you see the pictures in detail, you will realize that the upper first step is above the bean. That is because I have to built a second road of beans that will support the deck in that section.
All that section has a space between the roof of the stern below cabin and the deck floor of the upper deck cabin. That space goes the tiller that connects to the rudder. That isn't considered in the kit. I already tested the kit decorated doors of that upper stern deck cabin for fitness, like in the last picture of the Russian modeler Pegasus
See below pictures


From the Russian modeler

Cheers
Daniel
Much better than the foam version! I assume you will be sanding the forward edge to be a straight like the pictured plan. Then you can add the wall/railing. Just put the stairs on a belt or disc sander as assembled. Sand them together.A few months ago I did a circular staircase to practice. Here is the link to my posting on this thread:
Post in thread 'Statenjacht PEGASUS circa 1700' https://shipsofscale.com/sosforums/threads/statenjacht-pegasus-circa-1700.6196/post-138331
Now I did it in wood.
First glued the drawing to scrap pear wood from the frames. Cut them with the scroll saw and then sanded it using the circular sander and the spindle sander. Small finishing/sanding I did it by hand.
To test the stair I kept it in place with a little of tape. The column isn't the one to go. It is just a piece of wood to have an idea of the fitting.
Still needs work. Some adjustments when the time comes and I need to built the column.
Not to bad... what do you think?
Here you have the pictures in order.
View attachment 205413View attachment 205414View attachment 205415View attachment 205416View attachment 205417View attachment 205418View attachment 205419
The last ones have the plan drawings for you all to get an idea of that section.
Cheers
Daniel
In addition the edges against the beams can be matched as well. What I usually do is put the piece in place like what you have pictured, and trace the profile onto the piece you are going to cut to match. In this case you want to straighten or match the back face first, then put flush against the beam once matched and trace the right side profile and match that. And lastly put a straight face across all the stair edges that the half wall with railing will be against. Hope that makes sense. If you did the side first, then when you removed material from the back edge to match the beam, your stairs would move back thus creating a mismatch on the side.
Last edited:


Looking good!Step by step ..... one day I Will finish it
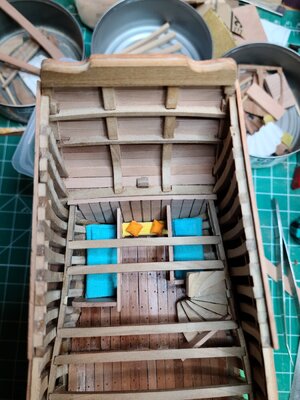
Nothing is glued and this cabin isn't finished yet.
View attachment 206703View attachment 206704View attachment 206705View attachment 206707
Cheers
Daniel
Looking good!
Thank you ! I did follow your comments with the stair. But it isn't glued yet so difficult to see the difference.
Daniel
I can already tell by looking it will fit now. Good job!Thank you ! I did follow your comments with the stair. But it isn't glued yet so difficult to see the difference.
Daniel

Very nice work daniel.
As you added the lower stern cabin I would also add the ports in the lower transome so you can look into this cabin from the stern.
These provide air and light to this cabin.
.JPG")
Your new stairs look great.
As you added the lower stern cabin I would also add the ports in the lower transome so you can look into this cabin from the stern.
These provide air and light to this cabin.
Your new stairs look great.
Very nice work daniel.
As you added the lower stern cabin I would also add the ports in the lower transome so you can look into this cabin from the stern.
These provide air and light to this cabin.
View attachment 207066
Your new stairs look great.
Thank you Maarten !!
You read my mind. Yesterday evening I was looking all what I have to build those ports. Your picture is great.
Based on your picture and the below picture of the book "Scratch building the Utrecht " I will need to modify the beds. They are too wide. Looks like my ports will be in the middle of the wood wall or over the beds.


Reducing the beds width will not be a problem at all. I can leave the bench with cushions as it is.
What I will do will be to mark their position at the back, measure distances and then located their position inside. Then, I will rebuilt the beds width.
Unfortunately I do not have pictures from other modelers of the lower stern cabin. They all covered the cabin with the roof (ship deck). I do not have a view of the interior. At least I can see how they did the stern ports.
@Jeronimo: if you have a picture of the stern cabin inside that shows the ports....Can you please post it here.
Below are the ports from one of Jerónimo's pictures.

From the Russian modeler


This modeler avoided the ports:

So here we are ...... All these was in my mind since I posted my pictures.
Thank you again Maarten for the picture !!!
Daniel
Great work Daniel. Adding all those details must give you a great sense of satisfaction.
Thank you Heinrich !!! Yes, it is a pleasure to built those details.... mainly when you do it more than once ..... Ha Ha ha..
because they never fit the first time Ja Ja Ja. Cheers
Daniel
Seems you will tackle this one and come up with a solution. I think it looks beautifull to add the two ports opened up.


Seems you will tackle this one and come up with a solution. I think it looks beautifull to add the two ports opened up.
I will !!!! ..... stay tuned.
Daniel
Very brave of you to be cutting holes in your hull at this stage! I can't wait to see how this turns out!I will !!!! ..... stay tuned.
Daniel