Test of Different Glues on Differing Surfaces

Joined
Nov 17, 2021
Messages
838
Points
318

Location
Columbia, SC
In preparation for assembly of my Bonhomme Richard cross section, I am looking at different types of finishes (in particular Wipe-On Ply varnish and wipe-on Danish Oil). I'd love it if you would stop by there (Signet's Bonhomme Richard Cross Section). Since I've been told to never glue to a finish, especially an oil finish, and to not glue to the char of laser cut wood, I thought I'd do a little testing.

Since I'm not Uwe (or you, for that matter), my test is rather cursory and not very complete. But I felt that any test would be better than none, and I'd best test out /something/ before finding out my future newly finished model falls apart.

The glues I am testing are:

Titebond Quick & Think Multi-Surface Glue - This is a thicker than normal PVA glue that dries clear, gives a higher initial hold and tends to not drip or run like normal white glue. I've been using it for a while and am pretty happy with it, where this type of glue is appropriate.

Gorilla Wood Glue - This is also basically a PVA glue, which the say Dries Natural Color (whatever that is). I mostly chose it because 1) I had it on hand, and 2) It was recommended as a good PVA glue to use on wood that already had a finish on it.

Titebond Instant Bond Wood Adhesive - This is a CA glue (superglue) that was new to me, and is available in Thin, Medium, Thick and Gel viscosities. I only had Gel on hand so used it for these test; I probably would have used Medium otherwise (it's on order), bet felt (hoped) they would be similar.

As to the finishes on my model, some of which might have to be glued to during assembly, I have tested two:

Minwax Wipe-On Poly, Clear Satin - I had this on hand and used it on some music boxes and other furniture, and liked the appearance and ease in hand or cloth application. I HATE finishes that end up brush strokes, and the spray version of this that I used I was unable to ever make as smooth as hand application.

Watco Danish Oil One Step Finish, Natural - I got this in hopes of using it on this project.

In my only test so far, I like the looks of the Danish Oil better - after 3 coats, it was darker and more uniform than the Wipe-On Ply, probably because more surface "satin" ingredients start to come through. I haven't considered Tung Oil here, despite working with Pear wood, because I've been told that glue won't stick to it. I'm still open to other finishes, but this is what I'm working with now.

TESTING
Since I have no extra Pear wood other that what came with the kit, I am using the straight outer portions of ribs, 0.225" or 5.7mm pear wood. I had some 1.5mm x 5 mm strips of wood left from another model that I glued to the pear wood. These pieces were cut 2.62" long and are probably basswood or similar (not a quality hardwood, not balsa). I then glued the strips at right angles on the edge of the pear wood, so that the glue is in contact with an area of about 5mm x 5.7mm. I tried to minimize overflow of glue, but I'm sure got some. I clamped all pieces after gluing, and let them all dry for 24 hours.

The Pear Wood pieces were of 4 types:

1) Dry, sanded pear wood edge, sanded with approximately 120 grit sandpaper.

2) Original laser-cut pear wood edge, with original char in place, to test adhesion on char without sanding.

3) Sanded pear wood with 3 coats of Wipe-On Poly applied to the top (adhesion) edge and the 2 sides.

4) Sanded pear wood with 3 coats of Danish Oil applied to the top (adhesion) edge and the 2 sides.

I glued 2 strips with each glue type to each of the pear edges, so 6 strips per pear piece. I repeated this for the other three prepared pear wood pieces.

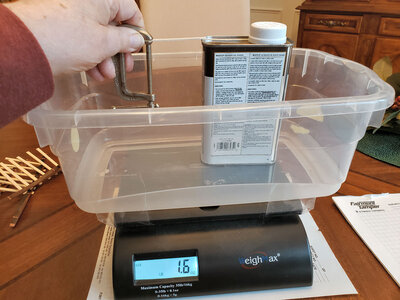
I used an accurate digital scale which measures in pounds, ounces and tenths of ounces. Since I have a clear container on top of the scale, I used the Danish Oil container to provide a higher surface to push down against with each strip. I first tested one of the strip in a tight clamp to check breaking strength:
20220108_150355.jpg
It may look like my arm is on the edge of the scale "basket", but it definitely wasn't during testing. This stick broke with about 12 pounds of force.
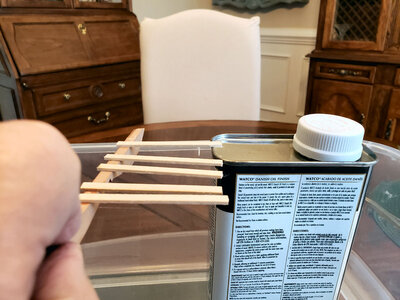
I then tested the samples, holding them more-or-less like this:
20220108_150631.jpg

After the first try, I used plyers to hold the other end of the pear stick to keep it level and apply more force. I didn't photograph these, as my third hand has not yet developed.

Notice that I glued two of each piece to the pear strips with each glue type. I tested one as shown, testing the tension force to pull up the strip from the pear wood. The next strip, I turned at 90 degrees, making each strip much stronger, but also placing the glue joint in shear. Due to the dimensions here, the shear force needed to rotate the glue joint was much higher than the tensile force.

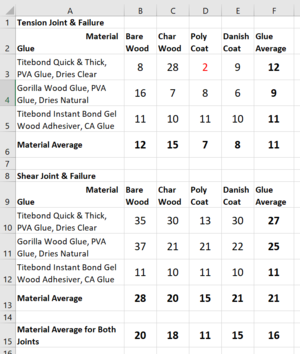
I placed all my measurements into an Excel spreadsheet (yes, Engineers love spreadsheets too, not just accountants), which resulted in:
1641684716201.png

One of the values, the 2 ounces for Titebond Q&T on Poly Coat in tension I believe to be an error. Nothing else is consistent with that, notably not the shear values with the same material, but as I said in the beginning, this is not a comprehensive test.

The following photo shows the pearwood sticks with the strips broken off. As you can see, in one case, the stick broke, but I believe it to be an substandard stick, and it broke at a reasonable force to test the glue anyhow:
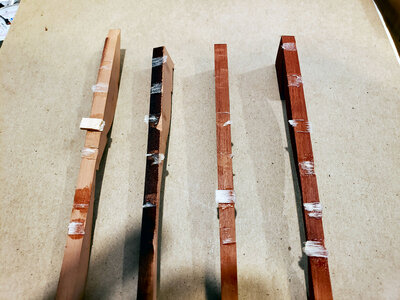
20220108_154546.jpg

The other values speak for themselves. In this rather unscientific and uncomprehensive test, the following appears true:
  1. Titebond Instant Bond (Superglue) is more consistent than the other glues (or my application of same was more consistent).
  2. Bare wood is better for gluing than with with char or other finishes.
  3. Laser-charred wood is still provides a surprisingly strong joint, even stronger possibly in tension. That may be due to the rougher surface. I wouldn't hesitate to use it if char was not visible or desired.
  4. Danish- and Poly-finished woods provided less adhesion, but not a night-and-day difference (except for the anomaly mentioned above). While not my preferred method, I don't think I'll worry too much about gluing some pieces onto finished pieces.
  5. Gorilla Wood Glue, while providing excellent adhesion, is not really an improvement on finished surfaces as I understood it to be.
If I were more ambitious, I'd repeat these multiple times, to get better averages. But I'm reasonably convinced that NONE of these combinations are horrible and to be completely avoided. We usually don't tear pieces off of our models using a lot of force, and when we do, it's usually because something's wrong and an extra-high adhesion level is not wanted at that point.

I personally feel pretty good using any of these combinations, unless ultimate strength is really required. And while I will exercise care in gluing to finished surfaces, I think that even that can be done in many cases.

I hope you obtained some information and insight from this test. Please feel free to provide your own testing or alternate information.

And please check out my Signet's Bonhomme Richard Cross Section thread. I'll be needing your help there even more!
 
In preparation for assembly of my Bonhomme Richard cross section, I am looking at different types of finishes (in particular Wipe-On Ply varnish and wipe-on Danish Oil). I'd love it if you would stop by there (Signet's Bonhomme Richard Cross Section). Since I've been told to never glue to a finish, especially an oil finish, and to not glue to the char of laser cut wood, I thought I'd do a little testing.

Since I'm not Uwe (or you, for that matter), my test is rather cursory and not very complete. But I felt that any test would be better than none, and I'd best test out /something/ before finding out my future newly finished model falls apart.

The glues I am testing are:

Titebond Quick & Think Multi-Surface Glue - This is a thicker than normal PVA glue that dries clear, gives a higher initial hold and tends to not drip or run like normal white glue. I've been using it for a while and am pretty happy with it, where this type of glue is appropriate.

Gorilla Wood Glue - This is also basically a PVA glue, which the say Dries Natural Color (whatever that is). I mostly chose it because 1) I had it on hand, and 2) It was recommended as a good PVA glue to use on wood that already had a finish on it.

Titebond Instant Bond Wood Adhesive - This is a CA glue (superglue) that was new to me, and is available in Thin, Medium, Thick and Gel viscosities. I only had Gel on hand so used it for these test; I probably would have used Medium otherwise (it's on order), bet felt (hoped) they would be similar.

As to the finishes on my model, some of which might have to be glued to during assembly, I have tested two:

Minwax Wipe-On Poly, Clear Satin - I had this on hand and used it on some music boxes and other furniture, and liked the appearance and ease in hand or cloth application. I HATE finishes that end up brush strokes, and the spray version of this that I used I was unable to ever make as smooth as hand application.

Watco Danish Oil One Step Finish, Natural - I got this in hopes of using it on this project.

In my only test so far, I like the looks of the Danish Oil better - after 3 coats, it was darker and more uniform than the Wipe-On Ply, probably because more surface "satin" ingredients start to come through. I haven't considered Tung Oil here, despite working with Pear wood, because I've been told that glue won't stick to it. I'm still open to other finishes, but this is what I'm working with now.

TESTING
Since I have no extra Pear wood other that what came with the kit, I am using the straight outer portions of ribs, 0.225" or 5.7mm pear wood. I had some 1.5mm x 5 mm strips of wood left from another model that I glued to the pear wood. These pieces were cut 2.62" long and are probably basswood or similar (not a quality hardwood, not balsa). I then glued the strips at right angles on the edge of the pear wood, so that the glue is in contact with an area of about 5mm x 5.7mm. I tried to minimize overflow of glue, but I'm sure got some. I clamped all pieces after gluing, and let them all dry for 24 hours.

The Pear Wood pieces were of 4 types:

1) Dry, sanded pear wood edge, sanded with approximately 120 grit sandpaper.

2) Original laser-cut pear wood edge, with original char in place, to test adhesion on char without sanding.

3) Sanded pear wood with 3 coats of Wipe-On Poly applied to the top (adhesion) edge and the 2 sides.

4) Sanded pear wood with 3 coats of Danish Oil applied to the top (adhesion) edge and the 2 sides.

I glued 2 strips with each glue type to each of the pear edges, so 6 strips per pear piece. I repeated this for the other three prepared pear wood pieces.

I used an accurate digital scale which measures in pounds, ounces and tenths of ounces. Since I have a clear container on top of the scale, I used the Danish Oil container to provide a higher surface to push down against with each strip. I first tested one of the strip in a tight clamp to check breaking strength:

View attachment 281434
It may look like my arm is on the edge of the scale "basket", but it definitely wasn't during testing. This stick broke with about 12 pounds of force.
I then tested the samples, holding them more-or-less like this:
View attachment 281435

After the first try, I used plyers to hold the other end of the pear stick to keep it level and apply more force. I didn't photograph these, as my third hand has not yet developed.

Notice that I glued two of each piece to the pear strips with each glue type. I tested one as shown, testing the tension force to pull up the strip from the pear wood. The next strip, I turned at 90 degrees, making each strip much stronger, but also placing the glue joint in shear. Due to the dimensions here, the shear force needed to rotate the glue joint was much higher than the tensile force.

I placed all my measurements into an Excel spreadsheet (yes, Engineers love spreadsheets too, not just accountants), which resulted in:

View attachment 281436

One of the values, the 2 ounces for Titebond Q&T on Poly Coat in tension I believe to be an error. Nothing else is consistent with that, notably not the shear values with the same material, but as I said in the beginning, this is not a comprehensive test.

The following photo shows the pearwood sticks with the strips broken off. As you can see, in one case, the stick broke, but I believe it to be an substandard stick, and it broke at a reasonable force to test the glue anyhow:

View attachment 281437

The other values speak for themselves. In this rather unscientific and uncomprehensive test, the following appears true:
  1. Titebond Instant Bond (Superglue) is more consistent than the other glues (or my application of same was more consistent).
  2. Bare wood is better for gluing than with with char or other finishes.
  3. Laser-charred wood is still provides a surprisingly strong joint, even stronger possibly in tension. That may be due to the rougher surface. I wouldn't hesitate to use it if char was not visible or desired.
  4. Danish- and Poly-finished woods provided less adhesion, but not a night-and-day difference (except for the anomaly mentioned above). While not my preferred method, I don't think I'll worry too much about gluing some pieces onto finished pieces.
  5. Gorilla Wood Glue, while providing excellent adhesion, is not really an improvement on finished surfaces as I understood it to be.
If I were more ambitious, I'd repeat these multiple times, to get better averages. But I'm reasonably convinced that NONE of these combinations are horrible and to be completely avoided. We usually don't tear pieces off of our models using a lot of force, and when we do, it's usually because something's wrong and an extra-high adhesion level is not wanted at that point.

I personally feel pretty good using any of these combinations, unless ultimate strength is really required. And while I will exercise care in gluing to finished surfaces, I think that even that can be done in many cases.

I hope you obtained some information and insight from this test. Please feel free to provide your own testing or alternate information.

And please check out my Signet's Bonhomme Richard Cross Section thread. I'll be needing your help there even more!
All I can say is don't hold back! That's the sort of test I would expect from an adhesives laboratory. Well done.
 
Thanks, guys. It's actually far from comprehensive, but still, it gives us usable information, I think, which is always helpful.
 
In preparation for assembly of my Bonhomme Richard cross section, I am looking at different types of finishes (in particular Wipe-On Ply varnish and wipe-on Danish Oil). I'd love it if you would stop by there (Signet's Bonhomme Richard Cross Section). Since I've been told to never glue to a finish, especially an oil finish, and to not glue to the char of laser cut wood, I thought I'd do a little testing.

Since I'm not Uwe (or you, for that matter), my test is rather cursory and not very complete. But I felt that any test would be better than none, and I'd best test out /something/ before finding out my future newly finished model falls apart.

The glues I am testing are:

Titebond Quick & Think Multi-Surface Glue - This is a thicker than normal PVA glue that dries clear, gives a higher initial hold and tends to not drip or run like normal white glue. I've been using it for a while and am pretty happy with it, where this type of glue is appropriate.

Gorilla Wood Glue - This is also basically a PVA glue, which the say Dries Natural Color (whatever that is). I mostly chose it because 1) I had it on hand, and 2) It was recommended as a good PVA glue to use on wood that already had a finish on it.

Titebond Instant Bond Wood Adhesive - This is a CA glue (superglue) that was new to me, and is available in Thin, Medium, Thick and Gel viscosities. I only had Gel on hand so used it for these test; I probably would have used Medium otherwise (it's on order), bet felt (hoped) they would be similar.

As to the finishes on my model, some of which might have to be glued to during assembly, I have tested two:

Minwax Wipe-On Poly, Clear Satin - I had this on hand and used it on some music boxes and other furniture, and liked the appearance and ease in hand or cloth application. I HATE finishes that end up brush strokes, and the spray version of this that I used I was unable to ever make as smooth as hand application.

Watco Danish Oil One Step Finish, Natural - I got this in hopes of using it on this project.

In my only test so far, I like the looks of the Danish Oil better - after 3 coats, it was darker and more uniform than the Wipe-On Ply, probably because more surface "satin" ingredients start to come through. I haven't considered Tung Oil here, despite working with Pear wood, because I've been told that glue won't stick to it. I'm still open to other finishes, but this is what I'm working with now.

TESTING
Since I have no extra Pear wood other that what came with the kit, I am using the straight outer portions of ribs, 0.225" or 5.7mm pear wood. I had some 1.5mm x 5 mm strips of wood left from another model that I glued to the pear wood. These pieces were cut 2.62" long and are probably basswood or similar (not a quality hardwood, not balsa). I then glued the strips at right angles on the edge of the pear wood, so that the glue is in contact with an area of about 5mm x 5.7mm. I tried to minimize overflow of glue, but I'm sure got some. I clamped all pieces after gluing, and let them all dry for 24 hours.

The Pear Wood pieces were of 4 types:

1) Dry, sanded pear wood edge, sanded with approximately 120 grit sandpaper.

2) Original laser-cut pear wood edge, with original char in place, to test adhesion on char without sanding.

3) Sanded pear wood with 3 coats of Wipe-On Poly applied to the top (adhesion) edge and the 2 sides.

4) Sanded pear wood with 3 coats of Danish Oil applied to the top (adhesion) edge and the 2 sides.

I glued 2 strips with each glue type to each of the pear edges, so 6 strips per pear piece. I repeated this for the other three prepared pear wood pieces.

I used an accurate digital scale which measures in pounds, ounces and tenths of ounces. Since I have a clear container on top of the scale, I used the Danish Oil container to provide a higher surface to push down against with each strip. I first tested one of the strip in a tight clamp to check breaking strength:

View attachment 281434
It may look like my arm is on the edge of the scale "basket", but it definitely wasn't during testing. This stick broke with about 12 pounds of force.
I then tested the samples, holding them more-or-less like this:
View attachment 281435

After the first try, I used plyers to hold the other end of the pear stick to keep it level and apply more force. I didn't photograph these, as my third hand has not yet developed.

Notice that I glued two of each piece to the pear strips with each glue type. I tested one as shown, testing the tension force to pull up the strip from the pear wood. The next strip, I turned at 90 degrees, making each strip much stronger, but also placing the glue joint in shear. Due to the dimensions here, the shear force needed to rotate the glue joint was much higher than the tensile force.

I placed all my measurements into an Excel spreadsheet (yes, Engineers love spreadsheets too, not just accountants), which resulted in:

View attachment 281436

One of the values, the 2 ounces for Titebond Q&T on Poly Coat in tension I believe to be an error. Nothing else is consistent with that, notably not the shear values with the same material, but as I said in the beginning, this is not a comprehensive test.

The following photo shows the pearwood sticks with the strips broken off. As you can see, in one case, the stick broke, but I believe it to be an substandard stick, and it broke at a reasonable force to test the glue anyhow:

View attachment 281437

The other values speak for themselves. In this rather unscientific and uncomprehensive test, the following appears true:
  1. Titebond Instant Bond (Superglue) is more consistent than the other glues (or my application of same was more consistent).
  2. Bare wood is better for gluing than with with char or other finishes.
  3. Laser-charred wood is still provides a surprisingly strong joint, even stronger possibly in tension. That may be due to the rougher surface. I wouldn't hesitate to use it if char was not visible or desired.
  4. Danish- and Poly-finished woods provided less adhesion, but not a night-and-day difference (except for the anomaly mentioned above). While not my preferred method, I don't think I'll worry too much about gluing some pieces onto finished pieces.
  5. Gorilla Wood Glue, while providing excellent adhesion, is not really an improvement on finished surfaces as I understood it to be.
If I were more ambitious, I'd repeat these multiple times, to get better averages. But I'm reasonably convinced that NONE of these combinations are horrible and to be completely avoided. We usually don't tear pieces off of our models using a lot of force, and when we do, it's usually because something's wrong and an extra-high adhesion level is not wanted at that point.

I personally feel pretty good using any of these combinations, unless ultimate strength is really required. And while I will exercise care in gluing to finished surfaces, I think that even that can be done in many cases.

I hope you obtained some information and insight from this test. Please feel free to provide your own testing or alternate information.

And please check out my Signet's Bonhomme Richard Cross Section thread. I'll be needing your help there even more!
Your approach and matrix modeling of results make me wonder if you are an engineer or have a scientific background???? More comprehensive than most of us (myself) may have thought of. I hope that the answers that you were seeking stood out sufficiently for your modeling. Rich (PT-2)
 
Your approach and matrix modeling of results make me wonder if you are an engineer or have a scientific background???? More comprehensive than most of us (myself) may have thought of. I hope that the answers that you were seeking stood out sufficiently for your modeling. Rich (PT-2)
Yeah, degree in Aerospace engineering, practiced most my life as a Mechanical engineer, ended up in IT and computer programming. Info Tidbit: When attending the University of Pittsburgh, I worked in the NASA research program doing subsonic wind tunnel testing on the Dyna-Soar, the forerunner to the space shuttle. My son likes to call me a rocket scientist. ;-)
 
Yeah, degree in Aerospace engineering, practiced most my life as a Mechanical engineer, ended up in IT and computer programming. Info Tidbit: When attending the University of Pittsburgh, I worked in the NASA research program doing subsonic wind tunnel testing on the Dyna-Soar, the forerunner to the space shuttle. My son likes to call me a rocket scientist. ;-)
And he is correct. You must have had a fascinating and enjoyable career amidst the hurdles and challenges along the way that when overcome make the journey all the better IMHO. Rich
 
Very interesting test - and proofs in several areas my own experience on the model

Only a small important add on:

Often it is important, that you can also disconnect a glued joint. So the other way around, when you made a mistake.
Here joints glued with waterbased wood glue are easy to disconnect without damages of the wood simply with water ......
Thanks for that. That's true. In fact I did just that on one of my BR frames recently. CA glue can be loosened and removed using acetone in a like manner. I'm not sure if either or both work after long periods, but it's worth a try.
 
Thanks for that. That's true. In fact I did just that on one of my BR frames recently. CA glue can be loosened and removed using acetone in a like manner. I'm not sure if either or both work after long periods, but it's worth a try.
I have to confess that I have had to use acetone more times thank I like as it still leaves some residue in the area and not a clean second attachment. . . at least from my hands. Rich
 
I have to confess that I have had to use acetone more times thank I like as it still leaves some residue in the area and not a clean second attachment. . . at least from my hands. Rich
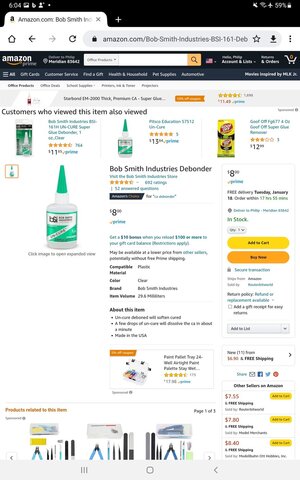
Have you tried a dedicated debonder? There a lot of them available. Screenshot_20220114-060418_Chrome.jpg
 
Your study was well done and is an example of how to do experiments. From one engineer to another.
 
A couple of comments based on my experience:
1) I use Minwax satin finish. CA bonds to it OK but it seems to soften the finish and it takes a longer time to cure. I don't like gluing to a finish but sometimes it is necessary.
2) For adding second planking, PVA glue has the added advantage of squeeze out when there is a gap at a seam. After the glue becomes tacky you can sand over it to generate sawdust to fill the seam and make it almost invisable.

Interestingly, when CA glues came out there was a lot of discussion in the ship modeling fraternity as whether the glued surfaces would hold up in the long term. Some modelers stayed away from using them because of this concern. I don't think this is an issue any longer and CA's have certainly proved their usefulness.
 
I used a lot of superglue many years ago and developed a bad cold afterwards. Some people have allergic reactions to the fumes as I did. Good ventilation is important with superglues. I use 5 min. Epoxy which gives me no trouble.
 
A couple of comments based on my experience:
1) I use Minwax satin finish. CA bonds to it OK but it seems to soften the finish and it takes a longer time to cure. I don't like gluing to a finish but sometimes it is necessary.
2) For adding second planking, PVA glue has the added advantage of squeeze out when there is a gap at a seam. After the glue becomes tacky you can sand over it to generate sawdust to fill the seam and make it almost invisable.

Interestingly, when CA glues came out there was a lot of discussion in the ship modeling fraternity as whether the glued surfaces would hold up in the long term. Some modelers stayed away from using them because of this concern. I don't think this is an issue any longer and CA's have certainly proved their usefulness.
Good tips for all. Thanks. I do like the Minwax Satin Poly, but felt the Danish Oil brought out the grain just a little bit more.
 
I used a lot of superglue many years ago and developed a bad cold afterwards. Some people have allergic reactions to the fumes as I did. Good ventilation is important with superglues. I use 5 min. Epoxy which gives me no trouble.
Yeah, just using it for a half hour or so it can start to get to you. My eyes are poor close-up, so I use 3, 4.5 and 6 diopter reading glasses, and it can really get up my nose. Unfortunately, ventilation of my den (also my build room) is hard to get this time of year.
 
A test that was very well done, well executed with a spreadsheet easy to follow - thank you. Now, one thing I noticed is this. I noticed that some of the glued parts that broke off the test left a "skin" of the piece broken off. Whereas some other pieces made a "clean break" from the other piece of wood. That tells me that the ones that had the other woods "skin" left on the testing piece was really bonding so tight that it left a remaining skin behind.
I am not sure if I am explaining myself well enough.
 
Back
Top