The Anatomy of the Bounty - AL-

Joined
May 13, 2020
Messages
2,008
Points
503

Hi all

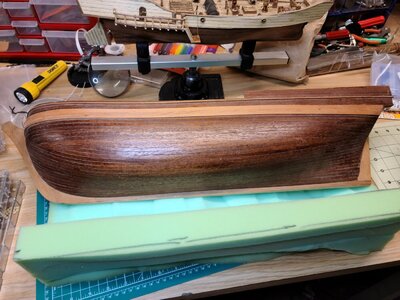
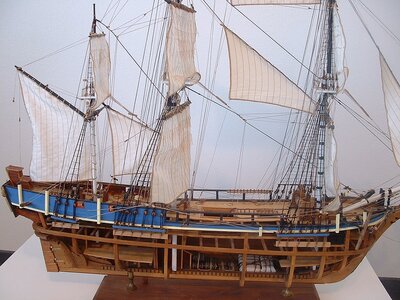
The Turtle Ship is arriving to an end. So I started to think, " what next ? ". After a lot of thoughts, I decided to finish a project I started 22 years ago. Precisely in 2000 when we were living in Belgium. Unfortunately, for the model, 1.5 years after I started it we relocated to USA, and the model was placed on hold. Also The hobby was placed on hold till ~ 2019. You have seen the models I built since then. All can be find here at SOS.

Now is time to get back to this unusual model, at least, at the time it was developed. Now is a discontinued model.

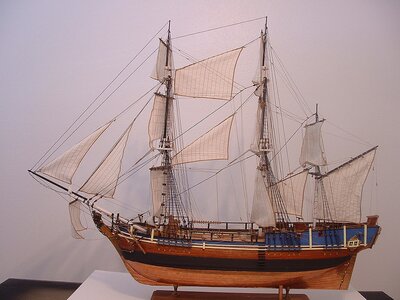
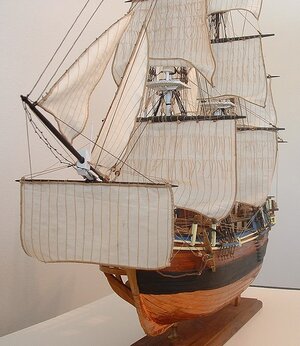
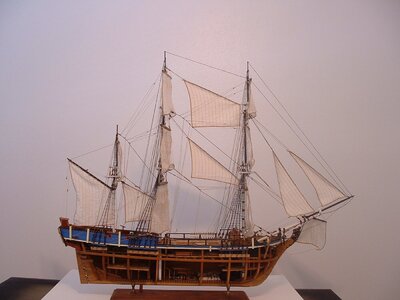
A lot have been written about the Bounty history, no need for me to rewrite it. Nevertheless, I will add comments along the built.

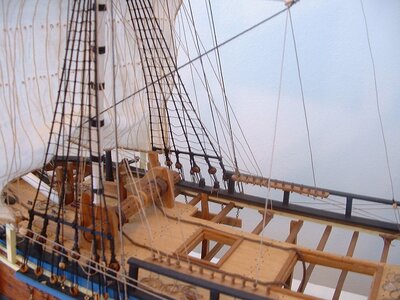
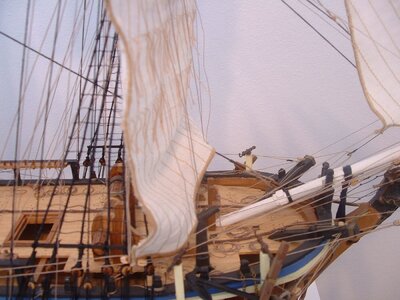
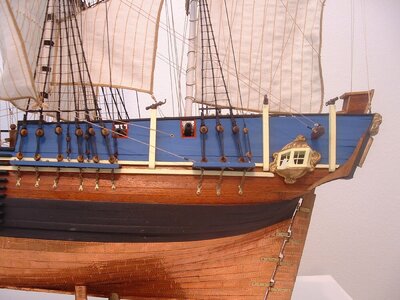
Let's show something of what I did so far.... on the next posting ... :)

Cheers
Daniel
 
First a picture of what was left of the original box

20200813_175032.jpg20200813_175039.jpg20200813_175047.jpg

Plans

20200813_175722.jpg20200813_175802.jpg

Hull built process.

You need to built a mold. To witch a first planking is done. Then a second planking. Then you take the hull out of the mold and ad a third internal planking.

I took these pictures from the construction manual so you can see what I meant.

20200813_175915.jpg

20200813_175949.jpg20200813_175956.jpg20200813_180030.jpg

Now my outcome.

First, I would like to apologize to the many SOS experts on how I did my second hull planking. It isn't correct. But at that time for me was fantastic. I thought in re-doing it by adding a new layer. But I then rejected the idea. Why ? Because the ship represent my skills and knowledge at those times and It brings me a lot of memories from when I built it.

20200813_175314.jpg20200813_175320.jpg20200813_175326.jpg20200813_175342.jpg20200813_175349.jpg20200813_175354.jpg20200813_175438.jpg20200813_175450.jpg

This is all what I have so far. I have already detected a few defects that I hope I will be able to solve them.

But the built will need to wait a few more weeks until I finish the Turtle Ship. But hey, she already waited 22 years. A few weeks more is nothing.

Cheers ..... and wish me good luck.

Daniel
 

Attachments

  • 20200813_175314.jpg
    20200813_175314.jpg
    271.5 KB · Views: 30
Looking forward to this (continued) build. They must have used a LOT of stealers at such blunt bow. How did they manage to bend at least 4" thick whales around it, makes me wonder.
 
This was a fun kit. I built it years ago. The Bounty kit from AL at the time did not include any masting or rigging above the lower tops. I used the Anatomy of a ship BOUNTY book to complete the build. I decided to include sails.
 

Attachments

  • 12697076_110856365969069_6566062449378344333_o.jpg
    12697076_110856365969069_6566062449378344333_o.jpg
    269.1 KB · Views: 45
  • 12654616_110856609302378_8986514143380771926_n.jpg
    12654616_110856609302378_8986514143380771926_n.jpg
    164.9 KB · Views: 43
  • 12698166_110856362635736_4183801350619424536_o.jpg
    12698166_110856362635736_4183801350619424536_o.jpg
    238.6 KB · Views: 45
  • 12710972_110856795969026_9078142947479783499_o.jpg
    12710972_110856795969026_9078142947479783499_o.jpg
    272.9 KB · Views: 47
  • 12615295_110856735969032_913948234832896599_o.jpg
    12615295_110856735969032_913948234832896599_o.jpg
    187.7 KB · Views: 42
  • 12657322_110857089302330_6013995281621623833_o.jpg
    12657322_110857089302330_6013995281621623833_o.jpg
    252 KB · Views: 41
  • 12719348_110856885969017_1590586366443177000_o.jpg
    12719348_110856885969017_1590586366443177000_o.jpg
    237.4 KB · Views: 54
  • 12697264_110857402635632_1961243986916837522_o.jpg
    12697264_110857402635632_1961243986916837522_o.jpg
    320 KB · Views: 44
Dave Teel, thank you for the pictures !!! May I kindly ask you to send detailed pictures of your built my PM.

Or better, do you have a built thread at SOS ?

If not, can you post pictures of your model on a thread at SOS ?

Thank you !!
Daniel
 
Dave Teel, thank you for the pictures !!! May I kindly ask you to send detailed pictures of your built my PM.

Or better, do you have a built thread at SOS ?

If not, can you post pictures of your model on a thread at SOS ?

Thank you !!
Daniel
I built it before I started to take pictures during the build. I do have the ship posted in the "completed" ship section on page 6.
 
I built it before I started to take pictures during the build. I do have the ship posted in the "completed" ship section on page 6.

Hi Dave

I will copper plate the hull. From your posted pictures looks like you did that. Can I kindly request if you can post here a few detailed pictures of your hull

Thank you !!
Daniel
 
The Bounty has been sold, I no longer have that one. I used copper tape and a ponce wheel to scribe the edges then cut to length and applied to the hull. The book "Anatomy Of A ship" series book details the layout very well.

Thank you !! I had the book. Just that a picture is always better than a thousand words.

Thank you again !!!
Daniel
 
Have fun, it's good build.

The fun started !!!

For what I did, I followed Lauckstreetshipyard online explanation.


Plus the pictures of many model ships with copper hulls.

You will see that first I marked the water line. Then I marked another one below the real one. On the below picture, taken from the book The Anatomy of The Bounty, scale 1:96. You will see that the copper sheathing has a change of pattern at the Bow.

20211014_181509.jpg

To achieve e that pattern change, you need that lower, transitory, water line (please read the link I posted).

See below picture : I started from the bottom following the natural curvature of the copper tape.

20211014_180437.jpg

Here you have a few pictures that you need to zoom to see all my defects :) .

20211014_181018.jpg20211014_180424.jpg20211014_180415.jpg

The plates are superimposed.

The small defect(s) that you see at the junction with the keel will be all covered/masked when I copper cover the keel.

Also you will notice that I provided a soft weathering using liver of sulfur gel applied with a cloth. VERY FEW !!! (Like a dry painting technique) and immediately cleaned with another cloth with water.

What I do not like so far is the brightness. I think that at the end I will paint the copper with clear matt varnish.

Cheers
Daniel
 
Moreover, I will try a different method to place the copper tape as I don't like IN THE PICTURES the wrinkles you see at some sections.

The pictures is in capital because you only see them at the zoom level that I posted. At EYE see vision, you really need to take a look pretty near the hull.

Nevertheless, I will try different ways to avoid the wrinkles for all the following rows

Cheers
Daniel
 
Back
Top