
You are using an out of date browser. It may not display this or other websites correctly.
You should upgrade or use an alternative browser.
You should upgrade or use an alternative browser.


Hello Australia! It is evening of your yesterday in Canada. Could you be more specific on what you mean by tool kits?
")
I try buying single ones and of as high quality as I can afford. Of course I buy only after I had done good research on internet.

Something like this is pretty basic but it would get you started. But I have found buying tools as I need them the best way to go. Just don't get caught in the trap of buying all these specialty tools you see unless you know you are going to use them Otherwise you'll spend a lot on unnecessary tools. Trust me. I have tools in the shop that I've used once and that's it. You really only need the basics if you are building from kits.


I BY ONE AT A TIME AS NEEDED, PAY ATTENTION TO WHAT WINSTON SAYS BEEN THERE DONE THAT STILL DOING IT OH, OH LOL. GOD BLESS STAY SAFE DON

Buying toolkits usually means you're buying some tools you don't need. Spanner sets and socket sets are prime examples - most nuts/bolts are of 4 or 5 different sizes not the 10 or more a kit supplies. Buy what you need when you need it (or the day before preferably!)
Kurt Konrath
Kurt Konrath
The basic starter kit shown is OK, but if you have any of the tools shown you don't need the whole kit.
I would suggest you look at what is listed in kit, and if and when you need them you can buy separate items, usually a bit better quality than what is in the kit.
Companies like Micro-Mark have a good selection of tools, reasonable priced and good quality.
Other model ship venders also sell tools as well.
I suggest you check the forum on home page for tools and other items, many good suggestions listed there.
A lot of what you need depends on what your building, as plastic, wood or paper builds have different needs.


Booze, lots of booze
hiccup....burp...hiccup@Ken...indeed, solvents are a must for...ahem....cleaning and the like. Just make sure you install the anchor at the correct end.....
For basic kit models, the toolkit shown will do 90% of the work ( Nail Pusher, Scissors & glue and your set!)
That looks like an Artesania Latina or OcCre tool set, I had something similar to that when I first started (although not in such a nice box)
These are the hand tools I keep on my bench all the time:

Sorry about the mess.
These are the hand tools I keep on my bench all the time:
Sorry about the mess.

I like your organizer box - Is this a "scratch" build?That looks like an Artesania Latina or OcCre tool set, I had something similar to that when I first started (although not in such a nice box)
These are the hand tools I keep on my bench all the time:
View attachment 184128
Sorry about the mess.
Yes, found some design I liked on the internet and built it in a day from scraps lying around.
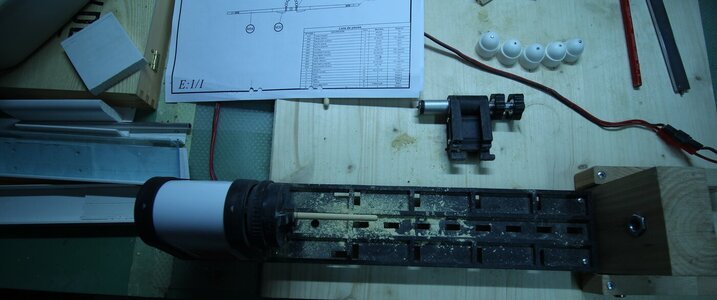
A tool I found useful for tapering is the wood turning machine from Krick. Power is supplied by a transformer with 4 speed settings, an adjustable tailstock, a tool rest and a 3-jaw chuck. Longer pieces of material of up to around 13 mm in diameter can be held as the spindle has a bore hole right through to the chuck.
For me the Krick machine is inadequate for wood turning, as the tool rest cannot be moved or rotated towards the workpiece and depending on the diameter of the wood the gap is too large. Otherwise, I have achieved good results using this tool as a taperer. I still taper by hand though yards with a diameter of 3 and 4 mm.
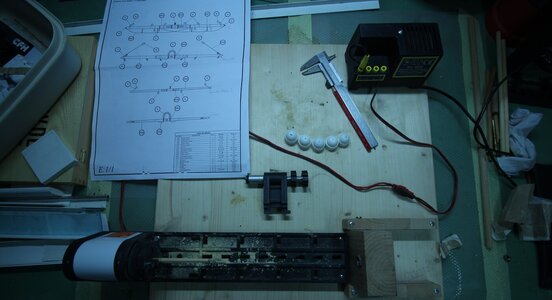
I had to make an additional tailstock for longer masts, as shown in the photos below.
The downside is that the jaws can leave marks on the wood if tightened too much. This can be countered by putting a piece of protective wrapping around the wood. When sanding a mast I support it with my fingers as I go along with the sandpaper. Not too tight though, as blisters will form on the fingers! My experience shows that it is important to ensure a smooth transition from the taper to the straight piece on the yard and on those yards where the tapers meet in the middle of its length when removing material. It is easy to remove too much and a dip at the meeting point occurs.


The additional tailstock


For me the Krick machine is inadequate for wood turning, as the tool rest cannot be moved or rotated towards the workpiece and depending on the diameter of the wood the gap is too large. Otherwise, I have achieved good results using this tool as a taperer. I still taper by hand though yards with a diameter of 3 and 4 mm.
I had to make an additional tailstock for longer masts, as shown in the photos below.
The downside is that the jaws can leave marks on the wood if tightened too much. This can be countered by putting a piece of protective wrapping around the wood. When sanding a mast I support it with my fingers as I go along with the sandpaper. Not too tight though, as blisters will form on the fingers! My experience shows that it is important to ensure a smooth transition from the taper to the straight piece on the yard and on those yards where the tapers meet in the middle of its length when removing material. It is easy to remove too much and a dip at the meeting point occurs.
The additional tailstock
Attachments
Last edited:
There are so many options for tools. I started with having basic tools and adding a few micro tools, especially miniature drill bits. I keep adding more tools, especially various pliers, tweezers and clamps. A great clamping tool is to use binder clips and clothes pegs. I need to add a jewelry saw for cutting brass shapes accurately.
The same applies to me. I would like to procure a small milling machine and lathe, but space doesn't permit. My personal experience has taught me not to go for the cheap option, but spend wisely and look for good quality tooling, which will last longer and give good results.There are so many options for tools. I started with having basic tools and adding a few micro tools, especially miniature drill bits. I keep adding more tools, especially various pliers, tweezers and clamps. A great clamping tool is to use binder clips and clothes pegs. I need to add a jewelry saw for cutting brass shapes accurately.
My next step in the build is to manufacture the long square on the end of the mast. To do this I will clamp a small mill from Dremel in the chuck of the pillar drill and with the mast fastened in the vice gently remove material on each side with a high chuck speed by moving the vice backwards and forwards carefully on the drill table until I reach the required dimension, having worked out beforehand how much is to be removed from each side to achieve the correct size of the square. The pillar drill has a digital depth stop.
When the first side of the square is finished turn the mast 90° in the vice, reclamp and remove the next amount. This ensures a near-perfect square, equi-spaced on the mast dia. The proviso is that the mast sits parallel in the vice. This method doesen't beat having a milling machine, though.
Happy modelling.
Trevor