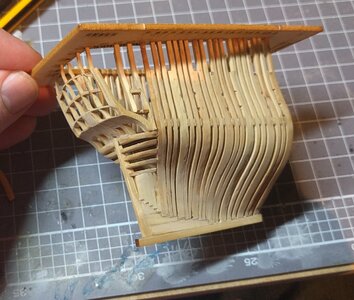
Unicorn models 1/160 HMS ENTERPRISE 1774 Stern section

Joined
Sep 29, 2021
Messages
77
Points
103

Well, I WAS going to build the Druid stern section. And I still will. But this hobby is all about the new shiney thing, right?

...So I'm building this instead. Then I'll do the druid.

Here's the kit, all built up from their Face Page.

141664179_1876806649139599_6755107892674311922_n.jpg

It has precisely one million microscopic bits that are supposed to build into a petite wee model about 3 inches wide and maybe 5 long.

I bought the kit a while back, (start of the year?) but have moved house since then and lost the instructions. A quick message to the facebook contact and some moderately English conversation later, I now have have a PDF of the instructions. Huzzah.

Construction starts with bottom bit at the back (technical term) which is build into a jig to keep it straight and true.

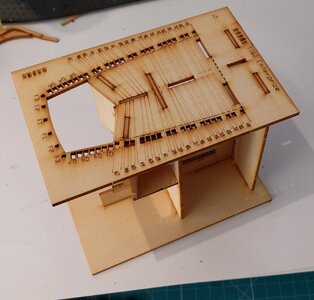
The supplied Jig, you'll notice, is very tight, so I filed it a bit. After that bit is all done and cured, it get's transferred to a second jig. There are lots of these. The super important thing is not to glue any of them. This next Jig would be a nightmare to remove from the model if you did. It's tight enough to hold together without adhesive, which is handy.

IMG_20211005_165509.jpg

IMG_20211005_165538.jpg

The Jig has to be assembled around the already completed parts in a particular order, which is not super easy to divine from the instructions. I'm sure the instructions are excellent, but they are in Chinese and google translate is only moderately helpful. Has helped me avoid a few pitfalls though. Think Indiana Jones pits full of spiders and spikes.

IMG_20211005_165827.jpg

IMG_20211005_165941.jpg

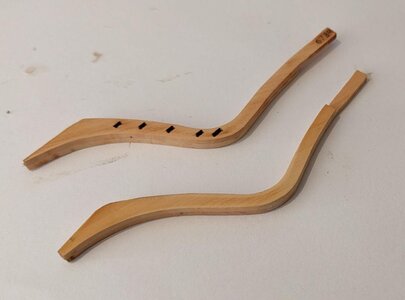
The first two Ribs are next, which have useful engraved lines to help shape them.

IMG_20211005_170113.jpg

there is laser charing on all the pieces that I will be doing my best to remove, though I suspect some of the smallest parts may get the better of me. Meh. How hard can it be?
IMG_20211005_171432.jpg
 

Attachments

  • IMG_20211005_165509.jpg
    IMG_20211005_165509.jpg
    87.8 KB · Views: 4
Interesting to see this build - I will follow with big interest (because I have the kir also at home)
 
Things are progressing well. This kit is more Jig than kit.

IMG_20211006_205213.jpg

loads of sanding to when this lot solidifies.

I wasn't convinced the horizontal spacers were going to remain in position after their ends are clipped off and sanded down, so I watered some glue down a bit and brushed it into the joints. This all gets covered up later, so staining from excess glue shouldn't be a problem.
 
This kit really is the full Indiana Jones experience. Highs, Lows, vague instructions that promise great things. I shall be playing the part of love interest that takes every opportunity to scream at things, but is otherwise fairly clueless.

The spacers trimmed off nicely and sanded without too much fuss. I wasn't happy with the mess I'd made at the bottom, along the keel. Pretty sure it was my mistake/ lack of effort and touch too much misplaced enthusiasm.

I can fix this, right? (queue intense music where Indi is weighing the sand while guessing the mass of the statuette).

IMG_20211007_164723.jpg

everything's under control. Situation Normal. It's fine. It's all fine here.

IMG_20211007_202021.jpg

Anyhoo, buoyed buy my aforementioned misplaced enthusiasm, I've ordered this:

Screenshot 2021-10-07 200713.jpg

Screenshot 2021-10-07 200617.jpg

...Which I'm sure I can build around until it turns up in three or four weeks...I DO have a ton of sanding to do.
 
Constructions continues to be a challenge, but somewhat satisfying. Now I could preface every section with "the next bit was kinda fiddly" or "the instructions tried really hard to helpful here..." or "oh God oh God WTF am I doing", but that would seem overly repetitive and a bit redundant. So I think we'll take that as a given from here on out.

The thin veneer of material that goes under the stern has a nifty former to assist gluing it in accurately and also avoiding having to hold it on with your fingers while the glue dries. Clever.

IMG_20211010_142730.jpg

IMG_20211009_161740.jpg

IMG_20211009_171230.jpg

exterior cladding started, and Gun ports mercilessly hacked through with a variety of sharpened tools and only a modicum of swearing.

The plank over the top of the ports is temporarily glued in place (inside and out) to prevent the ribs coming loose. I shall butcher them off with a dremel before the cladding goes on and covers the mess.

IMG_20211010_110956.jpg

IMG_20211010_113847.jpg
 
Hi! Great build if this. I have it too, and was wondering if you could point me in the direction of the English(y) pdf directions? (The FB contact)

thanks!

Mark
 
Hi! Great build if this. I have it too, and was wondering if you could point me in the direction of the English(y) pdf directions? (The FB contact)

thanks!

Mark

Super sorry, there is no English version. I might write some cliff notes though.

First thing to note: if it's plywood, it's a jig. If I were to do this kit again, I'd give all the plywood sheets a quick, thin spray with a bright, identifying colour. Fluro Green springs to mind.

Step 1. Use the jig to assist with marking lines on the plain side of part D2 (10)

Step 2. Use Jigs D18 and D19 (01) to assist with aligning the keel parts.

Step 3and 4. More Jigs! insert previously assembled keel into jig T5, and construct the rest of the Jig around it. Don't glue any of the Jig parts together. This all has to come off later.

Step 5, 6 and 7. Part 67AL (10) has a rectangular, arrowed tag on it. it's not required. cut it off. I guess it's there for easy part identification? Glue 67AL to 67BL making sure the engraved lines are on the outside. Repeat for pats 67AR and 67BR. Chamfer both parts as shown.

Steps 8,9 and 10 are pretty self explanatory. make sure you are only glueing at the keel end, and not to the jig at the top.

Steps 11, 12 and 13. Glue D17A(15) to D17B(15) and use some small clamps to bend it over Jig DM(04) while it dries.

Step 14, 15 and 16 . Jigs D13M , 14, 15 and 16 (06) are guide to mark chamfer lines on their respective components D13, 14, 15 and 16 (10).

Step 17. I found the small guide pegs to be way too long to fit into the ribs easily. Step sixteen indicates that you should trim them to fit, but doesn't indicate by how much. I broke some trying too hard. I suggest trimming them down until they are only just enough to help. Maybe a third of their original length. Using part D5 (08) from the next step can be helpful to check alignment.


...that should be enough to see you through page one. Enjoy.

What an interesting 'little' kit - it may be 'little', but it will take just as much time and effort as the larger scale ships!
Well done! - will follow with great interest

Ted
 
What an interesting 'little' kit - it may be 'little', but it will take just as much time and effort as the larger scale ships!
Well done! - will follow with great interest

Ted
Forgot to ask - who manufactures the kit?

Ted
 
Looking very interesting - so small but so nice
 
This kit really is the full Indiana Jones experience. Highs, Lows, vague instructions that promise great things. I shall be playing the part of love interest that takes every opportunity to scream at things, but is otherwise fairly clueless.

The spacers trimmed off nicely and sanded without too much fuss. I wasn't happy with the mess I'd made at the bottom, along the keel. Pretty sure it was my mistake/ lack of effort and touch too much misplaced enthusiasm.

I can fix this, right? (queue intense music where Indi is weighing the sand while guessing the mass of the statuette).

View attachment 260263

everything's under control. Situation Normal. It's fine. It's all fine here.

View attachment 260264

Anyhoo, buoyed buy my aforementioned misplaced enthusiasm, I've ordered this:

View attachment 260265

View attachment 260266

...Which I'm sure I can build around until it turns up in three or four weeks...I DO have a ton of sanding to do.
Where did you find the extra set? I got my kit off of eBay, but having just scoured it looking for the set, I drew a blank. It looks like a GREAT addition!

Thanks! (again)

mark
 
Forgot to ask - who manufactures the kit?
Unicorn Model I think.

Where did you find the extra set?

I got mine through ZJ CN Model on AliExpress.


Delivery was quite quick and the parts are every bit as good as the picture suggests.
 
Nice start!

I will follow this thread as I am also planning to buy this little kit. I was doubting to buy it before Aliexpress added the VAT here in Europe, and it was about 60USD which was quite nice despite it being relatively small... Now it costs around 90USD which is fairly expensive as there are other models from Mantua or other brands that are bigger and for the same price or cheaper, and they are more recognised than this one.

However, the overall quality is great for what I have seen in other threads and I am sure this little one can bring lots of hours of fun.

Keep the nice work!!

Alexis.
 
Back
Top