USCGC (Barque) Eagle by Constructo

Joined
Jan 2, 2021
Messages
85
Points
78

Location
Cadillac, MI
I am building this kit as a present for a former Coastie. I looked to see if there were any build logs for this one and didn't find any, so I thought it might help others when deciding is this is a good first kit or not. The pre-painted plastic hull can be a major selling point for some, and it does look good. However, it also presents some issues of it's own that will be addressed soon.

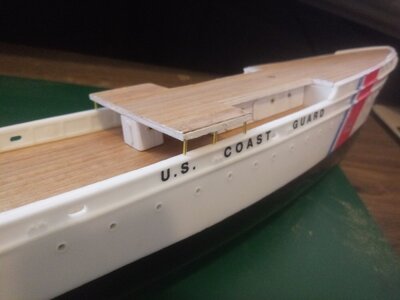
The packaging is nice, and everything seems to be well thought out. The instructions took me a minute to familiarize myself with, but once I figured out their method it all becomes pretty straight forward. However, they could go a bit deeper and explain some of the things that will need to be done in order to make parts fit, such as shaping the undersides of the decks to get them to fit down into the hull. I've started making some changes to make it more scale and accurate to the original, but when I do I will try to show how the kit expected it to be built as per the instructions and included materials.

Eagle_001.jpgEagle_002.jpgEagle_003.jpg
 
I really wanted to find some 2mm strips to replace the 4mm strips used for the decking, but I just couldn't seem to find any. I decided to use the strips provided, and stained them with some medium walnut Danish Oil.

Eagle_005.jpg

When dry fitting the deck pieces into the hull I noticed that they wouldn't sit down neatly, so I had to bevel the underside of the deck pieces to get them to seat properly.

Eagle_006.jpgEagle_008.jpgEagle_007.jpg
 
The midcastle and deckhouse became the first parts in this kit that I felt I really had to take it a step beyond what the kit was asking of me. Unfortunately, I couldn't find any really great pictures of these sections on the actual ship, so I had to take a little creative license and just try to make them look believable. The instructions show this:

Eagle_009.jpg

Here's one of the best photos of this section I could find. The windows on the actual ship are actually portholes, and the doors standard Navy water tight doors. As you can see, the instructions come nowhere near being an accurate, or even semi-accurate depiction of the actual prototype. So I opted to make some WTD's that are much closer, though the small scale makes it very difficult to be anywhere near as accurate as I would have liked. The portholes I made by drilling holes and inserting some brass rings left over from the San Francisco II build.
gallery3.jpg30415198_10155704582087933_3302779371873370112_n.jpg


Eagle_010.jpgEagle_011.jpgEagle_012.jpgEagle_013.jpgEagle_014.jpgEagle_015.jpg
 

Attachments

  • Eagle_016.jpg
    Eagle_016.jpg
    135.1 KB · Views: 3
Last edited:
The stanchions were supposed to be (as per the instructions) mounted to the deck, but looking at prototype pictures it was right out to the edge of the hull, so that's where I mounted them. Please ignore my overenthusiastic hole drilling. I would have run out of stanchions fast if I'd kept that distancing. I'll find some way of filling them. The stanchions and rails will be painted white next.

Eagle_017.jpgEagle_018.jpgEagle_019.jpg
 
Painted the stanchions and rails and began adding some deck details. I hadn't fully committed to going all out on the details yet, but looking back I wish I'd taken the time to research and correct the windlass to make it more true to the prototype. As modeled, it would stand as tall as an average human, and really does nothing to try to accurately depict the actual windlass on the ship. This is going to annoy me forever now that it's glued to the deck.

Eagle_020.jpgEagle_021.jpgEagle_022.jpg
 
These exhaust vents were nowhere near accurate, so having scoured the Net for pictures, I was able to create a fairly accurate depiction of what they SHOULD look like.

Eagle_023a.jpgCapture2.JPGCapture7.JPG

Once I had these pictures, I started working on the new exhaust vents.
 

Attachments

  • Eagle_023.jpg
    Eagle_023.jpg
    157.7 KB · Views: 5
  • Eagle_024.jpg
    Eagle_024.jpg
    150.6 KB · Views: 3
  • Eagle_027.jpg
    Eagle_027.jpg
    165.8 KB · Views: 3
The lifeboats are another issue. In the image of the plans in the previous post you can see how they wanted the life boats depicted, but as you can see from these photos, they're not quite right.

Capture3.JPGCapture4.JPGCapture5.JPG

So I made the appropriate changes. As of these pictures, there's still one more set to be placed, but it's on there now.Eagle_026.jpgEagle_027.jpg
 
Next we have what the instructions call a deck house, but I believe it's actually a big air conditioning unit. As you can see, their depiction of it is nowhere near what the actual unit looks like.

Eagle_036.jpg

This was a difficult part of the ship to find good pictures of, but from what little I did see, it wasn't anywhere close to being correct. So after hours and hours of scouring the Net for images, carefully watching videos of the Eagle in hopes of seeing a fleeting glimpse of the unit in hopes of getting a screen grab, I was able to collect these images:

800px-USCGC_Eagle_deck_house_3.jpg37260437_10155923965077933_381925006109573120_n.jpgCapture11.JPGDCillAIVoAAAcxf.jpg
Capture10.JPG

So I finally went to work on the unit.

Eagle_029.jpgEagle_030.jpg

Eagle_031.jpgEagle_032.jpg

Eagle_033.jpgEagle_034.jpgEagle_035.jpg

And I can't wait to start tying knots around those belaying pins. Yes, that's sarcasm.
 
I had to do something about those awful ladders supplied with the kit. Stamped out of flat brass, they came no where near as scale as I would have liked.
Eagle_037.jpg

So I cut some ladder parts from left over deck wood. Still, not truly scale, but a much more acceptable facsimile of what it should look like.

Eagle_038.jpgEagle_039.jpgEagle_040.jpg
Eagle_041.jpgEagle_042.jpg
 
And then there was the pilot house. If made per the instructions it would look more like a food vender shack at a local fair.

Eagle_043.jpg

So after scouring photos and videos of the real thing, I found these images to work from:

800px-USCGC_Eagle_deck_house_3.jpgCapture16.JPGCapture17.JPGmain-qimg-a0578256d9adad180ca356bd8c3a299f-c.jpg

With those images, I started working on the pilot house. I was pretty happy with the results.

Eagle_044.jpgEagle_045.jpgEagle_046.jpgEagle_047.jpgEagle_048.jpgEagle_049.jpgEagle_050.jpg
 
Aft steerage was quite unacceptable. As you can see by the picture of the instructions, it's nowhere near what the real thing looks like. So I made some changes.
Eagle_051.jpg20449045_10155061354152933_5497624613200825810_o.jpg20785916_10155096473052933_568570856070065833_o.jpg

I started with the supplied piece of wood, and cut it down. The removed parts would later be used to construct the seats.

Eagle_052.jpgEagle_053.jpgEagle_054.jpgEagle_055.jpgEagle_056.jpgEagle_057.jpgEagle_058.jpgEagle_059.jpg

Considering the small scale, I think I nailed it.

Eagle_060.jpg
 
The aft deckhouse was equally disappointing as pretty much the entire build to this point. Just a solid block of wood with some bits glued to it.
Eagle_070.jpg
Finding pictures of this portion of the ship was probably the hardest treasure hunt so far looking for any little bit of info that would give me a hint of what this is supposed to look like. These are the best I found.

stock-photo-portsmouth-uk-april-th-the-united-states-coastguard-tall-ship-uscgc-eagle-sails-fr...jpgCapture32.JPG

So I set to work on the aft deckhouse.

Eagle_071.jpgEagle_072.jpg

Eagle_073.jpgEagle_074.jpg

In looking through the millions of pictures on the Net, I found this little gem to give me insight into what the forward exterior bulkhead looks like
uscgc-eagle-wix-327_19.jpg

So I had more work to do.

Eagle_075.jpgEagle_076.jpgEagle_077.jpgEagle_078.jpgEagle_079.jpgEagle_080.jpgEagle_081.jpgEagle_082.jpg
 
So here's the first real stumbling block. The ship is called the Eagle, with a beautiful gold eagle on the bow.

Capture33.JPG

What the heck do I do with this goose they expect me to glue to the bow of the ship?

Eagle_083.jpg

As you can see, it looks nothing like an eagle, and doesn't even fit well on the bow. I'm not any good at carving things, so I'm at a loss as to what to do with this small but important detail. I'm not using their chicken/duck thing.
 
Back
Top