Vasa - 1:65 DeAgostini [COMPLETED BUILD]

Paul,

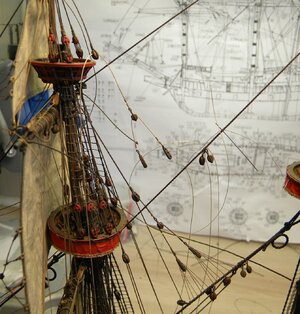
Beautiful rigging as usual. With regard to your euphroe blocks, below is a picture from the Vasa digital archive. It is similar to the pictures of blocks you showed and those shown in the blocks thesis by Howe (2011). I had the same problem as you when fabricating these euphroe blocks and trying to get the correct tapered shape. I found when I ran the crowsfeet lines and applied any tension, the wood would split. To overcome this, I rotated the wood stock 90 degrees and made the blocks with the grain running across the block. I was using the fine grained Huon Pine, and it worked a treat. What timber are you using? I love that dark red colour.

View attachment 310756

Another problem I faced to, and I note you are too, is the tight line turn that you are attempting on the ropes going through the euphroe blocks. They have a tendancy to curve (albeit tightly), but not the sharp angles of the ropes as I am sure they would have been.

Regards,

PeterG.

Lovely work Paul,

Maybe this is an idea for you and PeterG.
The crows-feet look like a hassle, I wonder if thinned PVA/white glue brushed onto the crows-feet whilst in tension would stiffen it up enough, maybe temporarily putting more tension on the stay to reduce the "kink" and once set reduce the tension in the crows-feet so the stay doesn't have a "kink" in it.
I would suggest doing some experimentation off the model with some sort of simulation.

Cheers,
Stephen.

Yes, Peter, your observation aligns with mine with regard to the way the rope looks as it passes through the euphroe (mine are made from pear by the way). I tried several different things:
  • using CA to force the rope into a sharper angle (essentially gluing the rope to the block) - this was a fail for me because it was impossible to tension both sides of six legs after that.
  • using Stephen's (the downunder Stephen) suggestion of thinned PVA glue - this was also a fail for me because the polyester based ropes repelled the glue rather than soaking it in (it simply beaded up on the surface along the length of the rope). I have seen other excellent examples of that working but only on cotton based ropes. I suppose I could have made cotton ropes but I don't have cotton source threads here and I was on a mission to get these done.
I'm going to try 'crimping' the rope with a tool when I get back to the ship later today and see if that will work. Looking at the pictures again this morning did not leave me with a satisfied feeling.

Stephan (Steef66) has it right. Polyester thread can be shaped under heat (we both heat treat our homemade ropes in an oven to prevent unraveling). I believe Stephan, however, premade his crows feet on a jig before taking them to the ship. I have done mine in situ and I'm not so sure bringing a heat gun to my ship at this point is wise. Maybe a hair dryer? I'll experiment a bit and see if this is possible.

I'm reluctant to start all over on these - they look OK if not perfect (lots of imperfections exist on my ship and one of my little mottos is: perfect is the enemy of good). As a rip-roaring perfectionist my whole life I consciously need to dial it back at times ;) or risk a breakdown.
 
Good morning Paul. Beautiful work as always. Those crows feet lines seem impossible to tension tight without pulling the stay up and thus not linear. I would be interested if any modeler has managed both. The chap on the knight head looks like he has been sent to the gallows-;). I find it interesting that this knight head was not centered on the deck. I know you got it right, however can’t see the logic ? Cheers Grant.
Hi Grant,

Yes, I have seen it done better. Cotton ropes are probably the solution as opposed to my polyester ones. Or maybe silk. Of course, and I'm confident most everyone will agree, better examples can be found on this forum for most everything we do on these ships. But I don't have enough years left to make this a ten-year build ROTF. I just moved the box containing my next build to the basement so the sirens contained therein could no longer be heard (What about me? I'm right here. Build me. Make me yours...). Sigh.
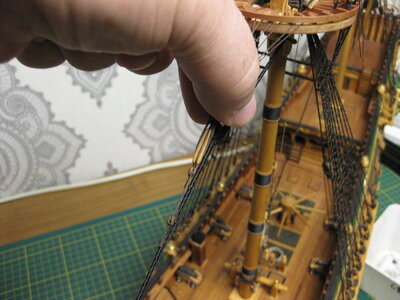
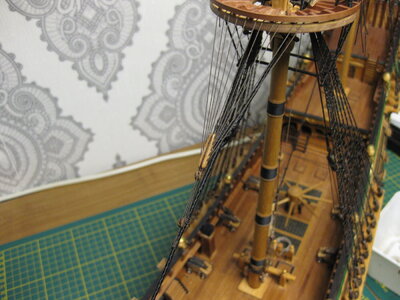
Oh, and the knighthead is off-center here to clear the stay that runs the centerline. There are several examples of that sort of thing on the Vasa which I have not noticed on later ships.
 
Stephan (Steef66) has it right. Polyester thread can be shaped under heat (we both heat treat our homemade ropes in an oven to prevent unraveling). I believe Stephan, however, premade his crows feet on a jig before taking them to the ship. I have done mine in situ and I'm not so sure bringing a heat gun to my ship at this point is wise. Maybe a hair dryer? I'll experiment a bit and see if this is possible.
I fit the jig on the ship like a construction on place. And I use real hemp rope in my case. So it looks like yours now. But with a paint burner gun, what have a regulated heat blow could be an option. Just hold the euphroe in you fingers and heat up the euphroe only. 140 degrees Celsius should be enough. Just a few seconds.
here I show on the PW
IMG_2567.JPG

You can see on mine the problem isn't there whit Poly thread. Because I made in the eaphroe a little kerf in the hole to make sure the tread goes to the right position.
IMG_2566.JPG
 
Last edited:
I am of your thinking too, Paul. I would be very reluctant to bring my heat gun anywhere near the rigging. However, thinking about it more, I might experiment with using some sort of heat resistant, small diameter tubing to direct some heat at just the euphroe block bend lines. I am using poly rope too. I’ll try this away from the ship to test.

Regards,

PeterG
 
Hi Grant,

Yes, I have seen it done better. Cotton ropes are probably the solution as opposed to my polyester ones. Or maybe silk. Of course, and I'm confident most everyone will agree, better examples can be found on this forum for most everything we do on these ships. But I don't have enough years left to make this a ten-year build ROTF. I just moved the box containing my next build to the basement so the sirens contained therein could no longer be heard (What about me? I'm right here. Build me. Make me yours...). Sigh.

Oh, and the knighthead is off-center here to clear the stay that runs the centerline. There are several examples of that sort of thing on the Vasa which I have not noticed on later ships.
Good day,
Dear all,
As variant,
how to make them without pulling stay up and without using hot gun :)))...
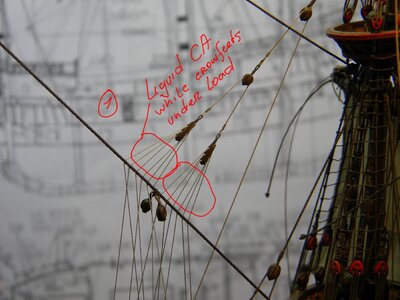
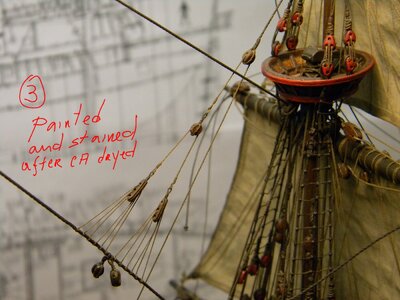
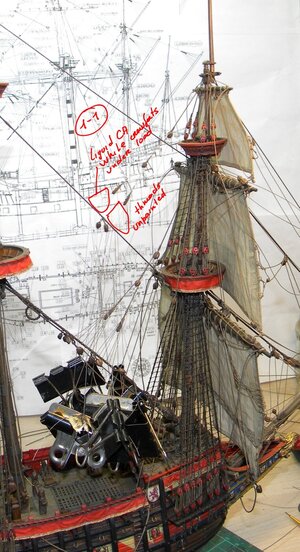
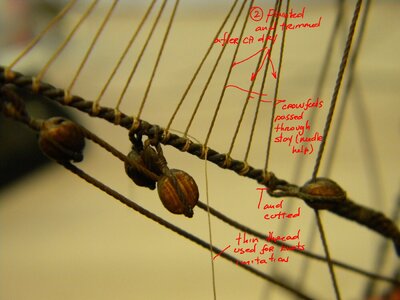
use needle to pull unpainted crowsfert trough stay , use weight and apply only super liquud type of CA , to let it dry , to trim crowsfeet and, imitate knots and paint all construction - stain them after...

20220529_133358.jpg

20220529_133532.jpg

20220529_133903.jpg

20220529_134417.jpg

20220529_135954.jpg
 
Last edited:
I fit the jig on the ship like a construction on place. And I use real hemp rope in my case. So it looks like yours now. But with a paint burner gun, what have a regulated heat blow could be an option. Just hold the euphroe in you fingers and heat up the euphroe only. 140 degrees Celsius should be enough. Just a few seconds.
here I show on the PW
View attachment 310792

You can see on mine the problem isn't there whit Poly thread. Because I made in the eaphroe a little kerf in the hole to make sure the tread goes to the right position.
View attachment 310790
I wish I had place my knight a little off center for that very reason.
 
So, for the past several days I have been consumed with researching how to make sails. I'm sure it will come as no surprise to any of you that long ago I determined that the sails provided in my kit would not be used. The fabric is satisfyingly lightweight (if not a bit coarse in terms of thread-count), but the stitching around the perimeter just isn't anything close to the real world (just a swirly rats-nest of thread). Plus, they are dimensionally inappropriate for the lengths of the yards.

I spent hours (and hours, and hours) reading books, surfing the internet, reading build logs, and viewing YouTube videos (thanks to those of you who made suggestions and offered guidance to my fumbling research). There are some marvelous techniques out there, each with pros and cons. Some require a sewing machine and others do not, some require hand sewing and others do not, some make sails that are more rigid, and some make sails that are more supple. Honestly, I would be happy if I could get even close to some of the sails I saw. Of course, scale is once again at issue and several of the techniques I looked at simply won't work at my scale.

As I lingered over this topic it became increasingly apparent that indecision was preventing me from committing to an approach. Part of that is a sense I have that poorly made sails can ruin an otherwise decent ship model. I am also of the opinion that the moment you start sewing at 1:65 you are instantly out of scale (but unacceptably so?).

Of course, I also considered simply foregoing sails (an age-old debate that I have only recently become aware of).

So, here is the current plan: I will put sails on my Vasa. I will attempt both furled and unfurled sails. I will try to sew the field of the sails to represent the panels (I'm using 28" panels per several reliable sources). I will also sew in a fold at the perimeter and add boltropes (not sure how I will accomplish that quite yet).

Long ago I ordered some cloth that I read about on another build log on this forum: Navarra Fine Lawn White from Whaleys (Bradford) in England. It is very lightweight and fine. Naturally it is out of scale at 1:65 but its not horrible. I'm going to try using this material for now and see how it goes.

I have been conducting trials on tinting my sail cloth and have selected 60 seconds in instant coffee (for the record - Starbucks Pike Peak instant coffee). I tried tea but it was just the barest bit too light (tea did work better on slightly heavier cloth - yes, I have choices...so much money wasted!) but coffee gave the best tone on this light and fine Navarra Lawn.

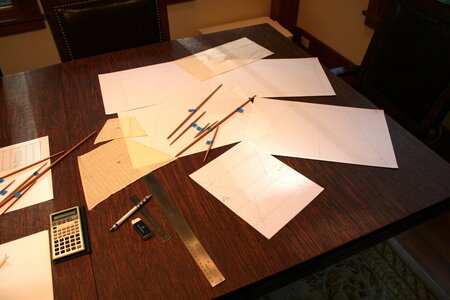
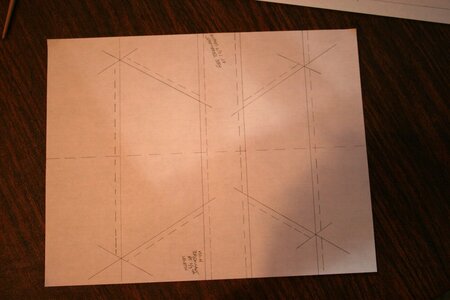
This afternoon I started drawing out my sails (my kit does not come with a sail plan - thank you Daniel for sending me the Billings sail plan which I then adjusted for scale). But mostly I just used the yards I made long ago paired with my estimation of vertical positioning of the yards on my actual model. Lots of variables that can all go very wrong but I don't know how to avoid not knowing what I don't know.

Here is my dining room work station (the sails you see are the kit sails):

IMG_8132.JPG

The drawings for the foreshortened topgallant sails that will be furled (at 66% of the correct length):

IMG_8133.JPG

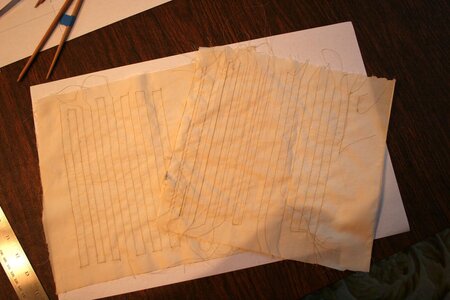
And I also sat down at a sewing machine for the first time in my life. Clearly, I need more practice!

IMG_8134.JPG

IMG_8135.JPG

What have I gotten myself into???
 
So, here is the current plan: I will put sails on my Vasa. I will attempt both furled and unfurled sails. I will try to sew the field of the sails to represent the panels (I'm using 28" panels per several reliable sources). I will also sew in a fold at the perimeter and add boltropes (not sure how I will accomplish that quite yet).

What have I gotten myself into???
I think the decision to adorn your ship with sail is in itself half the job. The rest is a case of rapidly-acquired sewing skills and an eye for a straight line. Your practice run with the sewing machine doesn't look too bad Paul, and like most repetitive tasks with model ship building you will soon develop a system that works, and which gets easier with each successive iteration. By the time you're on your third or fourth sail you'll be wondering what all the fuss was about :)
 
Hi Paul,
Last picture of sewing bids looks not so bad!!!
May be it will help, to soak sail cloth in deluted white wood clue( pva) , dry and ironing them... it made / transform them in a kind of paper matetial...seems to me , it will be easy to work with them than...
Ah... before You will start making real sails for the model, first be better to wash your sails cloth in warm soap water and dry it...
It will remove fabric chemical from material and prevent sails from shrinking in the future , if You will need them stain, paint or whatever...
 
Last edited:
So, for the past several days I have been consumed with researching how to make sails. I'm sure it will come as no surprise to any of you that long ago I determined that the sails provided in my kit would not be used. The fabric is satisfyingly lightweight (if not a bit coarse in terms of thread-count), but the stitching around the perimeter just isn't anything close to the real world (just a swirly rats-nest of thread). Plus, they are dimensionally inappropriate for the lengths of the yards.

I spent hours (and hours, and hours) reading books, surfing the internet, reading build logs, and viewing YouTube videos (thanks to those of you who made suggestions and offered guidance to my fumbling research). There are some marvelous techniques out there, each with pros and cons. Some require a sewing machine and others do not, some require hand sewing and others do not, some make sails that are more rigid, and some make sails that are more supple. Honestly, I would be happy if I could get even close to some of the sails I saw. Of course, scale is once again at issue and several of the techniques I looked at simply won't work at my scale.

As I lingered over this topic it became increasingly apparent that indecision was preventing me from committing to an approach. Part of that is a sense I have that poorly made sails can ruin an otherwise decent ship model. I am also of the opinion that the moment you start sewing at 1:65 you are instantly out of scale (but unacceptably so?).

Of course, I also considered simply foregoing sails (an age-old debate that I have only recently become aware of).

So, here is the current plan: I will put sails on my Vasa. I will attempt both furled and unfurled sails. I will try to sew the field of the sails to represent the panels (I'm using 28" panels per several reliable sources). I will also sew in a fold at the perimeter and add boltropes (not sure how I will accomplish that quite yet).

Long ago I ordered some cloth that I read about on another build log on this forum: Navarra Fine Lawn White from Whaleys (Bradford) in England. It is very lightweight and fine. Naturally it is out of scale at 1:65 but its not horrible. I'm going to try using this material for now and see how it goes.

I have been conducting trials on tinting my sail cloth and have selected 60 seconds in instant coffee (for the record - Starbucks Pike Peak instant coffee). I tried tea but it was just the barest bit too light (tea did work better on slightly heavier cloth - yes, I have choices...so much money wasted!) but coffee gave the best tone on this light and fine Navarra Lawn.

This afternoon I started drawing out my sails (my kit does not come with a sail plan - thank you Daniel for sending me the Billings sail plan which I then adjusted for scale). But mostly I just used the yards I made long ago paired with my estimation of vertical positioning of the yards on my actual model. Lots of variables that can all go very wrong but I don't know how to avoid not knowing what I don't know.

Here is my dining room work station (the sails you see are the kit sails):

View attachment 311533

The drawings for the foreshortened topgallant sails that will be furled (at 66% of the correct length):

View attachment 311534

And I also sat down at a sewing machine for the first time in my life. Clearly, I need more practice!

View attachment 311535

View attachment 311536

What have I gotten myself into???
The loose loops tell me that either your deck bobbin in the bobbin holder or your topside thread tension is out of adjustment on your sewing machine. The thread fed under the sewing deck from the bobbin and the thread coming from the sewing arm on top need to have the right balance of tensions or one thread will be too loose, causing these loops to appear. Get your sewing machine cleaned and adjusted before you make any more sails. Since sails are not that time consuming to pencil out and sew seam lines in, you may want to redo these sails.

Also, there are many ways to stain sails. I used toluene or kerosene thinned pine tar like Olha Batchvarov used, and for me that worked. Once the spirits dried, there was no after-smell. This method made recesses slightly darker, showing the fabric's weave better because of the contrast. You may want a stain that leaves a more even coloration. Tea is the traditional method, but you have to use REAL tea, not INSTANT tea for the staining to take hold, and tea seems to stain organic fabric like cotton better than any poly mix fabric. Other members here have there own sail staining recipes, and they all work. Stain some test sails so you are happy with the results.
 
Last edited:
Well Paul, I wish you good luck. Deck bobbins, line tension, staining, OH MY!!!! I too will have to learn how to sew on a machine I bought for my wife several years ago which she never really took a liking to. Needless to say, she has no interest in sewing my sails. I didn't see any blood stains on your practice sails so I assume it may be difficult to sew your fingers into the sails?? Ha..
 
"increasingly apparent that indecision was preventing me from committing to an approach"
Yes indeed, right where I am now, watching with great interest as I too will be adding sails in some form.
 
Hi Paul,
Last picture of sewing bids looks not so bad!!!
May be it will help, to soak sail cloth in deluted white wood clue( pva) , dry and ironing them... it made / transform them in a kind of paper matetial...seems to me , it will be easy to work with them than...
Ah... before You will start making real sails for the model, first be better to wash your sails cloth in warm soap water and dry it...
It will remove fabric chemical from material and prevent sails from shrinking in the future , if You will need them stain, paint or whatever...
Thanks Kirill. In order to furl some of the sails I'll need to avoid anything that makes the sail material stiff - or at least that's my current thought. Open to correction here.
 
The loose loops tell me that either your deck bobbin in the bobbin holder or your topside thread tension is out of adjustment on your sewing machine. The thread fed under the sewing deck from the bobbin and the thread coming from the sewing arm on top need to have the right balance of tensions or one thread will be too loose, causing these loops to appear. Get your sewing machine cleaned and adjusted before you make any more sails. Since sails are not that time consuming to pencil out and sew seam lines in, you may want to redo these sails.

Also, there are many ways to stain sails. I used toluene or kerosene thinned pine tar like Olha Batchvarov used, and for me that worked. Once the spirits dried, there was no after-smell. This method made recesses slightly darker, showing the fabric's weave better because of the contrast. You may want a stain that leaves a more even coloration. Tea is the traditional method, but you have to use REAL tea, not INSTANT tea for the staining to take hold, and tea seems to stain organic fabric like cotton better than any poly mix fabric. Other members here have there own sail staining recipes, and they all work. Stain some test sails so you are happy with the results.
Thanks, Kurt. What I showed was just a practice session (albeit on my actual sail material). I was playing around with the settings on the machine and you are exactly right - when I decreased the tension on the needle side the stitches got all messed up. I was trying to reduce the puckering of the fabric and a lower tension helped - up to the point I started to get loops and then I needed to add some tension back in. I also played around with different stitch lengths and stitch forms - my mom's sewing machine is old but it was top-of-the-line thirty years ago so I have options. It's really quite amazing what it can do though I am using it in a very elementary way.

Hmm. Can't use instant tea huh? I used a cheap tea bag so I assume that had real tea in it but maybe not. The color was just too faint. I'm not trying to produce aged sails - just want them to look like they were made from hemp and my fabric is very white which will certainly not do.

My plan is to stitch the panels on the furled sails first and hopefully I'll get enough practice in so that when I make the 'show' sails the lines will be straight and even.
 
Well Paul, I wish you good luck. Deck bobbins, line tension, staining, OH MY!!!! I too will have to learn how to sew on a machine I bought for my wife several years ago which she never really took a liking to. Needless to say, she has no interest in sewing my sails. I didn't see any blood stains on your practice sails so I assume it may be difficult to sew your fingers into the sails?? Ha..
Frankly, I can't believe I am sewing - my mom thought it was a hoot - but I got to spend a nice morning with her and she liked that. I suspect I'll have a wingman when I return to begin work on the actual sails.

I hope your machine came with instructions. I would have never been able to figure it all out without my mom's help.
 
This may sound funny, but this another fine example of the bonding that modeling can bring at times. As you said, you spent a nice morning with your mom - she had a good laugh at your expense, but so what - mother and son spent time together - that is what counts,

As to the actual sails, I agree with the sentiments expressed earlier - soon you will have it down to brass tacks and wonder what the fuss was all about.
 
Thanks, Kurt. What I showed was just a practice session (albeit on my actual sail material). I was playing around with the settings on the machine and you are exactly right - when I decreased the tension on the needle side the stitches got all messed up. I was trying to reduce the puckering of the fabric and a lower tension helped - up to the point I started to get loops and then I needed to add some tension back in. I also played around with different stitch lengths and stitch forms - my mom's sewing machine is old but it was top-of-the-line thirty years ago so I have options. It's really quite amazing what it can do though I am using it in a very elementary way.

Hmm. Can't use instant tea huh? I used a cheap tea bag so I assume that had real tea in it but maybe not. The color was just too faint. I'm not trying to produce aged sails - just want them to look like they were made from hemp and my fabric is very white which will certainly not do.

My plan is to stitch the panels on the furled sails first and hopefully I'll get enough practice in so that when I make the 'show' sails the lines will be straight and even.
You can use tea to age the sails until they are dirty brown, or just take the pristine white out of them until they look like fresh canvas. You can use instant tea, but who knows if the stain will take as well as fresh tea. Besides, you get to drink whatever you don't use (and maybe also the stuff you do use), and fresh tea beats that instant crap any day of the week. You use whatever works. Experiment. But if you use pine tar and kerosene, don't drink it. :D

I used my mother's 1980's Craft & Sew machine because it could do really small stitches, but am more familiar with my grandmother's 1952 Singer which I've sewn with since my teens. Just make sure you take measurements from the yards and account for the blocks and clews when figuring the size, and not trust the kit instructions on size if they provide any, because they are probably off. And don't worry about getting them perfect. They never are, but they can get pretty close. Stretching the sails will distort how they fit, and that distortion is hard to predict unless you make a proper test sail first, usually a topgallant to keep it simple.
 
Frankly, I can't believe I am sewing - my mom thought it was a hoot - but I got to spend a nice morning with her and she liked that. I suspect I'll have a wingman when I return to begin work on the actual sails.

I hope your machine came with instructions. I would have never been able to figure it all out without my mom's help.
I‘m about to start mine too, Paul. I won’t attach them to the masts until I get to my daughter‘s house, but they will be attached to the yards in the next two weeks. I’ll complete the standing rigging, ratlines, and running rigging when I get there. I’ll have three weeks with nothing else to do. If it takes longer, I’ll just stay there until it’s all done. I also have problems trying to determine exactly where everything goes, especially the blocks on the yards. The only are different from Anderson. And trying to decipher which is clew, buntline, bowline, sheet, reef line, brace, lift…I’m worn out thinking about it.
 
Back
Top