You are using an out of date browser. It may not display this or other websites correctly.
You should upgrade or use an alternative browser.
You should upgrade or use an alternative browser.
Vasa - 1:65 DeAgostini [COMPLETED BUILD]
- Thread starter dockattner
- Start date
- Watchers 145
- Joined
- Aug 8, 2019
- Messages
- 4,099
- Points
- 688

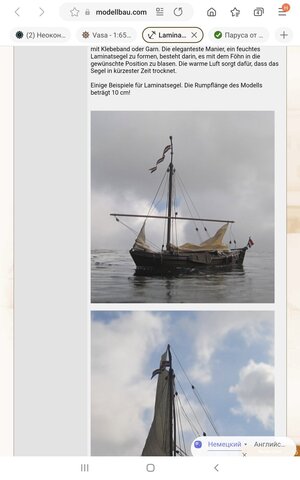
The German method looks like this

 www.modelbouwforum.nl
This builder uses thin paper for his sails, wrapping paper for glass or so. 2 cheats glued together and between he put copper wire from hi-fi speaker cables.
See the rest of his building logs, for example the Pieternel, wonderful craftsmanship with a small amount of tools. He builds in the way the ship where build in real.
Galjoot. 80 voet. 1:88
Hallo allemaal, bij deze wil ik mij graag aanmelden op dit forum. Ik ben al een tijdje ingeschreven maar heb nog nooit iets geplaatst, dus dat wil ik...
 www.modelbouwforum.nl
See the rest of his building logs, for example the Pieternel, wonderful craftsmanship with a small amount of tools. He builds in the way the ship where build in real.
Stephan is correct. Both are using a laminated strip technique. Turns out very convincing sails but they are quite stiff and would really only work for a 'full sails on display' model.The German method looks like this
This builder uses thin paper for his sails, wrapping paper for glass or so. 2 cheats glued together and between he put copper wire from hi-fi speaker cables.
Galjoot. 80 voet. 1:88
Hallo allemaal, bij deze wil ik mij graag aanmelden op dit forum. Ik ben al een tijdje ingeschreven maar heb nog nooit iets geplaatst, dus dat wil ik...www.modelbouwforum.nl
See the rest of his building logs, for example the Pieternel, wonderful craftsmanship with a small amount of tools. He builds in the way the ship where build in real.
Why not to visit that link which I gave... and to check it yourself,
looks like this technic allow you do whatever You want with your sails... furled, flat, full with wind...
looks like this technic allow you do whatever You want with your sails... furled, flat, full with wind...
- Joined
- Aug 8, 2019
- Messages
- 4,099
- Points
- 688

Filmoplast R is probably not available in the US. You have to look for it.
 www.neschen.de
That's what they use for making the sails. It LOOKS (that's what I said) like the method in the video I mentioned before. The difference is they use special tape and the video glued the sailcloth stripes to each other with white glue. He uses cotton in the video. Afterwards by heating the sail you can form it.
On the German forum it's more expensive method.
The tape they use on the German forum is made of Japanese paper and heat sensitive glue. Just need a hot iron to attach it to your sail. They using silk for sail.
They use the light plate to make sure the tape stripes come on both sides of the silk on the same spot.
You get a stiff piece of sail (that's correct Paul) you can form with heat in the way you want. And it looks damn good.
The tape will cost (the smallest 26200) about 10 euro, the 50 meter x 31 cm 26201 cost about 120 euro.
or

 www.bol.com
are 2 examples.
And then you need the silk cloth.
So yes that method is a little expensive, maybe worth to try. If it's available in the US.
Make sure you got the filmoplast R made of Japanese paper.
I think about this method, and maybe when I start on the sails I give it a try, it looks good. Thanks for that Kirill
filmoplast® R - Neschen
Repair paper with heat-activated adhesive for laminating documents
On the German forum it's more expensive method.
The tape they use on the German forum is made of Japanese paper and heat sensitive glue. Just need a hot iron to attach it to your sail. They using silk for sail.
They use the light plate to make sure the tape stripes come on both sides of the silk on the same spot.
You get a stiff piece of sail (that's correct Paul) you can form with heat in the way you want. And it looks damn good.
The tape will cost (the smallest 26200) about 10 euro, the 50 meter x 31 cm 26201 cost about 120 euro.
or

Labshop - Filmoplast R - 2 CM x 50 M Dispenser | bol.com
Labshop - Filmoplast R - 2 CM x 50 M Dispenser. De Filmoplast® R is een met warmte activeerbare lijm voor het inbedden van documenten. De Filmoplast® R...
are 2 examples.
And then you need the silk cloth.
So yes that method is a little expensive, maybe worth to try. If it's available in the US.
Make sure you got the filmoplast R made of Japanese paper.
I think about this method, and maybe when I start on the sails I give it a try, it looks good. Thanks for that Kirill
You can do it Paul, just look at the excellent workmanship and study level detail you have achieved since you started your build in September 2020. After all that accurate work you’ll kick yourself if you don’t get your sails right.Don't feel guilty Dean. Feel wise. I just ruined two sails yesterday with my lousy sewing. There are as many do-overs in sail making as there are in all the other elements of model ship construction. Honestly, I'm having my doubts whether I can make realistic sails.
Hello Friends,
Nearly two weeks has passed since research and work commenced on my sails. I have experimented with silkspan (tissue 'paper' but made from woven silk - I would recommend this for small scale models as it is very fine; I found it a bit too transparent at my scale), glue-laminating panels to build up sails (as Kirill has pointed out laminated panels can actually be made 'soft' by wetting them down though I believe this requires the use of a certain adhesive strip); as well as the linen fabric from Whaleys I mentioned previously (this is what I am about to show you).
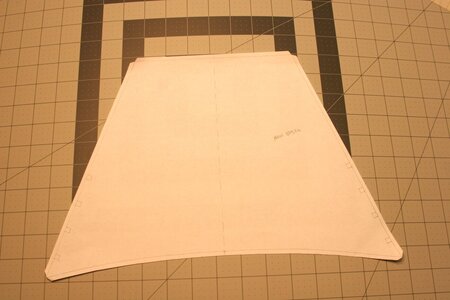
I started with a template created using the sails that came with my kit adjusted according to the Billing's sail plan and the actual lengths of my yards. Here is the main topsail as an example:
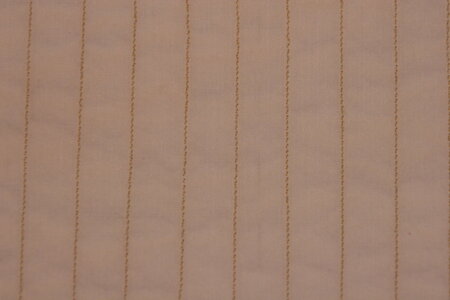
I then cut out the fabric (oversized) and popped over to my mom's house to sew faux panels (in the following image you will see I used a straight-line stitch at 1.5 mm). I suspect my mom's sewing machine needs a tune-up though to be fair the human eye cannot see this close):
I then traced the sail onto the fabric using heat-erasing ink (marked 3 mm oversized to account for a future fold). Here is the final result after the fold:
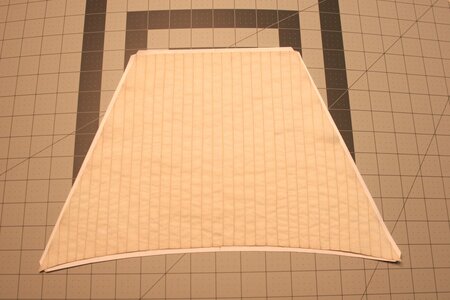
As you can see, I ended up choosing to NOT sew around the perimeter of the sail at the fold. While I actually like the sewing in the field of the sail that represents panels - when I sewed the perimeter it just looked out of scale to me. Part of the reason for that might have been my choice of thread color. Anyway, I convinced myself that leaving off the perimeter stitching looked marginally better.
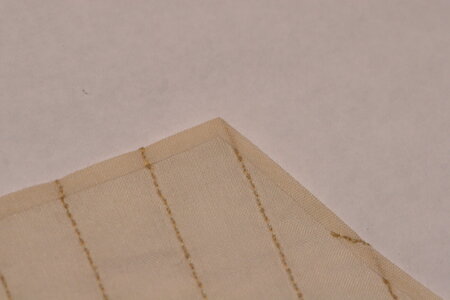
Here is the back side where you can see I did a single fold and mitered the corners (some corners turned out better than others). In order to keep the perimeter of the sail as thin as possible I did not fold over the fold (a double fold to hide the cut edge). Why is my fabric not unraveling? I treated the fabric cut line with a product called Fray Check from Dritz:
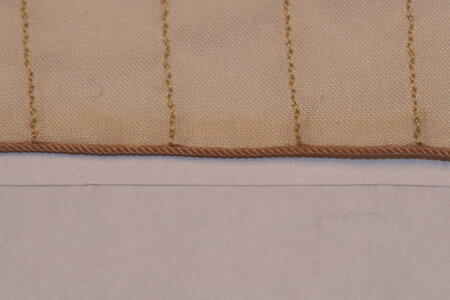
Next up was securing a bolt rope. Once again, I attempted to sew this to the perimeter of the sail but wasn't too impressed with my hand stitching. I ended up just gluing the rope to the edge of the sail. I tacked the bolt rope every inch or two using CA and then went back with a fabric glue called Liquid Stitch. Honestly, it's probably overpriced PVA, but it dries colorless, does not leave a mark on the fabric, and remains surprisingly flexible. Here is the bolt rope:
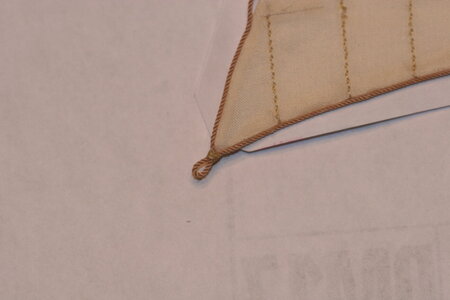
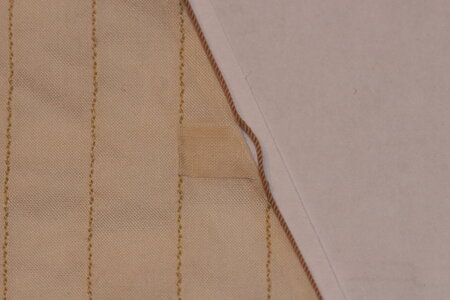
As I installed the bolt rope I added in the necessary details. Here are a few images...
Clews on the lower corners:
Cringles on the sides of the sail along with reinforcing patches:
And earing cringles at the top corners:
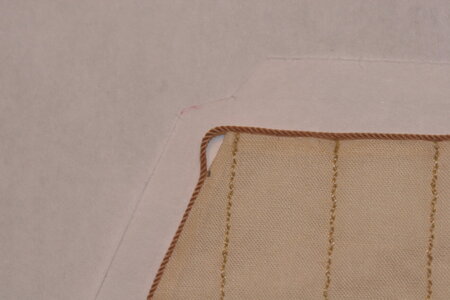
I have seen some modelers splice in a tiny piece of bolt rope under these attachment points. I may give that a go. I also think I may need to add something like stitching to the reinforcement patches to highlight them (???) - or maybe not.
Here is the overall appearance thus far:
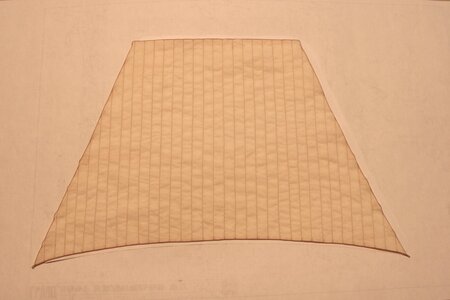
I am happy to hear your suggestions for improving my work. I have 9 more of these sails to make so I'll be at this for a while.
As always, I feel blessed that you would take the time away from your own builds to see what is happening on mine.
Nearly two weeks has passed since research and work commenced on my sails. I have experimented with silkspan (tissue 'paper' but made from woven silk - I would recommend this for small scale models as it is very fine; I found it a bit too transparent at my scale), glue-laminating panels to build up sails (as Kirill has pointed out laminated panels can actually be made 'soft' by wetting them down though I believe this requires the use of a certain adhesive strip); as well as the linen fabric from Whaleys I mentioned previously (this is what I am about to show you).
I started with a template created using the sails that came with my kit adjusted according to the Billing's sail plan and the actual lengths of my yards. Here is the main topsail as an example:

I then cut out the fabric (oversized) and popped over to my mom's house to sew faux panels (in the following image you will see I used a straight-line stitch at 1.5 mm). I suspect my mom's sewing machine needs a tune-up though to be fair the human eye cannot see this close):

I then traced the sail onto the fabric using heat-erasing ink (marked 3 mm oversized to account for a future fold). Here is the final result after the fold:

As you can see, I ended up choosing to NOT sew around the perimeter of the sail at the fold. While I actually like the sewing in the field of the sail that represents panels - when I sewed the perimeter it just looked out of scale to me. Part of the reason for that might have been my choice of thread color. Anyway, I convinced myself that leaving off the perimeter stitching looked marginally better.
Here is the back side where you can see I did a single fold and mitered the corners (some corners turned out better than others). In order to keep the perimeter of the sail as thin as possible I did not fold over the fold (a double fold to hide the cut edge). Why is my fabric not unraveling? I treated the fabric cut line with a product called Fray Check from Dritz:

Next up was securing a bolt rope. Once again, I attempted to sew this to the perimeter of the sail but wasn't too impressed with my hand stitching. I ended up just gluing the rope to the edge of the sail. I tacked the bolt rope every inch or two using CA and then went back with a fabric glue called Liquid Stitch. Honestly, it's probably overpriced PVA, but it dries colorless, does not leave a mark on the fabric, and remains surprisingly flexible. Here is the bolt rope:

As I installed the bolt rope I added in the necessary details. Here are a few images...
Clews on the lower corners:

Cringles on the sides of the sail along with reinforcing patches:

And earing cringles at the top corners:

I have seen some modelers splice in a tiny piece of bolt rope under these attachment points. I may give that a go. I also think I may need to add something like stitching to the reinforcement patches to highlight them (???) - or maybe not.
Here is the overall appearance thus far:

I am happy to hear your suggestions for improving my work. I have 9 more of these sails to make so I'll be at this for a while.
As always, I feel blessed that you would take the time away from your own builds to see what is happening on mine.
Last edited:
- Joined
- Apr 15, 2021
- Messages
- 212
- Points
- 213

Wow Paul, I feel like I just attended a seminar on sail-making after that. Thank you for the detailed explanation of your process. I agree that the bolt rope around the perimeter is a challenge to sew by hand. However, will glueing the bolt rope to the sail not impede any device that needs to latch onto that rope? I'm not sure how the Vasa's sails are configured so this observation is just a stab in the dark. Otherwise it looks like a fine bit of craftsmanship, although I don't envy your still having to create nine more of themNext up was securing a bolt rope. Once again, I attempted to sew this to the perimeter of the sail but wasn't too impressed with my hand stitching. I ended up just gluing the rope to the edge of the sail. I tacked the bolt rope every inch or two using CA and then went back with a fabric glue called Liquid Stitch.
- Joined
- Jan 9, 2020
- Messages
- 10,377
- Points
- 938

Dear Paul. You have now shown - countless times I may add - that when it comes to fine and detailed work there are very few, if any, who can hold a candle to you. The sail is the perfect example of that. I think it looks spectacular!
Good day,
Dear Paul,
They are Looks very,very good! Job is very accurate !
However , a few critical moments from my point of vew...
As far as I know, as described in every book about making sails for the model...
#cringles and bolt rope are different parts... cringles couldn't be forming from the bolt rope as You did...strange ,where/ why You see such solution...?
it looks just disaster wrong on the sails.
#bolt rope consists of a few parts, of different thikness( I think it could be ommited on the model for simplification) , and it is not necessary to make it running around the sail.
#loops on the upper cornrer need to be specifically formed, not like You shown )).
)).
I don't give pictures of above, You could find them easily in interned...
I would reccomend to Download some good ,solid modeling book for refrence in yоur rigging, how things should looks like/ Anderson, Markvardt orJ.Lee for example...in many cases it could save a lot of time and materials...
they give detailed" instructions" practicaly about every aspects of the model rigging, including sails making...
All the best !
Kirill
Dear Paul,
They are Looks very,very good! Job is very accurate !
However , a few critical moments from my point of vew...
As far as I know, as described in every book about making sails for the model...
#cringles and bolt rope are different parts... cringles couldn't be forming from the bolt rope as You did...strange ,where/ why You see such solution...?
it looks just disaster wrong on the sails.
#bolt rope consists of a few parts, of different thikness( I think it could be ommited on the model for simplification) , and it is not necessary to make it running around the sail.
#loops on the upper cornrer need to be specifically formed, not like You shown
I don't give pictures of above, You could find them easily in interned...
I would reccomend to Download some good ,solid modeling book for refrence in yоur rigging, how things should looks like/ Anderson, Markvardt orJ.Lee for example...in many cases it could save a lot of time and materials...
they give detailed" instructions" practicaly about every aspects of the model rigging, including sails making...
All the best !
Kirill
Very kind of you Stephan. Thank you.That's a very nice looking sail
Hi Ben, thank you for the favorable review. As for the ropes...that's my work on this ship but never again. Now that I see I can buy ropes just as nice from you and a select few other vendors I'll be ordering ropes on the aftermarket for future builds. By the way, my photos were poorly taken - the rope is not burnt caramel in color - they are very hempy as these did not receive any bitumen of judea.I second that!
Also, Nice rope
Hey Mark. Well, you have raised an issue I had not considered. There are some lines that will tie to the sail around the bolt rope. But the fabric glue is quite flexible/pliable so I think I will be able to pass a needle through it.Wow Paul, I feel like I just attended a seminar on sail-making after that. Thank you for the detailed explanation of your process. I agree that the bolt rope around the perimeter is a challenge to sew by hand. However, will glueing the bolt rope to the sail not impede any device that needs to latch onto that rope? I'm not sure how the Vasa's sails are configured so this observation is just a stab in the dark. Otherwise it looks like a fine bit of craftsmanship, although I don't envy your still having to create nine more of them
And yes, nine more but four of them are going to be furled so they are about 2/3rds the height they should be and will not have all the fancy attachment points except at the corners (I say that without actually knowing if that's entirely true). Still, your concern is well-placed. This one sail took a silly long time.
Wow, Heinrich. My cup overfloweth. If there is anything creditable in my work it can be only be attributed to the work of the wonderful builders (yourself included) on the forum. I wouldn't know how to seize a line if it wasn't for people sharing what they know with those of who don't.Dear Paul. You have now shown - countless times I may add - that when it comes to fine and detailed work there are very few, if any, who can hold a candle to you. The sail is the perfect example of that. I think it looks spectacular!
As kirill4 noted, some changes should be made for the cringles. Better to know up front what to change than after 10 sails are finished, and better make the mistakes on the practice sail than on the ones you use on the model. Don't throw away your practice sail. Save it for the next model, because if you change any of your techniques, you can hold the practice sail for the new model up along side the old one and see what effect your changes have. It gives you a frame of reference, so you can choose which techniques for sail staining, bolt rope attachment, and cringle and clue loop methods appeal to you the most. This is for wind filled sails: Since sails from this time period were more bellied and less flat that those in the next century, you may need to take a practice sail and stretch it on the sail stretching frame when you get to that stage so you don't do anything to one of your model sails that is irreversible or damage it, forcing you to make a replacement.
Hello Kirill. I am deeply grateful for your careful review. Here are a few thoughts.Good day,
Dear Paul,
They are Looks very,very good! Job is very accurate !
However , a few critical moments from my point of vew...
As far as I know, as described in every book about making sails for the model...
#cringles and bolt rope are different parts... cringles couldn't be forming from the bolt rope as You did...strange ,where/ why You see such solution...?
it looks just disaster wrong on the sails.
#bolt rope consists of a few parts, of different thikness( I think it could be ommited on the model for simplification) , and it is not necessary to make it running around the sail.
#loops on the upper cornrer need to be specifically formed, not like You shown)).
I don't give pictures of above, You could find them easily in interned...
I would reccomend to Download some good ,solid modeling book for refrence in yоur rigging, how things should looks like/ Anderson, Markvardt orJ.Lee for example...in many cases it could save a lot of time and materials...
they give detailed" instructions" practicaly about every aspects of the model rigging, including sails making...
All the best !
Kirill
You are correct on your first point. Cringles are spliced into the bolt rope which runs continuously around the sail. Indeed, the cringles should be a thinner rope than the bolt ropes. I obliquely acknowledged this in my post offering that some have chosen to fit in a substitute bolt rope under the cringles. I may very well do that but will obviously not be presenting the cringles in the smaller gauge rope. Still, your point is well taken.
Second. Yes, you are correct. The head rope should be about half the size of the bolt rope (which should be about 60-70% the dimension of the shrouds). I made a modeler's decision that this distinction would be unnoticeable at scale. I appreciate that the masters would disagree.
Finally, I am not sure how I have done the upper corners incorrectly. If what you are looking for is to have the head rope spliced into the bolt rope below the earring cringle I will agree with you. But once the decision has been made to present a head rope at the same dimension as the bolt rope all that remains is for me to piece in a bit of rope presenting the illusion of a continuous bolt rope. You have motivated me to do that very thing (see my earlier posting as well). Frankly, I think it would take a keen eye to see my mistake. I am grateful for the opportunity to correct this.
Last edited:
Excellent Kurt. My fabric stretches only on the oblique. For this reason I won't be attempting fully filled sails (ala you and Olha). Without knowing how this will turn out I am picturing something much closer to Ab Hoving's 'casual sails'. I have not yet practiced that part so the jury is still out. Either way, I have not fabricated my sails being 'drawn in' by the bolt rope as described in several resources. That is, I will not be presenting fully wind filled sails because I have not made them to be able to do that... Unless I change my mind and start all over!As kirill4 noted, some changes should be made for the cringles. Better to know up front what to change than after 10 sails are finished, and better make the mistakes on the practice sail than on the ones you use on the model. Don't throw away your practice sail. Save it for the next model, because if you change any of your techniques, you can hold the practice sail for the new model up along side the old one and see what effect your changes have. It gives you a frame of reference, so you can choose which techniques for sail staining, bolt rope attachment, and cringle and clue loop methods appeal to you the most. This is for wind filled sails: Since sails from this time period were more bellied and less flat that those in the next century, you may need to take a practice sail and stretch it on the sail stretching frame when you get to that stage so you don't do anything to one of your model sails that is irreversible or damage it, forcing you to make a replacement.
- Joined
- Apr 20, 2020
- Messages
- 5,140
- Points
- 738

That's a beautiful looking sailHello Friends,
Nearly two weeks has passed since research and work commenced on my sails. I have experimented with silkspan (tissue 'paper' but made from woven silk - I would recommend this for small scale models as it is very fine; I found it a bit too transparent at my scale), glue-laminating panels to build up sails (as Kirill has pointed out laminated panels can actually be made 'soft' by wetting them down though I believe this requires the use of a certain adhesive strip); as well as the linen fabric from Whaleys I mentioned previously (this is what I am about to show you).
I started with a template created using the sails that came with my kit adjusted according to the Billing's sail plan and the actual lengths of my yards. Here is the main topsail as an example:
View attachment 312923
I then cut out the fabric (oversized) and popped over to my mom's house to sew faux panels (in the following image you will see I used a straight-line stitch at 1.5 mm). I suspect my mom's sewing machine needs a tune-up though to be fair the human eye cannot see this close):
View attachment 312925
I then traced the sail onto the fabric using heat-erasing ink (marked 3 mm oversized to account for a future fold). Here is the final result after the fold:
View attachment 312924
As you can see, I ended up choosing to NOT sew around the perimeter of the sail at the fold. While I actually like the sewing in the field of the sail that represents panels - when I sewed the perimeter it just looked out of scale to me. Part of the reason for that might have been my choice of thread color. Anyway, I convinced myself that leaving off the perimeter stitching looked marginally better.
Here is the back side where you can see I did a single fold and mitered the corners (some corners turnout out better than others). In order to keep the perimeter of the sail as thin as possible I did not fold over the fold (a double fold to hide the cut edge). Why is my fabric not unraveling? I treated the fabric cut line with a product called Fray Check from Dritz:
View attachment 312926
Next up was securing a bolt rope. Once again, I attempted to sew this to the perimeter of the sail but wasn't too impressed with my hand stitching. I ended up just gluing the rope to the edge of the sail. I tacked the bolt rope every inch or two using CA and then went back with a fabric glue called Liquid Stitch. Honestly, it's probably overpriced PVA, but it dries colorless, does not leave a mark on the fabric, and remains surprisingly flexible. Here is the bolt rope:
View attachment 312930
As I installed the bolt rope I added in the necessary details. Here are a few images...
Clews on the lower corners:
View attachment 312927
Cringles on the sides of the sail along with reinforcing patches:
View attachment 312928
And earing cringles at the top corners:
View attachment 312929
I have seen some modelers splice in a tiny piece of bolt rope under these attachment points. I may give that a go. I also think I may need to add something like stitching to the reinforcement patches to highlight them (???) - or maybe not.
Here is the overall appearance thus far:
View attachment 312931
I am happy to hear your suggestions for improving my work. I have 9 more of these sails to make so I'll be at this for a while.
As always, I feel blessed that you would take the time away from your own builds to see what is happening on mine.
G
I left my remarks because I see Your great abilities for precision works, but your sails in present stage/ means rough issues with bolt rope and crigles, far from high standarts of your entire model... )) ... and I saw some our collegues appreciate such mistakes?
  )) but from my point of vew, thee mistakes are principal , which easily could be avoided...how sail should looks with all posible details even in simplified form...I don't know, may be Im wrong and better should say - Oh..!!! How Perfect they are !!!
I see that You very well able to make all that small but necessary corrections needed to be made on your sails, before You will start making complete set...
ALL THE BEST!
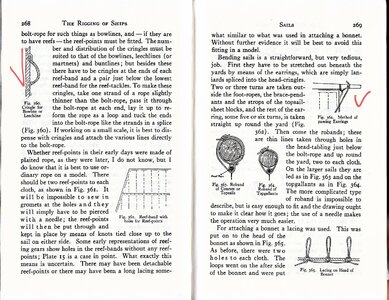
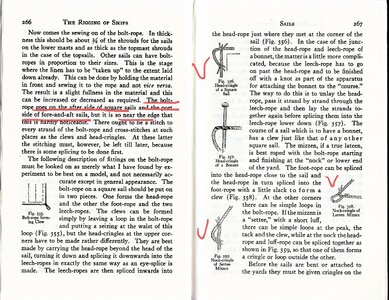
Good day Paul,Hello Kirill. I am deeply grateful for your careful review. Here are a few thoughts.
You are correct on your first point. Cringles are spliced into the bolt rope which runs continuously around the sail. Indeed, the cringles should be a thinner rope than the bolt ropes. I obliquely acknowledged this in my post offering that some have chosen to fit in a substitute bolt rope under the cringles. I may very well do that but will obviously not be presenting the cringles in the smaller gauge rope. Still, your point is well taken.
Second. Yes, you are correct. The head rope should be about half the size of the bolt tope (which should be about 60-70% the dimension of the shrouds). I made a modeler's decision that this distinction would be unnoticeable at scale. I appreciate that the masters would disagree.
Finally, I am not sure how I have done the upper corners incorrectly. If what you are looking for is to have the head rope spliced into the bolt rope below the earring cringle I will agree with you. But once the decision has been made to present a head rope at the same dimension as the bolt rope all that remains is for me to piece in a bit of rope presenting the illusion of a continuous bolt rope. You have motivated me to do that very thing (see my earlier posting as well). Frankly, I think it would take a keen eye to see my mistake. I am grateful for the opportunity to correct this.
I left my remarks because I see Your great abilities for precision works, but your sails in present stage/ means rough issues with bolt rope and crigles, far from high standarts of your entire model...
I see that You very well able to make all that small but necessary corrections needed to be made on your sails, before You will start making complete set...
ALL THE BEST!


