Way to go Paul. Excellent final product.Wow everyone! I am humbled by your positive reviews of my work. Of course it took "a village" to raise this "child" so I am blessed that you all spoke into my progress (or lack of progress) with affirmation and suggestions. And special thanks to @Maarten who took the time to answer some questions and offer clear instruction offline and in this build log.
Wait till you see what else Maarten taught me...coming soon...
Oh, and I forgot to post the obligatory porcupine hull picture so here you go...
View attachment 204433
View attachment 204434
You are using an out of date browser. It may not display this or other websites correctly.
You should upgrade or use an alternative browser.
You should upgrade or use an alternative browser.
Vasa - 1:65 DeAgostini [COMPLETED BUILD]
- Thread starter dockattner
- Start date
- Watchers 145
That planking and tree nailing work is superb Doc.
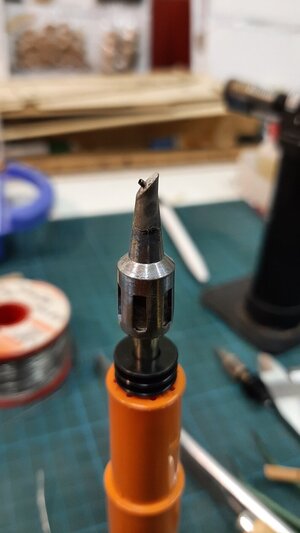
As I was sorting out my plans for the hull with Maarten he directed me to his Alert build where he was using a simple technique to make faux treenails. Basically it involves using a syringe needle and heat. His version is quite sophisticated as he uses a butane powered soldering iron with the needle soldered to the head providing continuous heat...
I don't have that fancy soldering iron (it's quite small making it easy to maneuver) - nor do I have the ability to high heat solder (I assume he used silver solder and an acetylene torch but he can explain if I am wrong here). Undeterred, I made it work with what I had on hand...
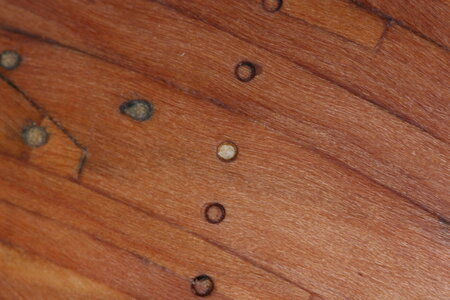
First - the results (note that this was accomplished in a single afternoon - and both sides of the hull are done):
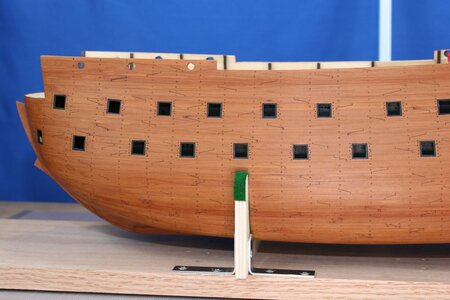
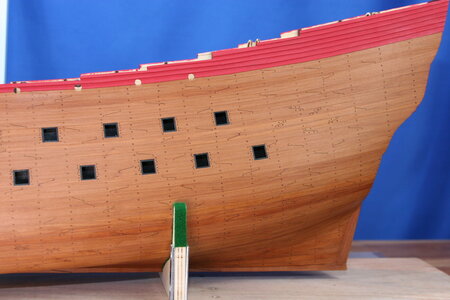
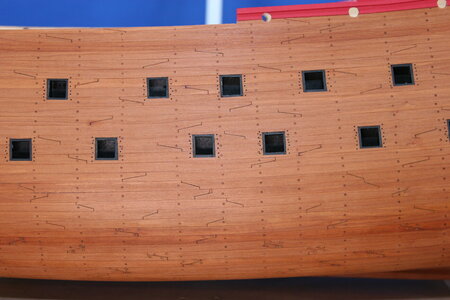
Leaning into my build philosophy of 'representing' the details of the original ship rather than 'replicating' the ship itself I chose to only include treenails for some of the frames, and at a lesser density than present in real life. As I progress with more hull details I may go back and add more of these framing pegs. I want to be careful to not overcook the hull with more than it can handle at scale.
I will continue to use the 'real' treenails at the scarf joints.
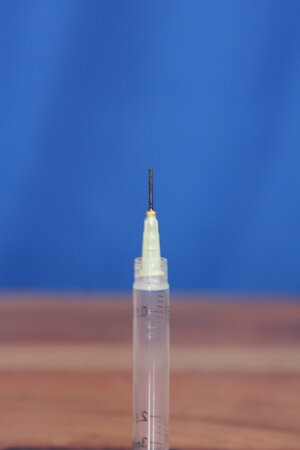
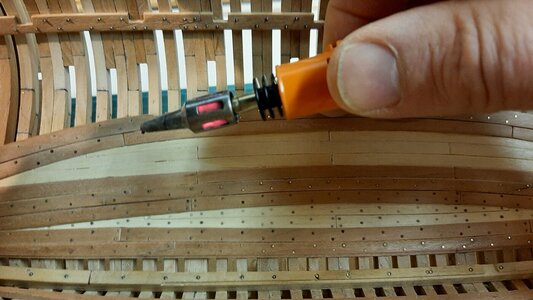
My adaptation of Maarten's marvelous technique was to file down a 20 gauge needle (I took the point off and then filed the outside circumference to make the edge quite thin). A 20 gauge needle has a 0.6 mm lumen and different needle sizes would produce different size circles. 0.6 mm is too large for my 1:65 scale but I wanted to approximate the size of the 'real' treenails at the scarf joints. Thus shaped, I simply placed the tip of the needle in the flame until it barely turned orange and quickly 'tapped' it into the wood of the hull (I used pin-striping tape to establish the line of the pegs).
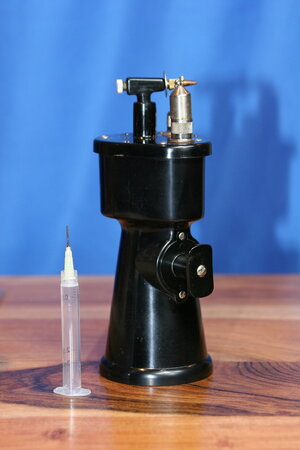
It takes some practice but once you get a flow going it's remarkably efficient.
Warning: with too heavy of a touch the needle is an effective hole punch!
If you love this technique please refer to Maarten's Alert build log to see how well it works in the hands of a master! As for me, I'm delighted with my clumsy efforts - I got more done this afternoon than I would have imagined possible. Thanks @Maarten!
And thanks to you for visiting my build log!
I don't have that fancy soldering iron (it's quite small making it easy to maneuver) - nor do I have the ability to high heat solder (I assume he used silver solder and an acetylene torch but he can explain if I am wrong here). Undeterred, I made it work with what I had on hand...
First - the results (note that this was accomplished in a single afternoon - and both sides of the hull are done):


Leaning into my build philosophy of 'representing' the details of the original ship rather than 'replicating' the ship itself I chose to only include treenails for some of the frames, and at a lesser density than present in real life. As I progress with more hull details I may go back and add more of these framing pegs. I want to be careful to not overcook the hull with more than it can handle at scale.
I will continue to use the 'real' treenails at the scarf joints.
My adaptation of Maarten's marvelous technique was to file down a 20 gauge needle (I took the point off and then filed the outside circumference to make the edge quite thin). A 20 gauge needle has a 0.6 mm lumen and different needle sizes would produce different size circles. 0.6 mm is too large for my 1:65 scale but I wanted to approximate the size of the 'real' treenails at the scarf joints. Thus shaped, I simply placed the tip of the needle in the flame until it barely turned orange and quickly 'tapped' it into the wood of the hull (I used pin-striping tape to establish the line of the pegs).


It takes some practice but once you get a flow going it's remarkably efficient.
Warning: with too heavy of a touch the needle is an effective hole punch!

If you love this technique please refer to Maarten's Alert build log to see how well it works in the hands of a master! As for me, I'm delighted with my clumsy efforts - I got more done this afternoon than I would have imagined possible. Thanks @Maarten!
And thanks to you for visiting my build log!
Last edited:
Very clever! I love this! Will definitely be using this technique in the future!As I was sorting out my plans for the hull with Maarten he directed me to his Alert build where he was using a simple technique to make faux treenails. Basically it involves using a syringe needle and heat. His version is quite sophisticated as he uses a butane powered soldering iron with the needle soldered to the head providing continuous heat...
I don't have that fancy soldering iron (it's quite small making it easy to maneuver) - nor do I have the ability to high heat solder (I assume he used silver solder and an acetylene torch but he can explain if I am wrong here). Undeterred, I made it work with what I had on hand...
First - the results (note that this was accomplished in a single afternoon - and both sides of the hull are done):
View attachment 204459
View attachment 204460
View attachment 204461
Leaning into my build philosophy of 'representing' the details of the original ship rather than 'replicating' the ship itself I chose to only include treenails for some of the frames, and at a lesser density than present in real life. As I progress with more hull details I may go back and add more of these framing pegs. I want to be careful to not overcook the hull with more than it can handle at scale.
I will continue to use the 'real' treenails at the scarf joints.
My adaptation of Maarten's marvelous technique was to file down a 20 gauge needle (I filed the outside circumference to make the edge quite thin). A 20 gauge needle has a 0.6 mm lumen and different needle sizes would produce different size circles. 0.6 mm is too large for my 1:65 scale but I wanted to approximate the size of the 'real' treenails at the scarf joints. Thus shaped, I simply placed the tip of the needle in the flame until it barely turned orange and quickly 'tapped' it into the wood of the hull (I used pin-striping tape to establish the line of the pegs).
View attachment 204462 View attachment 204463
It takes some practice but once you get a flow going it's remarkably efficient.
Warning: with too heavy of a touch the needle is an effective hole punch!
View attachment 204464
If you love this technique please refer to Maarten's Alert build log to see how well it works in the hands of a master! As for me, I'm delighted with my clumsy efforts - I got more done this afternoon than I would have imagined possible. Thanks @Maarten!
And thanks to you for visiting my build log!
Hi Paul, great work. You will see that the treenailing in combination with the knee bolts and wale bolts will give you a perfect looking hull.As I was sorting out my plans for the hull with Maarten he directed me to his Alert build where he was using a simple technique to make faux treenails. Basically it involves using a syringe needle and heat. His version is quite sophisticated as he uses a butane powered soldering iron with the needle soldered to the head providing continuous heat...
I don't have that fancy soldering iron (it's quite small making it easy to maneuver) - nor do I have the ability to high heat solder (I assume he used silver solder and an acetylene torch but he can explain if I am wrong here). Undeterred, I made it work with what I had on hand...
First - the results (note that this was accomplished in a single afternoon - and both sides of the hull are done):
View attachment 204459
View attachment 204460
View attachment 204461
Leaning into my build philosophy of 'representing' the details of the original ship rather than 'replicating' the ship itself I chose to only include treenails for some of the frames, and at a lesser density than present in real life. As I progress with more hull details I may go back and add more of these framing pegs. I want to be careful to not overcook the hull with more than it can handle at scale.
I will continue to use the 'real' treenails at the scarf joints.
My adaptation of Maarten's marvelous technique was to file down a 20 gauge needle (I filed the outside circumference to make the edge quite thin). A 20 gauge needle has a 0.6 mm lumen and different needle sizes would produce different size circles. 0.6 mm is too large for my 1:65 scale but I wanted to approximate the size of the 'real' treenails at the scarf joints. Thus shaped, I simply placed the tip of the needle in the flame until it barely turned orange and quickly 'tapped' it into the wood of the hull (I used pin-striping tape to establish the line of the pegs).
View attachment 204462 View attachment 204463
It takes some practice but once you get a flow going it's remarkably efficient.
Warning: with too heavy of a touch the needle is an effective hole punch!
View attachment 204464
If you love this technique please refer to Maarten's Alert build log to see how well it works in the hands of a master! As for me, I'm delighted with my clumsy efforts - I got more done this afternoon than I would have imagined possible. Thanks @Maarten!
And thanks to you for visiting my build log!
And yes I silver soldered my seringe tip into the head of the soldering iron.
Paul, you started your build for the same reasons I did ( with the emphasis on getting a laugh). Friendly banter and a few jokes are welcome on this front.Hello everyone! My name is Paul and I have been thinking about building the Vasa for a really, really long time. It would seem the time has finally come!
There are plenty of logs out there for the Swedish warship Vasa. So why another one?
Two reasons: 1) I need help! I have only built one other ship to scale (the Mamoli Roter Lowe more than 35 years ago!). But, I have read lots of build logs on various forums and, as a general rule, the participants are genuine and helpful. I have found this oddly encouraging – maybe with help I could actually get this thing done?
Which brings me to my related second reason: 2) the vast majority of build logs are posted by skilled and accomplished builders (rightly so – putting your stuff out there for others to see should be inspirational rather than tragic). But those same experienced artists know what they know and often do things without even thinking about it. Which also means they don’t struggle (at least anymore) with things that a novice will struggle with. Perhaps a log posted by someone less experienced will help others who are likewise less experienced (or, at least, give everyone something to laugh about).
I’m not sure this build log will gain any traction, but I’ll give it a shot and see if anyone shows up. I should mention that I still work for a living so progress might be slow. But I’m willing to put in the time to do this thing right so I would welcome anyone with an interest to pull up a chair and see me through this build.
As you look through the pages you will uncover more tragedy than accomplishment. But I'm learning! I have enjoyed watching your BP build and the story-telling that accompanies it. You'll be done in no time!Paul, you started your build for the same reasons I did ( with the emphasis on getting a laugh). Friendly banter and a few jokes are welcome on this front.
Last edited:
As I was sorting out my plans for the hull with Maarten he directed me to his Alert build where he was using a simple technique to make faux treenails. Basically it involves using a syringe needle and heat. His version is quite sophisticated as he uses a butane powered soldering iron with the needle soldered to the head providing continuous heat...
I don't have that fancy soldering iron (it's quite small making it easy to maneuver) - nor do I have the ability to high heat solder (I assume he used silver solder and an acetylene torch but he can explain if I am wrong here). Undeterred, I made it work with what I had on hand...
First - the results (note that this was accomplished in a single afternoon - and both sides of the hull are done):
View attachment 204459
View attachment 204460
View attachment 204461
Leaning into my build philosophy of 'representing' the details of the original ship rather than 'replicating' the ship itself I chose to only include treenails for some of the frames, and at a lesser density than present in real life. As I progress with more hull details I may go back and add more of these framing pegs. I want to be careful to not overcook the hull with more than it can handle at scale.
I will continue to use the 'real' treenails at the scarf joints.
My adaptation of Maarten's marvelous technique was to file down a 20 gauge needle (I took the point off and then filed the outside circumference to make the edge quite thin). A 20 gauge needle has a 0.6 mm lumen and different needle sizes would produce different size circles. 0.6 mm is too large for my 1:65 scale but I wanted to approximate the size of the 'real' treenails at the scarf joints. Thus shaped, I simply placed the tip of the needle in the flame until it barely turned orange and quickly 'tapped' it into the wood of the hull (I used pin-striping tape to establish the line of the pegs).
View attachment 204462 View attachment 204463
It takes some practice but once you get a flow going it's remarkably efficient.
Warning: with too heavy of a touch the needle is an effective hole punch!
View attachment 204464
If you love this technique please refer to Maarten's Alert build log to see how well it works in the hands of a master! As for me, I'm delighted with my clumsy efforts - I got more done this afternoon than I would have imagined possible. Thanks @Maarten!
And thanks to you for visiting my build log!
Looks amazing !! I was reading Maarten log a few days ago and I was thinking what I could use to do the same. And there you go... here is the answer.
I haven't seen that torch before. Not that I am an expert in torchs, but doing biology lab research for more than 30 years I have seen and used many types. But I haven't seen one like that one. Where did you get it ?
Again, the results are astonishing!!!!... well done !!
Daniel
Hi Daniel, see below.Looks amazing !! I was reading Maarten log a few days ago and I was thinking what I could use to do the same. And there you go... here is the answer.
I haven't seen that torch before. Not that I am an expert in torchs, but doing biology lab research for more than 30 years I have seen and used many types. But I haven't seen one like that one. Where did you get it ?
Again, the results are astonishing!!!!... well done !!
Daniel
Post in thread 'Hms Alert by Maarten' https://shipsofscale.com/sosforums/threads/hms-alert-by-maarten.6097/post-148329
In the US amazon is selling it.
PORTASOL - Technic, Gas Soldering Iron, 60W - - Amazon.com
PORTASOL - Technic, Gas Soldering Iron, 60W - - Amazon.com
www.amazon.com
Maybe better to purchase in Europe, here a factor 3 cheaper.
PORTASOL Gassoldeerbout techniek met soldeerpunten 2,4 mm 10-60 Watt : Amazon.nl: Klussen & gereedschap
PORTASOL Gassoldeerbout techniek met soldeerpunten 2,4 mm 10-60 Watt : Amazon.nl: Klussen & gereedschap
www.amazon.nl
Daniel,Hi Daniel, see below.
Post in thread 'Hms Alert by Maarten' https://shipsofscale.com/sosforums/threads/hms-alert-by-maarten.6097/post-148329
In the US amazon is selling it.
PORTASOL - Technic, Gas Soldering Iron, 60W - - Amazon.com
PORTASOL - Technic, Gas Soldering Iron, 60W - - Amazon.comwww.amazon.com
Maybe better to purchase in Europe, here a factor 3 cheaper.
PORTASOL Gassoldeerbout techniek met soldeerpunten 2,4 mm 10-60 Watt : Amazon.nl: Klussen & gereedschap
PORTASOL Gassoldeerbout techniek met soldeerpunten 2,4 mm 10-60 Watt : Amazon.nl: Klussen & gereedschapwww.amazon.nl
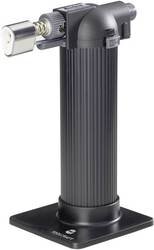
Here is the one I was looking at before "let's buy more stuff" was overtaken by "let's get this done".
Portasol MK-1 Technic
This may be a slightly smaller unit but it is well-reviewed and popular - and a bit less expensive. We're not soldering in an Alaskan oil field after all. Please note that Maarten used silver solder which I believe requires an oxy-acetylene torch. You can't use 'regular' solder because it will flow when you turn the soldering iron on and the needle bit will fall right off (starting your workshop on fire, burning down your house, causing your wife to leave you because this hobby thing has just gone too far...).
Whew, I'm just not sure it's worth it. Then again...
Oh, and here's an assortment of needles (various sizes) on the cheap...
Dispensing Needle Set
You're welcome.
Last edited:
Very good result on the planking finish - Looking much much better than the original 
Thanks, Uwe. I appreciate your encouragement. It was a hard-fought battle but I survived to fight another day...Very good result on the planking finish - Looking much much better than the original
You can use a standard propane burner for silver soldering. I actually use a creme brulee burner for it.Daniel,
Here is the one I was looking at before "let's buy more stuff" was overtaken by "let's get this done".
Portasol MK-1 Technic
This may be a slightly smaller unit but it is well-reviewed and popular - and a bit less expensive. We're not soldering in an Alaskan oil field after all. Please note that Maarten used silver solder which I believe requires an oxy-acetylene torch. You can't use 'regular' solder because it will flow when you turn the soldering iron on and the needle bit will fall right off (starting your workshop on fire, burning down your house, causing your wife to leave you because this hobby thing has just gone too far...).
Whew, I'm just not sure it's worth it. Then again....
Oh, and here's an assortment of needles (various sizes) on the cheap...
Dispensing Needle Set
You're welcome.
Thank you Maarten and Paul for all the detailed info.
PAUL... can't stop laughing with your description of the soldering event that finished in burning the house.... . My wife is already afraid I will leave something ON and burn the house. So the electricity that feeds the workshop in the basement is ON when I switch the basement light. And then at the workshop door I have another switch that NOW gives electricity to that room. 2 levels of security
  ..... in other words the electricity of the FULL workshop is manage at the workshop door. And the light switch at the basement entrance manage the workshop electrical switch at the workshop door..... too complicated
  but keeps Almirant happy
Paul: where I can find some info of the bunsen lab torch you have in your picture ?
Cheers
Daniel
PAUL... can't stop laughing with your description of the soldering event that finished in burning the house....
Paul: where I can find some info of the bunsen lab torch you have in your picture ?
Cheers
Daniel
You can use a standard propane burner for silver soldering. I actually use a creme brulee burner for it.
View attachment 205377
Fantastic !!! I will educate myself on how to do silver soldering. I have a very nice equipment to do electronics soldering. I have a big CARRERA slot car track at home and I used to do all the electronic soldering of the cars control boards. But NEVER did silver soldering.
Thank you!!!
Daniel
Oh no! Please don't buy what I showed. It is a specialty dental tool that will cost you $200. Just buy a cheapo alcohol lamp and be sure to use denatured alcohol.Thank you Maarten and Paul for all the detailed info.
PAUL... can't stop laughing with your description of the soldering event that finished in burning the house..... My wife is already afraid I will leave something ON and burn the house. So the electricity that feeds the workshop in the basement is ON when I switch the basement light. And then at the workshop door I have another switch that NOW gives electricity to that room. 2 levels of security
..... in other words the electricity of the FULL workshop is manage at the workshop door. And the light switch at the basement entrance manage the workshop electrical switch at the workshop door..... too complicated
but keeps Almirant happy
Paul: where I can find some info of the bunsen lab torch you have in your picture ?
Cheers
Daniel
For example: Alcohol Lamp
Hello Friends,
After a few days of recovering from my hull recovery efforts, work commenced again in earnest. For a change of pace I started on the deck planking.
For those of you accustomed to seeing precision via a 2-butt, 3-butt, or 4-butt shift what follows will appear disjointed; but when the Vasa was built the deck planks were laid without regard to a pattern - so I did the same.
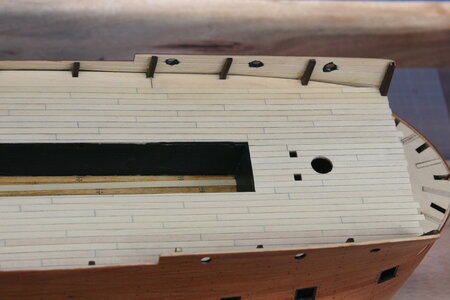
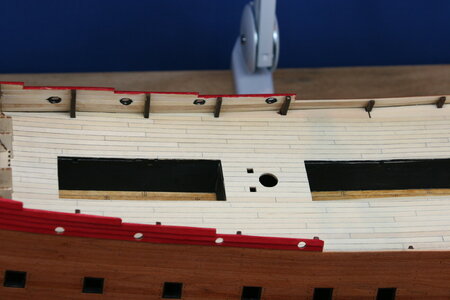
Veteran readers of this build log might remember that I laid the planks in those deck "cutouts" using a 5-butt shift. I will be covering that earlier work using a random pattern; in part because I have grown to like the random planking - and in part because I seem to have gotten somewhat more skilled as this build has progressed. I think I can improve on the decking completed earlier.
And then, without warning, this guy showed up:
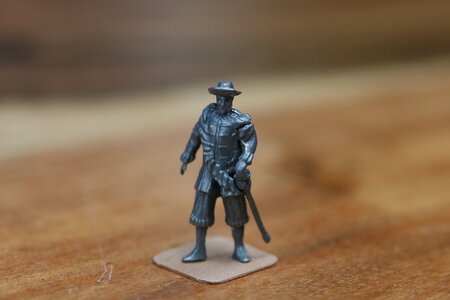
He introduced himself as Henrik Hybertsson, master ship builder and manager of the Stockholm ship yard in 1628. He had heard of an unauthorized Wasa under construction in the USA and came to investigate. Having completed a careful review of this build log he was not happy.
After I pointed out that his version (Henrik was the builder of the original ship - at least until he died midway through construction) tipped over and sank 20 minutes into it's shakedown cruise I was summarily demoted to shipwright's apprentice. He went on to explain that I would have been removed entirely were it not for the good judgement I had shown in accessing the collective wisdom of the SoS forum. He asked me to share this message with one of the members: @Maarten, bedankt voor het helpen van Paul.
He immediately set about inspecting my work. He found the materials provided in the kit to be substandard...
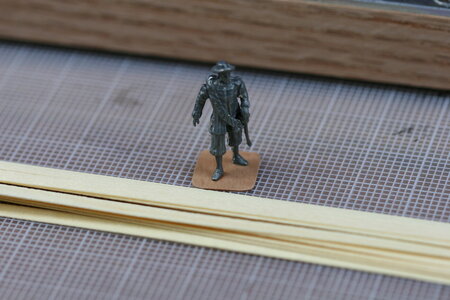
When I explained that I have been waiting for more than 8 weeks for a delivery of wood from Russia he immediately dispatched his brother (Arendt) to investigate. The two men emigrated from Rijswijk in South Holland twenty years earlier (early 1600's) and together had contracted with Gustav II, King of Sweden, to build ships for the war effort against Poland. Arendt (in Dutch sources their name appears as: Huybertszon) was in charge of securing raw materials - Henrik built the ships.
Henrik continued his investigation and insisted that I not be so wasteful with materials:
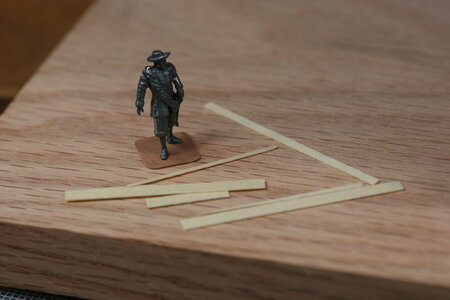
Sigh, probably a Dutch thing...
Setting aside this silliness...I am using this guy to help me with fidelity to scale. Adjusted for 1:65 Master Henrik stands 5' 10" (180 cm give or take).
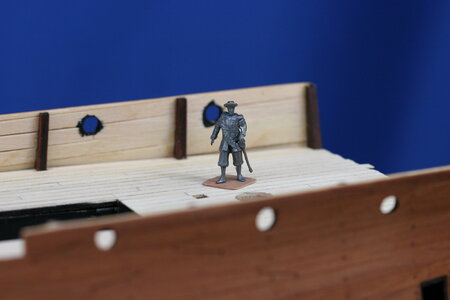
For now, planking of the weather deck continues - but Master Henrik will be back after he recovers from the shock of being transported 400 years into the future.
After a few days of recovering from my hull recovery efforts, work commenced again in earnest. For a change of pace I started on the deck planking.
For those of you accustomed to seeing precision via a 2-butt, 3-butt, or 4-butt shift what follows will appear disjointed; but when the Vasa was built the deck planks were laid without regard to a pattern - so I did the same.


Veteran readers of this build log might remember that I laid the planks in those deck "cutouts" using a 5-butt shift. I will be covering that earlier work using a random pattern; in part because I have grown to like the random planking - and in part because I seem to have gotten somewhat more skilled as this build has progressed. I think I can improve on the decking completed earlier.
And then, without warning, this guy showed up:

He introduced himself as Henrik Hybertsson, master ship builder and manager of the Stockholm ship yard in 1628. He had heard of an unauthorized Wasa under construction in the USA and came to investigate. Having completed a careful review of this build log he was not happy.
After I pointed out that his version (Henrik was the builder of the original ship - at least until he died midway through construction) tipped over and sank 20 minutes into it's shakedown cruise I was summarily demoted to shipwright's apprentice. He went on to explain that I would have been removed entirely were it not for the good judgement I had shown in accessing the collective wisdom of the SoS forum. He asked me to share this message with one of the members: @Maarten, bedankt voor het helpen van Paul.
He immediately set about inspecting my work. He found the materials provided in the kit to be substandard...

When I explained that I have been waiting for more than 8 weeks for a delivery of wood from Russia he immediately dispatched his brother (Arendt) to investigate. The two men emigrated from Rijswijk in South Holland twenty years earlier (early 1600's) and together had contracted with Gustav II, King of Sweden, to build ships for the war effort against Poland. Arendt (in Dutch sources their name appears as: Huybertszon) was in charge of securing raw materials - Henrik built the ships.
Henrik continued his investigation and insisted that I not be so wasteful with materials:

Sigh, probably a Dutch thing...
Setting aside this silliness...I am using this guy to help me with fidelity to scale. Adjusted for 1:65 Master Henrik stands 5' 10" (180 cm give or take).

For now, planking of the weather deck continues - but Master Henrik will be back after he recovers from the shock of being transported 400 years into the future.
I’ve locked the doors, turned off the lights and am looking at my security cameras. I’ve got enough problems without Dutch Master Builders showing up, I’d be demoted to bilge monkey. 
Jan
Jan
If I were you, I wouldn’t pay any attention to someone whose ship rolled over and sank like that.
Looking great Paul! I'm not sure I would change the lower deck boards, It will most likely be overlooked by the completion of the build. You would be hard pressed to see in there, without leaning over the ship. I'm sure between the masts, yards and sails being in the way, the case you will ultimately build will prevent that. So if you do change it, it will be for your benefit, because only you will know.Hello Friends,
After a few days of recovering from my hull recovery efforts, work commenced again in earnest. For a change of pace I started on the deck planking.
For those of you accustomed to seeing precision via a 2-butt, 3-butt, or 4-butt shift what follows will appear disjointed; but when the Vasa was built the deck planks were laid without regard to a pattern - so I did the same.
View attachment 206065
View attachment 206066
Veteran readers of this build log might remember that I laid the planks in those deck "cutouts" using a 5-butt shift. I will be covering that earlier work using a random pattern; in part because I have grown to like the random planking - and in part because I seem to have gotten somewhat more skilled as this build has progressed. I think I can improve on the decking completed earlier.
And then, without warning, this guy showed up:
View attachment 206067
He introduced himself as Henrik Hybertsson, master ship builder and manager of the Stockholm ship yard in 1628. He had heard of an unauthorized Wasa under construction in the USA and came to investigate. Having completed a careful review of this build log he was not happy.
After I pointed out that his version (Henrik was the builder of the original ship - at least until he died midway through construction) tipped over and sank 20 minutes into it's shakedown cruise I was summarily demoted to shipwright's apprentice. He went on to explain that I would have been removed entirely were it not for the good judgement I had shown in accessing the collective wisdom of the SoS forum. He asked me to share this message with one of the members: @Maarten, bedankt voor het helpen van Paul.
He immediately set about inspecting my work. He found the materials provided in the kit to be substandard...
View attachment 206070
When I explained that I have been waiting for more than 8 weeks for a delivery of wood from Russia he immediately dispatched his brother (Arendt) to investigate. The two men emigrated from Rijswijk in South Holland twenty years earlier (early 1600's) and together had contracted with Gustav II, King of Sweden, to build ships for the war effort against Poland. Arendt (in Dutch sources their name appears as: Huybertszon) was in charge of securing raw materials - Henrik built the ships.
Henrik continued his investigation and insisted that I not be so wasteful with materials:
View attachment 206069
Sigh, probably a Dutch thing...
Setting aside this silliness...I am using this guy to help me with fidelity to scale. Adjusted for 1:65 Master Henrik stands 5' 10" (180 cm give or take).
View attachment 206071
For now, planking of the weather deck continues - but Master Henrik will be back after he recovers from the shock of being transported 400 years into the future.
As for the master ship builder...throw him overboard, he is impeding progress!!!


