I'm finding the small details take the longest time and show little for the work put in but you would not feel good about your build unless you do it. Nice work
You are using an out of date browser. It may not display this or other websites correctly.
You should upgrade or use an alternative browser.
You should upgrade or use an alternative browser.
Vasa - 1:65 DeAgostini [COMPLETED BUILD]
- Thread starter dockattner
- Start date
- Watchers 145
- Joined
- Mar 1, 2021
- Messages
- 315
- Points
- 168

Paul, nothing that you share is an unimpressive update....I can envision how beautiful your ship will be when once completed! I enjoy every one of your updates! In regard to life challenges, we are going through crazy times and we can only pray that there is light at the end of the tunnel for all of us, wishing you well!First, I want to thank everyone for your very kind comments. All the likes and words of encouragement mean a lot and help keep me motivated.
Life challenges have prevented me from spending much time on my build recently - so this is a brief and rather uninspiring progress report.
The kit supplied parts for the trestle trees did not match what was on the original ship - but they were close enough that I could reshape and modify them to make them usable. I stained these the darker brown color you have seen on other portions of my build (frame tips - railing on the tops) and I will be continuing to use this color on a limited basis to provide some contrast to the pear hull and lighter decking. I am allowing the staining to be "imperfect" in the hopes that it will look more realistic. Not sure I'm succeeding but that's my goal.
View attachment 229628
View attachment 229629
View attachment 229630
A quick note to anyone using this log to assist them on their own DeAg (or AL) Wasa build: the trestle trees for Top 5 are cut wrong so you will need to correct the bevel on one of the crosspiece pairs.
Next, I cut into the hull (an unnerving exercise if there ever was one) to provide for the clever "mail delivery" ports - one on the portside and one on the starboard side. I will add hinges to my little door when I build the gun port doors...
View attachment 229633
Next, I discovered the following drain thing while studying pictures of the museum ship - it's not a scupper - the best I can guess is that this is the ejection point for one of the pumps (?):
View attachment 229631
And I also cut in a space-saver for the anchor lift assist (the catheads are at the bow). This anchor lift assist is not represented in the DeAg kit for some reason but I have seen it on most every other build. The ship had this opening on both sides but there was only one "bar" that would need to be moved from side to side. I'll need to adjust the size of this opening once I figure out the size of the lift assist (the gun port rounds are also undersized at this point).
View attachment 229632
See, I told you this would be an unimpressive update - but much of what we do on these kits falls into this category doesn't it?
I am truly enjoying this forum and peaking over your shoulders as you make progress on your individual projects. There have been some really impressive completions lately - you are a talented bunch!
Rick
I agree with Rick. Haven't seen anything uninspiring from you yet. Please keep the little details coming.Paul, nothing that you share is an unimpressive update....I can envision how beautiful your ship will be when once completed! I enjoy every one of your updates! In regard to life challenges, we are going through crazy times and we can only pray that there is light at the end of the tunnel for all of us, wishing you well!
Rick
Daniel
Very impressive, Paul! John MacKay mentioned that the pumps on Wasa were placed well aft near the mizzen, so your placement of the lower pumps discharge port makes sense. Great attention to detail. Love your tops! Best I've ever seen!
I am amazed every time I see the amount of detail in your hull, maybe one day I'll be able to do the same.First, I want to thank everyone for your very kind comments. All the likes and words of encouragement mean a lot and help keep me motivated.
Life challenges have prevented me from spending much time on my build recently - so this is a brief and rather uninspiring progress report.
The kit supplied parts for the trestle trees did not match what was on the original ship - but they were close enough that I could reshape and modify them to make them usable. I stained these the darker brown color you have seen on other portions of my build (frame tips - railing on the tops) and I will be continuing to use this color on a limited basis to provide some contrast to the pear hull and lighter decking. I am allowing the staining to be "imperfect" in the hopes that it will look more realistic. Not sure I'm succeeding but that's my goal.
View attachment 229628
View attachment 229629
View attachment 229630
A quick note to anyone using this log to assist them on their own DeAg (or AL) Wasa build: the trestle trees for Top 5 are cut wrong so you will need to correct the bevel on one of the crosspiece pairs.
Next, I cut into the hull (an unnerving exercise if there ever was one) to provide for the clever "mail delivery" ports - one on the portside and one on the starboard side. I will add hinges to my little door when I build the gun port doors...
View attachment 229633
Next, I discovered the following drain thing while studying pictures of the museum ship - it's not a scupper - the best I can guess is that this is the ejection point for one of the pumps (?):
View attachment 229631
And I also cut in a space-saver for the anchor lift assist (the catheads are at the bow). This anchor lift assist is not represented in the DeAg kit for some reason but I have seen it on most every other build. The ship had this opening on both sides but there was only one "bar" that would need to be moved from side to side. I'll need to adjust the size of this opening once I figure out the size of the lift assist (the gun port rounds are also undersized at this point).
View attachment 229632
See, I told you this would be an unimpressive update - but much of what we do on these kits falls into this category doesn't it?
I am truly enjoying this forum and peaking over your shoulders as you make progress on your individual projects. There have been some really impressive completions lately - you are a talented bunch!
Hi Paul I am still in love with this treenaildorado on your hull. All these details really make the difference.
I agree, it has grown on me...lol. I look at it now and I think...wow...Paul hit it out of the park on this hull.Hi Paul I am still in love with this treenaildorado on your hull. All these details really make the difference.
very nice I love your planking
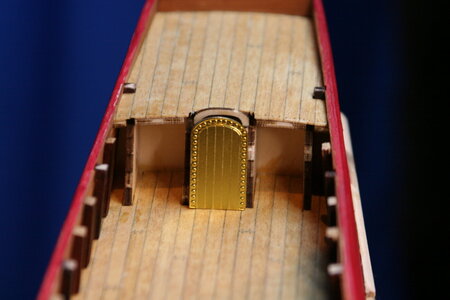
Just a quick update from the Kattner Shipyard. I was going to build out the bulkheads above the decks but realized it would be better to make the entryways and doors first and then trim out the bulkheads. Like everything else on this build it took me a while to figure out how to do (make) what I wanted to do (make). Tasks that are simple, obvious, and mundane for experienced modelers are an adventure into uncharted waters for me.
The kit comes with a photoetched and stamped door to use. I have seen these used to great effect by other builders - and the trim around the door frame looks nice when painted red and yellow - but the bulkhead veneer will already be painted red and I thought it would look nice to have wood doors rather than red painted doors. This meant I would be departing from the suspected (known?) color scheme but honestly - there's enough coloration on this ship that not painting the doors strikes me as an acceptable departure.
Here is the door from the kit:
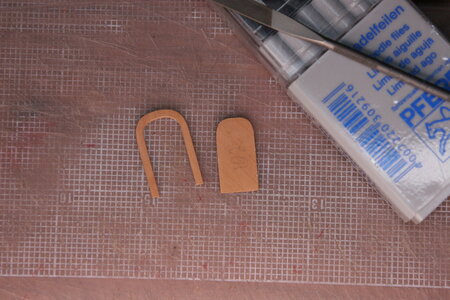
I cut out a door frame and door with a jewelers saw and lots of file work / sanding:
Veneered the door:
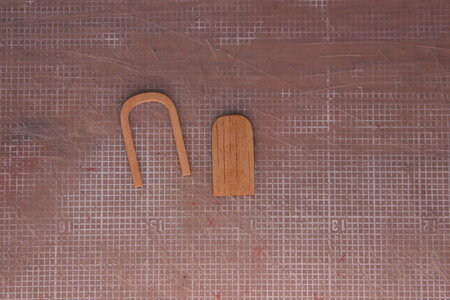
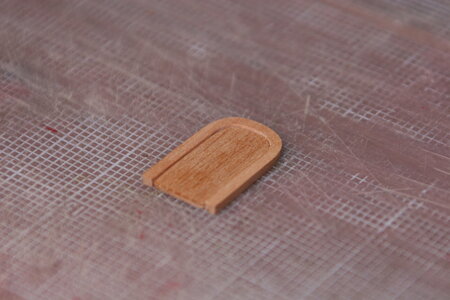
Then, added some details:
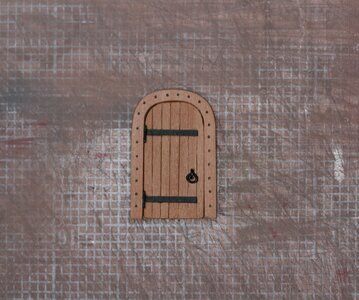
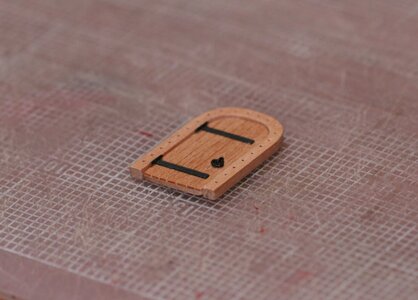
Finally, I built out the entryway (it still needs some sanding and refining). There will be clinker style planks (painted red) flanking the door:
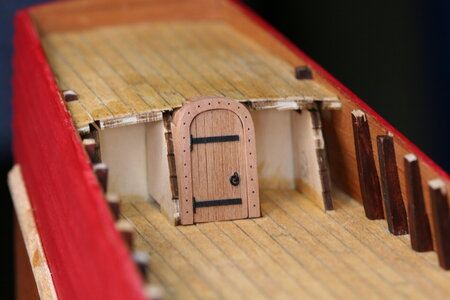
But first, six more to go...
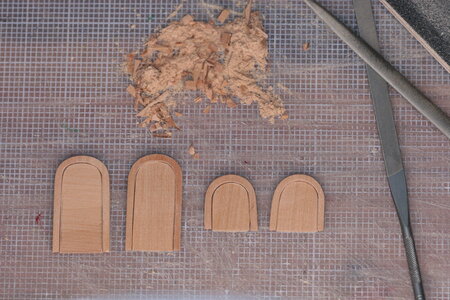
Thanks for stopping by!
The kit comes with a photoetched and stamped door to use. I have seen these used to great effect by other builders - and the trim around the door frame looks nice when painted red and yellow - but the bulkhead veneer will already be painted red and I thought it would look nice to have wood doors rather than red painted doors. This meant I would be departing from the suspected (known?) color scheme but honestly - there's enough coloration on this ship that not painting the doors strikes me as an acceptable departure.
Here is the door from the kit:

I cut out a door frame and door with a jewelers saw and lots of file work / sanding:

Veneered the door:


Then, added some details:


Finally, I built out the entryway (it still needs some sanding and refining). There will be clinker style planks (painted red) flanking the door:

But first, six more to go...

Thanks for stopping by!
Last edited:
I think that will be a great addition.
Jan
Jan
The doors look fabulous, Paul, and the hinges are in scale and nice fit indeed.  What material did you use to make those?
 What material did you use to make those?
Ha! The hinges and the handle hardware are orthodontic wireThe doors look fabulous, Paul, and the hinges are in scale and nice fit indeed.What material did you use to make those?
- Joined
- Mar 1, 2021
- Messages
- 315
- Points
- 168

Paul your work is incredible. Did you say you’re an orthodontist? If so, your customers must be really happy folks! Anyone that does this type of work is a perfectionist at heart! You must create beautiful smiles!Just a quick update from the Kattner Shipyard. I was going to build out the bulkheads above the decks but realized it would be better to make the entryways and doors first and then trim out the bulkheads. Like everything else on this build it took me a while to figure out how to do (make) what I wanted to do (make). Tasks that are simple, obvious, and mundane for experienced modelers are an adventure into uncharted waters for me.
The kit comes with a photoetched and stamped door to use. I have seen these used to great effect by other builders - and the trim around the door frame looks nice when painted red and yellow - but the bulkhead veneer will already be painted red and I thought it would look nice to have wood doors rather than red painted doors. This meant I would be departing from the suspected (known?) color scheme but honestly - there's enough coloration on this ship that not painting the doors strikes me as an acceptable departure.
Here is the door from the kit:
View attachment 230726
I cut out a door frame and door with a jewelers saw and lots of file work / sanding:
View attachment 230723
And veneered the door:
View attachment 230724 View attachment 230725
Then, added some details:
View attachment 230727
View attachment 230728
Finally, I build out the entryway (it still needs some sanding and refining). There will be clinker style planks (painted red) flanking the door:
View attachment 230729
But first, six more to go...
View attachment 230731
Thanks for stopping by!
...be careful, then those doors will be opened by themselvesHa! The hinges and the handle hardware are orthodontic wire
I want to thank everyone who has 'liked' and 'loved' and shared feedback from the last two posts (I rudely neglected to do that last week). I honestly have no idea what I'm doing (I abandoned the instruction manual a long time ago and am just working intuitively at this point choosing to work on whatever appears to be on the critical path) so your encouragement means quite a lot to me. I'm not really into social media and I am surprised how much I enjoy this forum (kudos to the administrators). I have learned so much from others and have received helpful tips (and stolen good ideas) from many of you. I have had a sad week and this hobby has been a source of helpful distraction giving my hands and brain something to do. Thanks for sharing this journey with me.
I've got some hard things to work through today and then it's back to my tiny door factory. Be blessed friends.
I've got some hard things to work through today and then it's back to my tiny door factory. Be blessed friends.
Keep the faith, Paul. As far as abandoning the kit instructions, there comes a point where you can make a better model by scratch building and planning the steps yourself. You are beyond that point, having delved into research material like the Wasa Museum photos as your main guide to making the model as realistic as possible. That's really where you want to be if you want to make the best model you can. Everyone here has noted the swift increase in your skills and build detail. My first ship La Couronne was a very steep learning curve as well, but when you truly love to make something, learning comes quickly without you even realizing it. You are basically a scratch builder now, despite that fact that many of your parts come from a kit, because of all the additions and hand fashioned parts you make. That last door you designed is a perfect example.I want to thank everyone who has 'liked' and 'loved' and shared feedback from the last two posts (I rudely neglected to do that last week). I honestly have no idea what I'm doing (I abandoned the instruction manual a long time ago and am just working intuitively at this point choosing to work on whatever appears to be on the critical path) so your encouragement means quite a lot to me. I'm not really into social media and I am surprised how much I enjoy this forum (kudos to the administrators). I have learned so much from others and have received helpful tips (and stolen good ideas) from many of you. I have had a sad week and this hobby has been a source of helpful distraction giving my hands and brain something to do. Thanks for sharing this journey with me.
I've got some hard things to work through today and then it's back to my tiny door factory. Be blessed friends.
Whenever I see a new post from you I'm amazed by what I see. I've always considered De Agostini an excellent kit producer then you keep adding so much more to the ship. Did you think you would be able to make such a high quality model at the start of your build?Just a quick update from the Kattner Shipyard. I was going to build out the bulkheads above the decks but realized it would be better to make the entryways and doors first and then trim out the bulkheads. Like everything else on this build it took me a while to figure out how to do (make) what I wanted to do (make). Tasks that are simple, obvious, and mundane for experienced modelers are an adventure into uncharted waters for me.
The kit comes with a photoetched and stamped door to use. I have seen these used to great effect by other builders - and the trim around the door frame looks nice when painted red and yellow - but the bulkhead veneer will already be painted red and I thought it would look nice to have wood doors rather than red painted doors. This meant I would be departing from the suspected (known?) color scheme but honestly - there's enough coloration on this ship that not painting the doors strikes me as an acceptable departure.
Here is the door from the kit:
View attachment 230726
I cut out a door frame and door with a jewelers saw and lots of file work / sanding:
View attachment 230723
Veneered the door:
View attachment 230724 View attachment 230725
Then, added some details:
View attachment 230727
View attachment 230728
Finally, I built out the entryway (it still needs some sanding and refining). There will be clinker style planks (painted red) flanking the door:
View attachment 230729
But first, six more to go...
View attachment 230731
Thanks for stopping by!
Hi Kurt, thank you for your kind review of my work. I really do enjoy making these little bits - but they sure take a lot of time. A lot of builders are purchasing future kits looking forward to wrapping up what they are working on in order to get on to the next thing. I get that impulse - but, for now, I need to invest myself in what is in front of me since this build is going to take a really long time.Keep the faith, Paul. As far as abandoning the kit instructions, there comes a point where you can make a better model by scratch building and planning the steps yourself. You are beyond that point, having delved into research material like the Wasa Museum photos as your main guide to making the model as realistic as possible. That's really where you want to be if you want to make the best model you can. Everyone here has noted the swift increase in your skills and build detail. My first ship La Couronne was a very steep learning curve as well, but when you truly love to make something, learning comes quickly without you even realizing it. You are basically a scratch builder now, despite that fact that many of your parts come from a kit, because of all the additions and hand fashioned parts you make. That last door you designed is a perfect example.
Last edited:
Wow, Tony, I'm humbled by your post. There are some excellent builds on this forum (yours included) and the fact that someone might count mine among them is almost embarrassing. Thank you for encouraging me!Whenever I see a new post from you I'm amazed by what I see. I've always considered De Agostini an excellent kit producer then you keep adding so much more to the ship. Did you think you would be able to make such a high quality model at the start of your build?
I might add a comment about DeAg here that could be helpful to future builders. The DeAg Vasa kit is designed to be buildable for a new (newer) builder. The hull shape is precise relative to the mother ship and the castings are excellent (though not perfect). What will leave some builders wanting is the quality of the wood - the strips are a very soft white wood (I don't think I got bamboo but it's bamboo-like) and every laser-cut sheet is plywood. Ply might be stable but on edge it is ugly. As I have mentioned before - the kit instructions call for this model to be painted - something I did not notice when choosing the DeAg version of the Vasa. Of course, painting hides the ply edges...
Which brings me to your question: did I think I would produce a high quality model? I guess the answer is no - I intended to build a nice clean version of the kit. But somewhere along the way I realized that the kit was going in a direction I could not go. Shaping a piece of wood in my hands is a joy - and to end up painting that wood was a no-fly zone for me. Inspired by others on this forum I chose to stop building the kit and just build the best Vasa I could. Purists will object to some errors that I have made along the way (bulwarks are wrong) or some artistic choices I have made that depart from the research findings (these new doors should be red with red/yellow decorative molding) but I can take the criticism if it is proffered - I'm a big boy and my identity is not found in my new hobby.
Whew! Got really deep there for a moment! Thanks, again, for your kind message. I am truly enjoying following your excellent build!
- Joined
- Mar 1, 2021
- Messages
- 315
- Points
- 168

Screw the purists, Paul! Ha! Newbies have a lot to offer too! I’m with Tony‘s opinion of your effort and your build will end up being one of the finest ships ever built!Wow, Tony, I'm humbled by your post. There are some excellent builds on this forum (yours included) and the fact that someone might count mine among them is almost embarrassing. Thank you for encouraging me!
I might add a comment about DeAg here that could be helpful to future builders. The DeAg Vasa kit is designed to be buildable for a new (newer) builder. The hull shape is precise relative to the mother ship and the castings are excellent (though not perfect). What will leave some builders wanting is the quality of the wood - the strips are a very soft white wood (I don't think I got bamboo but it's bamboo-like) and every laser-cut sheet is plywood. Ply might be stable but on edge it is ugly. As I have mentioned before - the kit instructions call for this model to be painted - something I did not notice when choosing the DeAg version of the Vasa. Of course, painting hides the ply edges...
Which brings me to your question: did I think I would produce a high quality model? I guess the answer is no - I intended to build a nice clean version of the kit. But somewhere along the way I realized that the kit was going in a direction I could not go. Shaping a piece of wood in my hands is a joy - and to end up painting that wood was a no-fly zone for me. Inspired by others on this forum I chose to stop building the kit and just build the best Vasa I could. Purists will object to some errors that I have made along the way (bulwarks are wrong) or some artistic choices I have made that depart from the research findings (these new doors should be red with red/yellow decorative molding) but I can take the criticism if it is proffered - I'm a big boy and my identity is not found in my new hobby.
Whew! Got really deep there for a moment! Thanks, again, for your kind message. I am truly enjoying following your excellent build!


