
I appreciated your input very much. And for the record, I have been full-on PPE in my office for months and months - hazmat suits and I are dear, dear friends!Hi Paul,
It sounds like there’s some options for you, which is really good. Hopefully the new glue will not be an irritant and you can continue with your block rigging.
I hope I wasn’t presumptuous with my input.
Look on the bright side - you don’t have to wear a hazmat suit")

You are using an out of date browser. It may not display this or other websites correctly.
You should upgrade or use an alternative browser.
You should upgrade or use an alternative browser.
Vasa - 1:65 DeAgostini [COMPLETED BUILD]
- Thread starter dockattner
- Start date
- Watchers 145

I work in a nuclear power plant... PPE is a lifestyle. Most of the time I'm in the office cube, but when the reactor shuts down for refueling and repairs, you get busy in the machine spaces.I appreciated your input very much. And for the record, I have been full-on PPE in my office for months and months - hazmat suits and I are dear, dear friends!
That's me on the left.


Paul,
I sometimes use CA and although the smell is annoying it doesn’t affect me like it does you. However, for most of my close rope work, the best glue I have found is GS Hypo, used for jewellery and beading. It is virtually clear, dries matt and is in a great applicator with a needle tip for really small amounts to be applied.
A picture of it is below:

Hope this helps and you feel better.
PeterG
I sometimes use CA and although the smell is annoying it doesn’t affect me like it does you. However, for most of my close rope work, the best glue I have found is GS Hypo, used for jewellery and beading. It is virtually clear, dries matt and is in a great applicator with a needle tip for really small amounts to be applied.
A picture of it is below:
Hope this helps and you feel better.
PeterG
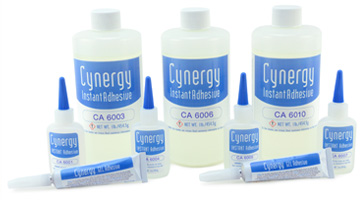
Paul, this might help:
 www.resinlab.com
Also, sometimes you can work with the wood glue.... but it has to be step, stop, step stop..... this works okay for things like cannons where you can do a production line.
Cyanoacrylate Adhesives - ResinLab
Cynergy® cyanoacrylates from ResinLab are available in basic methyl and ethyl grades in a variety of viscosities, ranging from water thin wicking grades to non-sag gels. Cynergy® also offers a full range of specialty cyanoacrylates and accessory products. Learn more.
www.resinlab.com
Also, sometimes you can work with the wood glue.... but it has to be step, stop, step stop..... this works okay for things like cannons where you can do a production line.
I made hooks for these guns on a 1/64 scale.Hey everyone. I don't have much to post but I'm feeling really discouraged this morning so I thought it might make me feel better if I provided a small progress report.
I've been thinking through the build process and realize I need to get things on the deck before it's too hard to work on the deck. To that end I thought it would be fun to start some gun rigging. I made up a breach line (still need more practice making ropes) and tried my hand at seizing for the first time.
In order to 'fix' the seizing I used cyanoacrylate. Previously I posted about my newly discovered allergy to CA. But rigging takes far too long to wear a respirator the whole time - never mind that I wear glasses and need magnification to see what I'm doing. By the time I get all my gear on it is really miserable...
So I put a fan in front of my face and kept the CA closed unless I was putting a bit on the tip of a toothpick for application. My total exposure to the liquid CA couldn't have been more than a few minutes (of course the vapors linger but I hoped the fan would solve that problem). Complete train wreck - was up most of the night unable to breathe.
The thought of rigging without all the benefits of CA (line stiffening, fast drying) has left me feeling quite depressed.
Here is a sample of my (continental style) breach line work:
View attachment 251597
View attachment 251598
Since I couldn't sleep I researched how to do outhaul tackle. Seems that I need a single block and a double block (and really tiny ones at that) and some tiny eyebolts. I noticed that on most smaller scale models (1:72 - 1:90) the lines are connected directly to the eyebolts and on larger scale models (1:48 or so) modelers start using hooks which then attach to the eyebolts. I managed to get a hook on a double block but I'm not sure it was worth the effort. There's a lot going on in a really small space and I'm not convinced the hooks are a good choice.
Proof of concept:
View attachment 251599
Anyway, I'm open to your suggestions for how to rig a big ship without CA as well as your thoughts about the advisability of using hooks on the gun rigging at 1:65...
Hope you all feel better than I do this morning!
Even discouraged Paul, you do some amazing work!

Paul,
you can say what you want, but it seems as if you have been building ships all your life. Wonderful smooth woodworking.
you can say what you want, but it seems as if you have been building ships all your life. Wonderful smooth woodworking.
Paul,
I know you are in the US and as an orthodontist you will know a lot about CA, but a useful guide I found (albeit in Australia) can be found at:
https://www.swiftsupplies.com.au/bu...glue-a-guide-to-choosing-the-best-super-glue/
Again, hope this helps.
PeterG
I know you are in the US and as an orthodontist you will know a lot about CA, but a useful guide I found (albeit in Australia) can be found at:
https://www.swiftsupplies.com.au/bu...glue-a-guide-to-choosing-the-best-super-glue/
Again, hope this helps.
PeterG

I cannot imagine what that must be like during these awful covid times. I have the utmost respect for you, and everyone in health care, as you risk yourself for the health of others. Stay safe my friend.I appreciated your input very much. And for the record, I have been full-on PPE in my office for months and months - hazmat suits and I are dear, dear friends!
Paul may be an orthodontist, but he’s about to become a surgeon when he does rigging!
Tying knots with tweezers…you will tie over 1,000 clove hitches on the rat lines alone! It’s a surgical prerequisite to rig a ship model!
Tying knots with tweezers…you will tie over 1,000 clove hitches on the rat lines alone! It’s a surgical prerequisite to rig a ship model!
Thanks to everyone who has shared words of encouragement and/or resources and suggestions. I have learned a lot - not the least of which is not all CA's are the same. I now have a low fume CA in hand but when I react to the evil elixir it lasts for days and days so I'm going to wait until my symptoms subside before giving it a go.
In the mean time I worked on things that require less noxious adhesives...
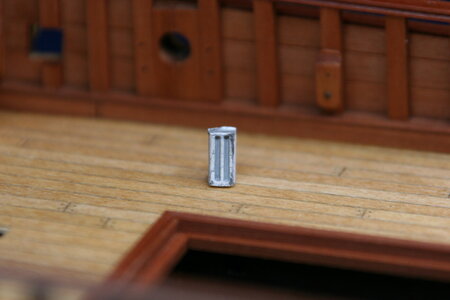
There are six little posts that provide sheaves/belay points for running rigging on the Vasa deck. Here's a wonderful image from the mother ship showing what I am referring to:

The kit provides these as castings but the casting is solid (that is, there is no place to insert a pulley). In the kit instructions they show ropes being tied around the necks of the figures. I considered drilling through the slots but I would still be left with a metal base that I would need to paint to look like wood. Possible. But less that ideal.
So, instead I decided to remove the neck and heads from the castings and add them to newly made wooden bases. I did not take progress photos - sorry about that - my brain is still addled.
Previously in this build I used solid stock and drills and files to create slots. I thought I would try something different this time just to see if it would work. Starting with 1mm strips I built up the base in layers. Here is what I ended up with:

The laminations are visible so I'm not sure I will use this technique again. You might be amused to learn that the guy on the right was decapitated during the process of being separated from the base and the head portion went flying leaving me with only the neck and shoulders. A full 30 minutes later (crawling around on my garage floor) he was found a mere two feet from where he started.
The heads and shoulders are to be painted and I need to fabricate and install pulleys but that will have to wait for another day.
In the mean time I worked on things that require less noxious adhesives...
There are six little posts that provide sheaves/belay points for running rigging on the Vasa deck. Here's a wonderful image from the mother ship showing what I am referring to:
The kit provides these as castings but the casting is solid (that is, there is no place to insert a pulley). In the kit instructions they show ropes being tied around the necks of the figures. I considered drilling through the slots but I would still be left with a metal base that I would need to paint to look like wood. Possible. But less that ideal.
So, instead I decided to remove the neck and heads from the castings and add them to newly made wooden bases. I did not take progress photos - sorry about that - my brain is still addled.
Previously in this build I used solid stock and drills and files to create slots. I thought I would try something different this time just to see if it would work. Starting with 1mm strips I built up the base in layers. Here is what I ended up with:
The laminations are visible so I'm not sure I will use this technique again. You might be amused to learn that the guy on the right was decapitated during the process of being separated from the base and the head portion went flying leaving me with only the neck and shoulders. A full 30 minutes later (crawling around on my garage floor) he was found a mere two feet from where he started.
The heads and shoulders are to be painted and I need to fabricate and install pulleys but that will have to wait for another day.
Attachments
Great idea Paul! Much better than a casting! I don’t think the laminations will be an issue, especially if the wood tones are the same.Thanks to everyone who has shared words of encouragement and/or resources and suggestions. I have learned a lot - not the least of which is not all CA's are the same. I now have a low fume CA in hand but when I react to the evil elixir it lasts for days and days so I'm going to wait until my symptoms subside before giving it a go.
In the mean time I worked on things that require less noxious adhesives...
There are six little posts that provide sheaves/belay points for running rigging on the Vasa deck. Here's a wonderful image from the mother ship showing what I am referring to:
View attachment 251751
The kit provides these as castings but the casting is solid (that is, there is no place to insert a pulley). In the kit instructions they show ropes being tied around the necks of the figures. I considered drilling through the slots but I would still be left with a metal base that I would need to paint to look like wood. Possible. But less that ideal.
So, instead I decided to remove the neck and heads from the castings and add them to newly made wooden bases. I did not take progress photos - sorry about that - my brain is still addled.
Previously in this build I used solid stock and drills and files to create slots. I thought I would try something different this time just to see if it would work. Starting with 1mm strips I built up the base in layers. Here is what I ended up with:
View attachment 251749
The laminations are visible so I'm not sure I will use this technique again. You might be amused to learn that the guy on the right was decapitated during the process of being separated from the base and the head portion went flying leaving me with only the neck and shoulders. A full 30 minutes later (crawling around on my garage floor) he was found a mere two feet from where he started.
The heads and shoulders are to be painted and I need to fabricate and install pulleys but that will have to wait for another day.

Agree with Dean, I don't think lamination will be an issue. Actually many blocks on the ship were built in layers. Crawling on the floor reminded me of the similar situation. Unlike you, I didn't find the piece. Instead, I developed arthritis in my right knee. Great work!

Hi Paul,
All I can say about your progress is wow wow wow. Just been off line for a while due to construction works on our house but your work in the meantime is really brilliant. Keep up the good work.
All I can say about your progress is wow wow wow. Just been off line for a while due to construction works on our house but your work in the meantime is really brilliant. Keep up the good work.
I completely agree with you, Paul’s fine work and detail is incredible.Hi Paul,
All I can say about your progress is wow wow wow.
Hallo Paul alias @dockattnerHello everyone! My name is Paul and I have been thinking about building the Vasa for a really, really long time. It would seem the time has finally come!
There are plenty of logs out there for the Swedish warship Vasa. So why another one?
Two reasons: 1) I need help! I have only built one other ship to scale (the Mamoli Roter Lowe more than 35 years ago!). But, I have read lots of build logs on various forums and, as a general rule, the participants are genuine and helpful. I have found this oddly encouraging – maybe with help I could actually get this thing done?
Which brings me to my related second reason: 2) the vast majority of build logs are posted by skilled and accomplished builders (rightly so – putting your stuff out there for others to see should be inspirational rather than tragic). But those same experienced artists know what they know and often do things without even thinking about it. Which also means they don’t struggle (at least anymore) with things that a novice will struggle with. Perhaps a log posted by someone less experienced will help others who are likewise less experienced (or, at least, give everyone something to laugh about).
I’m not sure this build log will gain any traction, but I’ll give it a shot and see if anyone shows up. I should mention that I still work for a living so progress might be slow. But I’m willing to put in the time to do this thing right so I would welcome anyone with an interest to pull up a chair and see me through this build.
we wish you all the BEST and a HAPPY BIRTHDAY

Enjoy your special day !!!
@dockattner
Hey Paul, a very happy birthday to you. I wish you many more years of excellent modelling, good health and happiness.
Best wishes to you, enjoy the day.
Roger
Hey Paul, a very happy birthday to you. I wish you many more years of excellent modelling, good health and happiness.
Best wishes to you, enjoy the day.
Roger
Hi Paul!
Best wishes for your birthday!
Thomas
Best wishes for your birthday!
Thomas