
This week I installed all 52 Kurt from Minnesota Tribute Dummy Guns ...


This week I installed all 52 Kurt from Minnesota Tribute Dummy Guns ...

Scarf joints?I was just admiring your fine work and was wondering about the joints you used for the planking of the hull. Are they called lapjoints?
Thank you Gilbert. I'm enjoying your SR build as well - the fleur de lis on your gun ports are spectacular - very French for a builder living in Provence!Hi Paul
Great progress and beautiful lion heads on the gun ports.
Fantastic job as usual
Much appreciated Roger - thank you for your kind and encouraging comments. Fully open they shall remain!Your log is such an enjoyable read Paul and with the quality of your work it continues to inspire.
As to the open gun port covers I have to agree, after all that minuscule painting, the lions should be proudly displayed.
Hi Dean. Yes, I will certainly want to protect her when she is done - but that will be a long time from now. Let's see - you have finished two builds since I started this one...good thing this isn't a race!Paul that looks fantastic! There is no way I would not display the lions heads after the work you put into them! This ship is really going to be beautiful, and I’m sure a nice stand and case are in order!
Ps - the Norske Love has 72 cannons…so I have that to look forward to!
Thank you kindly Vic!Inspiring!
You are always so kind with your comments Kurt. I suppose you are about a year behind me - and all of your extras will be time consuming (but fun!) though I do have more decorative bits to paint which always slows me down. The upper railings I started this afternoon are going to take me quite a while as well. Based on your progress to date and your book of work previously completed I know your Sovereign is going to be remarkable!Paul, your Wasa is at the level I am aspiring to. It will be the measure against with my Sovereign of the Seas will be compared. I am behind you in construction by about a year or more, but that's good, because I can steal your innovations as I go.
Building mostly complete interiors will slow me down quite a bit, so it will be some time before I can work on the outer hull surfaces and use your techniques to add details. Please continue to add details as you go, because your ship is a masterpiece.
Hello @Jack Sparrow - welcome to my build log. Vic is right of course. These are scarf (scarph) joints...I was just admiring your fine work and was wondering about the joints you used for the planking of the hull. Are they called lapjoints?
Thank you so much Jan. These lion heads were the first thing I painted on this project so they have a special place in my heart so I am pleased that you like them.Wow, that part of your build is outstanding. The Lion Heads over the gun barrels are super.
Jan
Well, I'm out of my depth when it comes to answering your excellent question. I do know that the 'intactness' of the 1628 Vasa has caused many to rethink what they assumed about ship construction back in the day. For example, hull planking is often presented as quite uniform - but on the Vasa the planks were random in length. The builders wanted to use every bit of the valuable lumber resource available to them so cutting off and discarding timber just to make things even was simply not done. You might also notice that the scarf joints are multidirectional and random - and the port and starboard hull planking is very different. All of these things are consistent with the raised ship at the museum in Stockholm. As @Maarten has observed in the past - perhaps we all need to rethink our assumptions about uniformity in period ship construction - at least for the older vessels...thank you. i like the look. I wonder if this was standard for all nations?
No...I was just admiring your fine work and was wondering about the joints you used for the planking of the hull. Are they called lapjoints?
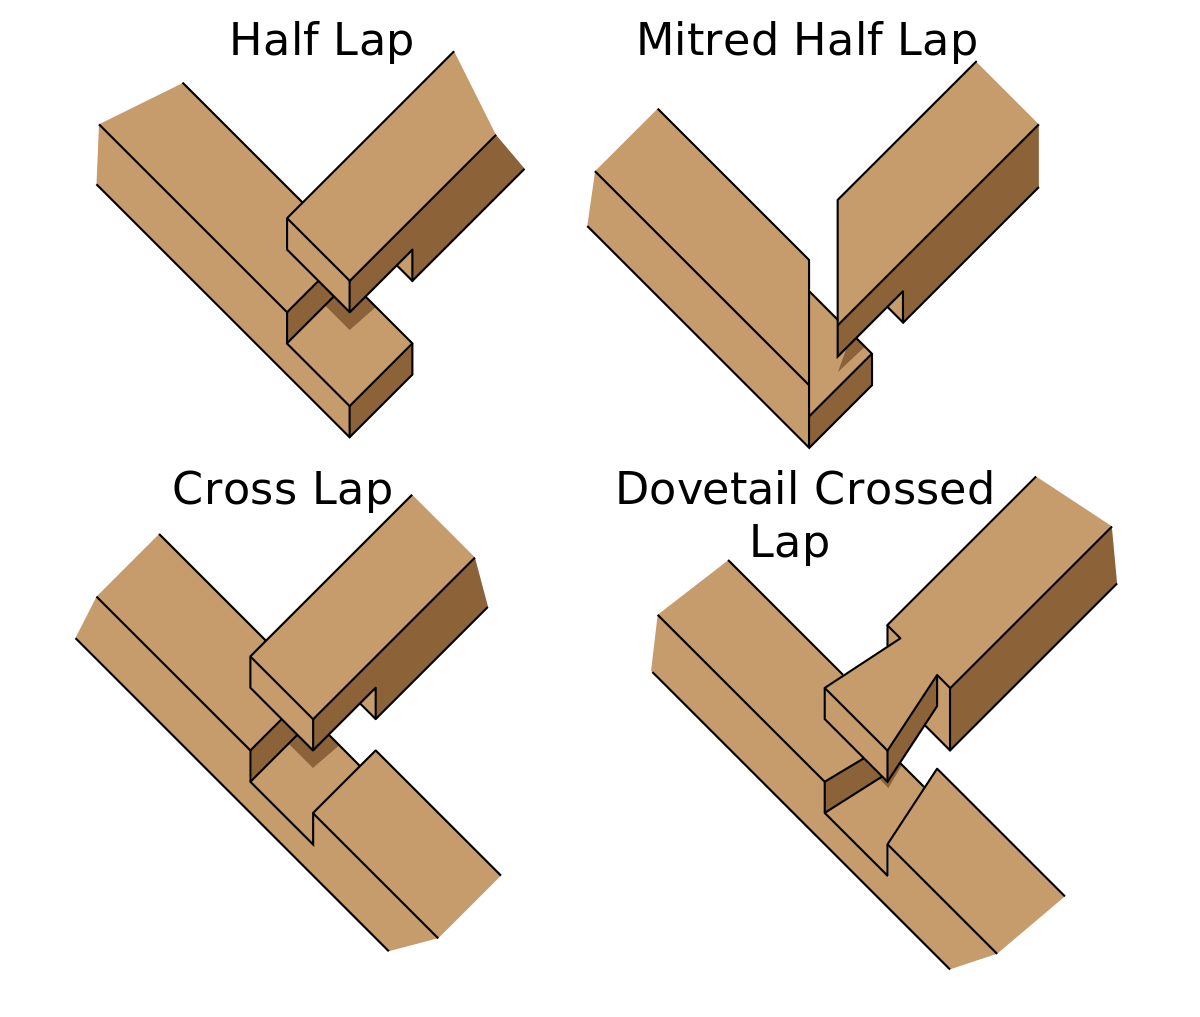
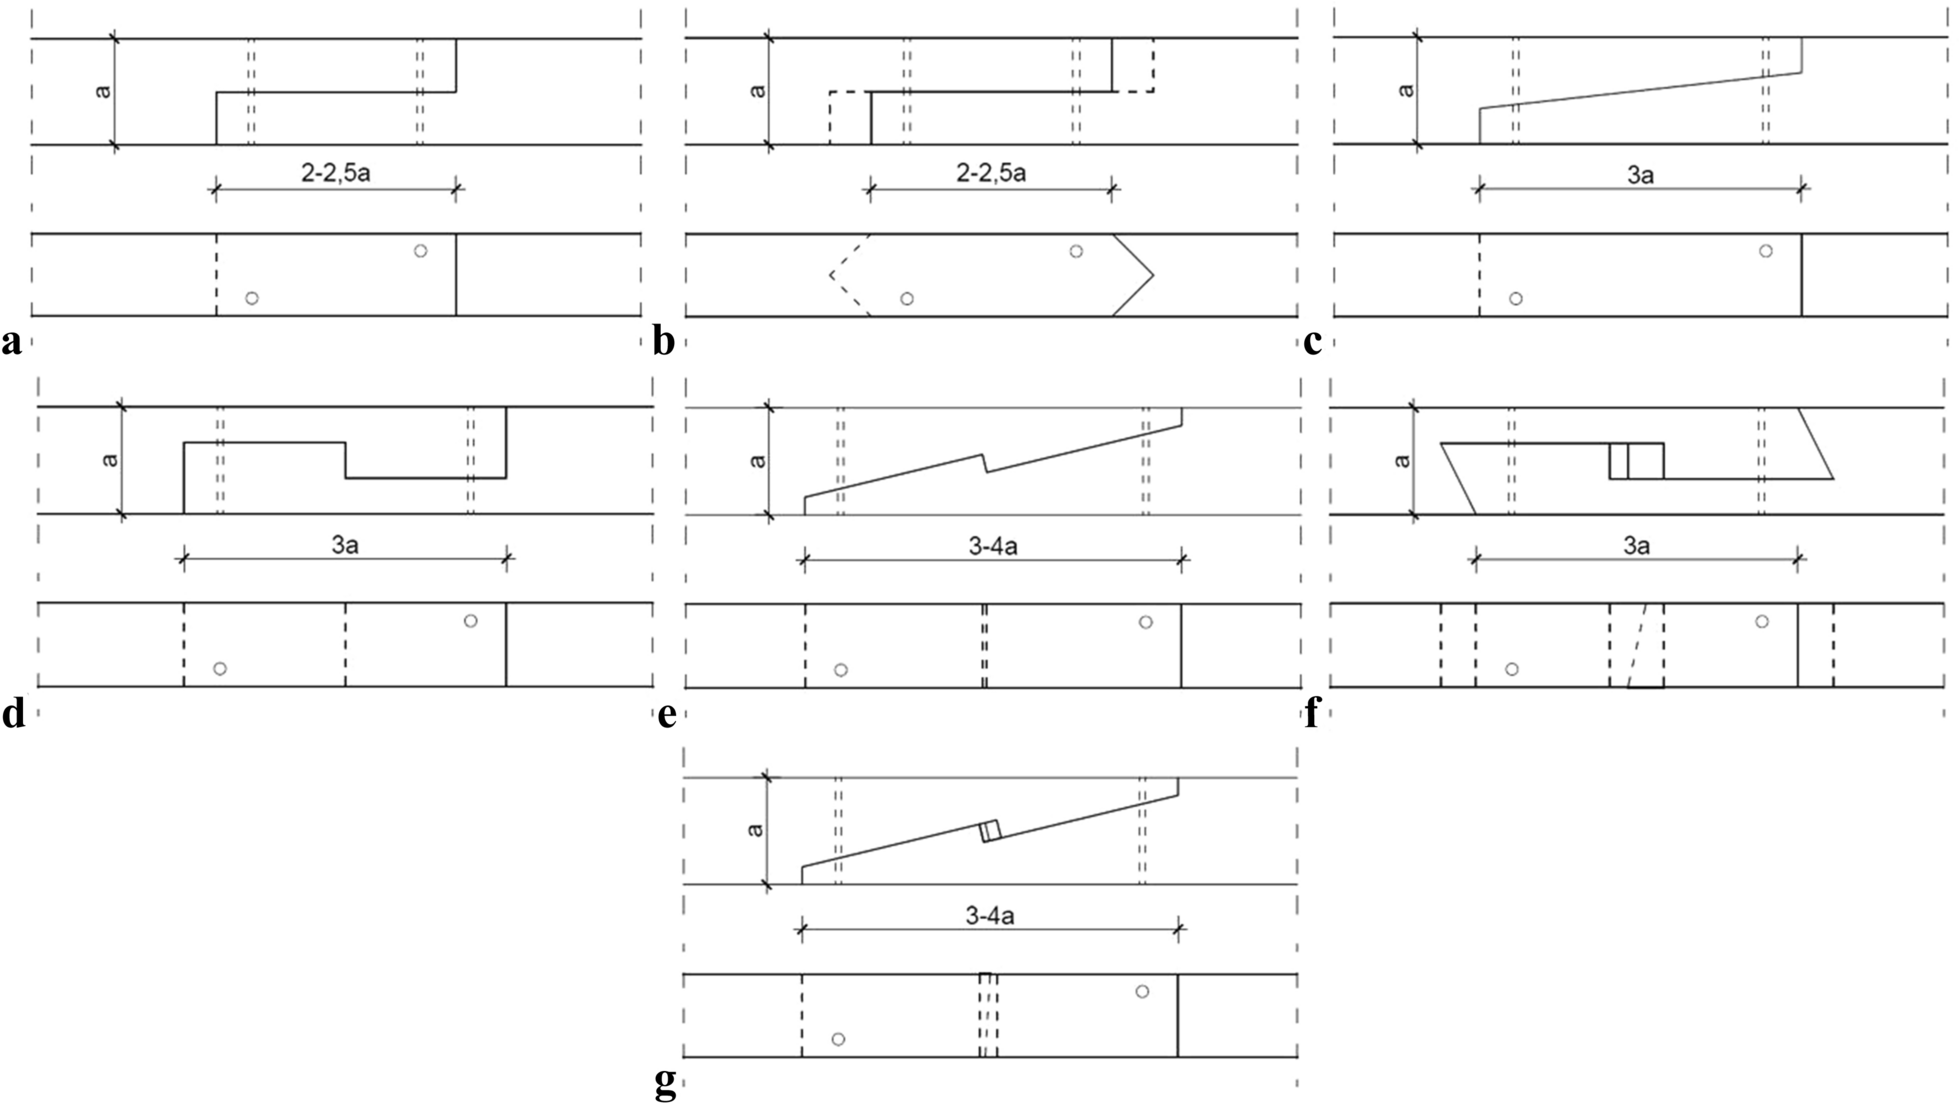
yes... In the case of Vasa, they are scarf joints. Vasa was built from all sizes of available timber lengths, therefore scarf joint was used. The typical ship, for the hull planking, uses joints called simply 'butt' joints. Planks are laid using three\four-shift of butts pattern (except for the wale, where 'scarf joint was used). Let's examine each in detail.Scarf joints?


I am quite certain that, if Kurt were not a fan before, he certainly is now!Early this week I set out to see what I could do to improve the dummy cannons that the kit calls for on the upper and lower gun decks. I tried a couple of things I saw on other builds but I could not replicate what others were doing - at least everything I tried was so fragile that it fell apart. After some (considerable) trial and error I ended up with the following...
Allow me to walk you through my approach. First I made the component parts:
View attachment 255703
Then I assembled the 'carriages' (I found that the longer bed gave me more gluing surface for the gun barrel which will be more clear in a moment).
View attachment 255704
Next, I added some simulated hardware...
View attachment 255706
View attachment 255705
And then cemented the barrels to the carriages:
View attachment 255707
I now give you what I have come to refer to as: Kurt from Minnesota Tribute Dummy Cannons (a bit of an inside joke - @DARIVS ARCHITECTVS is no fan of dummy guns
View attachment 255708
View attachment 255709
View attachment 255710
I've seen better but I am not disappointed. Making real carriages would have been the way to go but by the time I figured out that I was going to add some small enhancements to the kit it was too late for that.
I do appreciate that you stop by on occasion to see what I have been up to. Your interest in my build is quite motivating. Indeed, these dummy cannons are a direct product of this forum. I believe I would have just done normal dummy guns if I wasn't posting things on the SOS website. Thanks for motivating me to up my game!
Well said!I hope you don’t mind Paul if I jump in here to address Dean’s question.
The ship, once sunk, and besides numerous follow-up attempts to raise her (mainly with grappling equipment which did a lot of damage), was beneath the waters of Stockholm Harbour for over 300 years!! The evidence of paint and the poor quality of paint pigments then available, has led to considerable forensic research and study. For many years the belief and evidence suggested she had a blue topside colour. Only more recently was she determined to be a ‘Royal Red’ in keeping with the king’s extravagant style and wanting to indicate his status.
The many sculptures which adorn her flanks have long been known to have had elaborate and decorative paint. The sculptures on display in the museum have many painted replicas but the intact originals still attached to the ship are largely in the same degraded state they were when she was raised.
The low oxygen component of the Baltic Sea assisted significantly in the excellent condition that the Vasa was found, however, with the quality of the paint pigments and the time involved, the Vasa was still in remarkable condition, albeit without much visible evidence of her paintwork. The museum has always opted to retain the ship in an unrestored form for research and for history.
PeterG
A major part of the on-going work of the Museet is to pay meticulous attention to the ceaseless degradation of Vasa's timbers. One of the more recent efforts was to replace the restoration iron replacement fasteners with very high-grade stainless steel because the iron was reacting with the residual sulfur content of the preserved timbers and leading to cellular, structural compromise of the oak. Painting her to her original appearance would, indeed, be a vivid display, but it would be very much to the detriment of her long-term preservation; out of sight, out of mind.Thanks Peter.
I can understand the research reasoning on the paint. But as you know, typically wood subjected to the elements was painted or clear coated to help preserve it. I think it would look a lot better painted, verses the current state. And it would help preserve the wood. But maybe their research work is not done, and therefore it’s more beneficial to leave it unpainted?
And would you guess it’s his first ship? Imagine when he has 3 builds behind him!Paul, if your build-log were a racehorse in the Kentucky derby, I'd bet on it every time! Triple Crown? Triple me down! As soon as I'm caught up, you go ahead and make all of this remarkable progress. I'm beginning to think that your "professional career" is really a well-curated sham, and that you just work on this ship 24/7 like some sort of dexterous cyborg; "I'LL BE BACK, to ever so minutely detail these visible gun carriages, with their layered, nailed trucks and perfectly scaled block tackles!" JUST WATCH ME, SUCKA'. Oh, yes, I am watching - albeit on a delay.
I'm going to say something that may sound like false flattery, but I can assure you that I am 100% serious. I really think that I like your model considerably more than my own. Considering my own investment in time, that is really saying something - as you well know. Personally, while I know "perfection" is un-attainable, I always strive to maintain consistently scrutable results. You really deliver on that! The close-ups tell all, and the story is a real ripper. This is just one of the best models ever! Onward, my friend.
Amen!And would you guess it’s his first ship? Imagine when he has 3 builds behind him!
Well, I'm getting there... I'm still going to complete three decks of rigged cannons on the Sovereign. Check back afterward to see if I'm still sane.I am quite certain that, if Kurt were not a fan before, he certainly is now!
What do you mean “still”?Well, I'm getting there... I'm still going to complete three decks of rigged cannons on the Sovereign. Check back afterward to see if I'm still sane.
Paul, I know your pain, a few months back I caught the tip of one finger in a spinning router blade. Fortunatly only minor injury as the fingernail tool brunt of damage. Almost fully healed now, but a issue I will always remember.Thank you Gilbert. I'm enjoying your SR build as well - the fleur de lis on your gun ports are spectacular - very French for a builder living in Provence!
Much appreciated Roger - thank you for your kind and encouraging comments. Fully open they shall remain!
Hi Dean. Yes, I will certainly want to protect her when she is done - but that will be a long time from now. Let's see - you have finished two builds since I started this one...good thing this isn't a race!
Thank you kindly Vic!
You are always so kind with your comments Kurt. I suppose you are about a year behind me - and all of your extras will be time consuming (but fun!) though I do have more decorative bits to paint which always slows me down. The upper railings I started this afternoon are going to take me quite a while as well. Based on your progress to date and your book of work previously completed I know your Sovereign is going to be remarkable!
Hello @Jack Sparrow - welcome to my build log. Vic is right of course. These are scarf (scarph) joints...
Thank you so much Jan. These lion heads were the first thing I painted on this project so they have a special place in my heart so I am pleased that you like them.
Well, I'm out of my depth when it comes to answering your excellent question. I do know that the 'intactness' of the 1628 Vasa has caused many to rethink what they assumed about ship construction back in the day. For example, hull planking is often presented as quite uniform - but on the Vasa the planks were random in length. The builders wanted to use every bit of the valuable lumber resource available to them so cutting off and discarding timber just to make things even was simply not done. You might also notice that the scarf joints are multidirectional and random - and the port and starboard hull planking is very different. All of these things are consistent with the raised ship at the museum in Stockholm. As @Maarten has observed in the past - perhaps we all need to rethink our assumptions about uniformity in period ship construction - at least for the older vessels...
Thanks, everyone, for the likes. As you know they help with motivation to keep going so your encouragement is much appreciated.
Injury Update: some months ago I had a serious adverse encounter with an XActo. Today, I was wrestling with an electric plank bender and was enthusiastically pushing a 2x2 pear strip into a severe curve and missed the handle and pushed on the shaft of the plank bender with my finger. Turns out the shaft is screamin' hot. Mind you I was pushing pretty hard and so my response time was sluggish. As a result I managed to burn myself pretty good. The learning curve for this hobby has been a severe one in many ways...


