I am trying to correct the mistakes I made myself 25 years ago. Never to old to learnHi Doc. I am glad that you followed my advice on the Pear Wood. Now as to @Maarten comments about the wales: Of course he is right ... but tell him to practice what he preaches ....On his build of his superb Friesland the wales are .... hold on for it ....
View attachment 186295
So sometimes, there is nothing wrong with some artistic licence. I would still go for the Black Hornbeam.
You are using an out of date browser. It may not display this or other websites correctly.
You should upgrade or use an alternative browser.
You should upgrade or use an alternative browser.
Vasa - 1:65 DeAgostini [COMPLETED BUILD]
- Thread starter dockattner
- Start date
- Watchers 145
No tinting in the oil. Lightly sanded raw wood with 400 grit sandpaper - rubbed in a very thin coat of Danish oil - wiped off excess after about 10 minutes - allowed to dry overnight - buffed with 0000 steel wool - second oil treatment - buffed with a cloth the next morning. I don't think the second coat added much...The painting looks SUPERB. Shaded lions look more detailed. Perhaps let a little more yellow stand out, sort of in-between? You Wasa is going to be great. What color of Danish Oil did you use ?

Last edited:
It's been a busy week so not much progress to report...
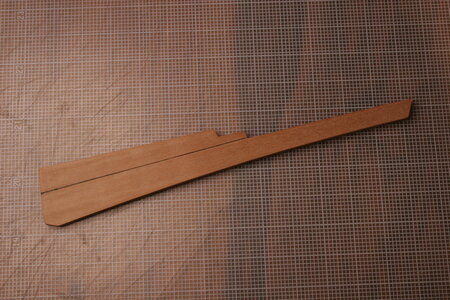
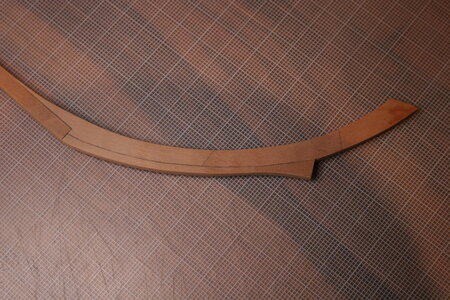
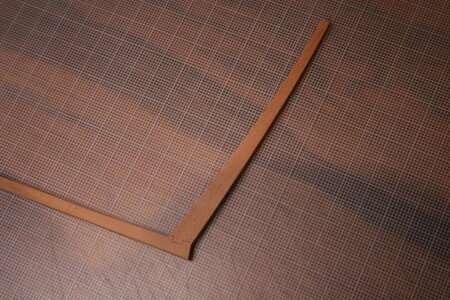
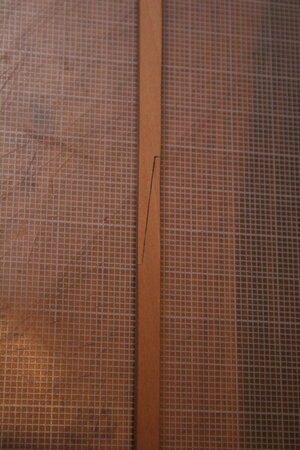
The most notable headway was made on the stem/keel/sternpost which will be added to the hull at some point. Looking ahead in the instructions I noted that both the stem and sternpost were to be planked essentially as a continuation of the hull planking. Of course, the stem and sternpost would not have been planked in that way so I ordered some pear veneer and attempted to simulate the big timbers used to construct these elements in real life.
Like everything else I've encountered this simple task proved to be more challenging (and take longer) than anticipated.
My clumsy efforts produced the following:
The keel may look undersized to you but the kit is accurate in this regard. The original ship order from King Gustav II was for four ships - two with keels of 108 feet and two with keels of 135 feet. Later that year (1625) the Swedish Navy lost 10 ships in a storm and the king asked for the 108 foot ships to be extended to 120 (records show that the builders laid a keel of only 111 feet - their approximation of 120?). Not long after, the king heard about a ship being built in Denmark that had two gun decks (this marked an important change in the use of ships like the Vasa - previously they were used primarily for troop transport - with the addition of a second gundeck they were now better suited for a broadside engagement).
Determined to keep pace, King Gustav now ordered that the ship under construction be extended to 135 feet and to include two enclosed gundecks (originally designed for one). Rather than starting over the builder determined it would be more expeditious to scale up the existing ship than lay a new 135 foot keel (this explains why the Vasa has four scarf joints on the keel rather than the customary three). All of this resulted in a keel that was thin in relation to its length, and shallow in relation to its depth. The thinness of the keel required extra bracing in the hold limiting the amount of ballast the ship could hold and the addition of the second gundeck and armament moved the center of gravity up. Thus begins the demise of the mighty Vasa...
Anyway, this survey from history pretty much required that I aim for an accurate depiction of this element of the ship!
Thanks for checking in!
The most notable headway was made on the stem/keel/sternpost which will be added to the hull at some point. Looking ahead in the instructions I noted that both the stem and sternpost were to be planked essentially as a continuation of the hull planking. Of course, the stem and sternpost would not have been planked in that way so I ordered some pear veneer and attempted to simulate the big timbers used to construct these elements in real life.
Like everything else I've encountered this simple task proved to be more challenging (and take longer) than anticipated.
My clumsy efforts produced the following:


The keel may look undersized to you but the kit is accurate in this regard. The original ship order from King Gustav II was for four ships - two with keels of 108 feet and two with keels of 135 feet. Later that year (1625) the Swedish Navy lost 10 ships in a storm and the king asked for the 108 foot ships to be extended to 120 (records show that the builders laid a keel of only 111 feet - their approximation of 120?). Not long after, the king heard about a ship being built in Denmark that had two gun decks (this marked an important change in the use of ships like the Vasa - previously they were used primarily for troop transport - with the addition of a second gundeck they were now better suited for a broadside engagement).
Determined to keep pace, King Gustav now ordered that the ship under construction be extended to 135 feet and to include two enclosed gundecks (originally designed for one). Rather than starting over the builder determined it would be more expeditious to scale up the existing ship than lay a new 135 foot keel (this explains why the Vasa has four scarf joints on the keel rather than the customary three). All of this resulted in a keel that was thin in relation to its length, and shallow in relation to its depth. The thinness of the keel required extra bracing in the hold limiting the amount of ballast the ship could hold and the addition of the second gundeck and armament moved the center of gravity up. Thus begins the demise of the mighty Vasa...
Anyway, this survey from history pretty much required that I aim for an accurate depiction of this element of the ship!
Thanks for checking in!
Thats beautiful timber work you are doing.
.
.
Still too busy to make significant progress but I did manage to get some painting done over the weekend.
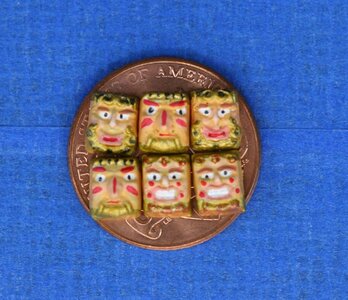
Not sure where these doves go...
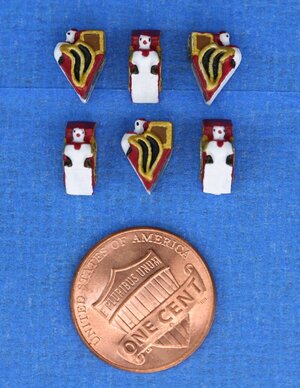
These really tiny kingly looking dudes (fools?) go on the stern...
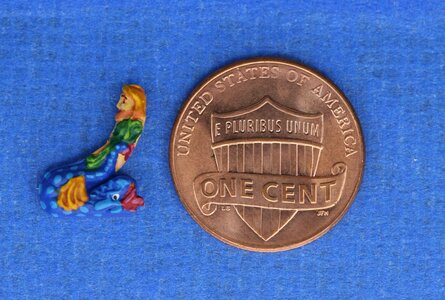
And these mermaids (technically: mermen) will show up again midships...
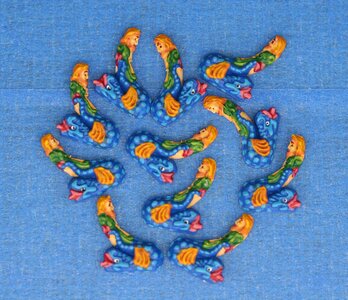
While I had previously sorted all the metal decorations I have become increasingly familiar with the different pieces as I spend more time with the instructions (a series of .pdf documents downloaded from the Model Space website) and this increased familiarity has forced me to 're-sort'. My guess is I still have work to do before I find all the similar items and package them together (so I can paint them together). You might think this would be easy (sorting precisely) but its not because the size and shape of the decorations often changes (grows/shrinks/morphs) in a particular series. If that doesn't make sense it will when I get far enough to show you exactly what I'm talking about.
Thanks so much for visiting my build log!
Not sure where these doves go...

These really tiny kingly looking dudes (fools?) go on the stern...

And these mermaids (technically: mermen) will show up again midships...


While I had previously sorted all the metal decorations I have become increasingly familiar with the different pieces as I spend more time with the instructions (a series of .pdf documents downloaded from the Model Space website) and this increased familiarity has forced me to 're-sort'. My guess is I still have work to do before I find all the similar items and package them together (so I can paint them together). You might think this would be easy (sorting precisely) but its not because the size and shape of the decorations often changes (grows/shrinks/morphs) in a particular series. If that doesn't make sense it will when I get far enough to show you exactly what I'm talking about.
Thanks so much for visiting my build log!
The detail of your casting painting is incredible!
Thank you Kurt - and thanks to everyone else for the encouraging 'likes' and 'loves.' I honestly think anyone could do this as well or better. It just takes time...The detail of your casting painting is incredible!
Paul,
As Kurt said Well done indeed!! I
It really helps having actual museum examples. From what I understand the Vasa Museum analized
hundreds of these wooden bits to determine what colors were used to paint/stain these pieces.
The scalloping white trims above the galeries will be a more difficult challenge no doubt??
Thank you, John! Yes, over the past ten-plus years the researchers have provided details of how the carvings were colorized. As I understand it, they did not analyze every single decorative bit - but from a sampling they had a pretty good handle on how the carvings were colored. The famous 1:10 model at the museum was originally displayed without all the painted bits awaiting the results of the research - only then was the model colored.Paul,
As Kurt said Well done indeed!! I
It really helps having actual museum examples. From what I understand the Vasa Museum analized
hundreds of these wooden bits to determine what colors were used to paint/stain these pieces.
The scalloping white trims above the galeries will be a more difficult challenge no doubt??
The galleries present all sorts of challenges - but DaAg does provide castings for the gallery hoods that capture the scalloping. We'll see how it goes when I get that far... I have notes on how others have handled the scallops (more yellow than white) and the best idea I have seen so far is someone who used ink and a calligraphy pen. It will most certainly be a test for the steadiness of my hands.
BTW, I'm enjoying watching your SoS progress!
And I see Dave Teel is peaking over my shoulder - your masterful rendition of the Corel Wasa has provided lots of inspiration! I'm embarrassed to show my work to you and the other fantastic builders who have been helping me along the way!
Last edited:
Those are so tiny...great job getting the detail in there. Remember at about 1 foot away, the typical viewing distance, I’m sure they look awesome!Still too busy to make significant progress but I did manage to get some painting done over the weekend.
Not sure where these doves go...
View attachment 188568
These really tiny kingly looking dudes (fools?) go on the stern...
View attachment 188569
And these mermaids (technically: mermen) will show up again midships...
View attachment 188571
View attachment 188570
While I had previously sorted all the metal decorations I have become increasingly familiar with the different pieces as I spend more time with the instructions (a series of .pdf documents downloaded from the Model Space website) and this increased familiarity has forced me to 're-sort'. My guess is I still have work to do before I find all the similar items and package them together (so I can paint them together). You might think this would be easy (sorting precisely) but its not because the size and shape of the decorations often changes (grows/shrinks/morphs) in a particular series. If that doesn't make sense it will when I get far enough to show you exactly what I'm talking about.
Thanks so much for visiting my build log!
Yes, I'm a far better painter when my work is viewed from far away and in dim lighting conditions!Those are so tiny...great job getting the detail in there. Remember at about 1 foot away, the typical viewing distance, I’m sure they look awesome!
In truth you are correct, Dean. When I showed them to one of my daughters she said, "wow dad, those are awesome, you painted that?" I'm not sure if that was a sincere compliment or a reflection of how often I have disappointed her in the past. There was that time I stood up and danced the hokey pokey so she could find me in the stands at a school band concert...
Hey Everyone,
I ran into a minor problem and I thought I would share my solution with you. As I understand it these forums are useful to not only get help, but also to give help. My experience as an orthodontist provided me with an unexpected solution that might be useful to one of you some day.
One of the king/fool castings was flawed:
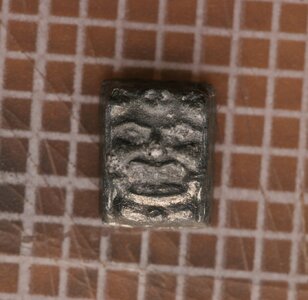
The surface is quite irregular and rough compared to the other castings. I could have worked with it - but this painting is challenging enough and trying to recover from a poor casting would have made a hard job even harder.
I determined to make a duplicate of one of the better castings for use as a replacement. I considered several options: I have a 3D scanner in my office that could have made a perfect/detailed digital map - but 3D printing will not reproduce the surface detail at this scale (at least the 3D printers I have available to me). Instead, I took an imprint of a better casting using the same material your dentist uses to take an impression of your teeth for a crown or a bridge.
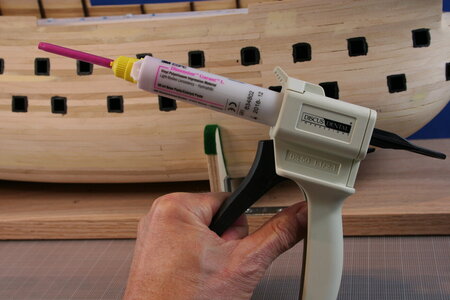
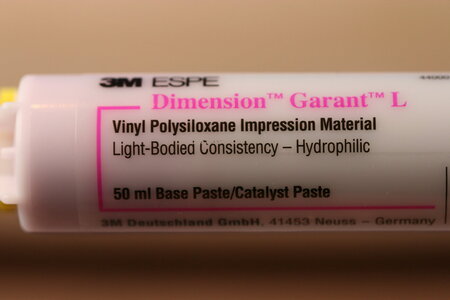
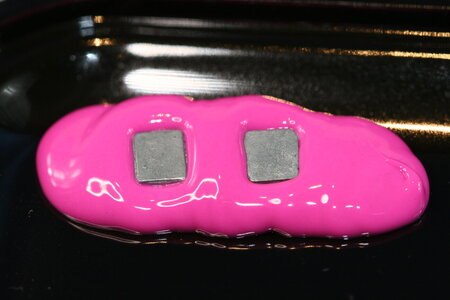
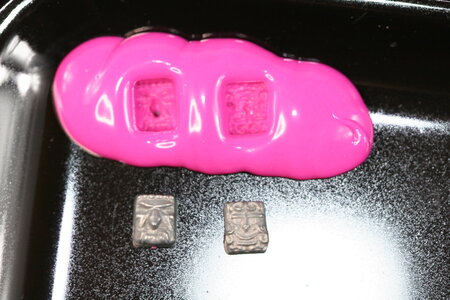
I then poured up the mold in plaster (using a vibrating platform to remove any air bubbles in the plaster is essential here).
The finished product:
Voila! After trimming up the plaster duplicate(s) I painted them along with the metal castings...
Which one is the metal original and which one is plaster? I'm declaring this technique a WIN!
Most dentists still use material like this though it is getting less common with the introduction of 3D scanning technology. In a pinch give your local dentist a call and see if they can help you out - it took no more than 30 minutes to fabricate the duplicates.
Hope this might be useful to someone in the future - or prompt you to come up with an even better idea...
I ran into a minor problem and I thought I would share my solution with you. As I understand it these forums are useful to not only get help, but also to give help. My experience as an orthodontist provided me with an unexpected solution that might be useful to one of you some day.
One of the king/fool castings was flawed:

The surface is quite irregular and rough compared to the other castings. I could have worked with it - but this painting is challenging enough and trying to recover from a poor casting would have made a hard job even harder.
I determined to make a duplicate of one of the better castings for use as a replacement. I considered several options: I have a 3D scanner in my office that could have made a perfect/detailed digital map - but 3D printing will not reproduce the surface detail at this scale (at least the 3D printers I have available to me). Instead, I took an imprint of a better casting using the same material your dentist uses to take an impression of your teeth for a crown or a bridge.


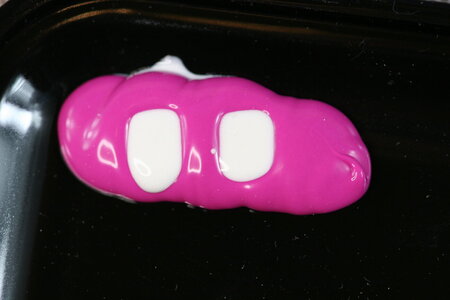
I then poured up the mold in plaster (using a vibrating platform to remove any air bubbles in the plaster is essential here).

The finished product:

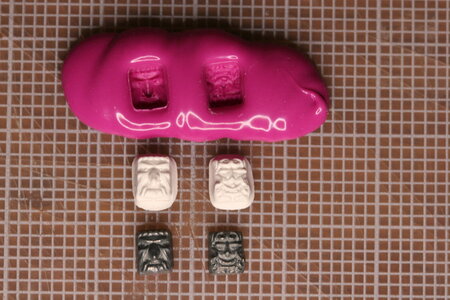
Voila! After trimming up the plaster duplicate(s) I painted them along with the metal castings...

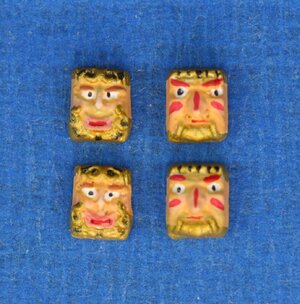
Which one is the metal original and which one is plaster? I'm declaring this technique a WIN!
Most dentists still use material like this though it is getting less common with the introduction of 3D scanning technology. In a pinch give your local dentist a call and see if they can help you out - it took no more than 30 minutes to fabricate the duplicates.
Hope this might be useful to someone in the future - or prompt you to come up with an even better idea...
I have a friend who owns a dental lab and I used to do the model work to help him out, so I am familiar with that process. I would always hold the impressions at an angle while filling, so the material runs across while rising up, that too will prevent air bubbles along with the vibrator. And of course pouring slowly to fill. And we used the lost wax process to make the castings. Anyway, Good idea!I ran into a minor problem and I thought I would share my solution with you. As I understand it these forums are useful to not only get help, but also to give help. My experience as an orthodontist provided me with an unexpected solution that might be useful to one of you some day.
One of the king/fool castings was flawed:
View attachment 188754
The surface is quite irregular and rough compared to the other castings. I could have worked with it - but this painting is challenging enough and trying to recover from a poor casting would have made a hard job even harder.
I determined to make a duplicate of one of the better castings for use as a replacement. I considered several options: I have a 3D scanner in my office that could have made a perfect/detailed digital map - but 3D printing will not reproduce the surface detail at this scale (at least the 3D printers I have available to me). Instead, I took an imprint of a better casting using the same material your dentist uses to take an impression of your teeth for a crown or a bridge.
View attachment 188747 View attachment 188746
View attachment 188748
View attachment 188749
I then poured up the mold in plaster (using a vibrating platform to remove any air bubbles in the plaster is essential here).
View attachment 188750
The finished product:
View attachment 188751
Voila! After trimming up the plaster duplicate(s) I painted them along with the metal castings...
View attachment 188752
Which one is the metal original and which one is plaster? I'm declaring this technique a WIN!
Most dentists still use material like this though it is getting less common with the introduction of 3D scanning technology. In a pinch give your local dentist a call and see if they can help you out - it took no more than 30 minutes to fabricate the duplicates.
Hope this might be useful to someone in the future - or prompt you to come up with an even better idea...
Last edited:
Pure genius.Hey Everyone,
I ran into a minor problem and I thought I would share my solution with you. As I understand it these forums are useful to not only get help, but also to give help. My experience as an orthodontist provided me with an unexpected solution that might be useful to one of you some day.
One of the king/fool castings was flawed:
View attachment 188754
The surface is quite irregular and rough compared to the other castings. I could have worked with it - but this painting is challenging enough and trying to recover from a poor casting would have made a hard job even harder.
I determined to make a duplicate of one of the better castings for use as a replacement. I considered several options: I have a 3D scanner in my office that could have made a perfect/detailed digital map - but 3D printing will not reproduce the surface detail at this scale (at least the 3D printers I have available to me). Instead, I took an imprint of a better casting using the same material your dentist uses to take an impression of your teeth for a crown or a bridge.
View attachment 188747 View attachment 188746
View attachment 188748
View attachment 188749
I then poured up the mold in plaster (using a vibrating platform to remove any air bubbles in the plaster is essential here).
View attachment 188750
The finished product:
View attachment 188751
Voila! After trimming up the plaster duplicate(s) I painted them along with the metal castings...
View attachment 188752
Which one is the metal original and which one is plaster? I'm declaring this technique a WIN!
Most dentists still use material like this though it is getting less common with the introduction of 3D scanning technology. In a pinch give your local dentist a call and see if they can help you out - it took no more than 30 minutes to fabricate the duplicates.
Hope this might be useful to someone in the future - or prompt you to come up with an even better idea...
You are funny Paul, but I sincerely hope you don’t think I was implying your work only looks good from a distance! I hope you understand I was pointing out that the pictures were magnified to see the details, next to a coin for reference of size. Therefore any and all flaws will be glaring, and I’m sure none of us can pass that degree of scrutiny! Keep up the good work, I think your skills are more than adequate enough to detail your small ship pieces.Yes, I'm a far better painter when my work is viewed from far away and in dim lighting conditions!
In truth you are correct, Dean. When I showed them to one of my daughters she said, "wow dad, those are awesome, you painted that?" I'm not sure if that was a sincere compliment or a reflection of how often I have disappointed her in the past. There was that time I stood up and danced the hokey pokey so she could find me in the stands at a school band concert...
Observe it from a mile away, and you have a MASTERPIECE. 
Hi Doc,
Main question remaining, what taste was it, strawberry or cherries?
Hi Paul, fantastic.Hey Everyone,
I ran into a minor problem and I thought I would share my solution with you. As I understand it these forums are useful to not only get help, but also to give help. My experience as an orthodontist provided me with an unexpected solution that might be useful to one of you some day.
One of the king/fool castings was flawed:
View attachment 188754
The surface is quite irregular and rough compared to the other castings. I could have worked with it - but this painting is challenging enough and trying to recover from a poor casting would have made a hard job even harder.
I determined to make a duplicate of one of the better castings for use as a replacement. I considered several options: I have a 3D scanner in my office that could have made a perfect/detailed digital map - but 3D printing will not reproduce the surface detail at this scale (at least the 3D printers I have available to me). Instead, I took an imprint of a better casting using the same material your dentist uses to take an impression of your teeth for a crown or a bridge.
View attachment 188747 View attachment 188746
View attachment 188748
View attachment 188749
I then poured up the mold in plaster (using a vibrating platform to remove any air bubbles in the plaster is essential here).
View attachment 188750
The finished product:
View attachment 188751
Voila! After trimming up the plaster duplicate(s) I painted them along with the metal castings...
View attachment 188752
Which one is the metal original and which one is plaster? I'm declaring this technique a WIN!
Most dentists still use material like this though it is getting less common with the introduction of 3D scanning technology. In a pinch give your local dentist a call and see if they can help you out - it took no more than 30 minutes to fabricate the duplicates.
Hope this might be useful to someone in the future - or prompt you to come up with an even better idea...
Main question remaining, what taste was it, strawberry or cherries?
No worries. I understood your point perfectly and took it as an encouragement not a criticism. I don't take myself too seriously. If I did I certainly wouldn't be sharing 10x life size art pieces so small that if I dropped three of them I'd only find two. I appreciate your engagement!You are funny Paul, but I sincerely hope you don’t think I was implying your work only looks good from a distance! I hope you understand I was pointing out that the pictures were magnified to see the details, next to a coin for reference of size. Therefore any and all flaws will be glaring, and I’m sure none of us can pass that degree of scrutiny! Keep up the good work, I think your skills are more than adequate enough to detail your small ship pieces.
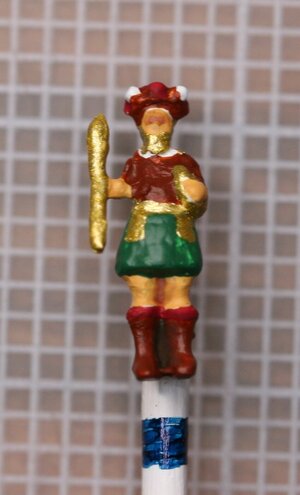
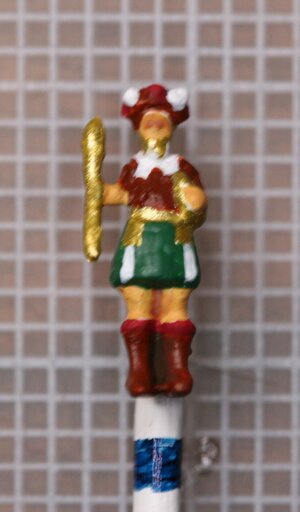
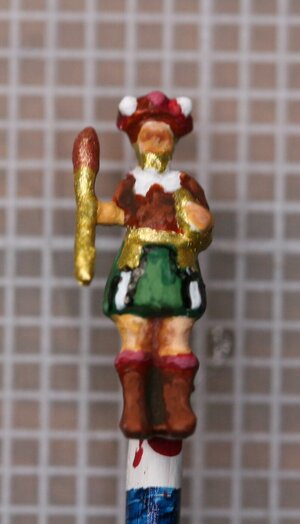
Here's my latest painting project. I found these particularly difficult for some reason... And there are similar castings about 30% smaller to be painted in the future  . A lot of them
  ... Like 20 of them
  ...
...
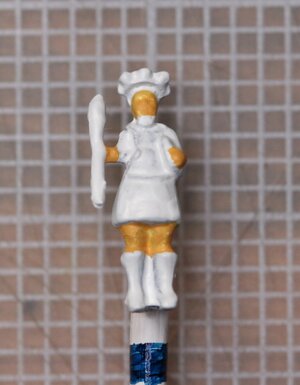
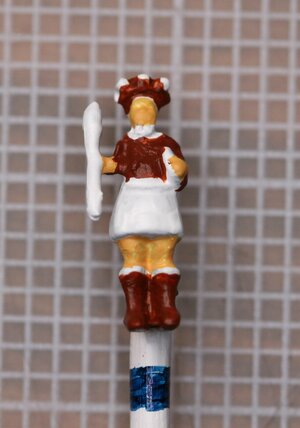
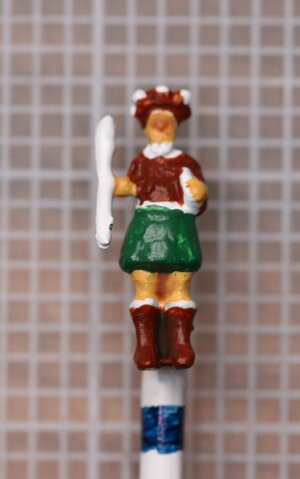
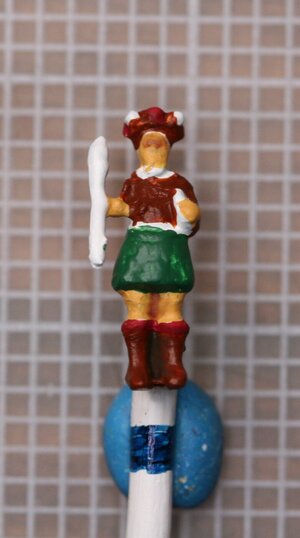
 ...
...
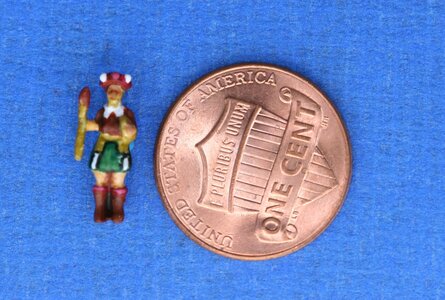
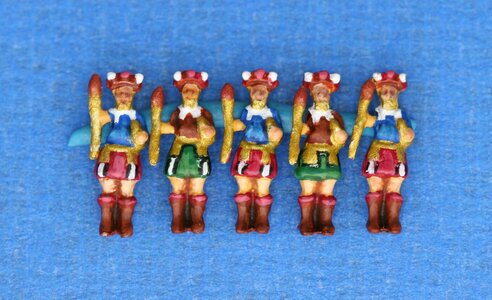
To make Dean's point from an earlier post: here they are closer to life size if you are viewing on a typical laptop or computer monitor:

Onward!


 ...
...

To make Dean's point from an earlier post: here they are closer to life size if you are viewing on a typical laptop or computer monitor:

Onward!
Last edited:


