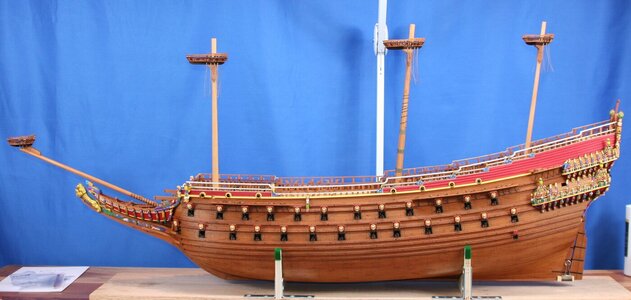
Thank you for this Christmas gift, Paul. She is stunning to behold, and she REALLY holds up well to intense scrutiny. There are so many subtle details in the paint-work; accents and highlights, throughout. I love it all!
You are using an out of date browser. It may not display this or other websites correctly.
You should upgrade or use an alternative browser.
You should upgrade or use an alternative browser.
Vasa - 1:65 DeAgostini [COMPLETED BUILD]
- Thread starter dockattner
- Start date
- Watchers 145
Thanks Marc!Thank you for this Christmas gift, Paul. She is stunning to behold, and she REALLY holds up well to intense scrutiny. There are so many subtle details in the paint-work; accents and highlights, throughout. I love it all!
An anecdote for you @Hubac’s Historian... Quite a long time ago I painted the windows for the stern. They were from a photo-etch sheet provided with the kit. At the time I considered them more than acceptable. But as time went on, I started to wonder if they were actually good enough. And then I started to have these annoying thoughts that you (and others that share your mind-numbing talents out there - you know who you are) would be disappointed if I used them. They were good - but not exactly realistic. Eventually I told myself to grow up and just use them - I didn't get into this build looking for validation from others - I wasn't going to start now...
Last week I set about finishing the stern decorations but the windows I had painted so long ago had gone missing. What ensued was a childish and desperate attempt to find these windows that I didn't even like all that much. I tore the place apart! How dare they go AWOL! After all we had been through together - the emotional anguish - the wringing of hands - the hours of self-reflection!
So I had to make new ones just like you would have expected me to do!

Here is what the kit provided (this image is from the instruction manual - I never took a picture of mine which might be telling...):
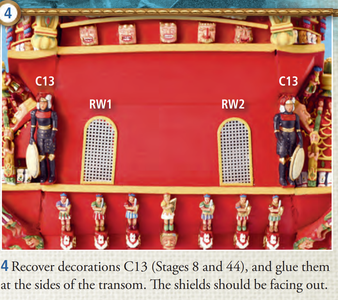
And here are my replacements:

You got the last laugh on me, and you didn't even know it was happening!
If anyone cares, they are made from card stock and window screen repair mesh from the home improvement mega-store near my house...
You meshed up those windows very well!Thanks Marc!
An anecdote for you @Hubac’s Historian... Quite a long time ago I painted the windows for the stern. They were from a photo-etch sheet provided with the kit. At the time I considered them more than acceptable. But as time went on, I started to wonder if they were actually good enough. And then I started to have these annoying thoughts that you (and others that share your mind-numbing talents out there - you know who you are) would be disappointed if I used them. They were good - but not exactly realistic. Eventually I told myself to grow up and just use them - I didn't get into this build looking for validation from others - I wasn't going to start now...
Last week I set about finishing the stern decorations but the windows I had painted so long ago had gone missing. What ensued was a childish and desperate attempt to find these windows that I didn't even like all that much. I tore the place apart! How dare they go AWOL! After all we had been through together - the emotional anguish - the wringing of hands - the hours of self-reflection!
So I had to make new ones just like you would have expected me to do!
Here is what the kit provided (this image is from the instruction manual - I never took a picture of mine which might be telling...):
View attachment 279643
And here are my replacements:
View attachment 279644
You got the last laugh on me, and you didn't even know it was happening!
If anyone cares, they are made from card stock and window screen repair mesh from the home improvement mega-store near my house...
Nicely invented.
Regards, Peter
Ha! Well, I would not have had anything to say about your work on the stock windows, however, your screen-mesh replacements are soooo much better scaled. With the tops and lower masts in-place, one can begin to get a sense for what’s in store. Let the fun begin(continue, really)!
Last edited:
I agree. In the mesh windows most kits provide, the screen mesh is so thick there is no room left for the window glass.Ha! Well, I would not have had anything to say about your work on the stock windows, however, your screen-mesh replacements are soooo much better scaled. With the tops and lower masts in-place, one can begin to get a sense for what’s in store. Let the fun begin(continue, really)!
Hello Friends,
A while back I promised to post a picture of the tinted ropes I intend to use for the standing rigging. In the following image you can see the darker line set alongside the lighter line I will use for the running rigging:
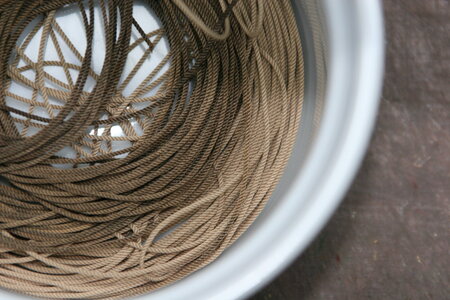
Yes, I know most everyone uses dark brown or black for fixed lines but for my build I am settled on less contrast. Go ahead and write up your hate mail - even if you never send it, you'll still feel better .
.
And here is my first bit of rope work...
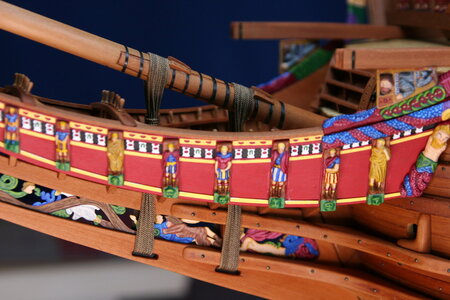
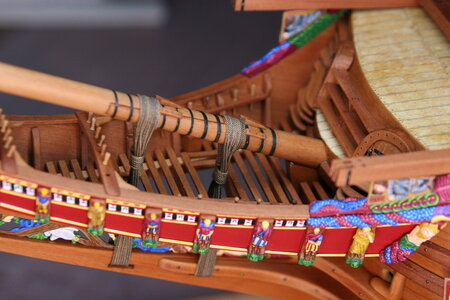
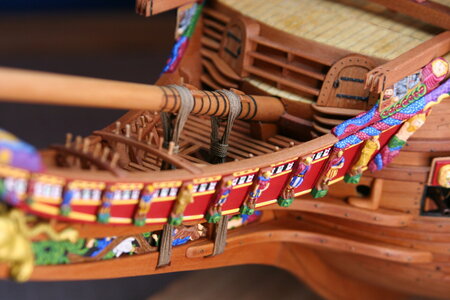
I noticed that on the Batavia the wrapping rope was a smaller diameter than the gammoning - and a few builders have used that approach. But Anderson and Mondfeld make no mention of that practice and the museum ship likewise keeps the wrapping rope the same diameter as the gammoning rope (indeed, it appears to be the same rope re-directioned). Decisions...decisions...decisions...
Speaking of decisions, I have decided that I will not be posting a play-by-play report on my rigging. I am certainly no expert so no one will really learn anything from me - and at 100 pages this build log is unwieldly enough already. If something is interesting, I'll certainly post it. Or when I complete significant stages it seems right that I should post a progress report.
I'll also be reaching out for help along the way so please feel encouraged to provide help or advice if you know how to solve one of my future questions or if you see mistakes in my rigging.
I truly enjoy following your work - you are a talented group and I have been learning from you and admiring your builds.
Onward with the rigging!
A while back I promised to post a picture of the tinted ropes I intend to use for the standing rigging. In the following image you can see the darker line set alongside the lighter line I will use for the running rigging:

Yes, I know most everyone uses dark brown or black for fixed lines but for my build I am settled on less contrast. Go ahead and write up your hate mail - even if you never send it, you'll still feel better
And here is my first bit of rope work...


I noticed that on the Batavia the wrapping rope was a smaller diameter than the gammoning - and a few builders have used that approach. But Anderson and Mondfeld make no mention of that practice and the museum ship likewise keeps the wrapping rope the same diameter as the gammoning rope (indeed, it appears to be the same rope re-directioned). Decisions...decisions...decisions...
Speaking of decisions, I have decided that I will not be posting a play-by-play report on my rigging. I am certainly no expert so no one will really learn anything from me - and at 100 pages this build log is unwieldly enough already. If something is interesting, I'll certainly post it. Or when I complete significant stages it seems right that I should post a progress report.
I'll also be reaching out for help along the way so please feel encouraged to provide help or advice if you know how to solve one of my future questions or if you see mistakes in my rigging.
I truly enjoy following your work - you are a talented group and I have been learning from you and admiring your builds.
Onward with the rigging!
Looking great Doc!
I ask you to reconsider about posting while you do the rigging. I suspect that due to your profession you "possess a unique skill set" you bring to our hobby. As a rookie I'd be very interested in the solutions you devise to the upcoming challenges. Things as basic as best way to tie a knot in a confined space using tweezers/hemostats would help me tremendously.
You've been doing a wonderful job on this log, keep it up!
Glenn
You have just proved that you are not just an Orthodontist and mastership modeler, you are a great baker. Those baked ropes look very good for my taste and the gammoning looks exactly what Doc prescribed.
Kurt Konrath
Kurt Konrath
Your windows are up to par with all your other work, and the ropes up front are looking good as well.
I think since its your model your decisions are the correct ones being made.
I think since its your model your decisions are the correct ones being made.
NO!Speaking of decisions, I have decided that I will not be posting a play-by-play report on my rigging. I am certainly no expert so no one will really learn anything from me - and at 100 pages this build log is unwieldly enough already. If something is interesting, I'll certainly post it. Or when I complete significant stages it seems right that I should post a progress report.
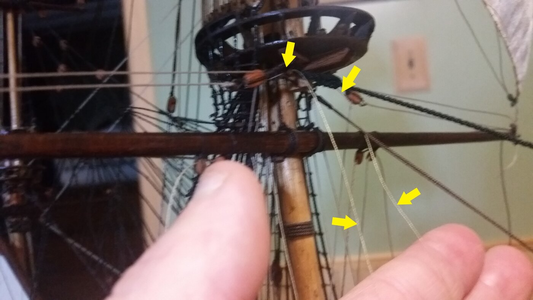
Actually Paul, if you take pictures and add arrows to point to the object of your descriptions, even though there is a maze of lines in photo, people will still be able to understand your rigging of each line. Take a photo of the starting point, certain intermediate blocks, and end point or belaying location of each line. I found rigging build logs the most useful to help with my first ship, because to newbies, rigging the THE MOST scary part of building. Also, by not providing a rigging log, you are depriving us all of a primary source of entertainment.
Example of how to show line routing
Belaying point example
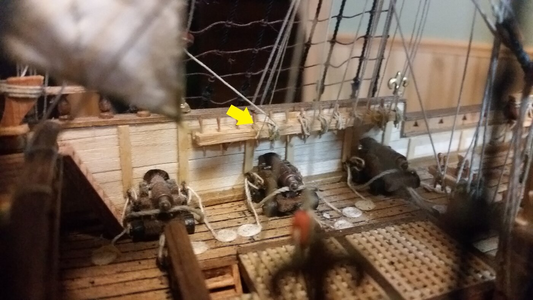
I used the 2-D shapes tool in Paint 3-D (which comes with Windows 10) to make the solid yellow arrows in mere seconds, and saved over the old .jpg photo before posting it here. It's super easy. Find a .jpg file, right click, and select "Edit with Paint 3-D". Also, your ropes look great. Nice choice in color! The detail comes out.
Last edited:
I agree that is useful to post your rigging...
Christos
Christos
I found rigging build logs the most useful t
Hi Paul,
Clearly you have significant support for ongoing log entries to detail your rigging. I too would encourage it, but there are some aspect which, once described will go on for a long time and not require additional comment eg rat lines. Once knots, spacing, shroud end securing and futtock shrouds are described, it’s onward to the next mast or yard portion with little need to repeat descriptions.
The other aspect about rigging I am finding (and my standing rigging is complete), is that it is SLOW to get right. Running rigging too, especially with sails is also SLOW but to get it right takes a lot of time, and there are many decisions you will need to make that research may not be able to answer. Sails will also be another decision you have to make at some point - will you have them or will you not? If so, all of them or only a select few? Will they be furled etc etc?
Your progress to date Paul is exemplary and it’s not surprising that you have have reached nearly 100 pages of build log - it’s filled with all the contributors praise you so deserve!!
Regards
PeterG
100 pages?Your progress to date Paul is exemplary and it’s not surprising that you have have reached nearly 100 pages of build log - it’s filled with all the contributors praise you so deserve!!
Regards
PeterG
PeterG is right. I have already made a log that does a basic job of describing rigging, but questions will arise and will be answered as the log is made, serving to help many other builders understand not only the individual lines, but a good example of which order to rig the lines. Other members ask specific questions and get answers between the steps you make in your log. A rigging log is what beginners need to help organize their steps into an order which will not cause undue access difficulties later in the process as things get more crowded. There are many posts on this forum that already discuss the rigging process, but Wasa builders would profit most from a Wasa log because it is specific to that ship. The feedback you get from the rigging log also makes for fun reading, especially with my input.
- Joined
- Jan 9, 2020
- Messages
- 10,377
- Points
- 938

Paul I have had to an incredible amount of catch-up. Let me start with the windows. Looking at the final picture of your second version windows mounted on the ship, they are largely hidden by the Swedish equivalent of the Beefeaters in front of them. Many builders - even though they may not be 100% satisfied with their efforts, would have installed them knowing that they will be largely obscured from view in any case. But not you. Even though - in the greater scheme of things - they are unimportant, you have still devoted a lot of time and effort to get them perfect (or as good as you can possibly get them). And that is indicative of your whole build. It applies to your self-made rope (of which I love both the color and the texture), your gammoning and the masts on the overall picture. Which brings us to the rigging and the decision of posting regularly or not.
That is exactly where the true value of a forum and build logs lies. It offers Joe Soap the opportunity of learning along with you. Even though I am very confident when it comes to planking, I made mistakes in my build and had to strip a large part of it and had to redo it. And in the redo and makeover, those following the log probably learnt more from planking than seeing perfect pictures taken after the fact. The decision though, remains yours - I know I would love to tag along as you start this adventure.
That is exactly where the true value of a forum and build logs lies. It offers Joe Soap the opportunity of learning along with you. Even though I am very confident when it comes to planking, I made mistakes in my build and had to strip a large part of it and had to redo it. And in the redo and makeover, those following the log probably learnt more from planking than seeing perfect pictures taken after the fact. The decision though, remains yours - I know I would love to tag along as you start this adventure.
Good Morning Paul. I am voting with the rest of the fellows following your log. 100 pages has been a study of excellence. You do have a unique skill set and how you have presented your build log has been nothing short of exemplary. I personally would love to see your rigging process. Cheers.Hello Friends,
A while back I promised to post a picture of the tinted ropes I intend to use for the standing rigging. In the following image you can see the darker line set alongside the lighter line I will use for the running rigging:
View attachment 280720
Yes, I know most everyone uses dark brown or black for fixed lines but for my build I am settled on less contrast. Go ahead and write up your hate mail - even if you never send it, you'll still feel better.
And here is my first bit of rope work...
View attachment 280722
View attachment 280723
View attachment 280724
I noticed that on the Batavia the wrapping rope was a smaller diameter than the gammoning - and a few builders have used that approach. But Anderson and Mondfeld make no mention of that practice and the museum ship likewise keeps the wrapping rope the same diameter as the gammoning rope (indeed, it appears to be the same rope re-directioned). Decisions...decisions...decisions...
Speaking of decisions, I have decided that I will not be posting a play-by-play report on my rigging. I am certainly no expert so no one will really learn anything from me - and at 100 pages this build log is unwieldly enough already. If something is interesting, I'll certainly post it. Or when I complete significant stages it seems right that I should post a progress report.
I'll also be reaching out for help along the way so please feel encouraged to provide help or advice if you know how to solve one of my future questions or if you see mistakes in my rigging.
I truly enjoy following your work - you are a talented group and I have been learning from you and admiring your builds.
Onward with the rigging!
Hi Paul I like your tinted ropes so much that I would consider not using black standing rigging on a future build. As for cutting down on the number of posts during the rigging process I agree with everyone else keep the post coming. I am always amazed at your work, the way you tackle problems and the excellent results.Hello Friends,
A while back I promised to post a picture of the tinted ropes I intend to use for the standing rigging. In the following image you can see the darker line set alongside the lighter line I will use for the running rigging:
View attachment 280720
Yes, I know most everyone uses dark brown or black for fixed lines but for my build I am settled on less contrast. Go ahead and write up your hate mail - even if you never send it, you'll still feel better.
And here is my first bit of rope work...
View attachment 280722
View attachment 280723
View attachment 280724
I noticed that on the Batavia the wrapping rope was a smaller diameter than the gammoning - and a few builders have used that approach. But Anderson and Mondfeld make no mention of that practice and the museum ship likewise keeps the wrapping rope the same diameter as the gammoning rope (indeed, it appears to be the same rope re-directioned). Decisions...decisions...decisions...
Speaking of decisions, I have decided that I will not be posting a play-by-play report on my rigging. I am certainly no expert so no one will really learn anything from me - and at 100 pages this build log is unwieldly enough already. If something is interesting, I'll certainly post it. Or when I complete significant stages it seems right that I should post a progress report.
I'll also be reaching out for help along the way so please feel encouraged to provide help or advice if you know how to solve one of my future questions or if you see mistakes in my rigging.
I truly enjoy following your work - you are a talented group and I have been learning from you and admiring your builds.
Onward with the rigging!
Hello Friends,
As I make the transition to rigging, I have been forced back into the build logs of my Vasa-building predecessors. In doing that I was reminded of the general level of excellence to be found in this niche community. On this forum and others there are some really masterful renditions of my beloved Vasa.
Equally impressive is the variety of rigging solutions for this ship. Indeed, there are more different interpretations than there are universal agreements. In fact, folks will make claims with great confidence: THIS IS HOW YOU DO THAT - and others will be equally assertive for an entirely different approach. At first I was greatly dismayed by that, but then I felt a certain freedom rising up from the discouragement. If people who know what they are doing have made different choices the 'bar' isn't as high as I feared it might be.
Anyway, I spent the entire day yesterday studying books, rigging guides, and build logs looking for answers to a very narrow set of questions about shrouds and mast tackles (and a bit about stays). Nothing was 'accomplished' on the ship itself - but decisions were made, and I'll call that progress.
Just so I could get my sea legs I decided I would rig one line. My goal was to get a sense of the skills I would need to develop. I served a rope, seized blocks, attached a hook - all things YOU already know how to do. For me it was all new ground being traveled (though I did rig cannons previously).
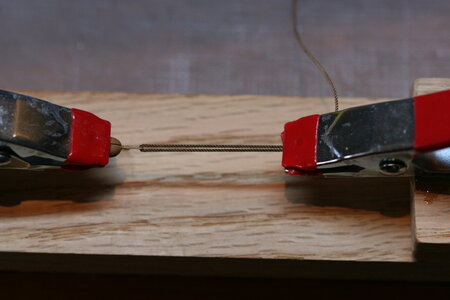
I also built some 'helpers' to assist me during the rigging stage. I have one of those alligator-clip 'third hand' things but I couldn't get it to hold lines securely or keep the rope straight enough for my tastes.
Here is my first finished line - a forward mast tackle using a violin (fiddle?) block and single block/hook at the channel (what Anderson calls a four-part Dutch tackle):
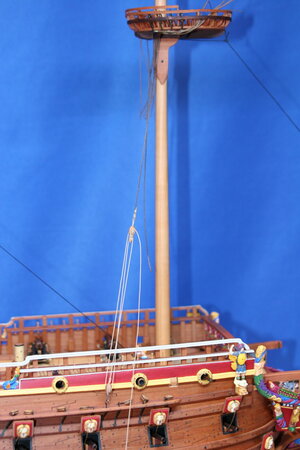
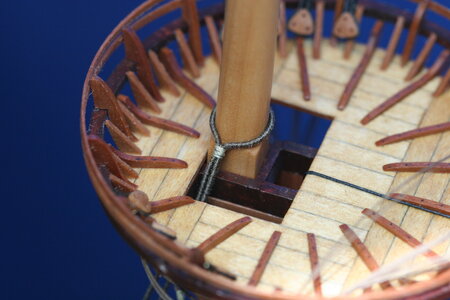
I started by creating a loop (a bight?) in the line. The rope diameter is 0.66 mm (I'll use the same size for the foremast shrouds) and has been served where it lays over the mast.
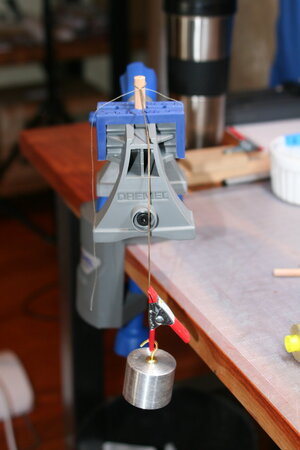
I then rigged up my blocks. Here is my 'helper' helping me tie into the loop at the violin block:
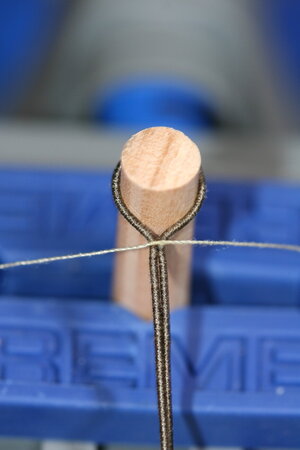
And here are some close-up images for your critical review. First, the loop over the mast:
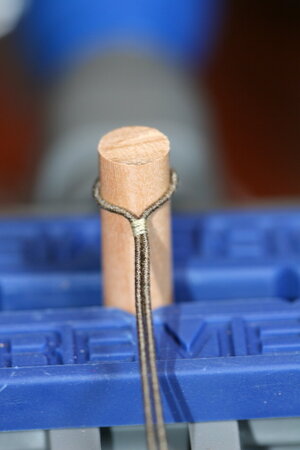
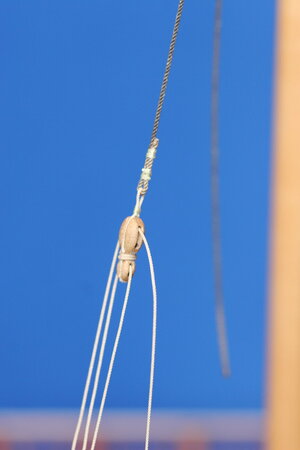
The rigging at the violin block:
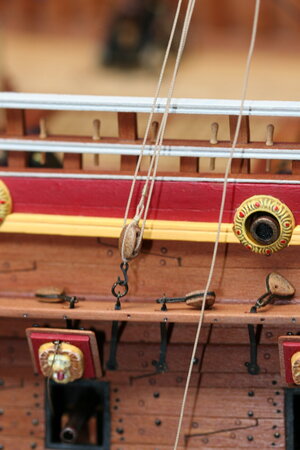
And the rigging at the channel:
Things I learned so far:
Still, it is clear I have rolled out of the blow-up 'pretty princess' kiddie pool right into the Olympic-sized competition pool...
This would be a great time for you all to point out things I did wrong during this trial run. I would be most grateful for your wise counsel and tricks of the trade.
Peace.
As I make the transition to rigging, I have been forced back into the build logs of my Vasa-building predecessors. In doing that I was reminded of the general level of excellence to be found in this niche community. On this forum and others there are some really masterful renditions of my beloved Vasa.
Equally impressive is the variety of rigging solutions for this ship. Indeed, there are more different interpretations than there are universal agreements. In fact, folks will make claims with great confidence: THIS IS HOW YOU DO THAT - and others will be equally assertive for an entirely different approach. At first I was greatly dismayed by that, but then I felt a certain freedom rising up from the discouragement. If people who know what they are doing have made different choices the 'bar' isn't as high as I feared it might be.
Anyway, I spent the entire day yesterday studying books, rigging guides, and build logs looking for answers to a very narrow set of questions about shrouds and mast tackles (and a bit about stays). Nothing was 'accomplished' on the ship itself - but decisions were made, and I'll call that progress.
Just so I could get my sea legs I decided I would rig one line. My goal was to get a sense of the skills I would need to develop. I served a rope, seized blocks, attached a hook - all things YOU already know how to do. For me it was all new ground being traveled (though I did rig cannons previously).
I also built some 'helpers' to assist me during the rigging stage. I have one of those alligator-clip 'third hand' things but I couldn't get it to hold lines securely or keep the rope straight enough for my tastes.
Here is my first finished line - a forward mast tackle using a violin (fiddle?) block and single block/hook at the channel (what Anderson calls a four-part Dutch tackle):

I started by creating a loop (a bight?) in the line. The rope diameter is 0.66 mm (I'll use the same size for the foremast shrouds) and has been served where it lays over the mast.


I then rigged up my blocks. Here is my 'helper' helping me tie into the loop at the violin block:

And here are some close-up images for your critical review. First, the loop over the mast:

The rigging at the violin block:

And the rigging at the channel:

Things I learned so far:
- This is going to take a long time.
- I don't have enough rope made - there is a lot of waste.
- Tweezers work better than fingers (at least in my hands - I'm pretty comfortable using small tools).
Still, it is clear I have rolled out of the blow-up 'pretty princess' kiddie pool right into the Olympic-sized competition pool...
This would be a great time for you all to point out things I did wrong during this trial run. I would be most grateful for your wise counsel and tricks of the trade.
Peace.
- Joined
- Apr 20, 2020
- Messages
- 5,125
- Points
- 738

Dear DocHello Friends,
As I make the transition to rigging, I have been forced back into the build logs of my Vasa-building predecessors. In doing that I was reminded of the general level of excellence to be found in this niche community. On this forum and others there are some really masterful renditions of my beloved Vasa.
Equally impressive is the variety of rigging solutions for this ship. Indeed, there are more different interpretations than there are universal agreements. In fact, folks will make claims with great confidence: THIS IS HOW YOU DO THAT - and others will be equally assertive for an entirely different approach. At first I was greatly dismayed by that, but then I felt a certain freedom rising up from the discouragement. If people who know what they are doing have made different choices the 'bar' isn't as high as I feared it might be.
Anyway, I spent the entire day yesterday studying books, rigging guides, and build logs looking for answers to a very narrow set of questions about shrouds and mast tackles (and a bit about stays). Nothing was 'accomplished' on the ship itself - but decisions were made, and I'll call that progress.
Just so I could get my sea legs I decided I would rig one line. My goal was to get a sense of the skills I would need to develop. I served a rope, seized blocks, attached a hook - all things YOU already know how to do. For me it was all new ground being traveled (though I did rig cannons previously).
I also built some 'helpers' to assist me during the rigging stage. I have one of those alligator-clip 'third hand' things but I couldn't get it to hold lines securely or keep the rope straight enough for my tastes.
Here is my first finished line - a forward mast tackle using a violin (fiddle?) block and single block/hook at the channel (what Anderson calls a four-part Dutch tackle):
View attachment 281397
I started by creating a loop (a bight?) in the line. The rope diameter is 0.66 mm (I'll use the same size for the foremast shrouds) and has been served where it lays over the mast.
View attachment 281390 View attachment 281391
View attachment 281392
I then rigged up my blocks. Here is my 'helper' helping me tie into the loop at the violin block:
View attachment 281393
And here are some close-up images for your critical review. First, the loop over the mast:
View attachment 281396
The rigging at the violin block:
View attachment 281394
And the rigging at the channel:
View attachment 281395
Things I learned so far:
Perhaps the most important thing I learned was that I did not 'hate' this as much as I feared I might. I was not super enthused with the process of rigging cannons, and I feared that might carry over. At least for now this was more fun (satisfying) than drudgery.
- This is going to take a long time.
- I don't have enough rope made - there is a lot of waste.
- Tweezers work better than fingers (at least in my hands - I'm pretty comfortable using small tools).
Still, it is clear I have rolled out of the blow-up 'pretty princess' kiddie pool right into the Olympic-sized competition pool...
This would be a great time for you all to point out things I did wrong during this trial run. I would be most grateful for your wise counsel and tricks of the trade.
Peace.
Well done for persevering in the learning and experimenting process, it has indeed brought you an impressive result. well done
Fear not, you are doing a great job, Mon Ami! Are those blocks from our friend of Dry Dock? Actually, they are a perfect match to the hull and masts (same great quality)!!!


