YIKES! It's not even the Vasa!About 40 years ago this was my first wooden kit and I really didn't know anything about them. I saw a big billings sailing ship in the hobby shop window and wanted to make one. I choose the Vasa as it was in my price range.
View attachment 229151
View attachment 229150View attachment 229152
I got up to the planking before having to pack it up as we were moving to Australia. The more I learnt about model ships I realised that this kit would never turn out well, it looked nothing like the Vasa. Also see the balsa for the rear balconies, stern galleries and life boat. It's a shame because I can see that they are a lot better now but I will never buy another one from Billings. Still very interested in your build you never know you could inspire me to change my mind.
You are using an out of date browser. It may not display this or other websites correctly.
You should upgrade or use an alternative browser.
You should upgrade or use an alternative browser.
VASA 490 Build Log - Billing Boats, 1:75 [Completed Build]
- Thread starter Daniel20
- Start date
- Watchers 64
-
- Tags
- billing boats vasa
Hi Daniel,
In a few posts ago (!!) you were questioning the colour red and its use in the various parts of the Vasa. Some time ago in my research of the ship, I too was confronted by the question, and I happened upon a research paper published in 2000 by Vasamuseet. The paper was written in both Swedish and English and brought a lot of light to the paint colours used on the ship. The paper was largely written by Hans Soop who was the art historian and senior curator at the Vasa Museum since the ship's excavation in 1961. In particular, there is a presentation and discussion of the pigments available and supplied to the ship's builders and artisans and this is useful in deducing the colour schema.
Below is a PDF of the document. The paper is now quite old and probably not available from the museum (although I am not sure). I hope you find it useful, I did.
PeterG
Attachments
Hi @PeterG !
Thank you so much for the PDF. I shall study it here shortly. It seems Vallejo Carmine Red is the primary choice but I'm also looking for some of the others as well. Right now I'm battling the decking veneer and am having to scrape two of the strips which came out way darker than the rest and am stalled for the time being.
After first sanding every thing seemed fine then as you can see after a linseed oil treatment one starboard and one port side strip way darker. Take a look.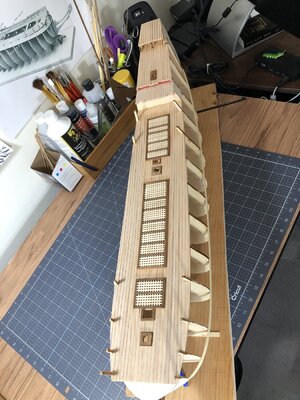
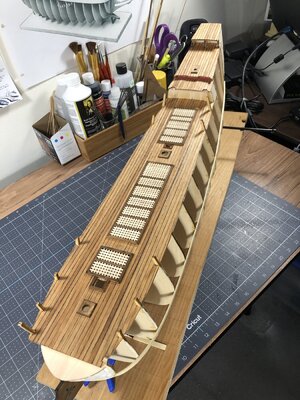
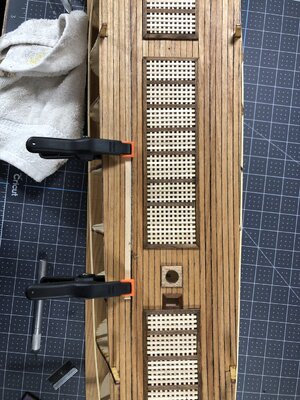
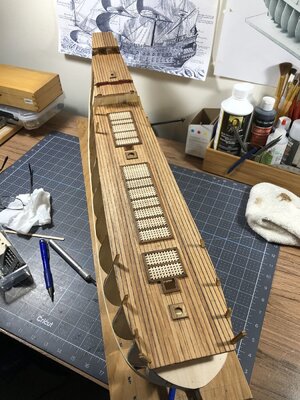
I think I'm slowly gaining on it though. Once I achieve a satisfactory color balance I'll add the random butt joints with nails.
Daniel.
Thank you so much for the PDF. I shall study it here shortly. It seems Vallejo Carmine Red is the primary choice but I'm also looking for some of the others as well. Right now I'm battling the decking veneer and am having to scrape two of the strips which came out way darker than the rest and am stalled for the time being.
After first sanding every thing seemed fine then as you can see after a linseed oil treatment one starboard and one port side strip way darker. Take a look.


I think I'm slowly gaining on it though. Once I achieve a satisfactory color balance I'll add the random butt joints with nails.
Daniel.
Daniel,
The linseed treatment (or any oil) will always bring out variations in the planking. Timber is not uniform, and in fact if you look at the actual Vasa, you will notice this variation too (although its a little hard to see in the light of the museum - I don't seem to have a good photo of the deck planking).
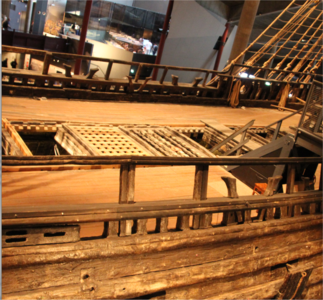
What have you used for the planking edges? You seem to have good 'tarring' between the planking, and it is quite uniform.
I also note that you have removed the tops of your bulkheads for the midships where they protrude through the decking. Was this to get them to fit, or was it that they were just to weakened when sanded. I had the same issue and just replaced them as the side planking came up around the ship and the upper decking.
Your gratings look excellent and I know its a lot of work, but it really enhances the appearance. Have you finished these for colour/stain or will they be darkened?
Great progress.
PeterG
The linseed treatment (or any oil) will always bring out variations in the planking. Timber is not uniform, and in fact if you look at the actual Vasa, you will notice this variation too (although its a little hard to see in the light of the museum - I don't seem to have a good photo of the deck planking).

What have you used for the planking edges? You seem to have good 'tarring' between the planking, and it is quite uniform.
I also note that you have removed the tops of your bulkheads for the midships where they protrude through the decking. Was this to get them to fit, or was it that they were just to weakened when sanded. I had the same issue and just replaced them as the side planking came up around the ship and the upper decking.
Your gratings look excellent and I know its a lot of work, but it really enhances the appearance. Have you finished these for colour/stain or will they be darkened?
Great progress.
PeterG
Даниэль, добрый день. Позвольте спросить - откуда взялась эта узкая дощечка на палубе? А петушиные решетки уложены по диагональной плоскости. Он касается верхнего гребня, и вы переносите его по всему кораблю.Привет, [USER = 7003] @PeterG [/ USER]!
Большое спасибо за PDF-файл. Я скоро изучу это здесь. Кажется, что Vallejo Carmine Red - лучший выбор, но я также ищу некоторые другие. Прямо сейчас я борюсь со шпоном настила, и мне нужно соскрести две полосы, которые оказались темнее остальных, и на время застряли.
После первой шлифовки все выглядело хорошо, как вы можете видеть после обработки льняным маслом, одна полоса правого борта и одна боковая полоса левого борта стали темнее. Взглянуть.View attachment 229646View attachment 229647View attachment 229648View attachment 229649
Я думаю, что я постепенно к этому прихожу. Как только я добьюсь удовлетворительного цветового баланса, я добавлю случайные стыки с гвоздями.
Даниэль.
Peter, Thank you for your encouraging words. I only left the taller bulkhead tips in to maintain continuity of the side slopes. I would have preferred to remove taller ones for ease of decking but it wasn't possible. For the tar effect I used a sharpie along the edges then after glue down, sanding, and oiling I used a .5mm mechanical pencil and straight edge as a top line over each joint. I'm sure at scale (what 3.75 cm) it is too wide but I like the effect.Daniel,
The linseed treatment (or any oil) will always bring out variations in the planking. Timber is not uniform, and in fact if you look at the actual Vasa, you will notice this variation too (although its a little hard to see in the light of the museum - I don't seem to have a good photo of the deck planking).
View attachment 229651
What have you used for the planking edges? You seem to have good 'tarring' between the planking, and it is quite uniform.
I also note that you have removed the tops of your bulkheads for the midships where they protrude through the decking. Was this to get them to fit, or was it that they were just to weakened when sanded. I had the same issue and just replaced them as the side planking came up around the ship and the upper decking.
Your gratings look excellent and I know its a lot of work, but it really enhances the appearance. Have you finished these for colour/stain or will they be darkened?
Great progress.
PeterG
Alexander, Thank you I'm sure for your reply however I do not know the Russian Federation language. I'm not sure if there is a built in translator somewhere but I will check into it.Даниэль, добрый день. Позвольте спросить - откуда взялась эта узкая дощечка на палубе? А петушиные решетки уложены по диагональной плоскости. Он касается верхнего гребня, и вы переносите его по всему кораблю.
Daniel
Daniel, good afternoon. Let me ask you-where did this narrow plank on the deck come from? And the rooster bars are laid on a diagonal plane. It touches the top ridge, and you carry it all over the ship.Alexander, Thank you I'm sure for your reply however I do not know the Russian Federation language. I'm not sure if there is a built in translator somewhere but I will check into it.
Daniel
Alexander, good afternoon to you too. The planking strips are 5mm wide by 1mm thick Tanganika wood. I bought these from Modelers Central and they shipped from Australia. In your translation you refer to "rooster bars" and I'm not sure what that is but if your referring to the alignment of the planking its just a mater of starting on the centerline of the ship and progressing out in each direction. The three upper decks on the stern were done that way. On the main deck I decided to use the left and right edge of the grating as my starting line which did give me some problems with symmetry if you look closely. This outweighed the problem of having to split longways two of the strips had I chosen to begin on the center line of the main deck. I hope that made sense.Daniel, good afternoon. Let me ask you-where did this narrow plank on the deck come from? And the rooster bars are laid on a diagonal plane. It touches the top ridge, and you carry it all over the ship.
Daniel
@Alexander74 Sasha, do you need my help translating? @Daniel20 I think, we called the 'raster bars' is the hatch covers, if I understand Aleksandr correctly. Here, I search for рустерные решетки (ru), and I found exactly the hatch covers.
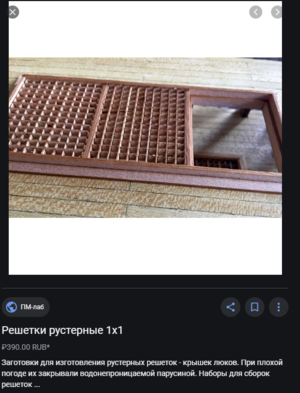

Thanks Jim. I did see where you can right click and get an English translation.@Alexander74 Sasha, do you need my help translating? @Daniel20 I think, we called the 'raster bars' is the hatch covers, if I understand Aleksandr correctly. Here, I search for рустерные решетки (ru), and I found exactly the hatch covers.
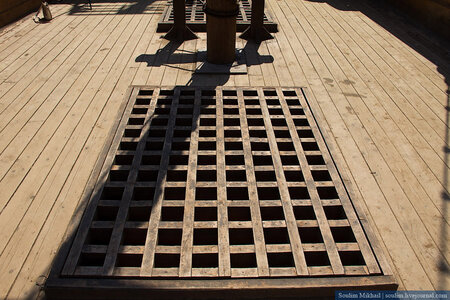
View attachment 229756
Hello@Alexander74. With some help from one of our staff administrators I see you are talking about the "grating". There is in fact a slight crown (top ridge) running the length of the ship. The crown is so slight I just clamped down both sides and forced a bond. The effects of this were so slight you have to look real close to see it. Buy the way welcome aboard SOS!
Daniel
Daniel
You did a great job Daniel, however individual planks create more variation like a real wood floor. I know it’s more work, but there is really no substitute.Hi @PeterG !
Thank you so much for the PDF. I shall study it here shortly. It seems Vallejo Carmine Red is the primary choice but I'm also looking for some of the others as well. Right now I'm battling the decking veneer and am having to scrape two of the strips which came out way darker than the rest and am stalled for the time being.
After first sanding every thing seemed fine then as you can see after a linseed oil treatment one starboard and one port side strip way darker. Take a look.View attachment 229646View attachment 229647View attachment 229648View attachment 229649
I think I'm slowly gaining on it though. Once I achieve a satisfactory color balance I'll add the random butt joints with nails.
Daniel.
That said I’m sure once done and all the cannons and deck furnishings are on, it will appear to have more variation.
Thanks for the encouragement Dean. I'm hoping the application of butt joints and nails will tend to break up ones eye being taken straight to the darker planks. Having said that what a wonderful learning experience.
Да, Джим. Есть трудности с переводом. Я пользуюсь переводчиком, но переводит не правильно. речь шла о тонкой рейке палубы в носу и до о рустерных решетках. на твоем фото они тоже лежат не правильно. Решетка состоит из гребенок. Верхние гребенки должны быть параллельно ДП (диаметральной плоскости) корабля. Проще говоря - верхние гребенки должны быть параллельно доскам палубы. Может так понятнее. Это написано во всех книгах, которые знаю.[USER = 13133] @ Alexander74 [/ USER] Саша, тебе нужна моя помощь с переводом? [USER = 9199] @ Daniel20 [/ USER] Я думаю, мы назвали «растровые полосы» - это крышки люков, если я правильно понял Александра. Здесь я ищу рустерные решетки (ru) и нашла именно крышки люков.
View attachment 229756
Даниель, я имел ввиду вот эти планки, которые стрелкой отметилАлександр, и вам добрый день. Планки обшивки имеют ширину 5 мм и толщину дерева Танганика 1 мм. Я купил их в Modelers Central, и они были отправлены из Австралии. В вашем переводе вы имеете в виду «петушиные перекладины», и я не уверен, что это такое, но если вы имеете в виду выравнивание обшивки, это всего лишь начало на центральной линии корабля и продвижение в каждом направлении. Так были сделаны три верхние палубы на корме. На главной палубе я решил использовать левый и правый край решетки в качестве стартовой линии, что действительно дало мне некоторые проблемы с симметрией, если вы присмотритесь. Это перевесило проблему разделения двух полос по длине, которые я выбрал для начала на центральной линии главной палубы. Надеюсь, это имело смысл.
Даниэль
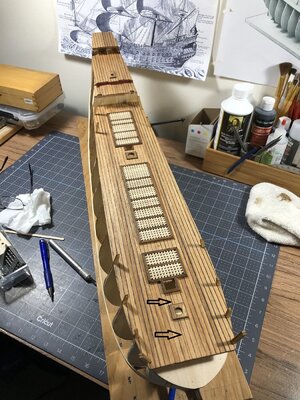
Aleksandr pointed out that the top planks of gratings must be parallel to the planks on the deck (I read this in all of my books I am familiar with)Да, Джим. Есть трудности с переводом. Я пользуюсь переводчиком, но переводит не правильно. речь шла о тонкой рейке палубы в носу и до о рустерных решетках. на твоем фото они тоже лежат не правильно. Решетка состоит из гребенок. Верхние гребенки должны быть параллельно ДП (диаметральной плоскости) корабля. Проще говоря - верхние гребенки должны быть параллельно доскам палубы. Может так понятнее. Это написано во всех книгах, которые знаю.
Hi Alexander.Daniel, I was referring to these planks that pointed the arrow.View attachment 229810
The thin planks you pointed out are a result of using the port and starboard sides of the grating frame as my beginning lines to lay in full width planks. In terms of symmetry this was not the best solution. However the planking on the real VASA is asymmetric near as I can tell. When I lay in the butt joints they will not be symmetric either. As for "top" grating direction I had no idea there was a correct direction parallel with the deck planking. There will no doubt be a very long list of inconsistences you will be able to find as my build progresses, I can only hope to keep your interest as I am always eager to learn. While I admire and applaud those who strive for historical correctness, my goals are not too strict in that arena. I just want to produce a model that is pleasing to the eye.
Hey Jim if I now understand the grating direction are the grating shown in post #70 going in the wrong direction?Aleksandr pointed out that the top planks of gratings must be parallel to the planks on the deck (I read this in all of my books I am familiar with)


