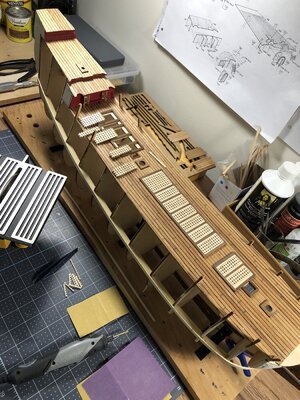
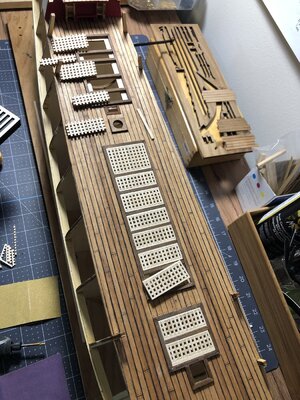
Thank you for the picture Alexander. I can see a consistent flow of direction. Much more pleasing to the eye. Maybe there is a structural component in this as well. The longer boards running longitudinal need better support from underneath??
You are using an out of date browser. It may not display this or other websites correctly.
You should upgrade or use an alternative browser.
You should upgrade or use an alternative browser.
VASA 490 Build Log - Billing Boats, 1:75 [Completed Build]
- Thread starter Daniel20
- Start date
- Watchers 64
-
- Tags
- billing boats vasa
Yes, Daniel. The image I supplied is wrong, indeed. The reason for this image is just to show you when you 'Google' search for Russian word of 'gratings'Hey Jim if I now understand the grating direction are the grating shown in post #70 going in the wrong direction?
Good rainy Friday morning.
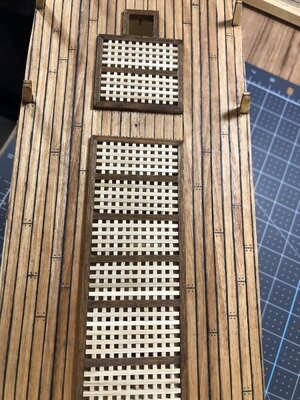
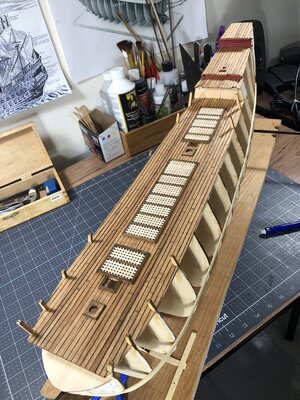
I've been working on the deck trying to do final improvements before moving on. I laid in the random butt joints and nails (black 0.5mm pencil marks). I was disappointed to learn I had the longitudinal components of the deck grating inverted, I attempted to flip them over but decided it would tear up too much. I may order more grating and just redo it. Meanwhile I added the lower deck canon supports and began fabrication of the faux cannon backdrop which I will "plug in " when I cut in the final port holes after hull planking. Right now this is sort of proof of concept that this method will work. I still need to set the reference plank for the mid row of cannon supports then will finish first layer hull planking.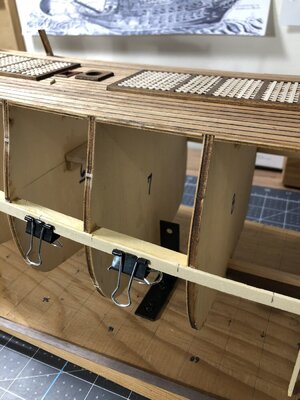
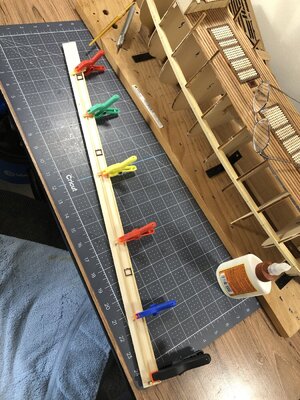
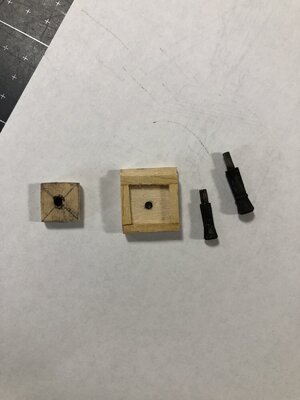
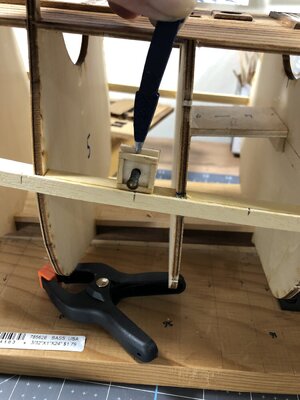
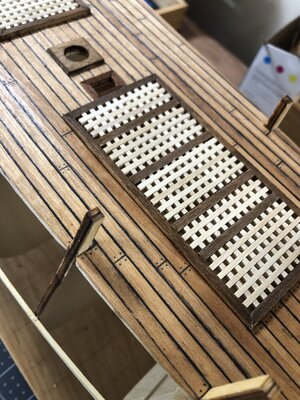
Before I plank up the sides I will finish with the doors stairs painting of the exterior while I have open access from the sides. Old chain plates cut in half and extra rings make excellent door hinges and pull handles.
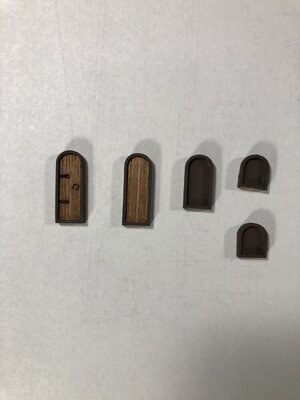
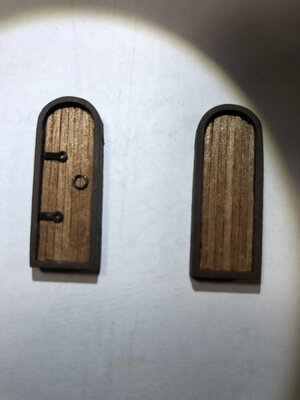
I thank you all for checking in and until next time
Happy modeling!
I've been working on the deck trying to do final improvements before moving on. I laid in the random butt joints and nails (black 0.5mm pencil marks). I was disappointed to learn I had the longitudinal components of the deck grating inverted, I attempted to flip them over but decided it would tear up too much. I may order more grating and just redo it. Meanwhile I added the lower deck canon supports and began fabrication of the faux cannon backdrop which I will "plug in " when I cut in the final port holes after hull planking. Right now this is sort of proof of concept that this method will work. I still need to set the reference plank for the mid row of cannon supports then will finish first layer hull planking.


Before I plank up the sides I will finish with the doors stairs painting of the exterior while I have open access from the sides. Old chain plates cut in half and extra rings make excellent door hinges and pull handles.


I thank you all for checking in and until next time
Happy modeling!
The deck is looking really nice Daniel! I noticed that the inside of the gun barrel (the opening) was not painted - don't forget that (though, of course, it can be done at any time). I laughed when I saw you were working on doors - me too. You're making speedy work of this build. You'll pass me up in no time!
Hello Paul, thanks for the complement. I noticed the brass inside the barrel as well. I used 'Brass Black' on the test cannon and will need to swirl some around the inside recess with a toothpick, I guess an air bubble formed in there. I will be painting the cannon mounting assembly black as well. there should be about a 4mm set back.
Даниэль, если вы решили переделать люковые решетки, обратите внимание на положение нижней и верхней планок по краям. Они должны быть рядом с зажимом люка.Доброе дождливое утро пятницы.
Я работал над колодой, пытаясь сделать последние улучшения, прежде чем двигаться дальше. Я уложил случайные стыки и гвозди (черные карандашные метки 0,5 мм). Я был разочарован, узнав, что у меня были перевернуты продольные компоненты решетки палубы, я попытался перевернуть их, но решил, что это будет слишком много. Я могу заказать еще решетку и просто переделать ее. Тем временем я добавил опоры для канонических пушек нижней палубы и приступил к изготовлению фальшивого фона для пушек, который я «вставлю», когда прорежу последние отверстия левого борта после обшивки корпуса. Прямо сейчас это своего рода доказательство концепции, что этот метод будет работать. Мне все еще нужно установить опорную планку для среднего ряда опор орудий, а затем закончу обшивку первого слоя корпуса.
Перед тем, как обшить боковые стенки, я закончу покраску дверных лестниц снаружи, пока у меня будет открытый доступ с боковыми стенками. Из старых цепных пластин, разрезанных пополам, и дополнительных колец получаются отличные дверные петли и ручки.
[ATTACH = полный] 230539 [/ ATTACH] [ATTACH = полный] 230540 [/ ATTACH]
Я благодарю вас всех за проверку и до следующего раза
Удачного моделирования!
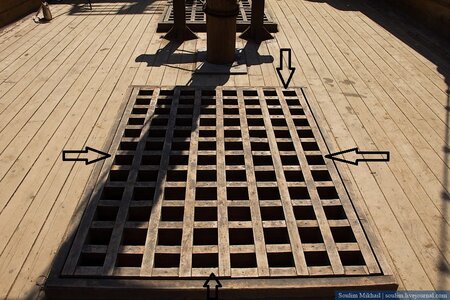
Hi Alexander, yes I will be sure to watch for this. If I had made them "removable" I could just flip them over but unfortunately I glued them down too good.Daniel, if you decide to remake the hatch grille, pay attention to the position of the bottom and top straps around the edges. They should be next to the hatch clamp.View attachment 230569
Looking great Daniel. Keep up the nice detail work!Good rainy Friday morning.
I've been working on the deck trying to do final improvements before moving on. I laid in the random butt joints and nails (black 0.5mm pencil marks). I was disappointed to learn I had the longitudinal components of the deck grating inverted, I attempted to flip them over but decided it would tear up too much. I may order more grating and just redo it. Meanwhile I added the lower deck canon supports and began fabrication of the faux cannon backdrop which I will "plug in " when I cut in the final port holes after hull planking. Right now this is sort of proof of concept that this method will work. I still need to set the reference plank for the mid row of cannon supports then will finish first layer hull planking.View attachment 230530View attachment 230531View attachment 230532View attachment 230533View attachment 230534View attachment 230535View attachment 230536
Before I plank up the sides I will finish with the doors stairs painting of the exterior while I have open access from the sides. Old chain plates cut in half and extra rings make excellent door hinges and pull handles.
View attachment 230539View attachment 230540
I thank you all for checking in and until next time
Happy modeling!
Is it possible to pull up the entire frame with all the grates and flip over? Then just sand the top of the frame and add the extra board in the center. Just food for thought. It really depends how well you glued it down, what glue you used and if your willing to put vinegar on it to loosen the glue. You run the risk of damaging the planking. Or you could do nothing, call it a lesson and move on.Hi Alexander, yes I will be sure to watch for this. If I had made them "removable" I could just flip them over but unfortunately I glued them down too good.
I am inclined to agree with Dean. The gratings may not be 100% accurate but it is a lesson well learnt.
The cannon lower deck mountings will look good when fitted and painted black. Sure beats making individual cannon carriages for that number!!
One I of the things I did for the outer door frames was to tightly twist thin copper wire with a drill, cut to length, bend to the shape of the frame and paint (probably yellow). Glued to the frames it looks really good and appears as a close match to the original ornamentation.
PeterG
Hi Dean. It is possible to pull it all up however it would damage the plywood base sub decking and the deck planking as well. I have glued down the grate frame onto the plywood sub deck then planked along the sides of the grating frame. I used wood glue to hold the frame down and CA to hold the grating inside the frame. If I do revise this I will carefully cut and mill out just the grating. Interesting comment about the vinegar as a glue solvent. What glue type does it work on?Is it possible to pull up the entire frame with all the grates and flip over? Then just sand the top of the frame and add the extra board in the center. Just food for thought. It really depends how well you glued it down, what glue you used and if your willing to put vinegar on it to loosen the glue. You run the risk of damaging the planking. Or you could do nothing, call it a lesson and move on.
Hello Peter, I do see the twisted wire detail in the plans and will experiment with it. I sure fell head down face first into this grating problem. I'm going to order more grating so if I get the inclination to change it at least I'll have it on hand. I appreciate your comments.I am inclined to agree with Dean. The gratings may not be 100% accurate but it is a lesson well learnt.
The cannon lower deck mountings will look good when fitted and painted black. Sure beats making individual cannon carriages for that number!!
One I of the things I did for the outer door frames was to tightly twist thin copper wire with a drill, cut to length, bend to the shape of the frame and paint (probably yellow). Glued to the frames it looks really good and appears as a close match to the original ornamentation.
PeterG
Daniel
Vinegar dissolves most PVA glue. Sounds like your best bet is to move on and consider it a lesson for the future.Hi Dean. It is possible to pull it all up however it would damage the plywood base sub decking and the deck planking as well. I have glued down the grate frame onto the plywood sub deck then planked along the sides of the grating frame. I used wood glue to hold the frame down and CA to hold the grating inside the frame. If I do revise this I will carefully cut and mill out just the grating. Interesting comment about the vinegar as a glue solvent. What glue type does it work on?
Если ошибку можно исправить, то это не ошибка. Но это дело капитана
Hi Dean, I've reorderd the grating and have decided to do this right. I think I'll fabricate the removable style anyways as I'm sure the real ones were.Vinegar dissolves most PVA glue. Sounds like your best bet is to move on and consider it a lesson for the future.
Last edited:
Hi Alexander, you are correct, in my old line of business if there was a problem the saying was it's not a mistake until the concrete is poured. Again I want to thank you for pointing this out originally.If the bug can be corrected, it is not a mistake. But it's the captain's business.
I have an exciting update here. I had ordered replacement grating to redo the grating that I had improperly aligned. I received a email from the supplier stating they would not have the size I needed in stock until September of this year! After checking around with other sources my size is nowhere to be found?? So I went for broke found a small painters putty spatula and eureka, was able to pop off the grating with very little damage. Now I will simply turn them over, create a frame for each to be removable and sand off the glue !!! As silly as all this may sound it is huge for me to be able craft a more reasonable representation of my model. Thanks again to the experts on this forum for educating me on this.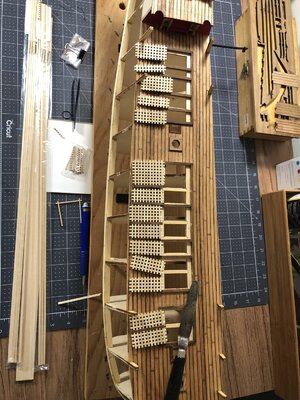

That's awesome Daniel...glad it worked out! I know you had a moment of anxiety when you pried on that first one, not knowing what the outcome would be!I have an exciting update here. I had ordered replacement grating to redo the grating that I had improperly aligned. I received a email from the supplier stating they would not have the size I needed in stock until September of this year! After checking around with other sources my size is nowhere to be found?? So I went for broke found a small painters putty spatula and eureka, was able to pop off the grating with very little damage. Now I will simply turn them over, create a frame for each to be removable and sand off the glue !!! As silly as all this may sound it is huge for me to be able craft a more reasonable representation of my model. Thanks again to the experts on this forum for educating me on this.View attachment 231666
Yes Dean I was so relieved when I could see how they were coming out. I must admit placing a frame around the grating itself and running the solid member longitudinal looks way better. Lesson learned! Here's a couple as built shots. I will try to finish tomorrow and resume my hull planking.That's awesome Daniel...glad it worked out! I know you had a moment of anxiety when you pried on that first one, not knowing what the outcome would be!
