Vasa Build Log - Billing Boats - Scale 1/75 [COMPLETED BUILD]

First of all

My CONGRATULATIONS for this amazing model - a wonderful model built with love, enthusiasm and knowledge
Great

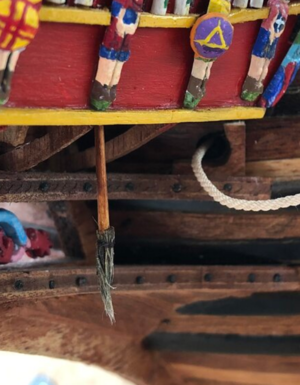
And I love these svalbel or brooms - known from diverse Van de Velde paintings
Screenshot 2022-11-22 134401.png IMG_0055.jpg

just a small remark: for me they are not for the anchors only for the "ease afterwards" - otherwise for anchors, they would have not been necessary at the sterns of these ships -> maybe you add one also at the stern???
IMG_0062.jpg IMG_0066.jpg

Realy a great detail - Bravo
 
Many thanks Daniel. Your ship is also progressing so well and I am jealous of your baseboard (wish I had seen that!!!).

The final detail takes a long while. Make sure you make a list - It’s the only way I could be sure to get all the late stage things done.

Thanks again,

Regards,

PeterG
 
Uwek,

Thank you for your comments. I had never seen any indication that the svalbel (singular and plural ???) were also at the stern of ships. This would indicate their purpose was definitely for the ‘seats of ease’. I had read in another build log that these were dual purpose but the writer said he was not sure.

Many thanks for clarifying their use. Glad we don’t have them on today’s ships!!

Regards,

PeterG
 
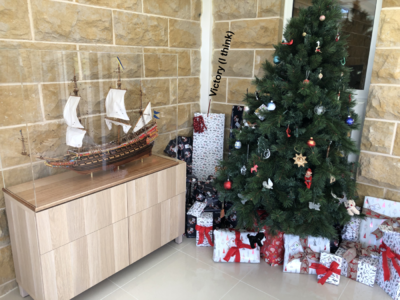
Well I finally positioned the Vasa and its baseboard onto a cabinet we purchased for the purpose. We needed a new cabinet/buffet in our conservatory anyhow so the admiral was happy to have it for the ship as well. It is on a wall that is sandstone so it suits quite well with the colour scheme and the look of the ship is great. After placing the ship and baseboard on the cabinet, we carefully lowered the new perspex enclosure over the top and seated it into the routed groove of the baseboard made for the purpose. The picture below shows the mounted ship and enclosure.

1669155872252.png

As you can see, the ship is in the same corner as our annual Christmas Tree (Happy Christmas everyone!!). I am not supposed to know, but I think my next project is in the corner (Caldercraft Victory) - Can't wait!!!

I am having a brass plaque made up for the ship and this will need to be inserted onto the baseboard by lifting the enclosure when it arrives. The ship is an imposing piece within the room and it has already gotten a lot of comments. My grandchildren want to touch it and are asking lots of questions about 'what is this?' or 'what is that?'.

You know that the project is close to the end at this stage. I don't know whether to be thankful or just exhausted.... Either way, it has been a long journey (especially through bushfires, Covid-19 and now consistent rain and floods), but a very enjoyable one. Thanks to everyone who has commented and contributed.

Regards,


PeterG

PS I think the final tally for the build was 2,650 hours. It was certainly no less but could be more!!
 
Many thanks Paul,

I look forward (as I am sure you do), to seeing your Vasa at this stage. Your build has been inspirational and helped me more than you will know.

Thanks again,

Regards

PeterG
 
A truly wonderful model, Peter. The transparency of the display case makes the whole model blend in wonderfully against the sandstone background. I can only imagine what a conversation piece she must be. I trust that your gift is indeed underneath the Christmas tree as I for one cannot wait to see you start that project. I am sure that everyone who has followed your VASA build, will wholeheartedly agree.
 
Thank you Heinrich.

A new ship project, especially one as ambitious as the Victory, will be a long time before completion. I have been reviewing the many books that detail her history and construction so, like the Vasa, the background research will also take a while.

It is this slow, methodical but enjoyable approach to the hobby that is so rewarding.

I know it is early, but have a Happy Christmas one and all. Let’s all hope we have something under your tree that contributes to your ship modelling hobby!!

Regards,

PeterG
 
Hello Peter,

I'm catching up a bit late, but I wanted to congratulate you on your magnificent Vasa! Your attention to detail is second to none, and I look forward to your Victory.

All the best,

Marc
 
Well I finally positioned the Vasa and its baseboard onto a cabinet we purchased for the purpose. We needed a new cabinet/buffet in our conservatory anyhow so the admiral was happy to have it for the ship as well. It is on a wall that is sandstone so it suits quite well with the colour scheme and the look of the ship is great. After placing the ship and baseboard on the cabinet, we carefully lowered the new perspex enclosure over the top and seated it into the routed groove of the baseboard made for the purpose. The picture below shows the mounted ship and enclosure.

View attachment 342027

As you can see, the ship is in the same corner as our annual Christmas Tree (Happy Christmas everyone!!). I am not supposed to know, but I think my next project is in the corner (Caldercraft Victory) - Can't wait!!!

I am having a brass plaque made up for the ship and this will need to be inserted onto the baseboard by lifting the enclosure when it arrives. The ship is an imposing piece within the room and it has already gotten a lot of comments. My grandchildren want to touch it and are asking lots of questions about 'what is this?' or 'what is that?'.

You know that the project is close to the end at this stage. I don't know whether to be thankful or just exhausted.... Either way, it has been a long journey (especially through bushfires, Covid-19 and now consistent rain and floods), but a very enjoyable one. Thanks to everyone who has commented and contributed.

Regards,


PeterG

PS I think the final tally for the build was 2,650 hours. It was certainly no less but could be more!!
Good morning Peter. Congratulations on completing this beautiful Vasa. Man you guys who built the Vasa are talented and have produced outstanding models. A very fitting place for your Vasa and displayed exquisitely.

I look forward to your Victory build.
Cheers Grant
 
I only recently discovered SOS and so wasn't entering a build log as I went for the last few months of a build of the Swedish Vasa from the Billing Boat kit. My name is Peter, and I live in the snow country of south-east Australia. About 12 months ago, following a cruise in the Baltic Sea my wife and I visited the amazing Vasamuseet in Stockholm, I commenced building the Vasa. This is the second large Billing Boat I have constructed, the first being the Cutty Sark, almost 40 years ago. This model is proudly displayed in a glass case in our home and has been a talking point and feature most of my life. Hopefully, while I now have more time, the Vasa will be the same.

I have read many of the build logs regarding the Vasa and of these, there are builds from kits of Corel, Sergal/Mantua, Billing and more recently the De Agostini release from Italy. Prior the DeAgostini model (by ModelSpace), a number of writers commented that they felt the Billing Boat's Vasa was the most accurate. It was available before the DeAgostini model release, and so my choice was the Billing Boats kit when I made the purchase. Having now progressed through this build, overall I am very happy with the content of materials (although I have substituted some timbers), and scratched a number of items (eg below decks cannon mounts etc). The instructions are limited and short on detail, but the build logs have subsequently helped and filled in some of the 'gaps'.

View attachment 113240

The kit packaging and delivered product was complete with no obvious broken parts or missing items. One thing that I did notice was that hull planking used timber referred to as 'Obechi'. While this was included, I did not like its scaled width or thickness, and so I did some maths to scale the planking of the actual ship pictures I had, and then purchased some 5 x 1 mm mahogany in precut strips. This to me, was a much better planking material, and better for the scaling appearance of the ship. A similar argument held for the deck planking and so I milled some of the mahogany to use for this as well. Different stain/treatments were also used to maintain reasonable appearance and weathering effects.

View attachment 113241

Bulkhead layout was straightforward but the bulkhead extensions above deck (which were instructed to be 'thinned') were weak and fragile. Some of these broke in the process of the build, especially with the deck plywood fitting and so I trimmed these and added extensions later when the planking was built up above the deck level. The decking base needed some trimming but this was minimal and fitted satisfactorily.

View attachment 113242

Before any comments are made about the Smirnoff bottles in the background, these are holding raw alcohol which I intend to use in assisting the bending of planks. This is to be an experiment, but I have read where it is more effective than water and/or steam bending. More on this later!!

Thanks - more soon

Peter G.
Hallo @PeterG
we wish you all the BEST and a HAPPY BIRTHDAY
Birthday-Cake
 
Awesome Peter! I hope you have a wonderful day celebrating with family and friends! I miss seeing you on the forum - I think there was a Victory in your closet begging to be built?
 
Back
Top