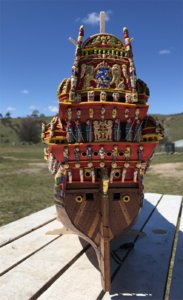
Vasa Build Log - Billing Boats - Scale 1/75 [COMPLETED BUILD]

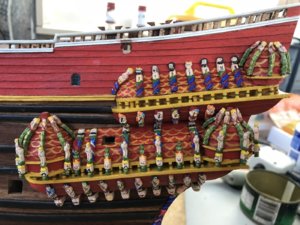
The galleries and topsides are now completed to a point where I can start dealing with the artwork/sculptures and their shaping and painting. There are two stages to adding the sculptures for the Billing Boat kit-supplied figures.

Stage 1: Shaping

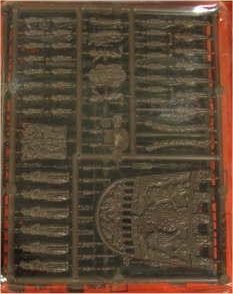
Billing Boats supply brown, dense plastic mouldings of the various carved figurines. These had to be shaped to conform with the various curved surfaces they needed to be fitted onto (especially in the case of the galleries). In other locations (eg bow section, the Roman figures are applied without shaping, only fitting). After a number of trials on discarded parts of the same plastic (frames), I attempted to shape the plastic. These trials included experimenting with using boiling water, hot air from a hot air gun, a ski waxing electric iron (similar to a clothes iron, but my wife wasn't happy about using that!!), a candle (as the instructions describe to use) and a curved but temperature controllable electric soldering iron. Some of these methods destroyed the plastic, melting it, others methods made it only a bit malleable so when bent to shape, the plastic cracked. The best method I found was the soldering iron on about half maximum heat. I found I could slide the back, flat surface of the figurines around the curve outer face of the soldering iron and then I had about 10-15 seconds to place it on the ship where required and bend to shape. After this time, it cooled back to being rigid and inflexible.

While the above method achieved the shaping I needed, one of the downsides (although this was an effect I noticed on ALL heating/shaping methods), was that the plastic slightly shrunk in size!! In some cases this was an advantage (when the space available on the model was tight), but generally the lengths of the figures fitted the ship for length so reducing size was an issue. The trick was to keep the heating to just enough to bend to shape, but not overheat to cause very much shrinkage. In general this worked OK, but there were a few disasters (over in excess of 200 figurines!!). Billing Boats provide only about the right number of sculptured carvings, so there was little room for error.

Stage 2: Painting

As said above, the supplied plastic was a dark brown. While the plastic took paint quite well, the brown is not a good colour when applying acrylic paints. So I needed to use a light, white undercoat to allow the best base for the overcoating. To minimise any loss of very small figure detail, I used a white spray-on undercoat while the figures were attached to their supplied frames. Below you can see an example of the plastic, supplied, unpainted figures in their frames.
Plastic.jpg

By undercoating the figures initially, this of course was pre-heating and pre-shaping. I found that the heating and bending in most cases did not cause the undercoat to come off or delaminate. In some instances there was a little cracking, but not too bad. So, with the undercoat relatively intact and the figures individually shaped, I could commence painting. My local supplier (and I live in the country, many hours from a large city), so the internet and mail postage is my normal means of supply), stocked Vallejo acrylic model paints and when trialled, these seem to give excellent, dense coverage, could be mixed effectively and dried quickly.

I purchased a range of what I thought would be the most used colours (black, white, silver, yellow, red, two blues, two greens, orange, two browns, two flesh colours and purple). Not a huge range I know, but with mixing, it should be adequate. I reviewed a lot of videos and web descriptions on acrylic model painting.

Let me tell you, there is a WHOLE NEW WORLD out there in painting of model figures. The painting is mainly targetted at gaming and painting figures for Warhammer and battles etc etc. The artwork is truly impressive with base coats, washes, highlights, dry painting and effects. If you are painting anything on your models, I urge you to spend a little time internet searching acrylic painting of plastic models/figures. It is a REAL EYE OPENER!!! some of the figures being painted is even a little risque!!

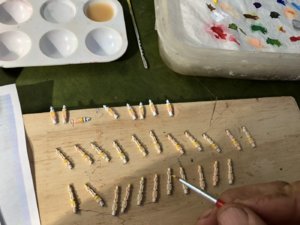
So with my newfound knowledge about techniques and a bit of experimenting I started on painting Vasa figurines. I started with small figures and got more confident (there was no shortage of the number to be done!!). I cut the figures from the frames and then painted individually. Others I know have tried painting on the frames and then cutting apart. While this is a reasonable method, the cut of course has to be then touched up later, and when mixing colours, this is not always possible, so I opted for individual figurine painting in the majority of cases. I tended to use a colour and go randomly from one figure to the next in the collection using the smae colour until done. The picture below shows this. I used a water-filled dish with baking paper sitting on wet sponge which acts as a palette and keeps the small amounts of paint useable for hours, even days, when sealed. This is a 'wet-method' idea I picked up from the internet research. You can see the water-pallette in the photo here:
IMG_4179.JPG

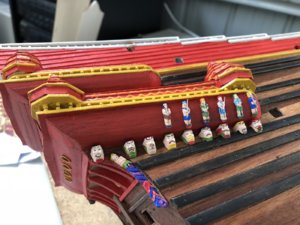
A few different paintbrushes ranging from size 00 to size 2 were used and with fresh water on hand, cleaning of the brush and moving on to different colours or different parts of each figure was not a problem. For some of the figures, spears, swords or musical instruments are seen on the original ship carvings. After painting, I added some of these for effect. I found for spears and poles etc, some trimmed brush hairs painted black or silver were ideal for the scale when CA glued on. I show some of these for the lower starboard gallery as it progresses.
IMG_4186.JPG

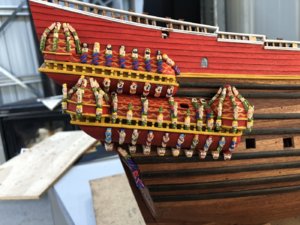
The number of figures on each side is impressive. It takes a LONG time but the effect is just amazing. In nearly all cases, I have used CA glue to attach the figures. The next photo shows the nearly completed starboard galleries.
IMG_4200.JPG

Well, nearly half way!! Now to do the portside galleries, and then the stern.

Time elapsed: 925 hours

Regards,

Peter G.
 
Peter,
Superb update. Your painting details are just perfect.
As you know the figures are one ot the big downsides to Corel's kit. One would think that after more than 30 years since its release Corel would update the kit. Though by now it might not be cost effective - Billings and Deagostini examples are so close to the 1:1
PS: I sent a lot of time studying the 1:10th :) as well
I was at the Vasa Museum in 2018, spent an hour with Dr. Fred Hocker - He gave me a tour of the research department (they are still removing artifacts from the wreck site) - we had a great discussion - Memorable experience, such a nice person.

I had also been at the museum in the mid 90s was working in London - (so had to hop over) - SO many more displays have been added since then, including being able to walk around the entire ship at its base.

IMG_7594.jpeg
 
Many thanks Charles. Your compliments are always well received.

Michael,

I have admired your build for a long time and have been absolutely impressed with you abilities to 'scratch' something when the kit falls short of the research. Your attention to fine detail is simply magnificent (https://shipsofscale.com/sosforums/threads/corel-vasa-bashed.2541/). I know you (and many others) have made comments about the Corel kit figures and other design faults previously. To give them some credit of course, their Vasa kit was based on knowledge as it was in, what, the 1980's (?), before Fred Hocker and the research team studied the ship in such depth. Updating such a kit, as you say, would probably not be cost-effective, but some effort would improve the situation.

Unfortunately I did not have the pleasure of meeting Mr Hocker when I visited in July 2017. It must have been a wonderful and educational experience. My visit to the museum in Stockholm (during a Baltic cruise), was the inspiration for my current build. I do however have Fred's first book 'Vasa I - The Archeology of a Warship of 1628' and am very much looking forward to the publication of Vasa II. Building the Vasa of course is such a rare privilege in that the original ship is now still in existence and providing us with so much detailed research to help detail our models!! The Vasa of course is not the only ship to still exist in its original form (others such as the Mary Rose, Victory, Cutty Sark etc etc all still exist), but it has the unique story of having been raised with over 90% of its hull/features etc still intact (thanks to the low oxygen of the Baltic Sea) and it did sink in April, 1628. It was submerged for 333 years so its condition is miraculous when seen in the museum. The restoration efforts by the Vasamuseet team too should not go unrecognised. It's their efforts that has allowed the ship to be in its present, wonderful, condition.

Its a great story and the history is just as interesting. It's no wonder that our ship modeller's interest is alive and well!!

Thanks again for your comments,

Best Regards,

Peter G.
 
Charles,

Many thanks for this. I was aware of this recent discovery but had not seen the videos. The discovery again highlights the amazing ability of the Baltic Sea to preserve the timbers and otherwise biodegradable materials of a ship. It has always amazed me that with the Vasa, even a large number of the sails were relatively intact when she was raised. An example of these are on display at the museum in Stockholm.

I guess at 120 metres water depth this ship is unlikely to be raised, but wouldn't it be interesting if it were!! It is of course many decades earlier in its construction and sinking than the Vasa (The Age of Discovery), but the effort I suspect would be unlikely to happen.

Again, Charles, many thanks for your comments and visiting my Log.

Regards,

Peter G.
 
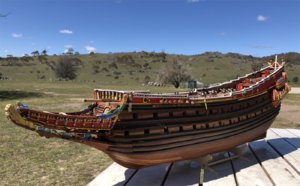
With considerable time and much painting, I have completed both the starboard and port side galleries and their artwork. The painting has taken the majority of the time but the shaping had to be carefully done so as not to melt or destroy the plastic figures. In the end, only a couple of retrievable disasters. The port quarter of the ship and the gallery artwork is shown in the picture below:

IMG_4201.JPG

Some of the finer detail on some of the figures will need adjustment a little later as I am not happy with some of the beards on the faces in particular, and the eyes in some figures too, are a little large. Its really hard to make the irises in the eyes small enough but also to line up with the left and right eye positions. Some of the figures look decidely drunk or cross-eyed. I will have a go at repairing this when my hands feel steadier!!

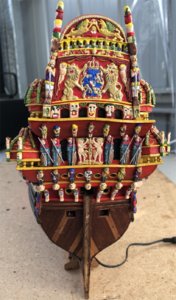
So I now move to the artwork on the stern. The figures here are a mixture of large ornamentation pieces with quite complex detail (but on one piece of plastic base), as well as individual figures having guards/soldiers, musicians and gargoyle-like heads etc. In addition, on both the starboard and port rear corners of the stern are tall structures that extend above the topsides and require gradual and diligent painting as there are a number of kings and carvings like a totem pole. An off-centre photo of the stern is shown below:

Stern.jpg

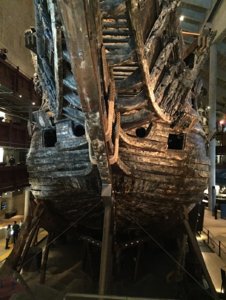
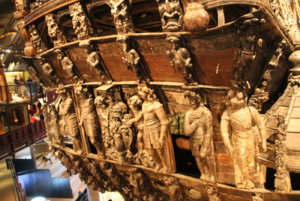
For the soldiers guarding the rear Captain's Cabin windows, I have added long 'poles/staves' which are painted silver. On the real ship, these guards have their hands in a position where it is probable that they were holding weapons on the real ship, but they are not there now (see below for these on the museum Vasa).

IMG_6681.JPG

A few other points of comparative interest:

- In the Billings Boats kit, I could not find the seven 'heads' of what look like chicken heads below the row of musicians. I 'scratched' these with some plastic frame material and then painted them to give the appearance as indicated in the 1/10 Vasa model and other Build Log descriptions.

- Above the corner guards on both the starboard and port edges of the original ship, are sculptures that are also not included in the kit. It appears to be Hercules and I might have to have a go at carving two of these guys to complete the corners of the stern. It would change the appearance considerably, rather than just having a stark corner join of timber.

- The row of 'angels' at the base of the stern sculptures had to have their heights reduced to allow them to fit correctly. Above their heads is a round 'halo' and at their feet is some 'ground' on which they stand. I decided to trim the 'ground' rather than cut off their halos, although the circular halos look a bit odd as they are relatively thick compared to the heads of the angels themselves. These 'angels' are also a bit risque in their state of dress (or undress) as the 'toga'-like garments they are wearing appear to be very much 'off the shoulder'.

Another picture of the stern, taken with a bit more light outside, shows the angels in their state of undress, and as I look at them a bit more critically, they actually look a little devilish, rather than angelic!!

Stern1.jpg

In this photo too, I have added the stern rope portholes and the upper gun port figures. It's interesting what you pick up, even in writing this Build Log. I notice from the original ship photo that at the base of the upper, corner 'totem poles', there are bulbous, rounded knobs present that are not on the model. I will have to add these - Never noticed them before!!

This artwork when I think back to the effort it has taken, has probably been one of the more rewarding parts of this build. It takes a lot of time, but every addition adds a lot to the ship and makes her appearance more complete. I can only imagine how this ship must have impressed and awed those who built her and those who viewed her before her demise.

Time Elapsed: 1010 hours

Best regards,

Peter G.
 
Hi Peter
Wonderful work. Looks like the real thing.
It's good, to complete the stern e.g. with the birds. The two Herculeses (one at younger and one of older age) would be also an enrichmement.
Billing Boat also omitted the two tritons which lay over the top bow of the stern
These figures got their propper placement very late - too late for the conception of the kit.
Very good work so far.

Cheers, Alexander

PS As far as I remember, only the two outer knights carry spears. (?)
 
Last edited:
Many thanks gentlemen for your encouragement and comments. Michael, I will follow your links and read the articles. Very interesting history in the Baltic Sea. Many battles, many ships and the perfect (well, nearly) environment for their preservation.

Alexander,

You have told me two things I did not realise:

a) Regarding the different ages of the Herculeses. I will look into this in my Vasa I book and online. I have finished carving one and am half way through the second, so it is not too late to modify.

b) I was not aware that only the two outer knights carried spears/staves. If this is true then many models have got this wrong (including the 1/10 Vasa at the Vasamuseet which has none, and the Janssen model at ). The Clayton model carvings are interesting as some of the guards have swords but none have spears.

I will continue to do some research on this before (and if) I remove the spears on my guards. It would be a simple matter to replace with swords if this is more accurate.

Many thanks,

Peter G.
 
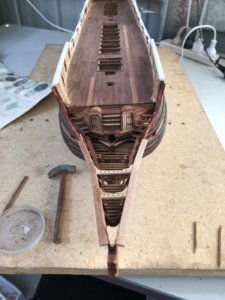
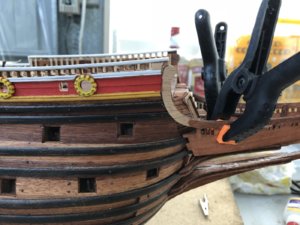
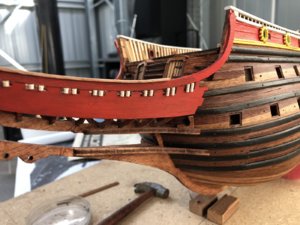
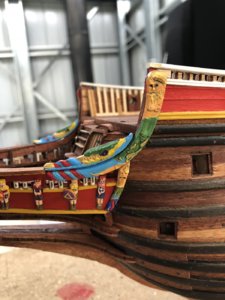
Moving from the stern to the bow, the beak was reasonably provided for in the Billing Boats kit and needed little addition of timbers to improve what is required. Alignment of the beak is critical and I got this a little wrong, but not a major problem. I only noticed this when I applied the upper plywood sheets that were a little tight on the starboard, but left a small gap on the portside. A bit of judicious pressure brought the beak back into line.

IMG_4239.JPG

In the above picture you will note that I have left out the enclosing timbers where the lashings of the bowsprit are passed down to the lower beak/bow timbers. This will enable the lashings to be better positioned and managed when the bowsprit is placed into the ship. I can then add the required timbers after these ropes are placed for a tighter, unimpeded arrangement. Also note that I have added openings to the beak crew toilets that are rounded. I have seen both square/rectangular open toilets and some with rounded tops. I can't imagine the difficulty of using these for the forward crewmen, but to just have a raw, timber edge would not have been comfortable, let alone dealing with the ship's movement and position beneath the pin rails located above them.

IMG_4218.JPG

I added the semi-circular timbers from the topside rails to the beak side panels and this took a bit of shaping to make them fit correctly. The aft and forward portions of these timbers are covered by sculptures but it still needed to fit correctly.

IMG_4238.JPG

The hawse holes for the anchor lines have been added (beneath the beak panels and adjacent the fourth wales as well as some half rounded, small columns on the beak panels which will be painted and infill the spaces between the artwork figures (Caesars) that are to be added along these panels. Having painted and decorated these figures, I added these with some surrounding strips of yellow timbers to the tops and bottoms of the beak sides.

IMG_4251.JPG

Fitting of the upper, shaped sculptures which lie on the beak railing needed some shaping and the painting required some alignment of colours to have the reds and blues carry through. The side sculptures have had the addition of some shields and swords where I thought appropriate. Between the timbers of the beak, beneath the bow walkways are a series of plastic sculptures which I have to paint and add. On trialing the placement of these, the fit is almost ideal so there will be no issue on attaching these once painted.

Time elapsed: 1042 hours

Regards,

Peter G.
 
Hi Peter

also the 1:10 model shows no weapons at the knights. Only shields. So it's a good decision to do it in the same way.

Other models might be a wrong interpretation. So it's the best, just to relie on what the original Vasa and / or the 1:10 model show.

Cheers Alexander
 
Thanks Alexander.

Your advice is well received and I have found in general you are correct. There are however some errors which have since been revealed by later evidence, eg the pinrails above the cannons on the weatherdeck amidships. As regards weaponry attached to many of the sculptures, it is a bit hard to rely on the original ship as these adornments would have been relatively fragile and so may have been lost while on the bottom for 333 years or lost during the sinking. As such, when reproduced (eg for the 1/10 model), should they be present, or should they mirror the ship as she was when raised? A number of modellers have taken the view of reproducing her as she would have been just before sinking, others as a reproduction of as she is now with evidence as presented as preserved. It's a vexed choice but one of course that the museum research team are studying daily. This choice is also what I and all modellers of the Vasa have to consider.

Thanks for your comments,

Peter G.
 
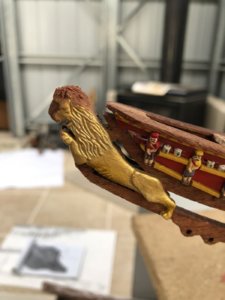
With the bow advanced, I then went on to adding the gold lion at the prow of the ship. In the Billing kit, this is provided with two plastic, scaled lion halves (which fitted around and sat on the timbers at the prow as an extension of the beak. The detail of this was not too bad, but the shape of the head left a lot to be desired. Similarly, there is a long lion's tail which extends from the starboard side body of the lion to lie adjacent the timbers on that side, but on the portside, there is no such tail extension, which looks really odd. So, to overcome the tail issue, I carved a tail extension from some frame plastic and shaped it like the mirror opposite of the other side.

For the lion head, I looked at a number of internet pictures of lions, their manes and shape of the body relative to the head, and thought the best remedy, was to add some filler which could then be shaped to appear like the top of a true lion's head and carve the mane hair matting into that. The result is shown below:

IMG_4250.JPG

Note in this photo, I have not yet added the tail extension. The next photograph, taken outside with a bit more light, shows the tail added. I have also finished painting and added the sculpture between the beak timbers just below the crew walkways and timbers. This you can see below. I believe that this sculpture was of Perseus from Greek mythology, the slayer of the Gorgon Medusa and the rescuer of Andromeda from a sea monster.

Perseus was the son of Zeus and Danaë, the daughter of Acrisius. Although most famous for the killing of the Medusa, Perseus was also key in the rescue of the Ethiopian princess Andromeda when he was on his way home with Medusa’s head. Andromeda’s mother, Cassiopeia, had claimed to be more beautiful than the sea nymphs. Poseidon had punished Ethiopia by flooding it and plaguing it with a sea monster. An oracle informed Andromeda’s father, King Cepheus, that the ills would cease if he exposed Andromeda to the monster, which he did. Perseus, passing by, saw the princess and fell in love with her. He turned the sea monster to stone by showing it Medusa’s head and afterward married Andromeda. The sculpture shows Perseus fleeing the sea monster with Andromeda at his heels.

Outside_1.jpg

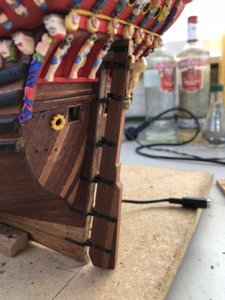
Another item added which took a bit of construction was the rudder. Where the timbers of the hull lie back in the line of the shape of the ship, for the Vasa, the timbers of the rudder were vertical. Also, at the top of the rudder is a headstock which extends into the ship and of course, was extended to the manual steering station under the weatherdeck. I added the gudgeons and pins for the rudder mounting which were a bit fiddly and used copper nails (painted black) to hold the gudgeon plates and gear in place. There was not a lot of room to manipulate the rudder into place and then position the pins. I should probably have done this before the stern sculptures were attached.

IMG_4610.JPG

Also at the top of the rudder, an upwards-facing lion and gargoyle are added. The lion again was provided by Billing's and as two separate halves which were CA glued together and then painted. The gargoyle beneath it however I could not find in the kit, so scratched this and painted it as per other build logs.

Time elapsed: 1075 hours

Regards,

Peter G.
 
Thanks Alexander.

Your advice is well received and I have found in general you are correct. There are however some errors which have since been revealed by later evidence, eg the pinrails above the cannons on the weatherdeck amidships. As regards weaponry attached to many of the sculptures, it is a bit hard to rely on the original ship as these adornments would have been relatively fragile and so may have been lost while on the bottom for 333 years or lost during the sinking. As such, when reproduced (eg for the 1/10 model), should they be present, or should they mirror the ship as she was when raised? A number of modellers have taken the view of reproducing her as she would have been just before sinking, others as a reproduction of as she is now with evidence as presented as preserved. It's a vexed choice but one of course that the museum research team are studying daily. This choice is also what I and all modellers of the Vasa have to consider.

Thanks for your comments,

Peter G.
Did the information I sent you include pictures of the figures on the ship for reference? Dave
 
Last edited by a moderator:
Many thanks for your comments gentlemen - Charles, Jan and Michael.

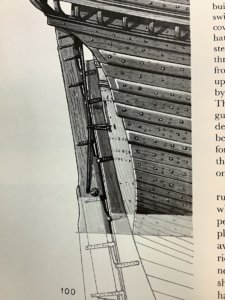
I am aware of the "runaway" ropes on the rudder. I do not have Landstrom (although I would love to have it in my collection). The ropes are documented elsewhere and are a feature that I will definately add in the future. At this stage, I am attempting to complete all the 'fixed' deck/hull fittings without adding parts that I might catch on or cause damage to if I got caught.

It is interesting how many Vasa models you look at (in build logs or elsewhere) where these ropes have been replaced with chains, as was the norm on later sailing ships (eg Cutty Sark). In these cases of course, the chains were often used to actually steer the ship and control the rudder rather than as a safety precaution for losing the rudder.

Actually, as I study it a bit further, I am a bit confused by the rope rigging used with the rudder. Note that there are the two ropes that come out of the portholes in the stern. However there is a third rope (as seen in Landstrom's drawing, where it parallels the leading edge of the rudder and then diverts slightly aft to be attached to the rudder just above the waterline. Is this rope repeated on both sides of the rudder and do they (it ?) form the other ends of the ropes that come out of the portholes?

Best Regards,

Peter G.
 
Last edited:
Back
Top