You are using an out of date browser. It may not display this or other websites correctly.
You should upgrade or use an alternative browser.
You should upgrade or use an alternative browser.
- Joined
- Feb 18, 2019
- Messages
- 685
- Points
- 353

Speaking in general terms as far the overall hull planking is concerned.
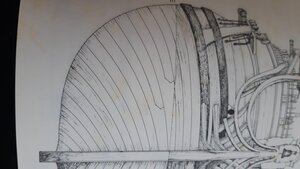
Looking at the 1st image:
The run of each row of planks is constant from top to bottom of the hull. the upper-works (above the waterline) is laid down from stem to stern.
the planking from the water line down, should be a "continuation" of it (again from top to bottom). The waterline is marked on the image but it does not mean that the planking is laid down differently. This can clearly be seen as the plank edges run through the waterline. If the hull is to be fully painted, then as far as the model is concerned, it would not make a difference. If only the very top is painted and everything else is left natural, then, it will look strange.
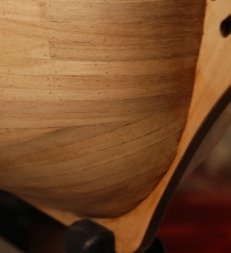
So, problems( (2 obvious ones) on the model, and again not particular to the bow:
1) The wales are missing in the model. They are an integral part of the planking as they have a purpose. By definition, they are thicker planks: not a second layer added after a first layer has been installed.
2) The planking runs should not stop at the waterline: then another different run below, in a different direction: showing an horizontal line through the hull. If this horizontal line precisely represents the waterline, then it would mean that the planks above the line have been laid down wrong: and it looks like it is the case: the planking should run horizontally from front to back, but should follow a slight vertical curve due to the shape of the hull. Structurally, it would be bad for the integrity of the hull. Basically, the waterline should not be visible by the way the planking is laid down on either side of it: by planks running in a different directions.
If this hull is planked with 2 layer, this would be ok for the first layer. the second layer would need to be more realistic and laid down properly.
There are more issues, but they could be considered secondary as far as the model hull is concerned: again it depends if the hull is going to be fully painted or not. I see that nails have been put in place in the mid section, so I would imagine that this area will not be painted. In this case, yes, there could be some improvements in the way the planking has been laid down.
G
Last edited:
Hi Gilles, there are so many different ways of planking by so many different modelers, in so many different books, for me the really only way that i can get it to look decent is by spileing, the only problem that i have is holding the bond paper attached to the model to mark it out, and finding the correct way to divide the model into bands, your thoughts on this. GOD BLESS STAY SAFE. Don
@Gilles Korent Thank you very much for your response. Thank you again for your informative and extended explanations.
I have the impression from what you just said, that you would not advise to follow any of the above two cases. I consider though to follow the 1st case, as the less wrong and try to avoid the plank edges under the water line to run over it.
I don't know how easy or hard that is going to be... am doing it for the first time. Still I would very much appreciate it, if you had any picture showing a correct planking.
Thank you again.
Christos
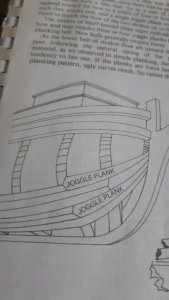
Ps ofcourse there two great instr.manuals one from Richard Mansir and another from Dirk De Bakker... which again would follow if I only new whats there better to use, the joggle planks or the drop planks method.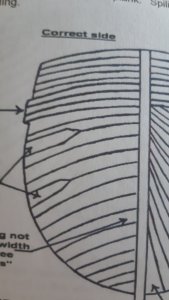


Last edited:
- Joined
- Dec 1, 2016
- Messages
- 5,127
- Points
- 728

what I see is in your first post the little color picture is the wrong way to plank a hull. The run of planks should not end under the top planking.
in the B&W pictures it is common practice to use stealers and drop planks, these are worked into the run of the planking. a master shipwright would lay out the planking so all the strakes flow from stern post to stem in one continues run. Using stealers and drop planks are a last resort.
in the B&W pictures it is common practice to use stealers and drop planks, these are worked into the run of the planking. a master shipwright would lay out the planking so all the strakes flow from stern post to stem in one continues run. Using stealers and drop planks are a last resort.
@Dave Stevens (Lumberyard) thank you very much Dave. Laconic and to the point! Or short and sweet!
Which bow planking is considered in real shipbuilding the correct one?
The 1st picture is taken from from Bellabarba's book The Royal Yacht Caroline, the second one its from a fine done model.
Greetings. The plating changed according to the place of production of the ship, here is a debate on the Czech forum, hopefully it will be useful.
- Joined
- Feb 18, 2019
- Messages
- 685
- Points
- 353

1) My previous comment was in regards to the following:
a - The wales are missing.
b - The horizontal line representing the waterline (?) in the photo below, should not be there, for the reason previously listed: the plank runs from bow to stern throughout the hull: above and below the waterline.
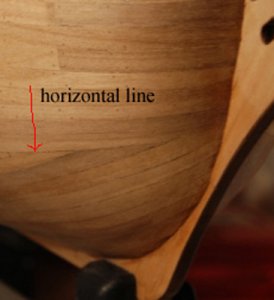
2) Now, as for the original question
The shape of the plank(s), “joggle plank(s)” in the drawing you posted, is more or less subject to where and when the ship was built: different nationalities have different ways during different time periods, incidentally achieving different looks: although the goal is always the same, to end up with a plank that is not too wide (at the stern) or to narrow and pointed (at the stem).
G.
a - The wales are missing.
b - The horizontal line representing the waterline (?) in the photo below, should not be there, for the reason previously listed: the plank runs from bow to stern throughout the hull: above and below the waterline.

2) Now, as for the original question
The shape of the plank(s), “joggle plank(s)” in the drawing you posted, is more or less subject to where and when the ship was built: different nationalities have different ways during different time periods, incidentally achieving different looks: although the goal is always the same, to end up with a plank that is not too wide (at the stern) or to narrow and pointed (at the stem).
G.
Last edited:
@Gilles Korent thank you again for coming back to my questions and ofcourse for patiently answering those.
The issue you will have Messis is that it is extremely hard to plank the hull correctly like in the book,using the kit planking.From memory it is 6 or 7mm wide and only 1mm thick.To get a realistic planking run,the strips are going to need a lot of edge bending.That is why many kit builds are planked like your colour picture.I planked my Caroline correctly with no stealers and no drop planks but I cut every plank out of 1mm Pear sheet to card templates I made.
The result is a correctly planked hull but I warn you,it is a LONG job.I probably spent 300-400 hours just on the outer hull planking.
Kind Regards
Nigel
The result is a correctly planked hull but I warn you,it is a LONG job.I probably spent 300-400 hours just on the outer hull planking.
Kind Regards
Nigel
- Joined
- Dec 1, 2016
- Messages
- 5,127
- Points
- 728

Greetings. The plating changed according to the place of production of the ship, here is a debate on the Czech forum, hopefully it will be useful.
I would be great if we can get permission from the Czech forum to copy and translate the debate and post it here
- Joined
- Dec 1, 2016
- Messages
- 5,127
- Points
- 728

The issue you will have Messis is that it is extremely hard to plank the hull correctly like in the book, using the kit planking.
this is very true kits provide just one width of planking, to do a good job you need several widths of planking so you can cut and shape the planks to fit.
Planking a model ship from a kit is nothing like how an actual ship would have been planked.
this is very true kits provide just one width of planking, to do a good job you need several widths of planking so you can cut and shape the planks to fit.
Planking a model ship from a kit is nothing like how an actual ship would have been planked.
- Joined
- Dec 1, 2016
- Messages
- 5,127
- Points
- 728

- Joined
- Dec 1, 2016
- Messages
- 5,127
- Points
- 728

I remember reading someplace a master shipwright took a lot of time and pre planning to "fit" the strakes of planking in a smooth run from stem to stern. This was the pride of a master shipwright to get the planking just right. The use of drop planks, stealers and jogging planks was a quick fix for an error in the laying out of the planking. A master shipwright if he did the math correctly and laid out the planking there would be no need for stealers.
- Joined
- Dec 1, 2016
- Messages
- 5,127
- Points
- 728

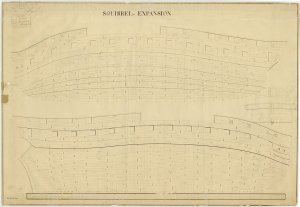
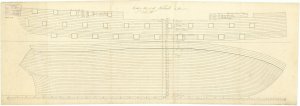
I think in some planking jobs some sort of stealers are needed no matter what. I see that last plank below the wales. sometimes that is called the shutter plank...no need for stealers - except for the 2 planks below the wales (see picture 3)
maybe a lesson on spiling planks an how to break up into bands and some modelers line out the hull. GOD BLESS AND STAY SAFE Don
Thank you all for your helpful comments. So I went on planking Caroline... its still very little to show, but I figured out a process taking into account a lot of what it was said here. I hope I do bearable planking using 2 jogglers and maybe one staler.
I promise I will show the result here, by taking close ups and explaining all the steps.
I promise I will show the result here, by taking close ups and explaining all the steps.


