YANGTZE RIVER HIGH-NET FISHING SAMPAN [COMPLETED BUILD]

So, with the introduction done, let us get to the actual build.

The word “sampan” is a derivative from the Chinese “San Ban” which literally means “three planks”. (“San” means “three” and “Ban” means “plank’).

Very solidly constructed from a variety of wood species (depending on where they were built), they feature a wide variety of designs, ranging from open to partly decked with a closely-woven shelter or cabin aft. In their sheltered configuration, they are often used as permanent habitation on inland waters.

Unicorn describes this version as a high-net fishing sampan with a load capacity of approximately 5 tons. It has a live fish tank, a canopy cabin with a canopy, storage space for ropes and other miscellaneous items – in all, it is regarded as a typical Chinese fishing boat. It is mainly used in the middle reaches of the Yangtze River where the multitude of rapids dictate a straight-bottomed hull with a slightly upswept bow and stern. As the fishing process requires maximum maneuverability, the boat can be operated from both ends to aid in flexibility.

The sampan is powered and steered by the “yuloh” (a single, long sculling-oar which doubles as a rudder) and two to four paddles, but it can be equipped with a single mast and single sail for long-distance sailing. As is typical of the sampan design, the draft is very shallow.

View attachment 242747
Unicorn's official rendering of what the completed model looks like. This is the Swiss Pear Wood version.

The kit is manufactured in 1:20 scale and there are three available varieties of wood: Cherry, Black Walnut and Swiss Pear Wood. From my previous experience, I knew that the Pear Wood used by Unicorn is of a very high quality with a lovely hue, so Pear it was.

Scale 1/20
Length 640 mm
Width 100 mm
Height 450 mm

View attachment 242748

Looking at the kit contents, confirmed what I knew already - simply beautiful Pear Wood! The mast and spars are from cherry and there are the few "inevitable" pieces of plywood. In general, I was happy with the overall quality - the laser cutting was good, but not nearly as sharply defined or crisp as YuanQing's. The flipside though, was that the char was far easier to remove. This is obviously a case of what you lose on the swings, you gain on the roundabouts.

View attachment 242749

The instructions though, were ... meh! The supplied booklet is only in Chinese (understandable), but the photographs which are supposed to act as a step-by-step guide, are of poor quality. Even though in color, they are small, grainy and certain crucial details are simply impossible to decipher. The drawings that come with the kit are in 1:50 scale, so every single dimension taken from it, has to be scaled up to 1:20. I suppose that it is not too big a deal, but it does leave the door open for errors.

So first up was the "construction" of the bulkheads. There are 14 of them of which 4 are made from plywood.

View attachment 242750

You will notice that on a number of bulkheads there are "supports" (yellow arrows) glued to the bottom (in some cases only on one side of the bulkhead, in others on both sides) These come in different configurations and are mounted at different heights - either to serve as supports for the decking or floor planking later. Also notice the "scoring" lines indicated by the red lines. These indicate the portions and tabs of the bulkheads that will be broken away after planking has been completed.

Next up was the gluing of the keel "stringers" (for want of a better word). Great care has to be taken with the alignment as any existing kind of jig is utterly useless for this type of assembly. Each of the three keel stringers consists of four separate parts – resulting in a total of 12 parts that make up the keel assembly. These are NOT correctly numbered (the same problem that @Donnie had on his Druid - come on, Unicorn!) and a fair amount of head-scratching was required to make sure that each stringer matches the exact curvature of the other two. Once the three stringers had been assembled, it was time for dry fitting the bulkheads and making sure that everything was square. Now remember, each bulkhead has to align perfectly with three stringers. 14 x 3 means there were 42 slots that had to be aligned! Again, this required great care and gentle massaging with files and sandpaper. The keel stringers are thin and very fragile and so are the bulkheads. In fact, neither inspire much confidence. When all the bulkheads fitted properly, everything was glued together and left to dry.

View attachment 242751

View attachment 242752
Ensuring that everything is kept square. Here you can see just how thin those stringers and bulkheads are!

View attachment 242753
These "supports" at the feet of the bulkheads will be used later to glue the floor planking onto.

View attachment 242754
The process continues. As you can see I made liberal use of glue here.

View attachment 242756
Notice how low the scoring lines are on the plywood bulkheads. Once they are broken away, there will only be the stubs left at the bottom for the floor planking to go on.

View attachment 242757

View attachment 242758
And when all is said and done, you are finally left with something that looks like this - not much to look at, but it is what it is.

Thank you all for your friendliness, kind remarks and comments.

Stay safe, take care and enjoy your model building!

Warmest regards - Heinrich
An interesting historical introduction and a very different structure from the many european models on SOS
At least there are no ratlines!
 
@Short John Bronze Welcome to the Sampan build log Edmund - it's great to have you here. You are right, everything about this build is different - that and the historical background are exactly the things that appeal so much to me. Yep ... no ratlines, but there is rigging. :)
 
Hello


Heinrich, Just caught up with your Unicorn Sampan build log. You sure have started out with a very nice and informative history of the Sampan, Thank You. It makes me wonder just how these people could live there hole life and even very happy on such a small boat.
This looks like a very interesting kit that you have chosen to build and are also doing a great job, even more so than your Great YQ-Bluenose that I have fowled this last year in preparation for me to start my Bluenose very soon, it seams like a long wait.
I will pull up a chair and watch with great interest as you so cleverly and lovely build your Sampan. I do hope that you will add a lot of detail to help us all understand how these people lived and worked on there little ships.
Regards Lawrence
 
@Canoe21 My dear Lawrence it is so great to have you here to join in the fun. As far as the history goes, I can assure you - there is still LOTS to come - not only pertaining to this particular sampan, but also to two other derivatives which are both under investigation at the moment. I promise to add as much detail as I possibly can and where I can't I will tell you what should have happened at that particular spot. I also plan to do some sort of a kit evaluation at the end of the build - not for any other reason than to be just complete about the build.

If all goes well, I should make my next posting tomorrow night - tonight South Africa is taking on the British Lions in the first of three Rugby Internationals. :)
 
( tonight South Africa is taking on the British Lions in the first of three Rugby Internationals)

:cool: I have no clue about Rugby :cool:, But Cheers for your team.

Jan
 
Thanks Jan. Due to Covid, South Africa has not played since they won the World Cup in 2019 (against England) so I'm sure there will be some needle tonight. Unfortunately, the match only starts in an hour and 15 minutes from now - meaning that it is 00:00 in Nantong. And tomorrow I start work at 09H00.
 
Thanks Jan. Due to Covid, South Africa has not played since they won the World Cup in 2019 (against England) so I'm sure there will be some needle tonight. Unfortunately, the match only starts in an hour and 15 minutes from now - meaning that it is 00:00 in Nantong. And tomorrow I start work at 09H00.
Lots of COFFEE tomorrow. Enjoy the game.

Jan
 
“It was God's will that they have to live on the water,

[that] they have learnt how to tread the wave from childhood.

boiling the crab as main food instead of grains,

using manila hemp instead of yarn to make garments.

children were assigned to cut the wild cane secretly,

when tides rising during spring nights

and the shallows are drown[ed].” (sic)

(Yang1,1154)

Hello Everyone

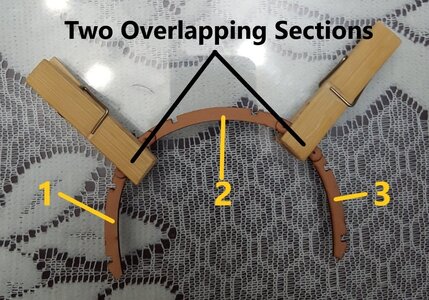
As promised in my previous posting, the bamboo canopy was next. It consisted of two main frames (each comprising of three separate sections) which are glued together and then further affixed by two overlapping sections which are appropriately curved.

20200124_140729 - 副本.jpg

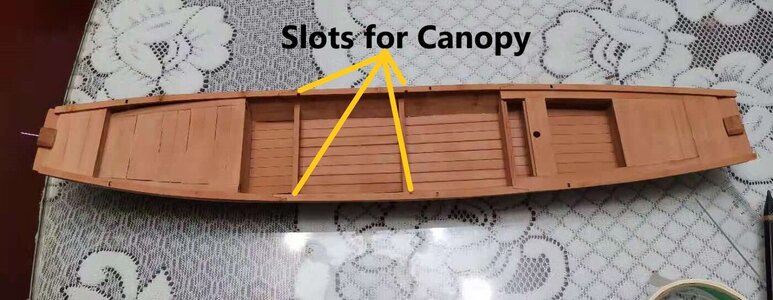
The three separate sections which make up one frame and the two overlapping pieces (here unfortunately blocked by the clothes’ pegs) which lock them together. These two assembled frames are then inserted into four slots which are provided for in the top railing.

微信图片_20210721220155.jpg

This was really an easy task and fitment of the two frames into the slots were perfect. However, here I deviated slightly from the kit plans. Have a look at the picture below.

20200124_140729 - 副本 - 副本.jpg

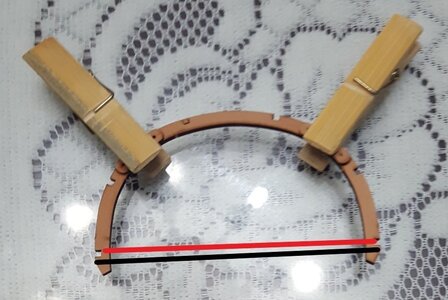
Unicorn suggests that the frames should be inserted into the slots up to the black line. The two slots directly above that line will thus stand proud of the top railing. This is understandable as there are 6 cross bars provided which slot into these six slots and which connect the two frames. However, I inserted my two frames up to the red line. This meant that my top railing would take the place of the first two bars which meant a much stronger connection and that the canopy would sit slightly deeper/lower than indicated on the plans. I was OK with this, and in the end, it turned out to be a very good move with an unexpected advantage.

Canopy.jpg

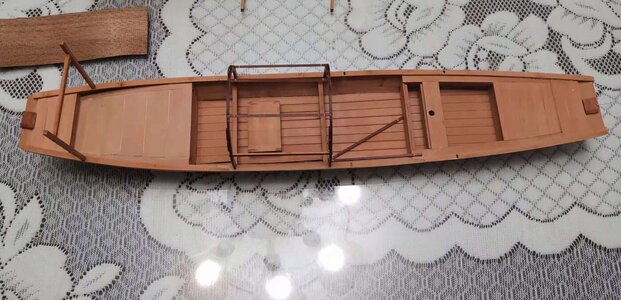
Here the framework of the canopy is completed. Note the two extra spars directly in front of the framework which I did not have to use. Also notice the table in the living area. It looks very rudimentary but that is exactly what they looked like – low in height and devoid of any kind of decoration.

The installation of the bamboo canopy is an exercise in dexterity. It comes supplied in two separate, but identical sheets which needs to be glued back-to-back and then shaped to the correct form and size. This was easy enough, but then I made a mistake – I left it overnight to dry. If ever you have to work with bamboo and do something similar – use your PVA, wait an hour for it to set and while the glue is still pliable, do the bending. The problem is that once the glue is dry, those two sheets become surprisingly stiff and resist bending. Great care has to be taken that it doesn’t develop cracks in the shaping process – if that happens you are screwed, because the cracks will just get bigger and bigger.

I had two small cracks develop (ok…ok, I know…personally, I probably have many large cracks – but I’m referring to the bamboo piece now). Luckily, I did still have the bamboo sheeting from the first model. I just cut two appropriately-sized pieces and carefully glued them to the inside of the canopy where the cracks were starting to rear their ugly heads. That solved that little issue once and for all.

Next, I soaked the bamboo sheeting in water and curved it around one of my favorite objects – a Nescafe Coffee bottle. Unfortunately, I did not take pictures of this as I was all thumbs trying to get the sheeting wrapped around the coffee bottle and securing it with elastic bands at the same time. After the bamboo had dried, it held its shape beautifully and could be glued onto the canopy framework.

微信图片_20210629235553.jpg

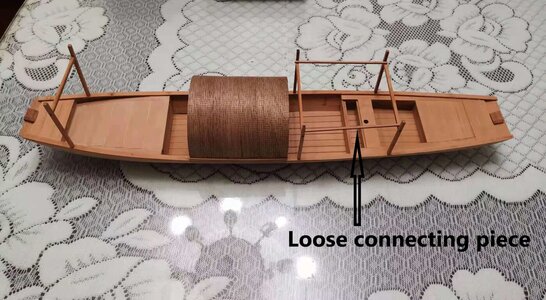
Bamboo canopy in place. You will also notice six H-shaped frames - two at the stern and four in front of the canopy. The connecting piece on the starboard side (closest to the camera) has not yet been glued down, but has just been placed into position. The framework in front of the canopy was used for fish nets and the two “paddle oars” (different oars to the Yuloh).

微信图片_20210721174856.jpg
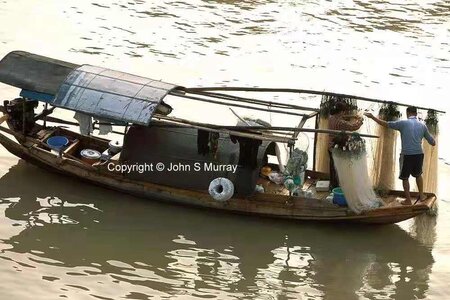
Copyright by John S. Murray (I have no idea where I downloaded this picture from.)

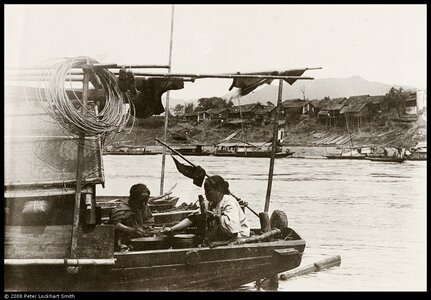
The one at the stern was primarily used for storing the Yuloh and excess rope not in use. Both set of frames could also be used for a host of other things – anything from clothes lines to additional sheltering.

ba06-022.jpg

Stern framework used for the storage of the rope and as a clothes line. Note that a piece of clothing was even attached to the yuloh to dry.

微信图片_20210629235610.jpg

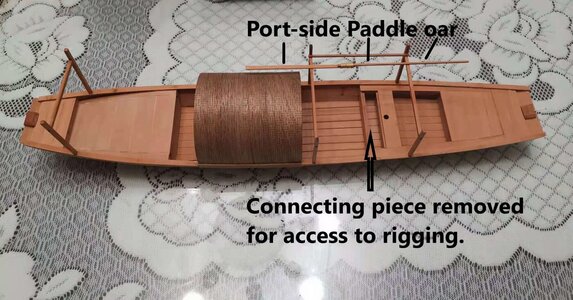
This picture shows the port side paddle oar in its storage place. The reason that I have kept the right side of the framework “open” at this stage is to facilitate easier working on the rigging.

This is also where my unexpected advantage of my lower canopy panned-out nicely. Notice how nicely the paddle oar clears the canopy – exactly like it does in real life. With the canopy installed as per the plans’ suggestion, it would have been too high for the paddle oar to be mounted like that.

Now let’s take a few looks at the canopy in real-life situations.

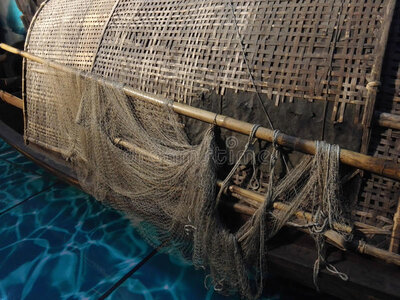
Worcester describes the canopy as follows: “The centre part is decked, leaving a cockpit amidships which is covered with a small house made of closely woven matting arranged in three overlapping sections and painted white*. In this portion the passengers are accommodated, and actually as many as five can be carried and even more; nine, however, is about the limit.

*In all my research, I have never found an example of a Yangtze-river sampan with a white-painted bamboo canopy. I think this comment refers more to the Shanghai “Hongtou” sampan – but more about that later.

微信图片_20210726222326.jpg
Close-up of the bamboo matting.

Earlier on you will recall I mentioned that there are two primary groups of sampans – the Ning-pang, manned by Ningpo men, and the Soo-pang, manned by either Soochow men, men of Shanghai, or men from Kiangyin, a small town some 80 miles up the Yangtze.

You will also recall that Worcester cited the mounting position of the load bearing-pin as a distinguishing feature. On the Ningpo-craft the bearing-pin for the yuloh is situated on the port side, which necessitates the sculler using his left hand on the oar; while in the boats operated by Soochow, Shanghai, and Kiangyin men, the bearing-pin is on the starboard side and the sculler operates the yuloh with his right hand.

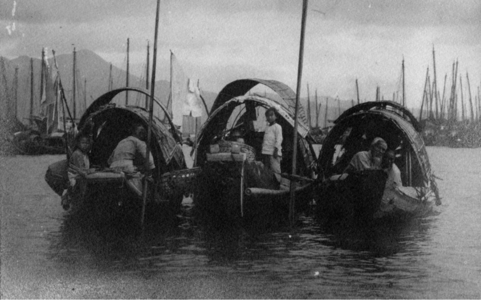
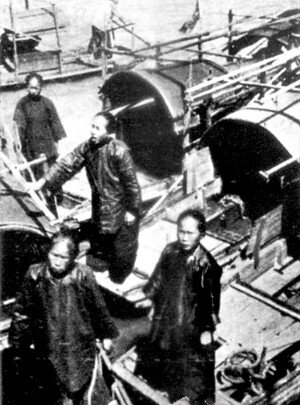
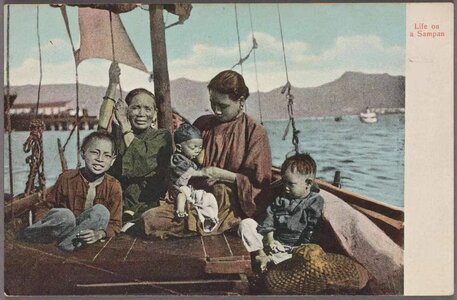
There is, however, one more difference. Unlike the sampanmen from the other three localities, Ningpo men never take their wives and families afloat. It is astonishing that so small an area can constitute a permanent home for two adults and several children. If the family live on board, they also stow themselves away in this small space during working hours. In the fore compartment are stored the bedding, clothing, provisions, oil, charcoal, and extra cooking utensils. The wives and even the children of these sampan-dwellers can take their turn at the yuloh. The Soo-pang women scornfully maintain that one reason why the women of Ningpo do not live afloat is that they suffer from seasickness and are unhandy in a boat.

微信图片_20210707105349.png

Hong Kong

UP20201231180444.jpg

微信图片_20210721174808.jpg

微信图片_20210721174801.jpg

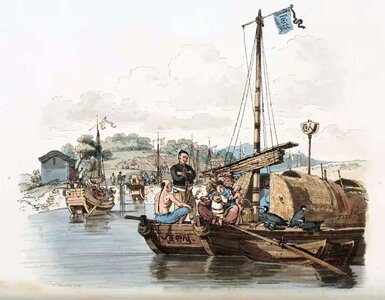
One of my favorite pictures of ancient times aboard a sampan.

And that my dear friends brings us to a close of tonight's posting. I want to thank each and all for the tremendous support that you have been giving me during this build. It has been absolutely heart-warming and is deeply appreciated.

Kindest regards - Heinrich
 
@Peter Voogt Dankjewel vie de mooi wense, Peter! I am very glad that you enjoy the build. It is indeed very different and beacuse it has been such an integral part of Chinese water transport for so many centuries, there is a lot of information available - ironically, most from the West! Maybe it's the old story of a prophet that is never truly valued in his own country.
 
@Pathfinder65 Thank you Jan! With this build I am trying to do everything as right as I possibly can. So far I am happy to say that it has all worked out and the information that is available makes it possible that there is very little second-guessing. With a scratch-build or a redesigned kit that incorporates actual frames into which the horizontal slats of the bulkheads can be inserted and by cedar wood, I believe that a 100% historically accurate build is possible.
 
“It was God's will that they have to live on the water,

[that] they have learnt how to tread the wave from childhood.

boiling the crab as main food instead of grains,

using manila hemp instead of yarn to make garments.

children were assigned to cut the wild cane secretly,

when tides rising during spring nights

and the shallows are drown[ed].” (sic)

(Yang1,1154)

Hello Everyone

As promised in my previous posting, the bamboo canopy was next. It consisted of two main frames (each comprising of three separate sections) which are glued together and then further affixed by two overlapping sections which are appropriately curved.

View attachment 246227

The three separate sections which make up one frame and the two overlapping pieces (here unfortunately blocked by the clothes’ pegs) which lock them together. These two assembled frames are then inserted into four slots which are provided for in the top railing.

View attachment 246228

This was really an easy task and fitment of the two frames into the slots were perfect. However, here I deviated slightly from the kit plans. Have a look at the picture below.

View attachment 246229

Unicorn suggests that the frames should be inserted into the slots up to the black line. The two slots directly above that line will thus stand proud of the top railing. This is understandable as there are 6 cross bars provided which slot into these six slots and which connect the two frames. However, I inserted my two frames up to the red line. This meant that my top railing would take the place of the first two bars which meant a much stronger connection and that the canopy would sit slightly deeper/lower than indicated on the plans. I was OK with this, and in the end, it turned out to be a very good move with an unexpected advantage.

View attachment 246230

Here the framework of the canopy is completed. Note the two extra spars directly in front of the framework which I did not have to use. Also notice the table in the living area. It looks very rudimentary but that is exactly what they looked like – low in height and devoid of any kind of decoration.

The installation of the bamboo canopy is an exercise in dexterity. It comes supplied in two separate, but identical sheets which needs to be glued back-to-back and then shaped to the correct form and size. This was easy enough, but then I made a mistake – I left it overnight to dry. If ever you have to work with bamboo and do something similar – use your PVA, wait an hour for it to set and while the glue is still pliable, do the bending. The problem is that once the glue is dry, those two sheets become surprisingly stiff and resist bending. Great care has to be taken that it doesn’t develop cracks in the shaping process – if that happens you are screwed, because the cracks will just get bigger and bigger.

I had two small cracks develop (ok…ok, I know…personally, I probably have many large cracks – but I’m referring to the bamboo piece now). Luckily, I did still have the bamboo sheeting from the first model. I just cut two appropriately-sized pieces and carefully glued them to the inside of the canopy where the cracks were starting to rear their ugly heads. That solved that little issue once and for all.

Next, I soaked the bamboo sheeting in water and curved it around one of my favorite objects – a Nescafe Coffee bottle. Unfortunately, I did not take pictures of this as I was all thumbs trying to get the sheeting wrapped around the coffee bottle and securing it with elastic bands at the same time. After the bamboo had dried, it held its shape beautifully and could be glued onto the canopy framework.

View attachment 246231

Bamboo canopy in place. You will also notice six H-shaped frames - two at the stern and four in front of the canopy. The connecting piece on the starboard side (closest to the camera) has not yet been glued down, but has just been placed into position. The framework in front of the canopy was used for fish nets and the two “paddle oars” (different oars to the Yuloh).

View attachment 246232
Copyright by John S. Murray (I have no idea where I downloaded this picture from.)

The one at the stern was primarily used for storing the Yuloh and excess rope not in use. Both set of frames could also be used for a host of other things – anything from clothes lines to additional sheltering.

View attachment 246236

Stern framework used for the storage of the rope and as a clothes line. Note that a piece of clothing was even attached to the yuloh to dry.

View attachment 246237

This picture shows the port side paddle oar in its storage place. The reason that I have kept the right side of the framework “open” at this stage is to facilitate easier working on the rigging.

This is also where my unexpected advantage of my lower canopy panned-out nicely. Notice how nicely the paddle oar clears the canopy – exactly like it does in real life. With the canopy installed as per the plans’ suggestion, it would have been too high for the paddle oar to be mounted like that.

Now let’s take a few looks at the canopy in real-life situations.

Worcester describes the canopy as follows: “The centre part is decked, leaving a cockpit amidships which is covered with a small house made of closely woven matting arranged in three overlapping sections and painted white*. In this portion the passengers are accommodated, and actually as many as five can be carried and even more; nine, however, is about the limit.

*In all my research, I have never found an example of a Yangtze-river sampan with a white-painted bamboo canopy. I think this comment refers more to the Shanghai “Hongtou” sampan – but more about that later.

View attachment 246247
Close-up of the bamboo matting.

Earlier on you will recall I mentioned that there are two primary groups of sampans – the Ning-pang, manned by Ningpo men, and the Soo-pang, manned by either Soochow men, men of Shanghai, or men from Kiangyin, a small town some 80 miles up the Yangtze.

You will also recall that Worcester cited the mounting position of the load bearing-pin as a distinguishing feature. On the Ningpo-craft the bearing-pin for the yuloh is situated on the port side, which necessitates the sculler using his left hand on the oar; while in the boats operated by Soochow, Shanghai, and Kiangyin men, the bearing-pin is on the starboard side and the sculler operates the yuloh with his right hand.

There is, however, one more difference. Unlike the sampanmen from the other three localities, Ningpo men never take their wives and families afloat. It is astonishing that so small an area can constitute a permanent home for two adults and several children. If the family live on board, they also stow themselves away in this small space during working hours. In the fore compartment are stored the bedding, clothing, provisions, oil, charcoal, and extra cooking utensils. The wives and even the children of these sampan-dwellers can take their turn at the yuloh. The Soo-pang women scornfully maintain that one reason why the women of Ningpo do not live afloat is that they suffer from seasickness and are unhandy in a boat.

View attachment 246248

Hong Kong

View attachment 246249

View attachment 246250

View attachment 246251

One of my favorite pictures of ancient times aboard a sampan.

And that my dear friends brings us to a close of tonight's posting. I want to thank each and all for the tremendous support that you have been giving me during this build. It has been absolutely heart-warming and is deeply appreciated.

Kindest regards - Heinrich
It’s really looking good Heinrich! The bamboo covering is very nice…great job!
 
Back
Top