YUANQING BLUENOSE - Peter Voogt [COMPLETED BUILD]

First made the 2 small supports with the drive wheel and the chain wheel. Because I was curious if my chain would fit and be a bit in proportion.
The two supports folded from metal scraps that I kept from the 1/12 Tamiya chain:
791 Windlass.jpg
Only the Ballistol browning does not work on that. Then get to work with other 'blackening'. Still need to update a few corners.
Found thin brass plate on Aliexpress, so I'm going to cut narrow strips from that to make all the other brackets.

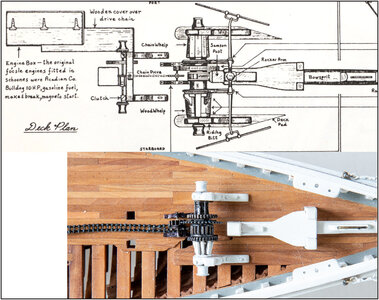
With the necessary creativity and the help of AL-FI, I can maintain the layout, as on the Saga drawing:
792 Windlass.jpg
The chain fits exactly on the teeth of the wheel. I think the sizing will be fine.
Everything is still dry-fit, because only when I have everything complete will the final finish and installation follow.
Regards, Peter
 
Exemplary work, Peter.
This blog is and will be used, at least by me, as a very valuable reference work. That does not imply I will just be copying all your ideas and implement those into my build...
 
First made the 2 small supports with the drive wheel and the chain wheel. Because I was curious if my chain would fit and be a bit in proportion.
The two supports folded from metal scraps that I kept from the 1/12 Tamiya chain:
View attachment 315791
Only the Ballistol browning does not work on that. Then get to work with other 'blackening'. Still need to update a few corners.
Found thin brass plate on Aliexpress, so I'm going to cut narrow strips from that to make all the other brackets.

With the necessary creativity and the help of AL-FI, I can maintain the layout, as on the Saga drawing:
View attachment 315792
The chain fits exactly on the teeth of the wheel. I think the sizing will be fine.
Everything is still dry-fit, because only when I have everything complete will the final finish and installation follow.
Regards, Peter
This really is going to look good!
 
After a lot of tweezing work, the third part is ready: the winch drive:
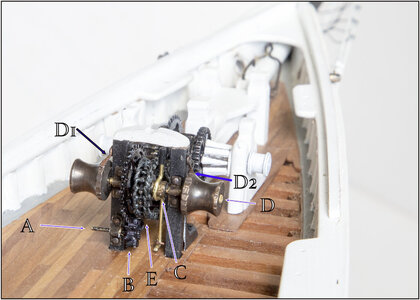
793 Windlass.jpg
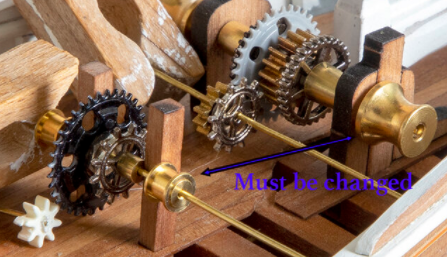
A = 1st axle that will be connected to the machine house later;
B = small gear on this axle is driving the large gear on 2nd axis 'D';
C = clutch that engages or disengages chain sprocket 'E'. Thus, the 2nd axis 'D' can also work separately. This allows heavy loads to be lifted;
D = 2nd axle with both barrels. The catches D1 and D2 engage on the teeth on both sides, depending on which direction of rotation is to be secured;
E = Chain sprocket with chain that provides the drive to the 3rd axle.
Both shafts are mounted in brass bushings over which naild brackets are attached.
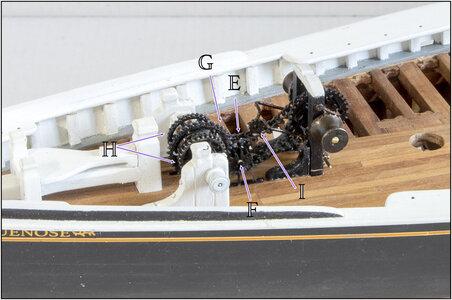
794 Windlass.jpg
E = chain sprocket on the minor 3rd axle 'F'
F = the small gear on the shaft drives the large gear 'G' on the 4th shaft, the winch;
G = there are 2 decelerations, shaft 1 to shaft 2 as well as shaft 3 to shaft 4, which ensure that the windlass for the anchors, among other things, rotates slowly and can move large loads;
H = 2 gears on the winch that are connected to the braking system. That comes on the table for the samson.
I = tensioner on the drive chain.

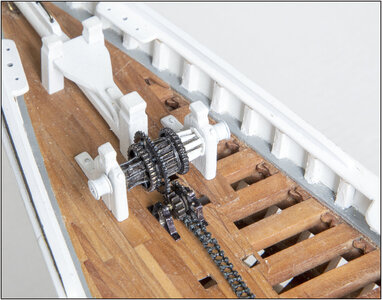
The unforgivable macro shot:
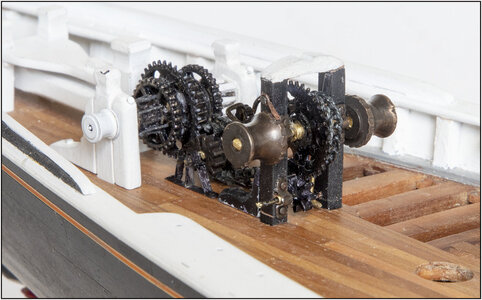
795 Windlass.jpg
Keep in mind that the entire gear is just under 4.5 cm long / less then 2" ........

The whole on the bow:
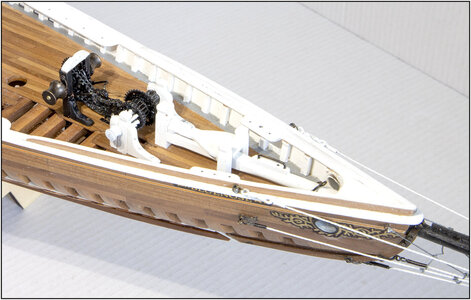
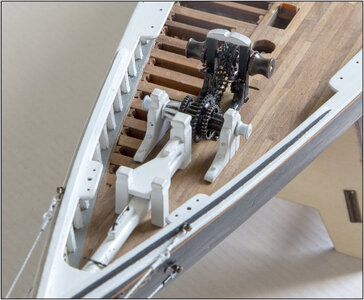
796 Windlass.jpg
And one more from the front:
797 Windlass.jpg

A complex past that has cost me a lot of thinking and improvisation, with the help of AL-FI.
Now the braking system that also needs to be completely scratched. And the catch on the samson and cover over the gears on axle 1 and 2.
Regards, Peter
 
Last edited:
Hello Peter, Great job you have done on your windless and drive system, this sure has been a lot of extra work on your behalf and it sure looks great. Could you tell me what size those drive chain sprockets are and where ever did you find them? Thanks.
Regards Lawrence
 
After a lot of tweezing work, the third part is ready: the winch drive
Well that blew my mind. A lot of intricate machinery in such a compact space. Yes you definitely were a Swiss watch-maker at some stage Peter. I particularly enjoyed the explanation of each part, most interesting, especially the variations that allow the axles to work independently and the deceleration mechanisms to allow for heavier workloads. Fascinating. Thanks for sharing that Peter, a magnificent piece of work Thumbsup
 
Hello Peter, Great job you have done on your windless and drive system, this sure has been a lot of extra work on your behalf and it sure looks great. Could you tell me what size those drive chain sprockets are and where ever did you find them? Thanks.
Regards Lawrence
Hi Lawrence. Thanxs for the compliments. Most of the sprockets are from this:
I chose the 'gun metal'. With also some smaller ones from 10 and 8 mm.

The 2 biggest sprockets are 14 mm. I find them in my 'collection of stuff'.
But I ordered also this, with a wider collection:
But still not arrived, so I could not tell you there dimensions.

For most dimensions I have reduced the drawings of The Saga on page 54. These are '10ft=5cm' = 1:60.96. In imperial I think it's 1:24? (10ft=120" / 5 = 24)
I scaled the drawing in Photoshop to the size of YQ 1:72.
If you wanted, I can mail you the jpg (send it in a PM) in that size to print your own.
Regards, Peter
 
Last edited:
Well that blew my mind. A lot of intricate machinery in such a compact space. Yes you definitely were a Swiss watch-maker at some stage Peter. I particularly enjoyed the explanation of each part, most interesting, especially the variations that allow the axles to work independently and the deceleration mechanisms to allow for heavier workloads. Fascinating. Thanks for sharing that Peter, a magnificent piece of work Thumbsup
Hi Mark. You also thanx for the compliments. Howard Chapelle's book is like a encyclopedia. It was also enlightening to me how thoughtful this winch was. It also took some time to get everything clear. The combination of the two authors is then a great plus. But they also differ in detail that they show. So why not share?
Regards, Peter
 
To me this build is special on so many levels. AS far as the build itself goes, you have shifted boundaries by segmenting the hull, compartmentalizing it and detailing it to a level that was simply never attempted before anywhere in the word. But also, on a personal level I appreciate how you have taken a natural leadership role in the Bluenose Group Build and how you are offering the soundest possible advice to others who want to follow. Like Johan said, other members don't have to copy item for item - they can choose what they want to include or omit - but you have given them the choice. Thank you for that!
 
To me this build is special on so many levels. AS far as the build itself goes, you have shifted boundaries by segmenting the hull, compartmentalizing it and detailing it to a level that was simply never attempted before anywhere in the word. But also, on a personal level I appreciate how you have taken a natural leadership role in the Bluenose Group Build and how you are offering the soundest possible advice to others who want to follow. Like Johan said, other members don't have to copy item for item - they can choose what they want to include or omit - but you have given them the choice. Thank you for that!
Hi Heinrich.
Thank you very very much for your compliments and nice words. :) I really appreciate this!
I am happy that I can serve as an inspiration to others. That I am building a bit 'out of the box' was not my plan in advance. And that is partly prompted by what others describe and/or show in their build log. And that's the beauty of this SOS with, among other things, the Group Builds.
Given my pace and the number of pages so far, there are quite a few more to come. Still have some ideas in mind, so who knows...... ;)
Regards, Peter
 
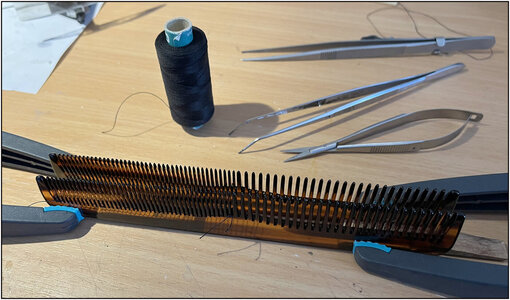
You will know me a bit by now: not easily satisfied!
Maybe some of you actually likely too: that chain is nice, but a bit too coarse. Especially now that you see the chain on the mechanism. Totally correct!
I also kept the 1st version close to 'the machine' and then it becomes completely too coarse.

Putting the material back into position:
798 Chain.jpg
But now with thinner sewing machine thread.

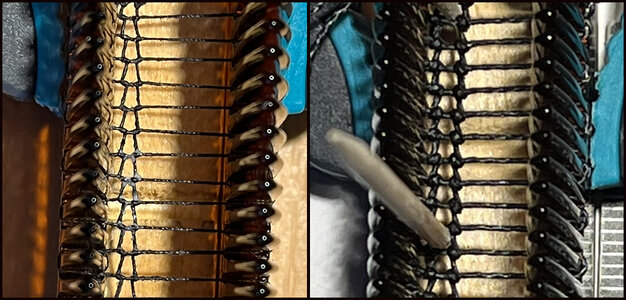
The 1st row looks promising:
799 Chain.jpg

Compared with the first 13 links:
800 Chain.jpg
I also make them a little smaller.
well ....... I continue weaving .......

And the chain tensioner …….. mwa….there comes also a new one.
Regards, Peter
 
Last edited:
You will know me a bit by now: not easily satisfied!
Maybe some of you actually likely too: that chain is nice, but a bit too coarse. Especially now that you see the chain on the mechanism. Totally correct!
I also kept the 1st version close to 'the machine' and then it becomes completely too coarse.

Putting the material back into position:
View attachment 316078
But now with thinner sewing machine thread.

The 1st row looks promising:
View attachment 316079

Compared with the first 13 links:
View attachment 316080
I also make them a little smaller.
well ....... I continue weaving .......

And the chain tensioner …….. mwa….there comes also a new one.
Regards, Peter
Admittedly looking a lot more to scale than your first attempt.
When looking at your installation pictures, the first try didn’t look too bad either. That could have been caused by the fact that, when building to scale, you just can’t get everything down to it; look at a 1mm bold head, that becomes 72mm in real life. An intricate balancing act, that’s certain, if you don’t like what you see, it’s back to the drawing board.
Still, this still is a very inventive way of simulating a chain.
Thanxs Johan. Most of the time, by the first look of a builded part, you think: yes, it's allright. When it's also allright by the second look, the it must be allright.
And about our scale building, there is a lot out of scale. But for the most it is: are 'the looks' allright.
Regards, Peter
 
Back
Top