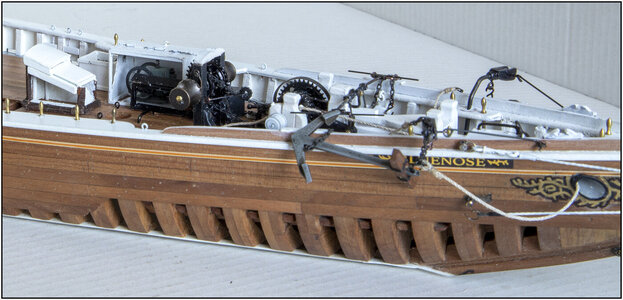
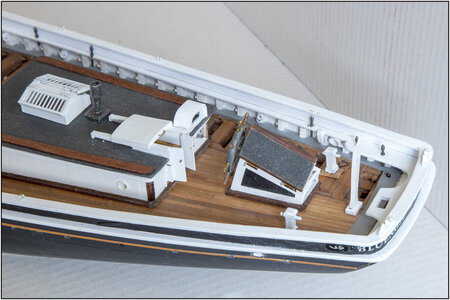
YUANQING BLUENOSE - Peter Voogt [COMPLETED BUILD]

Looking forward to the final result of all your contemplations and hard work.
So far, looking good. Thumbsup
Although not at the stage of this build yet, I am already trying to form an image on how I want the aft cabin to look. Now this allows me to compare this image against your aft cabin design. Interesting times ahead...;)
Thank, Johan. Always willing to help by visualizing ideas. :)
Regards, Peter
 
Being able to close the chapter 'Cabin'.
In particular, my decision to make the roof removable took a lot of creativity time.

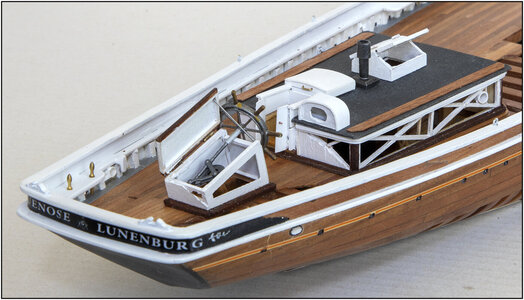
This is what the 'closed side' now looks like:
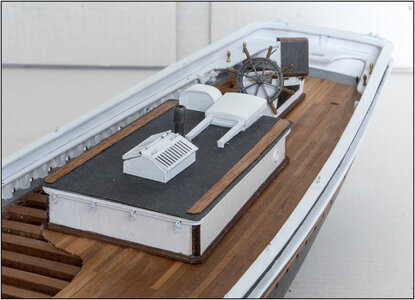
833 Cabin.jpg
4 eyebolts with ring on the front with which at least 1 oil drum is later secured.
The chimney is the version YQ provides with the kit. The Saga and Eisnor show the same. MS shows a flat laid pipe, which can also be seen in the old photo shown earlier. I went for this pipe anyway.
On either side of the deck a wide plank across the entire side.
Here MS is clear again with the text: "A solid handrail optional, since not seen in all photos. Perhaps by Racing. Another option: wide board along entire edge, used for cutting bait while fishing." I make my BN in fishing version, so with the planks.

Seen obliquely from the rear:
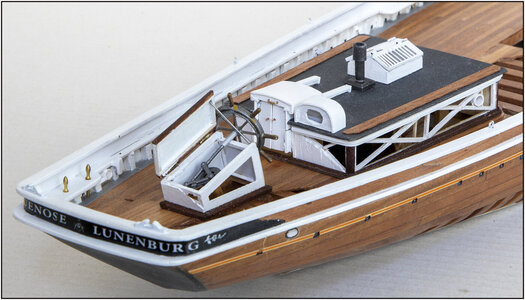
834 Cabin.jpg
And:
835 Cabin.jpg
with open sky light, sliding cover and doors.

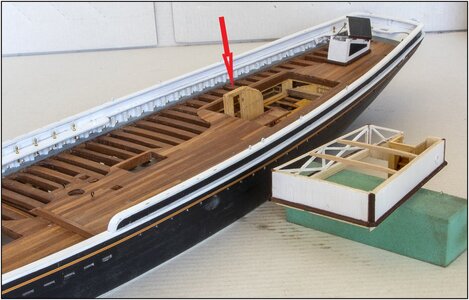
To show enthusiasts the interior better, the roof can be removed:
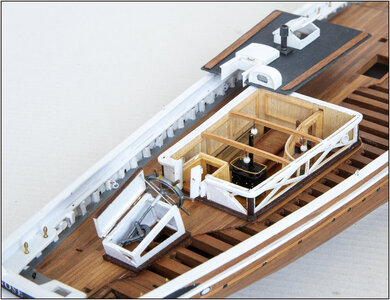
836 Cabin.jpg
With the problem mentioned above: Part of the side walls to which the doors are attached.
I had 2 options:
1: put the side walls on the walls of the stairwell, but then the sliders of the sliding cover started to float;
2: divide the side walls at the height of the roof, but then the doors were only fixed with the bottom hinges.
It eventually became option 2. Why choose the easiest way ........ On reflection: I could also have cut them diagonally from 'high back' to 'low front'. :rolleyes:
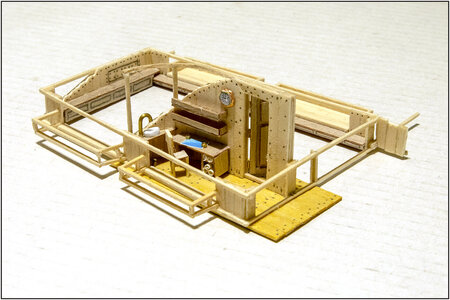
The bare wood of the inside is coated with linseed oil. This accentuates the moldings on the walls again.
The trim at the top has a gap on the starboard side and partly at the rear. That's right. The planking on the outside has not been installed there and the molding runs around the 1/4 round corner posts that also protrude slightly on the open side.

The view into the cab from the other side:
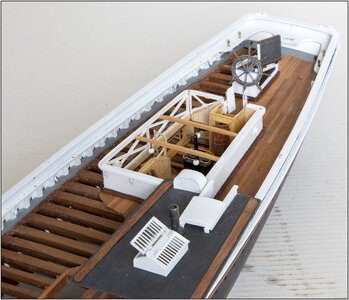
837 Cabin.jpg
I had already made the interior. Only 3 light bulbs hung. Not as bright as the led's like Johan @RDN1954 of Lawrence @Canoe21 ;) ...........

Gr. Peter
 
Last edited:
My friend, your work is beautiful, and I fully agree with your modus operandum. Please forgive this obviously stupid question, but where does the door indicated in red lead to? I ask this, because it looks like the upper third of the door is obstructed by the coaming.

830 Cabin.jpg
 
My friend, your work is beautiful, and I fully agree with your modus operandum. Please forgive this obviously stupid question, but where does the door indicated in red lead to? I ask this, because it looks like the upper third of the door is obstructed by the coaming.

View attachment 321846
Hi Heinrich. Thanxs for your post and comment. And ....... there is only one stupid question ...... the not asked one!
That photo with that wall is a bit distorted. That door goes to the Captains Cabin:
512 CapCab.jpg
Regards, Peter
 
Hi Heinrich. Thanxs for your post and comment. And ....... there is only one stupid question ...... the not asked one!
That photo with that wall is a bit distorted. That door goes to the Captains Cabin:
View attachment 321847
Regards, Peter
Aahhh! Thumbsup This picture explains it perfectly. ThumbsupYou have so much detail in this build, that sometimes when I view only parts of it, I have to think carefully how it gels into the unit as a whole. :)
 
Seeing your update left me absolutely flabbergasted, again...

So after taking a break and 30km of bicycling I was able to kickstart my brains again. While your build is progressing into this superb example of inventive and creative modeling, you are setting new and hard to meet modeling standards. There are others, of course, to name one, @Maarten, but this particular model is dear to me, since I'm building the same kit.
The Admiral also expressed her admiration for your work on this model, of which note.
Thanxs, Johan. Much appreciated. Pass my thanks to your Admiral.
Regard, Peter
 
I had to do some serious catching up on your build! Everything looks great as usual! I really love the bow and everything you did with that! Now the stern is taking great shape as well! Soon you will be going skyward… ;)
 
I had to do some serious catching up on your build! Everything looks great as usual! I really love the bow and everything you did with that! Now the stern is taking great shape as well! Soon you will be going skyward… ;)
Thanxs very much, Dean. I appreciate this very much from you as my building-duddy. And yes, I am looking forward to start with the masts and the rigging. But still some items to do on the deck, working form bow and stern to the centre.
Regards, Peter
 
Despite the size, or perhaps because of the size, this little friend still provided the necessary head calculations. Access to the forecastle / foc's'le companionway:
838 Focs-Comp.jpg
I started with both side walls. I turned out to make them in mirror image ....... :confused:
And I wanted to make the sliding cover and the entrance panels functional here too. Then those panels had to be able to pass between the guides of the sliding cover. And the guides also had to rest on something ........
Well....... it works:
839 Focs-Comp.jpg

Here's a picture of the open side:
840 Focs-Comp.jpg
When both parts of the hull have been joined, the stairs protrude from the forecastle, just above the floor at the height of the plinth. Yep, I always have to take the other part into account.
Even more dust ........ but the big cleaning is for later. :)
Regards, Peter
 
Inspirationol post, Peter.
I will not copy exactly what you’re doing, but it gives me a multitude of ideas on possible customizations.
Thanks!
 
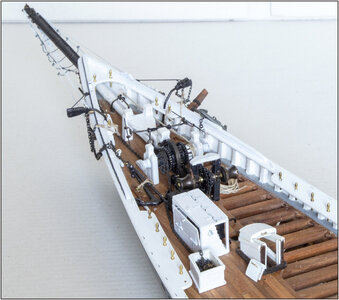
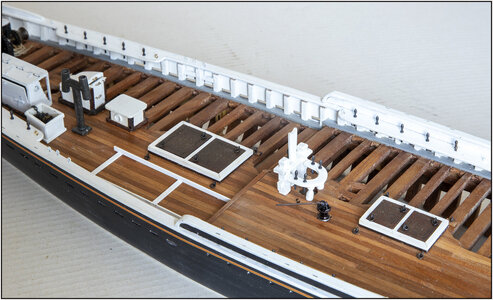
The middle deck with the attributes:
841 Mid-Deck.jpg
-the sky-light for the forecastle, but that does not provide light but ventilation for the galley and stove;
-the chimney above the stove. I will probably shorten it a bit;
- the hatches above the fore and aft fish hold, with lashing eyes on the hatches and deck (removable of course);
-the Fife rail around the mainmast. Self-provided with 2 columns made on the lathe. YQ had provided 1. This also contains the support for the boom of the foremast. Also fitted with snatch blocks on the side;
-the bilge pump, itself equipped with hinge and arm. On starboard the unfinished column of the other pump will point through the hole in the deck;
-the frame for the Dorries on the port side. It will be later secured with lashing eyes and cleats for the Dorries. But I'll finish that when the Dorries are made.
-all belaying pins blackened: thanks for the attention of a Dutch forum member. I also did a test with white ones, but the fittings for the standing and walking rigging are also black. The eyes are also blackened.

The aft deck has also been given a bit more:
842 Aft-Deck.jpg
- the support for the boom of the main boom;
-2 quarter bits.

The view from above:
843 Main-Deck.jpg
It has become quite full.

And one more from a lower standpoint:
844 Main-Deck.jpg

I still have to make 2 'Sheet Boom Buffers' to which the two tackles on the back of both booms will be attached. I still have to study how to make it.
Gr. Peter
 
Back
Top