YUANQING BLUENOSE - Peter Voogt [COMPLETED BUILD]

With some notable differences in name and:
-Jenson's diameters are much larger than Lankford's.
I was looking in Chapelle's book "The American Fishing Schooner" to measurements of the rigging ropes.
On the pages 592 en 592 I found a list of rigging of the 'Gertrude L. Thebaud". She was a great competitor of the Bluenose and very comparable.
And Chapelle added by the values of the list "CIRC.". A great aha ....... that's 'Circumference'.:) The outline value.
Well, added Chapelle's values to the excel-file and divide them with 'pi'=3,14
Then I divided the values of Jenson also bij 'pi'. And then .........tada tada::rolleyes:
1669729891721.png
I can live with these difference.
Then I'll just assume Jenson's list includes the outlines. Apparently that was the standard at the time.
And if it isn't, then I find myself, for myself, very convincing.ROTF
I will up-date the excel list in a moment.
Regards, Peter
 
There are still 3 lines to apply on the back. In order to cause the least inconvenience to each other, this is the order:
-topping lift
-peak halliard
-quarter lift
When applying, I already have to provide both lifts of 0.6 mm / 027" with baggywrinkel.
I've shown this photo before, but it's clearly visible on the back:
1003 Baggy.jpg
It is to prevent damaging the sail. In the past, old lines were used for this. They were cut into pieces and partly unraveled.

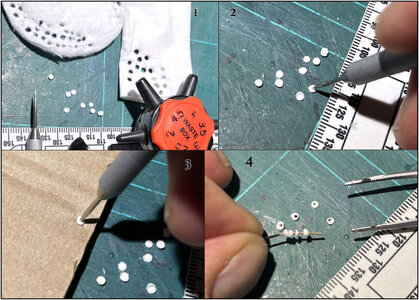
I've had an idea for a while. So tried:
1000 Baggy.jpg
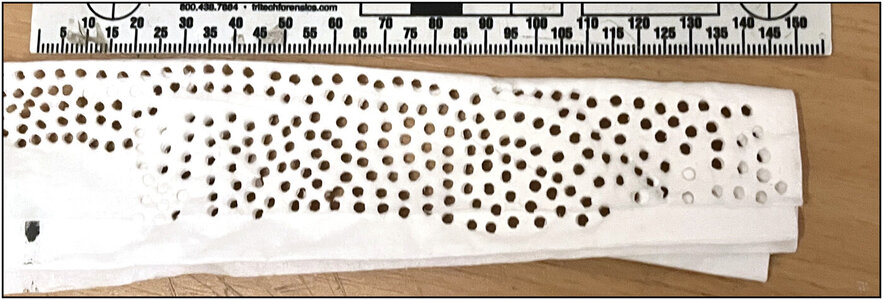
1: Made rounds of 2 mm / 0,08" and 2.5 mm / 0,1" with the 6-hole pliers. First printed from a cotton ball, but that was too fibrous. Then a tissue folded in half 4 times.
The choice fell on 2 mm.
2: the circles pinned on a counting needle. I used it at work to count fingerprints on typica.
3: pressed on a piece of cardboard to enlarge the hole slightly.
4: they are now small barrels that I can string on the line.

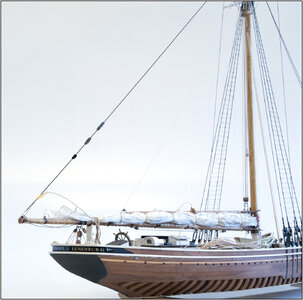
Here's a test setting:
1001 Baggy.jpg
They are not yet the right length. And I still have to find the desired color.
On this picture slanted from behind, they look a bit bigger. Tomorrow one square. Now to Rotterdam for a concert of the Dutch Police Orchestra. My Admiral was a player for many years.

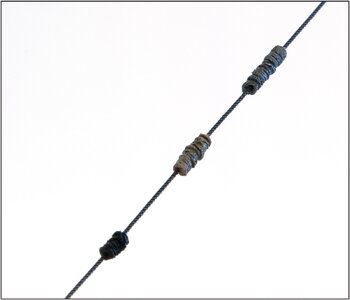
An enlargement:
1002 Baggy.jpg
Below: black, middle: brown/grey, above: dark grey.
I think I'm going for the dark gray. Then it sticks out just a bit on the black lines.
Regards, Peter
 
Last edited:
There are still 3 lines to apply on the back. In order to cause the least inconvenience to each other, this is the order:
-topping lift
-peak halliard
-quarter lift
When applying, I already have to provide both lifts of 0.6 mm / 027" with baggywrinkel.
I've shown this photo before, but it's clearly visible on the back:
View attachment 343312
It is to damage the sail. In the past, old lines were used for this. They were cut into pieces and partly unraveled.

I've had an idea for a while. So tried:
View attachment 343309
1: Made rounds of 2 mm / 0,08" and 2.5 mm / 0,1" with the 6-hole pliers. First printed from a cotton ball, but that was too fibrous. Then a tissue folded in half 4 times.
The choice fell on 2 mm.
2: the circles pinned on a counting needle. I used it at work to count fingerprints on typica.
3: pressed on a piece of cardboard to enlarge the hole slightly.
4: they are now small barrels that I can string on the line.

Here's a test setting:
View attachment 343310
They are not yet the right length. And I still have to find the desired color.

An enlargement:
View attachment 343311
Below black, medium brown/grey, above dark grey.
I think I'm going for the dark gray. Then it sticks out just a bit on the black lines.
Regards, Peter
Ladies' leg warmers (har!)
 
There are still 3 lines to apply on the back. In order to cause the least inconvenience to each other, this is the order:
-topping lift
-peak halliard
-quarter lift
When applying, I already have to provide both lifts of 0.6 mm / 027" with baggywrinkel.
I've shown this photo before, but it's clearly visible on the back:
View attachment 343312
It is to damage the sail. In the past, old lines were used for this. They were cut into pieces and partly unraveled.

I've had an idea for a while. So tried:
View attachment 343309
1: Made rounds of 2 mm / 0,08" and 2.5 mm / 0,1" with the 6-hole pliers. First printed from a cotton ball, but that was too fibrous. Then a tissue folded in half 4 times.
The choice fell on 2 mm.
2: the circles pinned on a counting needle. I used it at work to count fingerprints on typica.
3: pressed on a piece of cardboard to enlarge the hole slightly.
4: they are now small barrels that I can string on the line.

Here's a test setting:
View attachment 343310
They are not yet the right length. And I still have to find the desired color.

An enlargement:
View attachment 343311
Below black, medium brown/grey, above dark grey.
I think I'm going for the dark gray. Then it sticks out just a bit on the black lines.
Regards, Peter
And in the test setting pic the city park trash bin stands out there just ahead of the wheel.
 
The promised 'right angle' photo.
Playing around in Photoshop is fun, but sometimes also confrontational.
I took a photo perpendicular to the side of the model:
1005 Baggy.jpg
It seems that the baggywrinkle is quite in proportion.

This photo placed on the old photo I showed regarding the baggywrinkel. The layers in Photoshop can give you a degree of translucency. That produces this image:
1004 Baggy.jpg
The hulls placed on top of each other to scale them.
Before we start comparing, a note about photography. What kind of lens on the camera? And a distance, probably with something tele? That becomes quite a task with model photography to imitate exactly.

The comparison was about whether the diameter of the baggywrinkle was correct. That's okay.:)
There are differences, such as the place and position of the main mast and the bowsprit. The mast of my model could be slightly backward and straighter. Only the last is possible.;)
But the question is whether the old photo is of the Bluenose.
I came across it on the internet. A quick search first yielded a link to Pinterest. And through some steps at the "Essex Historical Society & Shipbuilding Museum". But could not find the picture.
It is probably from the BN-II, given the radar dome on the foremast.

Found in Nova Scotia one other picture, also with the radar dome, where she is also almost at right angles. That gives this picture:
1006 Baggy.jpg
The hulls are again placed on top of each other. They match nicely. The mast of my model could be slightly forward and straighter. Only the last is possible.;) And given both comparisons the only thing I will do to the mast.
But enough rambling. I'll take a look at the 1st picture of this post again and continue building. But it's still fun to 'dive into the old box'.
Regards, Peter
 
Last edited:
Very illustrative, combining these old pictures with your model.
What's noteworthy is that the bowsprit of the BNII may have been of different lengths. The angle though seems to be the same on both pictures.
 
Ladies' leg warmers (har!)
I was wearing them also during the 70´s !!! it was the period of aerobic
They are looking great - these from my legs, but also these from Peter

Peter One point:
When the photo was not exactly at 90° towards the ship axis made and the ship was a little bit listing in that moment of the photo, you have immediately a different angle of the mast shown on the photo .... have this in mind
 
Very illustrative, combining these old pictures with your model.
What's noteworthy is that the bowsprit of the BNII may have been of different lengths. The angle though seems to be the same on both pictures.
Peter One point:
When the photo was not exactly at 90° towards the ship axis made and the ship was a little bit listing in that moment of the photo, you have immediately a different angle of the mast shown on the photo .... have this in mind
Thanks both for the reply, Johan & Uwe.
I am aware that taking pictures of the real ship depends on many things. I already mentioned the lens used. Tele or (a bit) wide angle. And the little bit listing you named.
In reconstructions at my earlier work, we sometimes spent hours trying to get equations equivalent. And now for 2 old photos in a few minutes ..........
In the meantime I checked the angle of the mast with the drawings of both Eisnor and MS/Lankford. And then that makes very little difference.
Regards, Peter
 
Last edited:
Thanks both for the reply, Johan & Uwe.
I am aware that taking pictures of the real ship depends on many things. I already mentioned the lens used. Tele or (a bit) wide angle. And the little bit missing you named.
In reconstructions at my earlier work, we sometimes spent hours trying to get equations equivalent. And now for 2 old photos in a few minutes ..........
In the meantime I checked the angle of the mast with the drawings of both Eisnor and MS/Lankford. And then that makes very little difference.
Regards, Peter
As long as we don't regard these pictures as drawings/gospel, but merely as references, there's little wrong in using them.
 
The promised 'right angle' photo.
Playing around in Photoshop is fun, but sometimes also confrontational.
I took a photo perpendicular to the side of the model:
View attachment 343430
It seems that the baggywrinkle is quite in proportion.

This photo placed on the old photo I showed regarding the baggywrinkel. The layers in Photoshop can give you a degree of translucency. That produces this image:
View attachment 343432
The hulls placed on top of each other to scale them.
Before we start comparing, a note about photography. What kind of lens on the camera? And a distance, probably with something tele? That becomes quite a task with model photography to imitate exactly.

The comparison was about whether the diameter of the baggywrinkle was correct. That's okay.:)
There are differences, such as the place and position of the main mast and the bowsprit. The mast of my model could be slightly backward and straighter. Only the last is possible.;)
But the question is whether the old photo is of the Bluenose.
I came across it on the internet. A quick search first yielded a link to Pinterest. And through some steps at the "Essex Historical Society & Shipbuilding Museum". But could not find the picture.
It is probably from the BN-II, given the radar dome on the foremast.

Found in Nova Scotia one other picture, also with the radar dome, where she is also almost at right angles. That gives this picture:
View attachment 343431
The hulls are again placed on top of each other. They match nicely. The mast of my model could be slightly forward and straighter. Only the last is possible.;) And given both comparisons the only thing I will do to the mast.
But enough rambling. I'll take a look at the 1st picture of this post again and continue building. But it's still fun to 'dive into the old box'.
Regards, Peter
Good morning Peter. Brilliant post. Nice "leg warmers" as Alf puts it. Cheers Grant.
 
As long as we don't regard these pictures as drawings/gospel, but merely as references, there's little wrong in using them.
Good morning Peter. Brilliant post. Nice "leg warmers" as Alf puts it. Cheers Grant.
Thanks, Johan and Grant. It’s great fun to search and look in the archives to older stuff and thus messing around in modern applications. Still looking for a representative picture from the original in right perspective.
Regards, Peter
 
What would be the possibility of trimming these masts. On modern sailing yachts you can trim the mast depending on wind and sails. The bluenose being a racing yacht maybe also used mast trimming?
Ps thats why I stay safe in the 17th and 18th century, no photos available :cool:
Thanks for naming that opportunity, Maarten. But given the rigging with the shrouds and the many stays, I think it's getting a bit too complex.
Regards, Peter
 
Last edited:
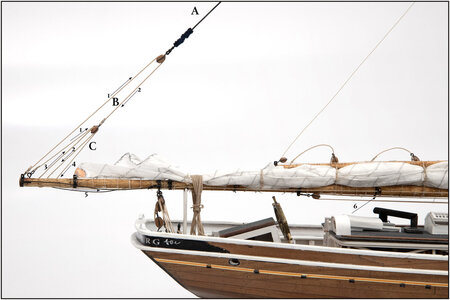
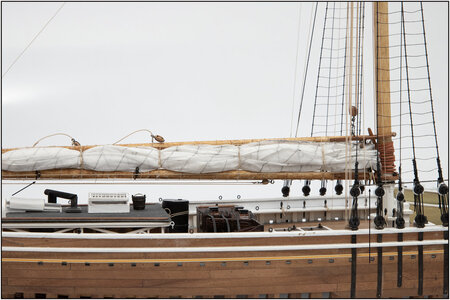
The topping lift applied, including the baggywrinkle:
1007 TopLift.jpg

On the end of the boom:
1008 TopLift.jpg
A: The pendent from 0.6mm/.027" line with a 4.5mm/3/16" single-disc block at the end.
B: the 1st tackle attached to the band on the end of the boom. The driving part 'B2' has a 3 mm/1/8" double disc block at the end.
C: the 2nd tackle is attached to an eyelet just before the band to which the 1st tackle is attached. The part 'C2' goes from the front to the rear around the rear disc in the boom, after which part 'C3' leads back to the block. The part 'C4' goes through the rear of the front disc and under the boom to the front of the boom, 'C5'. About half way up the boom it passes through the bullseye fairlead, '6'.

The hauling part is attached to a belaying pin on the starboard side of the claw of the boom:
1009 TopLift.jpg

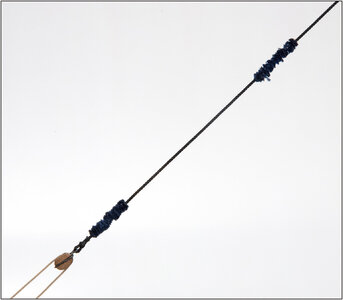
The baggywrinkle is also made of tissue:
1010 Baggy.jpg
As mentioned with the 6-hole pliers with 2mm/.08" rounds.

I colored these with Indigo Ecoline:
1011 Baggy.jpg
Because the black of the hull is also slightly 'blued'. It is not painting but more or less saturated with the ink. The open appearance is thus retained with the advantage that the drying ink ensures that it no longer shifts.

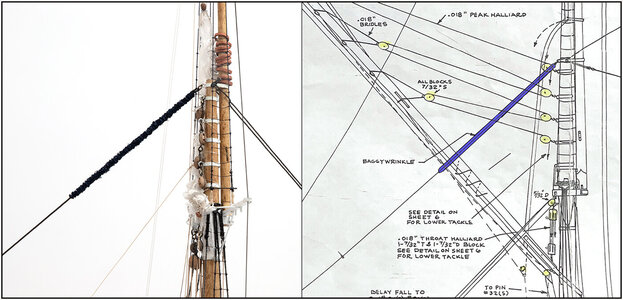
The pendant is secured to the top strap on top of the lower mast:
1012 Baggy.jpg
On the right is a cut-out of a drawing by MS/Lankford.
There the baggywrinkle is a lot longer. This is because the topsail rubs against the lines there and is also carried underneath the peaks halliard and over the gaff from port to starboard.
Regards, Peter
 
Last edited:
Back
Top