YUANQING BLUENOSE - Peter Voogt [COMPLETED BUILD]

Hello Peter,I just love all of that great detail that you are adding to tour YQ-Bluenose the cook stove, bulkheads along with the bunks. Your divided hull looks very nice, you sure are brave to tackle such a project such as this, I would be afraid to do so. I have seen this idea on another form from a fellow from Australia, who did very nice work but on a much smaller scale that the Bluenose, But I do not go there any longer. Will you be adding sails, this would be a feat on a build such as yours. Well Done.
Regards Lawrence
 
I can see where you're coming from; I think your bulkhead shows your intent quite clearly.
What I'm having difficulty with is visualizing the vertical split, given the mix between horizontal, vertical and oblique/curved parts. I'm really not sure, but I'm imagining that for the innocent spectator it is hard to understand what he/she is seeing. Mind you, a horizontal split would have the same issue...
I made a sketch, trying to capture your intent, see attachment. Is that what your aim is?

Kind regards,

Johan

View attachment 256527
These kind of splits do make life more difficult, and also makes it harder to understand what you are looking at when it is apart.
This is why I would have opted for a split down the middle, that was side to side, or have frames removed on the open side to have an unobstructed view from the side. But you Peter have chosen to split it the hard way as far as showing detail below...lol...but I think you like the challenge! ;)
And now we wait... ;)
 
I can see where you're coming from; I think your bulkhead shows your intent quite clearly.
What I'm having difficulty with is visualizing the vertical split, given the mix between horizontal, vertical and oblique/curved parts. I'm really not sure, but I'm imagining that for the innocent spectator it is hard to understand what he/she is seeing. Mind you, a horizontal split would have the same issue...
I made a sketch, trying to capture your intent, see attachment. Is that what your aim is?

Kind regards,

Johan

View attachment 256527
As 1st compliments for your drawing, Johan!
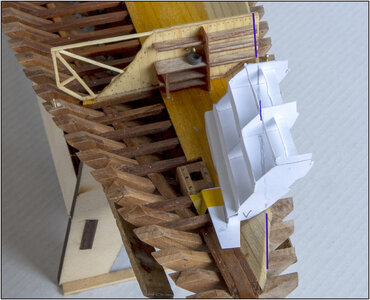
The cut goes through the floors of the 2 top bunks:
341 Bunks.jpg
I have chosen the camera position in such a way that the drawn pencil cutting line in the bunks connects with the cutting surface of the hull.
The 2 blue arrows point to the edge of the cutting surface of the hull.
I try to make that the cutting also goes exactly through the top / front of wall of the top bunks. (The little blue line.)

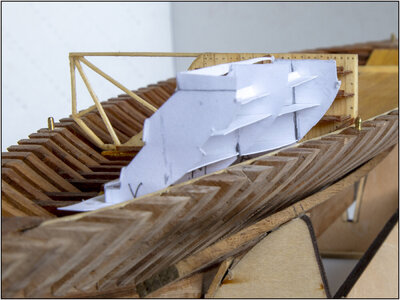
I have positioned the floors of the bottom 2 in such a way that they come exactly horizontal on the cutting edge of the hull:
340 Bunks.jpg
The front lower floor is slightly slanted and in the correct position also comes to the horizontal waterline.
Hopefully this gives a better picture of my brain waves.
PS: I now have much more respect for Ab Hoving's @Ab Hoving paper modeling!
regards, Peter
 
Last edited:
Hello Peter,I just love all of that great detail that you are adding to tour YQ-Bluenose the cook stove, bulkheads along with the bunks. Your divided hull looks very nice, you sure are brave to tackle such a project such as this, I would be afraid to do so. I have seen this idea on another form from a fellow from Australia, who did very nice work but on a much smaller scale that the Bluenose, But I do not go there any longer. Will you be adding sails, this would be a feat on a build such as yours. Well Done.
Regards Lawrence
Thanxs Lawrence.
It starts with an idea and then it gets out of hand. But everything is under control for now. :)
I most likely won't make sails on it. It will be Open-Admiralty-Wharf model.
regards, Peter
 
These kind of splits do make life more difficult, and also makes it harder to understand what you are looking at when it is apart.
This is why I would have opted for a split down the middle, that was side to side, or have frames removed on the open side to have an unobstructed view from the side. But you Peter have chosen to split it the hard way as far as showing detail below...lol...but I think you like the challenge! ;)
You also thanxs, Dean.
The splitting down the middle, side to side ...... the model builders of Nova Scotia has done that. But I didn't know that when I started sawing. :)
but I think you like the challenge!
O yes, more and more. And getting more ideas during the thinking and pre-building.
Regards, Peter
 
As 1st compliments for your drawing, Johan!
The cut goes through the floors of the 2 top bunks:
View attachment 256552
I have chosen the camera position in such a way that the drawn pencil cutting line in the bunks connects with the cutting surface of the hull.
The 2 blue arrows point to the edge of the cutting surface of the hull.
I try to make that the cutting also goes exactly through the top / front of wall of the top bunks. (The little blue line.)

I have positioned the floors of the bottom 2 in such a way that they come exactly horizontal on the cutting edge of the hull:
View attachment 256543
The front lower floor is slightly slanted and in the correct position also comes to the horizontal waterline.
Hopefully this gives a better picture of my brain waves.
PS: I now have much more respect for Ab Hoving's @Ab Hoving paper modeling!
regards, Peter
Oké, understood, that does really need some thinking ahead... A true piece of art, if you ask me.
Given the benign curvature of the horizontal cut, I assume you'll do a planar (vertical) cut? (Theoretically one would need a cutting surface, taking into account the curvature of the horizontal cut of the hull.)
I almost think it would be easier to glue the bunks in place, and then put the ship halves together as a guide to cut the bunks. ;)
 
Oké, understood, that does really need some thinking ahead... A true piece of art, if you ask me.
Given the benign curvature of the horizontal cut, I assume you'll do a planar (vertical) cut? (Theoretically one would need a cutting surface, taking into account the curvature of the horizontal cut of the hull.)
That's right, the cut in the bunks follows the curvature cut edge of the hull.
Da’s wel ff een gedoe ..... technische Engelse termen, vertalen, antwoord bedenken, vertalen, posten ...
(Translation: That's quite a hassle ..... technical English terms, translate, come up with an answer, translate, post ...) And that all for to communicate with another Dutch builder. LOL :)
Regards, Peter
 
Last edited:
That's right, the cut in the bunks follows the curvature cut edge of the hull.
Da’s wel ff een gedoe ..... technische Engelse termen, vertalen, antwoord bedenken, vertalen, posten ...
(Translation: That's quite a hassle ..... technical English terms, translate, come up with an answer, translate, post ...) And that all for to communicate with another Dutch builder. LOL :)
Regards, Peter
Sorry about it Peter, but I don't dare upset our English spoken fellow builders... ;)
 
I almost think it would be easier to glue the bunks in place, and then put the ship halves together as a guide to cut the bunks. ;)
Another approach would be to model (part of) the hull with a 3D modeling program, add the bunks to the mix and then define the theoretical cut. (Check the 3D model with reality.) Once established theory meets reality, start cutting.
Still a risky approach, given the high standards Peter applies to his builds.
I am certain no matter what approach you take, that the end result will be fantastic! Carry On My Wayward Son! ;)
Ah. But is Peter a Kansas fan? I know I loved me some Kerry Livgren!
Thanxs Johan, Dean and Paul.
I like how a build-log can go either way with all the compassionate advices, from application to music, from 3D to now Kansas too.
Let's just say I'm a little old-fashioned. So I have fun tinkering with my hands. In terms of applications, I stick to Photoshop and don't put any energy into a 3D program. Although I think it's beautiful what Dean conjures up.
And in terms of music: whatever it is old-fashioned. And that includes Kansas. A welcome variation.
Turn IT On, Turn It On, Turn It On Again
Regards, Peter
 
Last edited:
Thanxs Johan, Dean and Paul.
I like how a build-log can go either way with all the compassionate advices, from application to music, from 3D to now Kansas too.
Let's just say I'm a little old-fashioned. So have fun tinkering with my hands. In terms of applications, I stick to Photoshop and don't put any energy into a 3D program. Although I think it's beautiful what Dean conjures up.
And in terms of music: whatever it is old-fashioned. And that includes Kansas. A welcome variation.
Turn IT On, Turn It On, Turn It On Again
Regards, Peter
Luckily, there's not the one way how to approach any build, it's more like finding the way that suits you. ;)
 
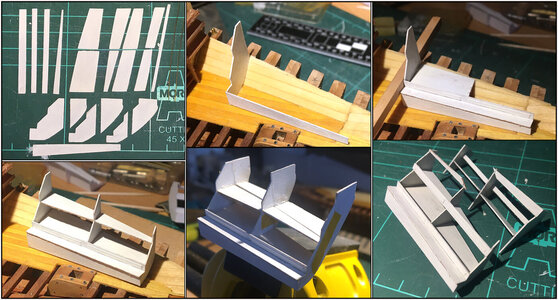
Building the bunks in a few steps:
342 Bunks.jpg
With everything in the 1st layer. I chose Talens Ecoline because it gives a nice matte finish.

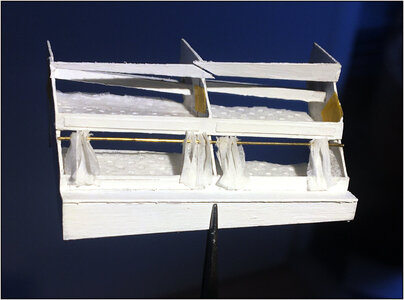
The bunks equipped with a mattress and the lower ones with curtains:
343 Bunks.jpg
The top one unfortunately doesn't, because they go in half halfway.
The rod is 0,5 mm brass, the curtains 1/3 layer of a tissue.

The whole glued into the hull and aligned under some deck beams:
344 Bunks.jpg

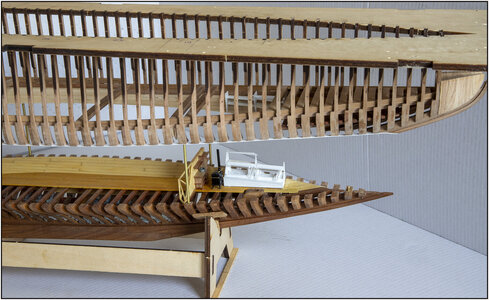
With the moment of truth: the parts come apart and slide past each other:
345 Bunks.jpg
I had to pry off 1 partition with a scalpel blade. Just a little too much glue.

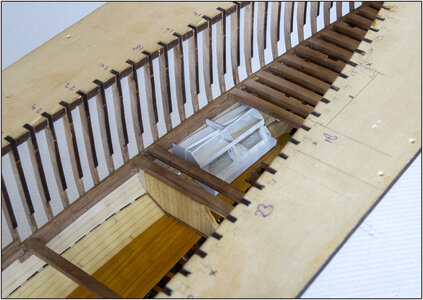
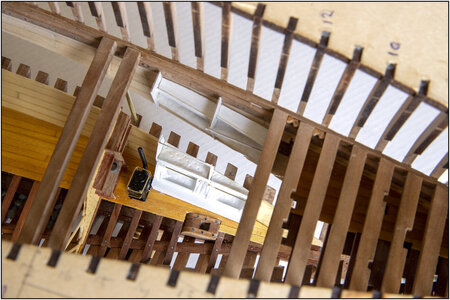
This is what the view looks like from above:
346 Bunks.jpg
The stove is not yet firmly in place. I'll have to check that once the deck beams are on and the stairs are in place.

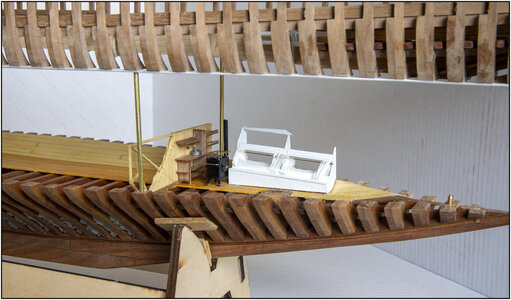
From the side:
347 Bunks.jpg
A bit of a relief that everything is 'running past each other' again.
Regards, Peter
 
Last edited:
Back
Top