YUANQING BLUENOSE - Peter Voogt [COMPLETED BUILD]

Hello Peter,

When looking at the Saga' sketch, the stove, obviously, is on the starboard side, at approximately the same fuselage station as the ladder.
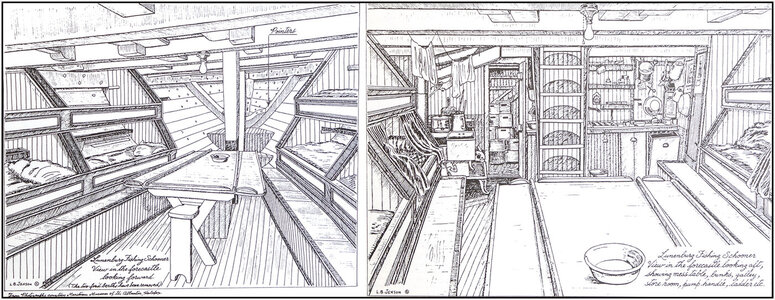
Across the entrance to the storage between the pantry/galley and the ice hold bulkhead and half hidden by the stairs, one could assume the sink and tap(s) to be positioned there and to the port side, given the layout is some form of storage. There is a waste disposal(?), some cabinets under the working top, so yes, I'm leaning towards a pantry area being there, also heavily based on the sketch on page 66 of the Saga.
The sketch you using in your post is, to me at least, a little misleading; the perspective used, leads me to believe that the sink/storage area is almost immediately aft of the ladder, which in real life would lead to a very wet and dirty galley area. When looking at the sketch from page 66, there appears to be a little more room to manoeuvre.
The half moons: could that have been a protective coating of some sort?

Kind regards,

Johan

View attachment 258881
Thanxs for your reply, Johan.
As you can see in the text in the drawing on pag. 49, the drawings are based on the schooner "Caroline Rose". I assumed that the other drawings are also of that. So they serve as a source of inspiration. Dean had introduced the Artistic License (AL). Because there are no more official drawings of the original BN available. I myself have added Free Interpretation (FI). Hence AL-FI sits on my shoulder and whispers in my ear every now and then. :rolleyes:

I am familiar with the drawings on p. 66 and 67. I used these to plot some positions against the drawings YQ. See my post #672 (pag.34).
For the layout I am depending on the construction that YQ has devised. The lower and between front floors in particular have an influence. The space of my ForeCastle is therefore more limited. I also couldn't make a flat floor with the FreshWaterTank under it. If I had known everything in advance, I could have adjusted that. Therefore also no 8 bunks on the port side but 4. Then my crew will have to take turns sleeping and sharing a cage. ;)
On the YQ drawing and the drawings on pag. 66 and 67 you can see that the chimney of the stove is on the port side of the stair case. So in my model it is also on the port side.
Rich has wrote that the build of the BN was arranged according to usual practice and wishes of Captain Angus Walters.
So, captain Peter Voogt does the same during his build. :)
Regards, Peter
 
Last edited:
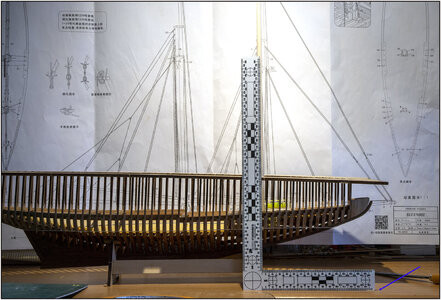
Before I could place the table, I first had to determine the position of the foremast. With the square on the drawing I saw that the foremast is about 1 degree backwards. Placed the model in front of the drawing and checked again:
352 ForeMast.jpg
On the bottom right of the square I glued a 1 mm slat so that I had the stand.
In the picture, the top of the jig stands round. I had limited space for my camera tripod and therefore had to use a bit of wide angle.

Made the pin at the bottom of the mast. Because the hole in the mast foot is a little bit rectangular, the position of the mast on the underside is indicated:
353 ForeMast.jpg
So from now on it will always be in the same position.

I slid the table over the mast and then put the mast in position. Tensioned with thin elastic wire so that I could position the mast well:
354 Table.jpg
I have a little space around the mast, in case the mast is supposed to be straight. I'm still trying to find info on that.
On the little drawing on page 294 of Chapelle's book, it also stand a bit backwards. Measured from the waterline.

The table was glued and the mast could be straight out:
355 Table.jpg
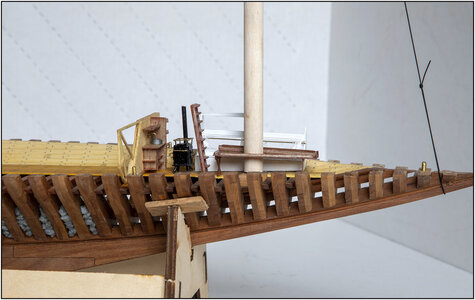
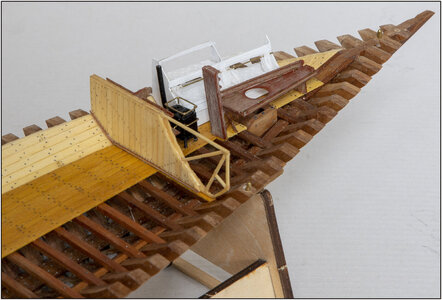
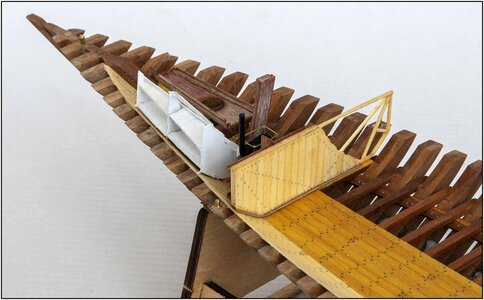
The table has foldable hinged sides so that you can take a seat while shuffling along the cages. Once seated, fold the side down. All the ends also have a raised edge so that the pans, plates and mugs do not slide off the table with a little rough seas.
I added one extra row of floor planks to place the table. They have to get there layer of oil.

With another shot from 2 different angles:
356 ForeCastle.jpg
357 ForeCastle.jpg

The ForeCastle is now complete. Continue with installing the deck beams above the ForeCastle in the upper part. Then to the 2nd inside wall for the IceHold.
Regards, Peter
 
Last edited:
Before I could place the table, I first had to determine the position of the foremast. With the square on the drawing I saw that the foremast is about 1 degree backwards. Placed the model in front of the drawing and checked again:
View attachment 258902
On the bottom right of the square I glued a 1 mm slat so that I had the stand.
In the picture, the top of the jig stands round. I had limited space for my camera tripod and therefore had to use a bit of wide angle.

Made the pin at the bottom of the mast. Because the hole in the mast foot is a little bit rectangular, the position of the mast on the underside is indicated:
View attachment 258903
So from now on I will always be in the same position.

I slid the table over the mast and then put the mast in position. Tensioned with thin elastic wire so that I could position the mast well:
View attachment 258904
I have a little space around the mast, in case the mast is supposed to be straight. I'm still trying to find info on that.

The table was glued and the mast could be straight out:
View attachment 258905
The table has foldable hinged sides so that you can take a seat while shuffling along the cages. Once seated, fold the side down. All the ends also have a raised edge so that the pans, plates and mugs do not slide off the table with a little rough seas.
I added one extra row of floor planks to place the table. They have to get there layer of oil.

With another shot from 2 different angles:
View attachment 258906
View attachment 258907

The ForeCastle is now complete. Continue with installing the deck beams above the ForeCastle in the upper part. Then to the 2nd inside wall for the IceHold.
Regards, Peter
Peter,
Without a doubt, a work of art!
Impressed, as usual, with your updates.
Johan.
 
Peter,
Without a doubt, a work of art!
Impressed, as usual, with your updates.
Johan.
Thanxs Johan. Taking into account the limitation described, this is what was within my capabilities. There are still some imperfections visible in the photos. That’s the evil of a macro. But from a normal viewing distance I am satisfied.
Regards, Peter
 
Thanxs for your reply, Johan.
As you can see in the text in the drawing on pag. 49, the drawings are based on the schooner "Caroline Rose". I assumed that the other drawings are also of that. So they serve as a source of inspiration. Dean had introduced the Artistic License (AL). Because there are no more official drawings of the original BN available. I myself have added Free Interpretation (FI). Hence AL-FI sits on my shoulder and whispers in my ear every now and then. :rolleyes:

I am familiar with the drawings on p. 66 and 67. I used these to plot some positions against the drawings YQ. See my post #672.
For the layout I am depending on the construction that YQ has devised. The lower and between front floors in particular have an influence. The space of my ForeCastle is therefore more limited. I also couldn't make a flat floor with the FreshWaterTank under it. If I had known everything in advance, I could have adjusted that. Therefore also no 8 bunks on the port side but 4. Then my crew will have to take turns sleeping and sharing a cage. ;)
On the YQ drawing and the drawings on pag. 66 and 67 you can see that the chimney of the stove is on the port side of the stair case. So in my model it is also on the port side.
Rich has wrote that the build of the BN was arranged according to usual practice and wishes of Captain Angus Walters.
So, captain Peter Voogt does the same during his build. :)
Regards, Peter
Dear Captain Peter,

Thanks for your extensive reply, I appreciate the time and effort you took for your response.
I have read several of the conversations on AL-FI and I encountered the same phenomenon in person with the rebuild of my Bluenose model.
From my past work experience I am used to what is called "unambiguous engineering definitions".
So now, entering this world, I have to get used to the fact that a lot of original information has been lost over time, has seen various interpretations/translations and, as you say, no original blueprints survived.
I am keenly interested in your rationale behind the decisions you are taking, one, because the results are astonishing and two, while a rookie, I am considering how far I want to go, customizing my build of the Bluenose and the build Iogs on this website are a source of inspiration and learning.
For now, I am not inclined to go ahead and cut the hull in half. That means I will probably not be able to get an as detailed interior like you are getting, but I am contemplating to add at least some interior details, hence my interest. I hope my questions or remarks are not offending you, that's not my intention... ;)

Kind regards,

Johan
 
Hi Peter

I possess neither AL- nor FI; so AL-FI is out of the question for me. However, I am trying my damndest to understand the forecastle layout.

At the hand of your excellent picture I have the following question:

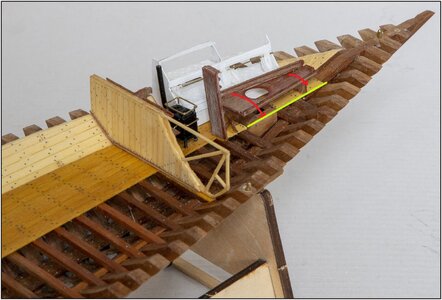
356 ForeCastle.jpg

Am I right in assuming that the table folds down as I have indicated with the arrows? (In other words, it folds down in the direction of the starboard side).
 
Hi Peter

I possess neither AL- nor FI; so AL-FI is out of the question for me. However, I am trying my damndest to understand the forecastle layout.

At the hand of your excellent picture I have the following question:

View attachment 258921

Am I right in assuming that the table folds down as I have indicated with the arrows? (In other words, it folds down in the direction of the starboard side).
Hi Heinrich.
The small starboard part is already folded down. The port side part is still folded up for a quarter.
In this drawings you side the table with both parts folded down:
59EB5ED5-9899-49AE-82CE-F9A7D8E4F49D.jpeg
The setup of the ForeCastle is already over a few pages. I can understand that you don't have everything in mind anymore. I also have to browse pretty every now and then.
The raised edges also hide something from the view on the table. But I couldn't cut them much thinner, to be able to grab them to glue.
I'll make another 'horrible macro' in a moment. ;)
Regards, Peter
 
Last edited:
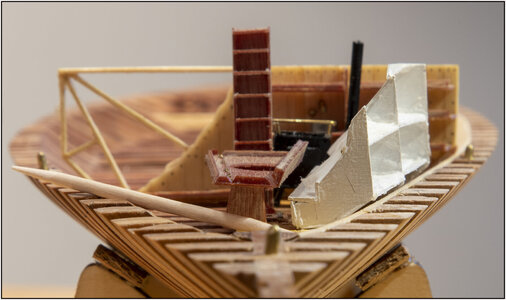
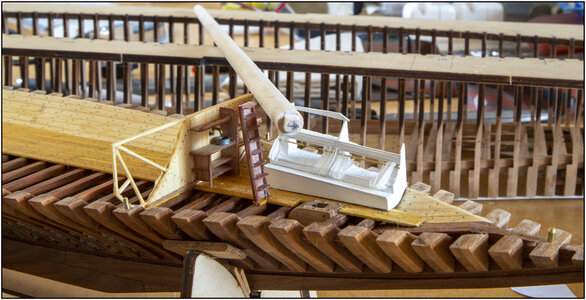
Auch .... those macro's ......... but this is for me working on the limit. The port side part of the table folded up:
358 Table.jpg
-The stove + chimney is a little bit tilted, but will be finalized once I have the deck beams in place.
I put a toothpick in front of the table to show a reference for the scale.

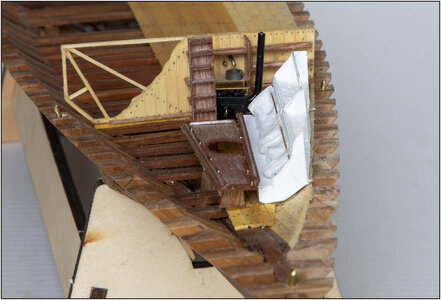
As an encore, another one from above with both parts of the hull together. Soon the inside will be shielded with the deck beams. To look inside, therefore is the extended-view.
359 ForeCastle.jpg
Regards, Peter
 
Last edited:
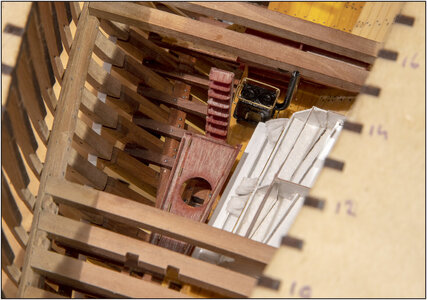
Thanxs for you comment, Rich.
Is 'Fish Guts' (under a boot) no 'Dirt'? :rolleyes:
.... If you have ever ascended a steep ships ladder .....
In my time as the miller on the windmill of Woudrichem I have ascend and decend the steep stairs often. Also in a hurry, running on the famous Dutch Wooden Shoes. Forwards and backwards. But due to the current safety and hygiene measures, you see this nowadays mainly by the polder millers.
When I am working in the garden, I still wear them.
Besides: Have you ever wear them of have you been running on them? Let me invite you when you have the opportunity to visit the Netherlands. Then we go to a 'klompenmaker' (<-- Click) near here and have a few custom made. By the way: that offer stands for every foreign SoS member! (When you visit me!)

Back to the stairs/ladder on the ship:
A 'ladder' is indeed a better word for this type of stairs. The BN was not a luxury yacht like the BN-II. Therefore is the compact accommodation more spartan than luxurious. And given the limited space, there was no room for a 'walking staircase'. In the captain's cabin there is one.
This previously posted picture from The Saga was my inspiration:
View attachment 258850
I have accentuated the ladder. I don't know if 'the half moons' are shadows of protections for the wood from kicking boots.
Maybe someone still thinks this is a pantry? But there is no stock om the shelfs. And given the position, this corresponds well with the deck components.
PS:
I like the stair/ladder walking/running discussion! Of some of you clearly a deja-vu. :) For me it is.
Regards, Peter
I am wondering if those "half moons" are actually openings to the back wall with the white portion above a reinforcing vertical board strengthening the treads.

It is fascinating to think about jogging or running in wooden shoes. That would be an acoustic reward but hard on my knees. Rich
 
Thanxs for your reply, Johan.
As you can see in the text in the drawing on pag. 49, the drawings are based on the schooner "Caroline Rose". I assumed that the other drawings are also of that. So they serve as a source of inspiration. Dean had introduced the Artistic License (AL). Because there are no more official drawings of the original BN available. I myself have added Free Interpretation (FI). Hence AL-FI sits on my shoulder and whispers in my ear every now and then. :rolleyes:

I am familiar with the drawings on p. 66 and 67. I used these to plot some positions against the drawings YQ. See my post #672 (pag.34).
For the layout I am depending on the construction that YQ has devised. The lower and between front floors in particular have an influence. The space of my ForeCastle is therefore more limited. I also couldn't make a flat floor with the FreshWaterTank under it. If I had known everything in advance, I could have adjusted that. Therefore also no 8 bunks on the port side but 4. Then my crew will have to take turns sleeping and sharing a cage. ;)
On the YQ drawing and the drawings on pag. 66 and 67 you can see that the chimney of the stove is on the port side of the stair case. So in my model it is also on the port side.
Rich has wrote that the build of the BN was arranged according to usual practice and wishes of Captain Angus Walters.
So, captain Peter Voogt does the same during his build. :)
Regards, Peter
Regarding "sharing of bunks" from my reading and watching dory fishing off of schooners, including BN, the entire crew would be out at the same time: prepping their lines, fishing, returning to unload and prep the fish for storage, and then sleep for a very short period before resuming the evolations togethere around 4 am. No watch on watch in these schooners. Only the Captain, cook, and carpenter/sailmaker were aboard when fishing was ordered. Just my understanding so where the other bunks were located must have been distributed between the focs'l and aft. Rich
 
Regarding "sharing of bunks" from my reading and watching dory fishing off of schooners, including BN, the entire crew would be out at the same time: prepping their lines, fishing, returning to unload and prep the fish for storage, and then sleep for a very short period before resuming the evolations togethere around 4 am. No watch on watch in these schooners. Only the Captain, cook, and carpenter/sailmaker were aboard when fishing was ordered. Just my understanding so where the other bunks were located must have been distributed between the focs'l and aft. Rich
Thanks Rich. In the (captains) cabin in the back, there are also a few bunks.
The drawings of the ForeCastle shows 2x4 bunks. I suppose it would be on both sides. So, 16 in the ForeCastle. But as written, because of the YQ construction, I could not make more bunks further to the front. Therefore my AL-FI solution.
Regards, Peter
Well, neither of us should lose sleep on this a we don't have to go dory fishing . . . just schooner building at our own pace and not of the captain or shareholders seeking financial profits, not hobby returns. ;) Rich
 
Thank you very much for your posting and explanation Peter. Now I understand completely how the layout works. This highlights the magnitude of what you are striving for. What you mention as "building at your limit" is certainly "beyond" mine when it comes to cramming detail into such a small space. Petje af!
 
Auch .... those macro's ......... but this is for me working on the limit. The port side part of the table folded up:
View attachment 258925
-The stove + chimney is a little bit tilted, but will be finalized once I have the deck beams in place.
I put a toothpick in front of the table to show a reference for the scale.

As an encore, another one from above with both parts of the hull together. Soon the inside will be shielded with the deck beams. To look inside, therefore is the extended-view.
View attachment 258926
Regards, Peter
If they fall off the ladder, at least they will land on the table! :p
Looks great Peter! I like it!
 
Thanks Rich. In the (captains) cabin in the back, there are also a few bunks.
The drawings of the ForeCastle shows 2x4 bunks. I suppose it would be on both sides. So, 16 in the ForeCastle. But as written, because of the YQ construction, I could not make more bunks further to the front. Therefore my AL-FI solution.
Regards, Peter
I read that Capt. Walters had a brass bead so that will give you some extra soldering practice if you can get him out of his cabin to avoid the flux and catch a solder flow ;) Rich
 
Back
Top