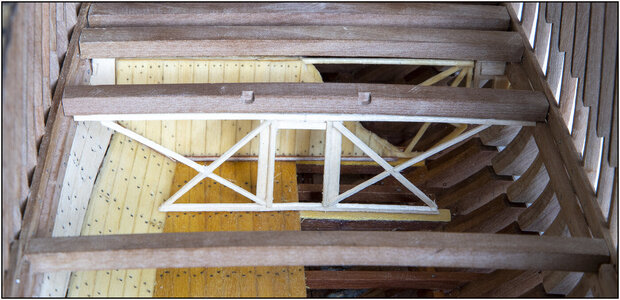
Peter,
I dunno about nuttin', but it sure looks absolutely great to me.
Jan
I dunno about nuttin', but it sure looks absolutely great to me.
Jan
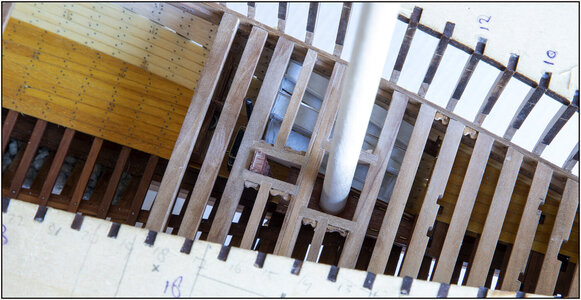
Hi Jan, .... you ain't seen nothing yet ......Peter,
I dunno about nuttin', but it sure looks absolutely great to me.
Jan
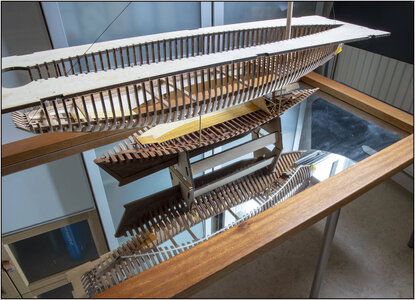
Good idea!I had an idea how I would like to display the BN in a display case when see is finished. And since I've now completed the ForeCastle with deck beams and the position of the foremast, time to set that up:
View attachment 262891
Here the mast is on its pin in the mast foot.
The mast is temporarily secured above the deck with a clip so that it does not sink down. And the mast is held in place in the longitudinal direction with an elastic cord. It does indeed slide through the hole in and out of the table in the mast foot.
The idea is to place the BN on a construction frame and a mirror on the floor of the display case:
View attachment 262892
Thanxs to my Admiral for borrowing the mirror
Then you have through the mirror a view into the interior of the upper part via the mirror.
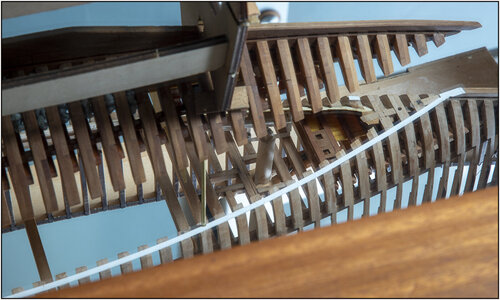
View attachment 262893
Now you can also see the double knees there. The image is just not sharp in the photo. But a mirror, like a regular window, has a birefringence index. So you get a double image.
I have decided to also apply the double knees along the sides, because you can see them through the mirror when you changed your position of viewing. I just have to see what can be seen from above. Because that already depends on the 'waterboards' and what planks come against them.
Regards, Peter

Not wanting to downplay the displayed craftsmanship and love for detail, I'll have to agree with Heinrich on this one. I think I might have an idea as to why it looks cramped, or, as Heinrich put it, cluttered. It has already been mentioned that the YQ floorbeams are too wide. This means there's less space for the knees to fit in between two beams, hence the out-of-proportion (also see the relevant sketches in the Saga) dimensions of the knees.Now please don't shoot me ... the double knees on the picture below, still do not have me convinced. To me they are simply too small to reflect detail, yet big enough to "clutter" your otherwise clean and precise joinery. Anyway my friend, that is just how I look at it and does not detract one iota from what is one heck of a build!

Hi Johan. Thanxs voor the reply.Not wanting to downplay the displayed craftsmanship and love for detail, I'll have to agree with Heinrich on this one. I think I might have an idea as to why it looks cramped, or, as Heinrich put it, cluttered. It has already been mentioned that the YQ floorbeams are too wide. This means there's less space for the knees to fit in between two beams, hence the out-of-proportion (also see the relevant sketches in the Saga) dimensions of the knees.
And this is where AL-FI kicks in, Peter's ideas and goals take precedence over anything we throw his way.
Heinrich phrased it beautifully: our views do "not detract one iota from what is a hack of a build".
So Peter, don't get too distracted from your goals by us mere modeling-mortals and keep us on our toes.
Johan
PS @Heinrich: Have you by any chance discussed the floorbeam width with YQ? I'm curious as to what their rationale is behind the wider floorbeams.
Thanxs Henk. I try to sail with any wind. And a saying among (windmill) millers: "North wind is always cold, whichever direction it comes from."Nice work again Peter,
I already knew some details about you and the mirror is a masterstroke
AL-FI at the helm, and further determines the course how you sail your BN
Gr
Henk

Dear Johan. Trying to discuss such a technical issue with YQ in a mixture of translated Chinese and English usually gets a response similar to "our draughtsman designed it like that." If I were then to bring the Saga into the discussion and explain that it is a generic source and not particularly related to Bluenose, it will compound the whole issue even further. So there are times - for the sanity of all concerned - when you simply do not ask questions to which you will never receive a workable answer.Not wanting to downplay the displayed craftsmanship and love for detail, I'll have to agree with Heinrich on this one. I think I might have an idea as to why it looks cramped, or, as Heinrich put it, cluttered. It has already been mentioned that the YQ floorbeams are too wide. This means there's less space for the knees to fit in between two beams, hence the out-of-proportion (also see the relevant sketches in the Saga) dimensions of the knees.
And this is where AL-FI kicks in, Peter's ideas and goals take precedence over anything we throw his way.
Heinrich phrased it beautifully: our views do "not detract one iota from what is a hack of a build".
So Peter, don't get too distracted from your goals by us mere modeling-mortals and keep us on our toes.
Johan
PS @Heinrich: Have you by any chance discussed the floorbeam width with YQ? I'm curious as to what their rationale is behind the wider floorbeams.
Thanxs Heinrich, for your explanation. It are those items that you keep in mind when you build the YQ-BN the next time.Dear Johan. Trying to discuss such a technical issue with YQ in a mixture of translated Chinese and English usually gets a response similar to "our draughtsman designed it like that." If I were then to bring the Saga into the discussion and explain that it is a generic source and not particularly related to Bluenose, it will compound the whole issue even further. So there are times - for the sanity of all concerned - when you simply do not ask questions to which you will never receive a workable answer.


@RDN1954
@Peter Voogt
Dear Gents. I have replied in length to Peter via a PM to explain my earlier posting (#909) more in detail. Johan, I have also asked Peter to give you the essence of the explanation.
 Heinrich, I just got Peter's PM. Thanks!
I have been in China several times, so I have some experience there.Dear Johan. Trying to discuss such a technical issue with YQ in a mixture of translated Chinese and English usually gets a response similar to "our draughtsman designed it like that." If I were then to bring the Saga into the discussion and explain that it is a generic source and not particularly related to Bluenose, it will compound the whole issue even further. So there are times - for the sanity of all concerned - when you simply do not ask questions to which you will never receive a workable answer.
Thanks Paul.Well Peter, I don't know much about artistic license and such, I just know you are pushing the envelope and that will always invite a response. Sometimes you will hit a home run - other times you will strike out. Other times everyone will think you struck out when in fact you hit a grand slam (or vice versa). Sure is fun to watch though!!!
Now it’s time to ice down your knees…Before I start on the Icehold, I still had to add 1 detail part.
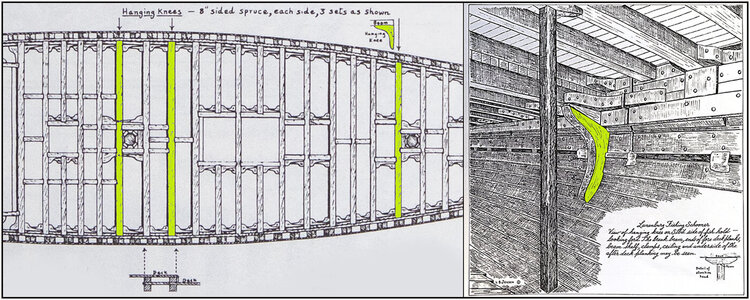
The Saga drawings with the double-knees also mentions the "Hanging Knees":
View attachment 263129
In this drawing, the front is facing right.
These hanging beams are located under 3 deck beams: both directly behind the masts and under the BreakBeam. That last beam is the beam that is the transition from the low foredeck to the higher aft deck. I accentuated the items in both drawings. The right drawing is of position below the breakbeam. It also gets a bigger knee for fixation in the backward direction.
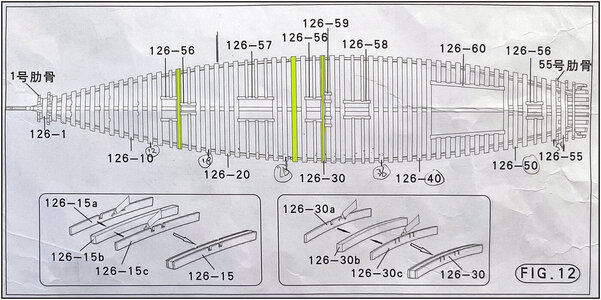
It is nice that in the YQ model the two beams behind the two masts are a thicker composite beam:
View attachment 263131
In this drawing, the front is facing left.
They are beams 15 and 30. In principle, the BreakBeam (27) is also in the right position there, the 2nd beam for the hole for the main boom. The foremast hole is also somewhat larger here with an intermediate beam (29).
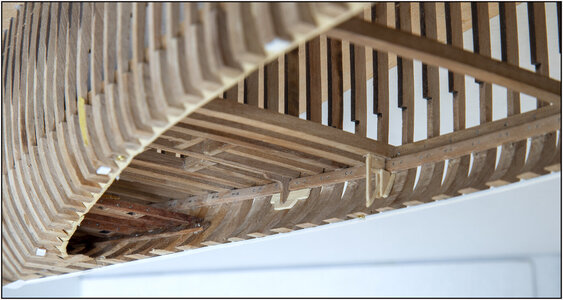
The hanging knee applied:
View attachment 263133
Because the 'leg' of the knee extends over the inner wall, I applied 2 pieces of skin plank. Because the deck beams in the YQ model lie between the frames, that 'leg' would float between 2 frames. A matter of AL-FI.....
PS: I left out the small wedge between the knee and the deck beam. Less is more ....
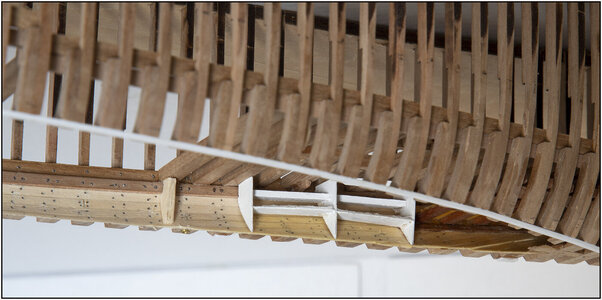
On the other side, the knee is partly hidden behind the bunks:
View attachment 263134
You just see the 'arm'.
Regards, Peter
Yep, the ship carpenter is already busy with measuring and making some corner molds.Now it’s time to ice down your knees…
