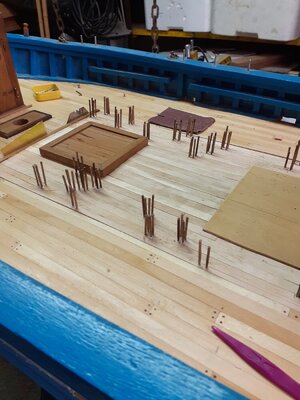
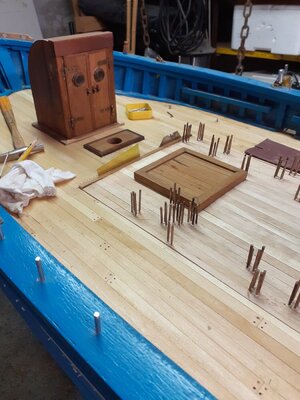
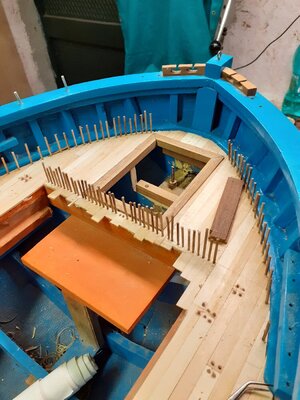
YUANQING BLUENOSE - Peter Voogt [COMPLETED BUILD]

Peter, I don't know whether I'm more impressed by the accracy of the indentations you've created in preparation for the drilling, or by the fact that you counted all of them ROTF
Hi Mark,
That counting was more a matter of calculating:
5 rows of planks with 2 holes each on all 56 frames = 560.
Then 3 extra small planks over 5 frames = 30.
With a few more small rows on the bow filler piece.
I can't make it any easier. ;)
 
Last edited:
I showed the Admiral, Ellen, these pictures and briefly discussed the various options, as shown and described in earlier posts. I was of a half mind to use the tweak, using an old fashioned draftsman's pencil. This idea was shot down real quick by the Admiral, so now I am heading towards a toothpick nightmare... Thanks Peter! ;)
Again thumbs up!
I know it is dangerous what I gonna write now, but: 'I love your Admiral.' :)
I'll correct myself: 'I really appreciate your Admiral thinking along with your building process.' :D
 
Ciao Frank, devo usare la mia app di traduzione, quindi ho capito che li metti prima in acqua?
Le foto con le unghie degli alberi sembrano belle.
Saluti, Pietro
Buongiorno, io uso questo metodo, stuzzicadenti con il bagno nell'acqua del morso, in modo da evidenziare l'inchiodatura
 

Attachments

  • 20201020_120203.jpg
    20201020_120203.jpg
    221.9 KB · Views: 9
  • 20201020_120207.jpg
    20201020_120207.jpg
    237.6 KB · Views: 9
  • 20201003_093326.jpg
    20201003_093326.jpg
    241.2 KB · Views: 9
Last edited:
Good morning, I use this method , toothpick with the bath in the water bite, so as to highlight the nailing
I understand, Frank. I appriciate your input. Perhaps it is useful for me to use by the deck planking. There the planks will be oiled clear wood.
On the hull they will be painted and be seen as dots, as show in the last picture of post #1394.
Regards, Peter
 
I was curious in which direction the result would go. When placing the treenails I slightly adjusted the method.
I inserted them with the drawplate pointed tootpicks into the holes with a tip of glue and kept turning until they broke off on their own. That gave little pockmarked stumps. By the next section I will make a picture of them.

Provided the back half and started sanding:
571 Treenails.jpg

So far I am satisfied with the polishing blocks over it, but it could be even nicer. Like the laser, imitation seam at 2 the top shelf.
572 Treenails.jpg
I would almost choose not to paint the planking.
I should think about it again. Perhaps this side in the linseed oil and leave it as the intended 'yard model'. And the fully planked port side maybe in the blue-black.
Input on that is always welcome.
Regards, Peter
 
Last edited:
Ero curioso in quale direzione sarebbe andato il risultato. Quando ho posizionato le unghie degli alberi ho leggermente regolato il metodo.
Ho inserito gli stuzzicadenti con la trafila appuntita nei fori con una punta di colla e ho continuato a girare finché non si sono staccati da soli. Questo ha dato dei piccoli moncherini butterati. Nella prossima sezione farò una foto di loro.

Fornito la metà posteriore e iniziato a levigare:
View attachment 283765

Finora sono soddisfatto dei blocchi di lucidatura su di esso:
View attachment 283766
Sceglierei quasi di non dipingere il fasciame.
Dovrei pensarci di nuovo. Forse questo lato nell'olio di lino e lasciarlo come il "modello cantiere". E il lato sinistro completamente fasciato forse nel blu-nero.
L'input su questo è sempre il benvenuto.
Saluti, Pietro
Buongiorno Pietro, il legno al naturale ha un fascino tutto particolare , fai una prova con olio di balena, sei sempre Tu a decidere il fare, buon vento
 
Busy replenishing my stock.
First a sharp point on both sides using the sanding disc:
573 Treenails.jpg
Then in the draw plate. I use the back side:
574 Treenails.jpg
A jeweler will use the other side with tapered holes. I showed that a few posts back, with the numbers besides the holes. He/she pulls the metal thread through to rejuvenate / stretch it.
I use the sharp edge to 'turn off' the point by pushing the toothpick in while turning:
575 Treenails.jpg
And the stock is growing:
576 Treenails.jpg
Just keep working hard.
I also ran a toothpick for 3/4 through thru smaller holes. But around 1 mm that became too fragile to continue. And such a long thin piece I would also have to poke in the holes with tweezers with a high chance of breaking off.
The now +/- 2 to 3 mm long dots I can screw in by hand.
Regards, Peter
 
L'ho appena provato, ma poi ottengo solo un punto fuori +/- 1,5 mm. Con la possibilità di rimpiangere il legno.
La punta deve essere spenta, come in un tornio. E ora posso usare lo stuzzicadenti più volte. :) E può fabbricare di più in un minuto.;)
il diametro del foro quante? Se è di 1mm puoi provare con tondino dello stesso diametro o con filo di rame, fai varie prove
 
Back
Top