
You are using an out of date browser. It may not display this or other websites correctly.
You should upgrade or use an alternative browser.
You should upgrade or use an alternative browser.
ZHL Black Pearl 2019 Golden Edition-Newbie build [COMPLETED BUILD]


Whoa.... now that is spooky!!!just want to see her again
Love it.
- Joined
- Apr 20, 2020
- Messages
- 305
- Points
- 278

Just a few more minor details. I finished the captain's gallery by gluing the golden statuettes and the ornamental etched pieces. I must say, ZHL really does a great job in giving these etched pieces a great amount of detail as shown below.


The statuettes are glued to a triangular piece to give them the proper angle when installed. I used CA gel to glue these pieces but I have an uneasy feeling that they may not be secure enough. Maybe later I will dab a few drops of thin CA just to be safe.


I really like the way that stern section looks all dressed up like this.
Next I did a few more things on the deck. The small boat was fun to build but the parts were so small that I broke a few pieces that had to be glued back together. The boat was tied down to the deck using rope that went through rings that I pinned to the deck.


That's it for now. Till next time.
The statuettes are glued to a triangular piece to give them the proper angle when installed. I used CA gel to glue these pieces but I have an uneasy feeling that they may not be secure enough. Maybe later I will dab a few drops of thin CA just to be safe.
I really like the way that stern section looks all dressed up like this.
Next I did a few more things on the deck. The small boat was fun to build but the parts were so small that I broke a few pieces that had to be glued back together. The boat was tied down to the deck using rope that went through rings that I pinned to the deck.
That's it for now. Till next time.
Coming along nicely.

You may have described yourself as a “newbie” when you started this build, but your work so far looks like that of an experienced modeler. Good job on a challenging kit for a beginner.
- Joined
- Apr 20, 2020
- Messages
- 305
- Points
- 278
Thanks for the kind words @Jnorton ...I truly started from a zero knowledge base but I got a lot of help from reading posts from our friends in this forum which guided me every step of the way.You may have described yourself as a “newbie” when you started this build, but your work so far looks like that of an experienced modeler. Good job on a challenging kit for a beginner.

Looking great @WarrLight Did your instructions specify the ropes holding the gunports or did you put them in based on historical knowledge? My instructions don't specify them but then my model is quite old and basic. Trying to decide if I should include them or not.
- Joined
- Apr 20, 2020
- Messages
- 305
- Points
- 278
Looking great @WarrLight Did your instructions specify the ropes holding the gunports or did you put them in based on historical knowledge? My instructions don't specify them but then my model is quite old and basic. Trying to decide if I should include them or not.
Thanks @Soozook ...My instructions didn't specify the ropes to the gun ports, but I have seen other people put them in their builds and I also observed that the BP in the movie had them as well. Besides, I thought that the ropes will provide added strength to the ports considering the way they precariously hang out from the hull.
@WarrLight good point. I can also see that the pinning could be a good idea also. Keep up the great work.
- Joined
- Apr 20, 2020
- Messages
- 305
- Points
- 278
I spent the last two weeks trying to finish the final touches on the deck and hull.
Starting with the bow...but before I put on the front rails, I decided to install the bowsprit first. I figured it will be more difficult to put on the gammoning ropes if the rails were in the way.
The bowsprit had to be tapered then glued on to the front. The gammoning ropes were then tied thru a small hole on the bow.
The railings were then assembled. These are very delicate pieces and care had to be taken when handling them. Rather than assembling these to the boat straightaway, I decided to glue it together first. In order to ensure the vertical and horizontal pieces were aligned properly, I drew up a grid where I then positioned the various pieces.
Note how I made sure the left side of the rail is vertically aligned.
I then aligned and glued the rest of the pieces.


Here are the finished rails.

I dry fitted the rails to the bow and after soaking in water for a few minutes, clamped them to form the proper bend.


There is a round piece at the front of the rails that is supposed to meet up with the bow, but in order to do this, I would have needed to bend it almost 90degrees and for sure the piece cannot tolerate such bending. So, the wise (and easy) thing to do was just to cut the round piece(notice where I am pointing to it) , and later reattach it.

The pieces were glued to the boat using CA gel, and later I pinned them in strategic areas in order to further strengthen them.


There were also small triangular pieces that had to be glued to the underside of the rails. This was a bit tricky to do but I just needed to make sure they were installed at the proper angle.

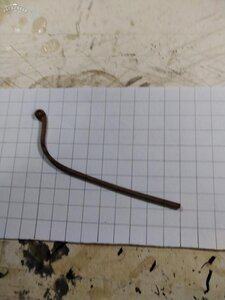
Next up was the installation of the anchor and the cathead. I had to seek help on how to do this especially the rigging of the cathead. Seems like people have different methods to do this. In the end, after considering the principles on how the anchor is raised and secured thru the catheads, I rigged it the simplest way I knew how. The anchor had a thick rope that goes in thru the holes (hawse). The rope from the cathead was attached to a ring in the anchor using a hook, the rope then proceeds to the side of the cathead where it is attached to a ring. The other end of the rope goes up to the cathead to the deck, where I glued a belaying pin.


Eagle eyed observers can probably spot the mistake I made on the cathead on the starboard side. The cathead sits a few mm off the deck floor because of the way it is wedged in between the top rails. Tried to trim and sand it down but in the end, I decided to just leave it as it is.
Starting with the bow...but before I put on the front rails, I decided to install the bowsprit first. I figured it will be more difficult to put on the gammoning ropes if the rails were in the way.
The bowsprit had to be tapered then glued on to the front. The gammoning ropes were then tied thru a small hole on the bow.
The railings were then assembled. These are very delicate pieces and care had to be taken when handling them. Rather than assembling these to the boat straightaway, I decided to glue it together first. In order to ensure the vertical and horizontal pieces were aligned properly, I drew up a grid where I then positioned the various pieces.
Note how I made sure the left side of the rail is vertically aligned.
I then aligned and glued the rest of the pieces.
Here are the finished rails.
I dry fitted the rails to the bow and after soaking in water for a few minutes, clamped them to form the proper bend.
There is a round piece at the front of the rails that is supposed to meet up with the bow, but in order to do this, I would have needed to bend it almost 90degrees and for sure the piece cannot tolerate such bending. So, the wise (and easy) thing to do was just to cut the round piece(notice where I am pointing to it) , and later reattach it.
The pieces were glued to the boat using CA gel, and later I pinned them in strategic areas in order to further strengthen them.
There were also small triangular pieces that had to be glued to the underside of the rails. This was a bit tricky to do but I just needed to make sure they were installed at the proper angle.
Next up was the installation of the anchor and the cathead. I had to seek help on how to do this especially the rigging of the cathead. Seems like people have different methods to do this. In the end, after considering the principles on how the anchor is raised and secured thru the catheads, I rigged it the simplest way I knew how. The anchor had a thick rope that goes in thru the holes (hawse). The rope from the cathead was attached to a ring in the anchor using a hook, the rope then proceeds to the side of the cathead where it is attached to a ring. The other end of the rope goes up to the cathead to the deck, where I glued a belaying pin.
Eagle eyed observers can probably spot the mistake I made on the cathead on the starboard side. The cathead sits a few mm off the deck floor because of the way it is wedged in between the top rails. Tried to trim and sand it down but in the end, I decided to just leave it as it is.
Attachments
- Joined
- Dec 27, 2019
- Messages
- 549
- Points
- 308

WarrLight,
You are doing great.
You are doing great.
I spent the last two weeks trying to finish the final touches on the deck and hull.
Starting with the bow...but before I put on the front rails, I decided to install the bowsprit first. I figured it will be more difficult to put on the gammoning ropes if the rails were in the way.
The bowsprit had to be tapered then glued on to the front. The gammoning ropes were then tied thru a small hole on the bow.
The railings were then assembled. These are very delicate pieces and care had to be taken when handling them. Rather than assembling these to the boat straightaway, I decided to glue it together first. In order to ensure the vertical and horizontal pieces were aligned properly, I drew up a grid where I then positioned the various pieces.
Note how I made sure the left side of the rail is vertically aligned.
I then aligned and glued the rest of the pieces.
View attachment 176769View attachment 176770
Here are the finished rails.
View attachment 176771
I dry fitted the rails to the bow and after soaking in water for a few minutes, clamped them to form the proper bend.
View attachment 176772
View attachment 176773
There is a round piece at the front of the rails that is supposed to meet up with the bow, but in order to do this, I would have needed to bend it almost 90degrees and for sure the piece cannot tolerate such bending. So, the wise (and easy) thing to do was just to cut the round piece(notice where I am pointing to it) , and later reattach it.
View attachment 176784
View attachment 176771
The pieces were glued to the boat using CA gel, and later I pinned them in strategic areas in order to further strengthen them.
View attachment 176785View attachment 176786
There were also small triangular pieces that had to be glued to the underside of the rails. This was a bit tricky to do but I just needed to make sure they were installed at the proper angle.
View attachment 176787
Next up was the installation of the anchor and the cathead. I had to seek help on how to do this especially the rigging of the cathead. Seems like people have different methods to do this. In the end, after considering the principles on how the anchor is raised and secured thru the catheads, I rigged it the simplest way I knew how. The anchor had a thick rope that goes in thru the holes (hawse). The rope from the cathead was attached to a ring in the anchor using a hook, the rope then proceeds to the side of the cathead where it is attached to a ring. The other end of the rope goes up to the cathead to the deck, where I glued a belaying pin.
View attachment 176788View attachment 176789View attachment 176790View attachment 176791View attachment 176792
Eagle eyed observers can probably spot the mistake I made on the cathead on the starboard side. The cathead sits a few mm off the deck floor because of the way it is wedged in between the top rails. Tried to trim and sand it down but in the end, I decided to just leave it as it is.
- Joined
- Dec 27, 2019
- Messages
- 549
- Points
- 308
I spent the last two weeks trying to finish the final touches on the deck and hull.
Starting with the bow...but before I put on the front rails, I decided to install the bowsprit first. I figured it will be more difficult to put on the gammoning ropes if the rails were in the way.
The bowsprit had to be tapered then glued on to the front. The gammoning ropes were then tied thru a small hole on the bow.
The railings were then assembled. These are very delicate pieces and care had to be taken when handling them. Rather than assembling these to the boat straightaway, I decided to glue it together first. In order to ensure the vertical and horizontal pieces were aligned properly, I drew up a grid where I then positioned the various pieces.
Note how I made sure the left side of the rail is vertically aligned.
I then aligned and glued the rest of the pieces.
View attachment 176769View attachment 176770
Here are the finished rails.
View attachment 176771
I dry fitted the rails to the bow and after soaking in water for a few minutes, clamped them to form the proper bend.
View attachment 176772
View attachment 176773
There is a round piece at the front of the rails that is supposed to meet up with the bow, but in order to do this, I would have needed to bend it almost 90degrees and for sure the piece cannot tolerate such bending. So, the wise (and easy) thing to do was just to cut the round piece(notice where I am pointing to it) , and later reattach it.
View attachment 176784
View attachment 176771
The pieces were glued to the boat using CA gel, and later I pinned them in strategic areas in order to further strengthen them.
View attachment 176785View attachment 176786
There were also small triangular pieces that had to be glued to the underside of the rails. This was a bit tricky to do but I just needed to make sure they were installed at the proper angle.
View attachment 176787
Next up was the installation of the anchor and the cathead. I had to seek help on how to do this especially the rigging of the cathead. Seems like people have different methods to do this. In the end, after considering the principles on how the anchor is raised and secured thru the catheads, I rigged it the simplest way I knew how. The anchor had a thick rope that goes in thru the holes (hawse). The rope from the cathead was attached to a ring in the anchor using a hook, the rope then proceeds to the side of the cathead where it is attached to a ring. The other end of the rope goes up to the cathead to the deck, where I glued a belaying pin.
View attachment 176788View attachment 176789View attachment 176790View attachment 176791View attachment 176792
Eagle eyed observers can probably spot the mistake I made on the cathead on the starboard side. The cathead sits a few mm off the deck floor because of the way it is wedged in between the top rails. Tried to trim and sand it down but in the end, I decided to just leave it as it is.
- Joined
- Apr 20, 2020
- Messages
- 305
- Points
- 278
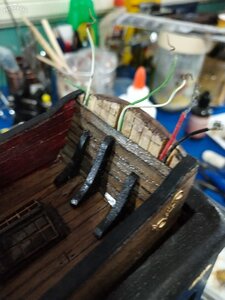
The final task on the deck (before I embark on the masts and rigging) was installing the lanterns on the stern.
If you recall,as described in a post several months ago, I had pre-wired the lanterns on the stern and glued the LEDs to the inside of the lanterns.


I used gold acrilyc to highlight the lantern glass and black acrilyc for the top covers. I then applied dabs of weathering powder (burnished bronze color).
The LEDs were soldered (not very neatly, I must say) and then installed.

The wires were dangerously too close to each other in the cramped space and I feared that I might get a short and fry my lights, so I stripped some electric wire, and used the skin as insulating material (green in the photo).

After testing that the lights worked, I covered everything up with the walnut strips to finish.
But wait! When I turned on the switch again after planking, one of the lights would not come on.

I must have pulled some wires loose as I was finishing up. So I banged my head on the wall once and meekly tore down the planks to fix the problem. Thankfully it was just a matter of soldering the wires again and voila! I have lights.

From here, it's just a simple matter of attaching the golden ornaments. But, nothing in life is simple, as I discovered. I committed another rookie mistake. The Neptune ornament would not fit in between the lanterns where they were supposed to go.

To fix this, I would have had to move my two side lanterns to the very edge, and even then I doubt if I had enough room for the ornament. So, humbly I had to accept my mistake and settle for an easy way out... which is to glue the ornaments in front of the lanterns. But this meant that the ornament will overhang out over the edge. But, such is life.

This completes my major tasks for the deck and the hull. I feel I am now ready to take on the masts and riggings.
But first, I thought I'd step back and ponder on what I have done so far. Here are some pictures.


And finally, some twilight shots.


And the money shot.... another glimpse at the fair lass.

Have a great week everyone. And all please keep safe.
If you recall,as described in a post several months ago, I had pre-wired the lanterns on the stern and glued the LEDs to the inside of the lanterns.
I used gold acrilyc to highlight the lantern glass and black acrilyc for the top covers. I then applied dabs of weathering powder (burnished bronze
color).The LEDs were soldered (not very neatly, I must say) and then installed.
The wires were dangerously too close to each other in the cramped space and I feared that I might get a short and fry my lights, so I stripped some electric wire, and used the skin as insulating material (green in the photo).
After testing that the lights worked, I covered everything up with the walnut strips to finish.
But wait! When I turned on the switch again after planking, one of the lights would not come on.
I must have pulled some wires loose as I was finishing up. So I banged my head on the wall once and meekly tore down the planks to fix the problem. Thankfully it was just a matter of soldering the wires again and voila! I have lights.
From here, it's just a simple matter of attaching the golden ornaments. But, nothing in life is simple, as I discovered. I committed another rookie mistake. The Neptune ornament would not fit in between the lanterns where they were supposed to go.
To fix this, I would have had to move my two side lanterns to the very edge, and even then I doubt if I had enough room for the ornament. So, humbly I had to accept my mistake and settle for an easy way out... which is to glue the ornaments in front of the lanterns. But this meant that the ornament will overhang out over the edge. But, such is life.
This completes my major tasks for the deck and the hull. I feel I am now ready to take on the masts and riggings.
But first, I thought I'd step back and ponder on what I have done so far. Here are some pictures.
And finally, some twilight shots.
And the money shot.... another glimpse at the fair lass.
Have a great week everyone. And all please keep safe.
Attachments


How did you know Id want to see the lass again???? Way to go brother, she's a beautiful ship!!!!


The Admiral says that’s good, Clair.
The Pearl I received from ZHL has a cutaway side so you can see inside the ship.Hi everyone. My name is Reggie and I am a true, honest to goodness newbie. The only ship I ever built was a cheapie 1:130 sailboat model that I purchased from Lazada (the Far East equivalent of Amazon). It took me a while to build, only because I was really coming from a zero knowledge base, and every step was like groping in the dark. I was never very handy with my hands, for I’ve always been an office-type guy. My last job before I retired in 2015 was heading a national tv and media organization in the Philippines.
I stumbled across this forum and was so mesmerized (and not just a little bit jealous) of all the beautiful builds and I was immediately hooked. I read through the builds of @Donnie and @DariusArchitectus and was fascinated by their techniques, artistry and creativity. (I am sure there are lots of others in the group just as equally talented, so apologies if I fail to mention your names.) It was like bingeing on Netflix – I just couldn’t stop reading. Then I came across the build logs of @Hoffy, @Jay and @epicdoom for the ZHL Black Pearl Golden Edition, and I knew right away what my next project was going to be.
I placed my order through ZHL’s website on April 19 and it was fairly straightforward, including payment using Paypal. With the Covid quarantine restrictions, I didn’t expect to receive the package quite as fast. But, lo and behold, on April 23 I received an email which said my package has shipped via DHL, complete with a tracking number. It took a few more days for it to get to Manila and clear Customs, but I finally received the package on May 4. Not bad. And no customs duties! Shout-out to Max at ZHL... well done.
So, that brings me to today. I thought that I could start a build log, but focus more on the newbie perspective – including how to get started, what basic tools you need, basic concepts, how to navigate through the various choke points in the build, etc.
I hope the group will be forgiving for any mistakes in technique that I may commit, and I will welcome any constructive criticism or suggestions so I can further develop my skills. I look to our more experienced members for guidance and thank you all in advance. And please be patient with me... it may take longer for me to do this since I will need to do a lot of reading and research every step of the way.
So here it goes. I will start with the unboxing of the kit. Admin, this is my first post, so please let me know if I can do things better
The box arrived fairly well secured. I thoroughly disinfected the box before bringing it inside the house, as a precaution against Covid-19.
View attachment 148799View attachment 148800View attachment 148801View attachment 148802
Inside were two boxes, the smaller one containing the masts and planking strips. The other box had all the other components. Planks are Black walnut and Paulownia.
View attachment 148823View attachment 148824
View attachment 148825
There is a 32 page color instruction booklet. Probably not as detailed as I've wanted, but will have to do for now.
View attachment 148826
The following pictures show the rest of the contents of the box. It even includes a few LEDs, wire and switch box. Also shown are the 3 lanterns for the stern.
View attachment 148827View attachment 148828
A sheet of copper photo etched parts. And, a pleasant surprise, pre-cut cloth for the sail with nice clean edges.
View attachment 148829View attachment 148830
Carvings and other ornaments.
View attachment 148831View attachment 148832
Cannons, half cannons ands
View attachment 148835
View attachment 148833View attachment 148834
Deadeyes, blocks, beads, etc
View attachment 148836View attachment 148837View attachment 148838View attachment 148839View attachment 148840
View attachment 148841View attachment 148842
Laser cut wooden parts
View attachment 148843
Ooops... looks like I've reached the maximum 25 picture attachments. Will post more in the next one.
Thanks everyone. Hope I didn't do too badly.