
Looks like a lot of work. I'm glad my wife can sew!I tried a few different spacing for the ratlines this one looked about right and was the same for all the masts.
This is the link for the sails check his other pages they're excellent.
Also check @moreplovac Brigantine Phoenix log post 374 there is some very detailed information on sail making, as always I only found this after I had made my trail sails.

You are using an out of date browser. It may not display this or other websites correctly.
You should upgrade or use an alternative browser.
You should upgrade or use an alternative browser.

G;day Tony H Terence here Great job on the sails I to had a bit of a job on rat lines found how to on Utube then after a bit of a practice managed to get them done see attached photos now its all go. Thanks again for all the information on masts just started working on them regards Terence (terry)
Attachments


Hi Terry it's coming on nicely you'll be over taking my build soon.G;day Tony H Terence here Great job on the sails I to had a bit of a job on rat lines found how to on Utube then after a bit of a practice managed to get them done see attached photos now its all go. Thanks again for all the information on masts just started working on them regards Terence (terry)
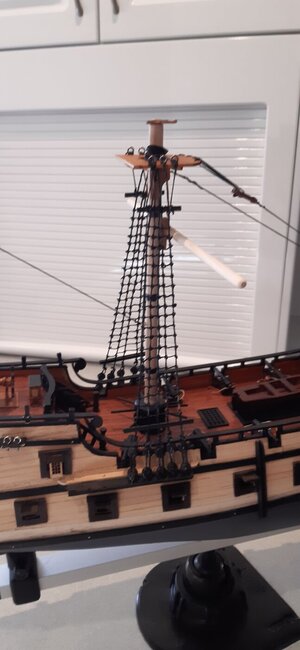
Finally finished the ratlines here is a few photos


I had a bit of trouble with some knots coming loose I think this is due to the supplied rope being quite soft. After a while I didn't mind doing this job which was a surprise to me.
Question the instructions show no ratlines on the top masts, these will be difficult to tie as the shrouds are thin.

Should there be ratlines on these?
I had a bit of trouble with some knots coming loose I think this is due to the supplied rope being quite soft. After a while I didn't mind doing this job which was a surprise to me.
Question the instructions show no ratlines on the top masts, these will be difficult to tie as the shrouds are thin.
Should there be ratlines on these?

Tony, they might not have been there. They simply lowered the rey to the level of Mars and assembled the sail.
There were none on my model either.Finally finished the ratlines here is a few photos
View attachment 251402
View attachment 251401View attachment 251400View attachment 251399View attachment 251398
I had a bit of trouble with some knots coming loose I think this is due to the supplied rope being quite soft. After a while I didn't mind doing this job which was a surprise to me.
Question the instructions show no ratlines on the top masts, these will be difficult to tie as the shrouds are thin.
View attachment 251403
Should there be ratlines on these?

Thanks I hadn't thought of that, makes sense.Tony, they might not have been there. They simply lowered the rey to the level of Mars and assembled the sail.
I think it was typical not to have ratlines in the upper parts of the masts.Finally finished the ratlines here is a few photos
View attachment 251402
View attachment 251401View attachment 251400View attachment 251399View attachment 251398
I had a bit of trouble with some knots coming loose I think this is due to the supplied rope being quite soft. After a while I didn't mind doing this job which was a surprise to me.
Question the instructions show no ratlines on the top masts, these will be difficult to tie as the shrouds are thin.
View attachment 251403
Should there be ratlines on these?
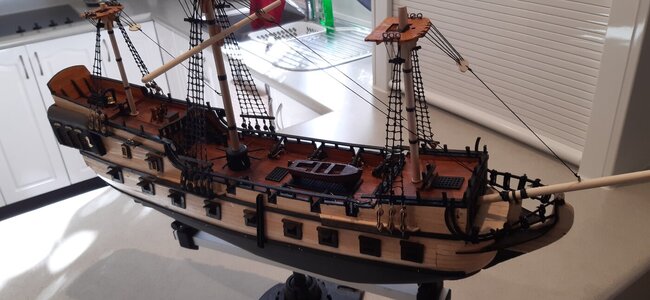
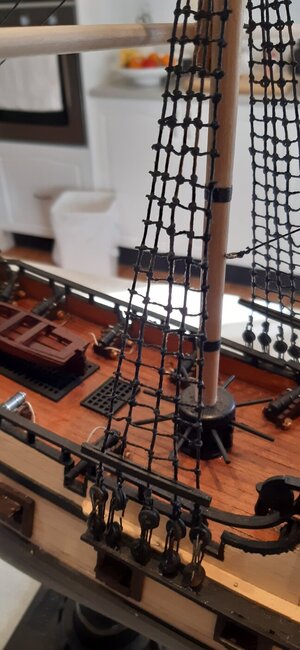
Now the ratlines are done I can finish off the masts and standing rigging.

I used two tooth picks to hold the mast in position while the glue set.
The standing rigging was pretty straightforward.


All finished, a few of the lines are held on temporarily incase I need the access later.
Next job, put the blocks on the yards and make some sails.
I used two tooth picks to hold the mast in position while the glue set.
The standing rigging was pretty straightforward.
All finished, a few of the lines are held on temporarily incase I need the access later.
Next job, put the blocks on the yards and make some sails.

She's looking fantastic Tony!

Very nice job on the standing rigging Tony!
I’m impressed, Tony. Keep up the good work!
Looking very good - really good 
- Joined
- Mar 1, 2021
- Messages
- 315
- Points
- 168

WOW Tony. Excellent work on the Pearl! She’s really looking like a show piece!Looking very good - really good
- Joined
- Apr 20, 2020
- Messages
- 305
- Points
- 278
Wow...impressive work Tony...loved the shrouds and ratlines, especially the way you seized the shrouds around the mast. Small details but really add to the overall look of the ship.Now the ratlines are done I can finish off the masts and standing rigging.
View attachment 252588
I used two tooth picks to hold the mast in position while the glue set.
The standing rigging was pretty straightforward.
View attachment 252589View attachment 252590View attachment 252591View attachment 252592View attachment 252594
All finished, a few of the lines are held on temporarily incase I need the access later.
Next job, put the blocks on the yards and make some sails.

Thanks for all likes and complements it's very encouraging.
I'm making progress with the sails, I wasn't happy with the material provided in the kit so I looked at making my own. Browsing online I found a way to make them with no sewing required, the link is on post #274.
I've simplified and adapted the method to suit.

Firstly I checked the size of the sails by making paper templates the drawing sizes are not very good.

I got some cotton material to experiment with. The colour was achieved with a acrylic wash then coated with a 50:50 PVA water mix to stop the material fraying when it's cut.

The material was cut into 20mm strips.


The strips are stuck together with a 50:50 PVA mix applied with a syringe, the overlap is 1.5 - 2mm.


The sail is cut out then the edges added.

After final trimming next job is adding the rope around the outside.
I'm making progress with the sails, I wasn't happy with the material provided in the kit so I looked at making my own. Browsing online I found a way to make them with no sewing required, the link is on post #274.
I've simplified and adapted the method to suit.
Firstly I checked the size of the sails by making paper templates the drawing sizes are not very good.
I got some cotton material to experiment with. The colour was achieved with a acrylic wash then coated with a 50:50 PVA water mix to stop the material fraying when it's cut.
The material was cut into 20mm strips.
The strips are stuck together with a 50:50 PVA mix applied with a syringe, the overlap is 1.5 - 2mm.
The sail is cut out then the edges added.
After final trimming next job is adding the rope around the outside.
Nice.
Very tidy bit of sail work sans sewing...
Very nice. I agree with your comment on the sail material that is supplied. I think I will try to do something similar to what you are doing. Thanks for the ideas and link provided earlier. I am thinking of a more grey color for the sails since it is the Black Pearl.