You are using an out of date browser. It may not display this or other websites correctly.
You should upgrade or use an alternative browser.
You should upgrade or use an alternative browser.
Soleil Royal - ZHL 1/90 Scale by Paulb [COMPLETED BUILD]
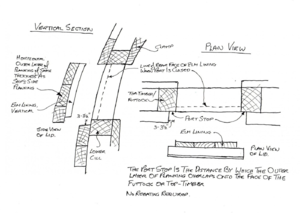
Hello Heinrich, a small correction (hope you don't mind), I know it is a bit confusing... The ports frames MUST be flush with the first layer of planking (hull). Its the second planking must be recessed 1 ~1.5mm from both sides, Take a look at Uwek's picture (Plan View). Top Timber Futtock, on both sides - is flush with the hull. In our case, it is a port frame. Planks have recessed both sides to make a port stop:Hi Paul. Just remember what Uwe and Mr Deep were saying. When gluing, the frames need to be recessed by about 1.5mm. They must not lie flush with the hull.
The Port Stop is the distance by which the outer layer of planking overlaps onto the face of Futtok or Top-timber. No rebating required,
- Joined
- Nov 25, 2018
- Messages
- 598
- Points
- 403

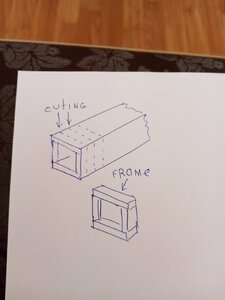
Again, you took the parts from the set.Throw them out.First, they are thin.Secondly, on a real ship, the side walls of the ports were used as frames.But they were hit from above and below by the jambs .The angle should be straight 90 degrees.I have already written about the thickness of the hull skin, along with the internal and together with the thickness of the frames.You can glue a box of slats.Then cut it into frames of the desired thickness.When gluing the frame, do not forget about the bending of the casing.The upper and lower jambs should be strictly horizontal.The gunport frames are finished and I have installed (not glued) one.
View attachment 151509View attachment 151510



Good points actually!
MR.Deep - I'm going to stick with the kit frames for 3 reasons.
1 - I've already installed one row
2 - I don't have a saw that will cut anything as thick as the frame-box you suggest
3 - The SL doesn't have near the tumble-home that is shown in your drawing - I will probably sand the bottom ledge down a little to approach a horizontal line.
Keep the suggestions coming tho - I really appreciate and need them. I'm a real novice here.
- Joined
- Nov 25, 2018
- Messages
- 598
- Points
- 403

I often did this.Glued the frames with separate rails.First, I inserted the upper and lower ones.Oriented them along the horizon.Then pasted the side walls.From a square bar made a template for the internal size of the port.That's what I did on my Soleil Royal.
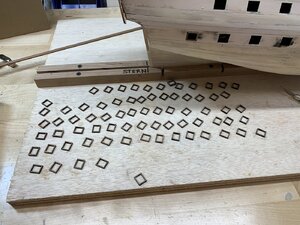
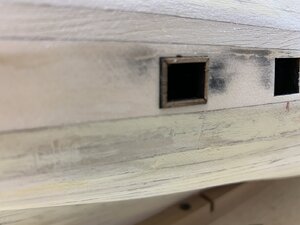
A little more has been done: the gunport frames, done a little finish work on the stern, and the lower planking. Next I will do finish sanding on the lower planking, paint the gunport frames red then proceed to plank the upper hull followed by the whales. I have made a couple of gunport plugs which will space out the upper planking slightly from the inner face of the frames. I plan on finishing the hull with a black belt and black whales as shown in the top pic.
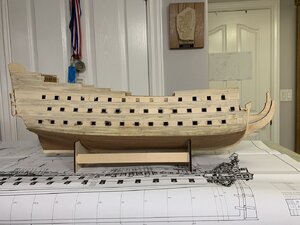
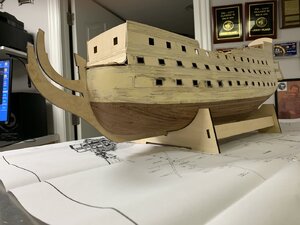
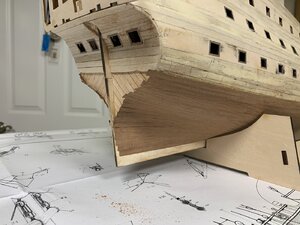


Last edited:
Mr.Deep - I'm not understanding. Should I re-glue the lower planking? If so how? Should I just smear the Titebond glue I use over the outside? What is barkhout? What slats should I make narrow - the upper hull planks? I've already done the second planking on the bottom the hull so that's done.
Thanks for your help.
Thanks for your help.
Hello Paul, @Mr.Deep uses Google Translate, and the translation went on its own...  Basically, if I correctly interpret the meaning of Mr.Deep, he suggested to re-do the planking. 'Barkhout' is the Russian word for the wale. He suggested planking from the wale towards the keel, narrowing planks at the bow area.
Jimsky - so what you are saying is that it is necessary to redo my lower second planking? Is my first attempt not good enough? I'm new at this so I appreciate all the advice.
Hello Paul, There is no such thing as necessary when it comes to your own build. I think we have no authority to amend changes if you don't ask for our opinion. I tried to help you put meaningful translation Mr.Deep replied.
You did a decent job on the second planking! However, this is not the way I would do it. But it doesn't mean it is necessary to re-do it the way I do, or others doing. In every work, there is a thing called 'Level of Acceptance'. Did you satisfy with the planking you made? Do you accept the job? If yes, then move on. If you have doubts, then you may need to re-do... There are many books and references for basic planking techniques. Take a look at some, they may be a good reference to help if you decide to re-do. But... before you made a decision - think twice!!!
https://www.modelerscentral.com/blog/planking-tips-for-building-a-model-ship/
Big thanks! Looking at the links I see where I can do better. I need to check a see if I have enough wood strips for a do over.
Paul
As Jim said, it is your ship, you do it the way you like it. If you look at the literature (I strongly recommend Donald Dressel's book for this) you will see that the way you have done it, is adequate for the first planking. The second planking requires more preparation by gradually narrowing the planks at the bow (but do not narrow it for less than half the original width at the end!) so all of them ends in the rabbet in the keel rather than running into the wale-like plank as you've done it. I would not think that you got enough plank in the kit for re-doing anyhow. And there is a chance of running into a dead-end street while removing the planks and laying them again because one loses patient easily at this point and slams the whole thing into the corner...so do not do it!
János
Thanks guys - I've just checked. There are 21 rows of planks on each side, figure 2 planks per row equals 84 planks. I have exactly 84 planks plus 3 1/2 planks that are badly cut but can still be used in some areas. If I'm careful it can be done. There isn't much room for mistakes tho lol. I've been building models for most of my life so I'm used to stuff like this, and I know it will require patience and perseverance. I'm not going to do anything till tomorrow (today is Sunday) so I have time to mull it over.
And I have Dressel's book - too bad I didn't read it. I just glanced over it. Sigh
I welcome any and all thoughts.
And I have Dressel's book - too bad I didn't read it. I just glanced over it. Sigh
I welcome any and all thoughts.
Just poking my 2 cents in re scale, as I've seen it crop up I believe on this model. Sorry , I am new, have watched the forums with great interest, hopefully will post a build on my HMS Revenge and Batavia soon, or at least some input. If you look at Sergal model of this ship and ZHL, the dimensions are within mm's of each other , yet the scale on each model varies from 1:77 to 1:90. I don't believe the ZHL scale is accurate as it would make the ship way too long for the era, even taking the bowsprit into account (which manufacturers figures use) . I believe large ships of this era varied from around 60m to under 70m in length and of course in width and depth, depending on whether it was a merchant ship (Batavia) or a first or second rate war ship (Soleil or WASA). I believe looking at length alone is not a true indication of scale as the HMS Victory was about the same as the Batavia , yet one was a merchant ship (although heavily armed) and the other needs no introduction., she was 5m wider and several meters deeper. The Victory obviously needed much larger ropes, blocks etc for the same length. Do your research. Loving the site, keep it up everyone. I am looking very seriously at the ZHL Soleil btw, or maybe the WASA from Corel, not sure on their quality/instructions.
Great build btw Paul, sorry for putting this post up. Ship looking Beeuutiful.
frankieg - I've done some of my own calculations and have come to believe that ZHL SL is closer to 1/71 scale.


