Well Jim, I've reread my recent posts and for the life of me I cannot figure out why you posted this. While I certainly agree with your thoughts in principle - I fail to see how they apply to me, to those who have shared their observations, or to my build log in general. Perhaps I am missing something?Good day, Mon Ami. I think... I should say I believe, with this build you are losing the most important part of our hobby -the fun!! You are overconcern about this and that, and this leads you to worry too much! Why? Why substitute the process of having fun with the constant pressure of "Am I doing it wrong?" Mistakes are part of our hobby...they come in the package, sorry.
Your current skill set is far superior to what most of us can only dream of. Stop worrying about what others might say! If you are happy with the results, what else matters? You absolutely cannot make happy everyone. There will be critics every time... one like, another will not. Should this be the point of concern? Absolutely not, IMHO.
You are doing just great, it doesn't matter what tools you are using, and why it should matter. Work with the tools that make you happy, and apply your skills alone with those tools you are comfortable working with. I am confident that your Kings Fisher will be a great-looking model, and your grandchildren will proudly say - "This is my grandpa made"...and this will make you super happy because you building your models for them, not for us.
P.S. ...sorry I have to say that
You are using an out of date browser. It may not display this or other websites correctly.
You should upgrade or use an alternative browser.
You should upgrade or use an alternative browser.
Kingfisher 1770 1:48 POF
- Thread starter dockattner
- Start date
- Watchers 111
Take it easy, mon ami! You haven't missed anything. It is only my personal observations.Well Jim, I've reread my recent posts and for the life of me I cannot figure out why you posted this. While I certainly agree with your thoughts in principle - I fail to see how they apply to me, to those who have shared their observations, or to my build log in general. Perhaps I am missing something?
Dear Paul,Work slowly continues on the pointy end. The first thing I needed to do was bevel the bollard timbers (as I understand it these are also referred to as knightheads but since they no longer have knight's heads, I'm going with bollard timbers) and the hawse timbers.
I left quite a lot of excess when I did these bevels - and since I didn't feel confident about the layout lines for the inner surfaces I left even more excess on the inside than I did on the outside. The instructions confidently tell me to just follow the patterns, but Antscherl (The Fully Framed Model) uses a somewhat different approach.
Anyway, here are the beveled bow pieces:
View attachment 372010
View attachment 372011
The instructions call for these pieces to be 'joined together' off the ship (and off the building jig) - and when I did that I could make them fit very nicely. But when I attempted to bring that construction to the ship it didn't fit at all...
I have now abandoned that approach and have installed the most forward of the cant frames and will now be working within the constraints established by the stem and the cant frame:
View attachment 372015
This is the way scratch builders are fabricating this area (at least some of them).
There is a curiosity on the swan class ships: an airspace between the hawse timbers. And there is a further curiosity on the first three ships of the swan class series: a thickened 'blocking' in the area of the hawseholes (later abandoned because of the waste of timber in fabricating this unique feature). Anyway, Kingfisher is the second ship in the series so I'm trying to replicate the blocking.
The important point is that there is not an airspace in the area of the blocking.
The hashed area represents where I need to reduce the thickness of the timber by 3/4" (real size) on each surface...
View attachment 372012
I'm sure a mill is the perfect tool for this. Allow me to introduce you to the poor-man's mill:
View attachment 372013
It turns out this strip of sandpaper is the perfect thickness...
Here is what it looks like (the smaller space on the top left (between the bollard timber and hawse #1 is correct):
View attachment 372014
As far as I am concerned this is a tremendous about of work on pieces that I still don't know will fit. And the other side remains...
I built the Kingfisher kit some years ago. I maked the hawsetimbers twice without having them to fit. Then I noticed in David Antscherls book on page 22, that the halfbreadth line and the toptimber line where crossing each other in the framingplan by frame seven. After that I made a new attempt and everything fitted perfect. Perhaps the lines are not drawn on your plan either?
Best regards Magnus
Brilliant Magnus! I do have the proper flare cut into the hawse timbers so I'll see if I can locate that in the right place relative to the toptimber line. Thanks for the tip - I'll update my building board plan right now!Dear Paul,
I built the Kingfisher kit some years ago. I maked the hawsetimbers twice without having them to fit. Then I noticed in David Antscherls book on page 22, that the halfbreadth line and the toptimber line where crossing each other in the framingplan by frame seven. After that I made a new attempt and everything fitted perfect. Perhaps the lines are not drawn on your plan either?
Best regards Magnus
Good morning Paul. Played a little catch up with your build. I miss a few days and I have a book to read . Firstly Brilliant work as always. Secondly your hunger for perfection and accuracy is admired. Thirdly you have decisively put me off ever building a POF model…thanks
 .
.
Cheers Grant
 . Firstly Brilliant work as always. Secondly your hunger for perfection and accuracy is admired. Thirdly you have decisively put me off ever building a POF model…thanks
 .
.Cheers Grant
Good morning Paul. Played a little catch up with your build. I miss a few days and I have a book to read . Firstly Brilliant work as always. Secondly your hunger for perfection and accuracy is admired. Thirdly you have decisively put me off ever building a POF model…thanks
 .
.
Cheers Grant
 . Firstly Brilliant work as always. Secondly your hunger for perfection and accuracy is admired. Thirdly you have decisively put me off ever building a POF model…thanks
 .
.Cheers Grant
And you get it twice… . Power failure again here and plays havoc with my WiFi . Cheers Grant
 . Power failure again here and plays havoc with my WiFi . Cheers Grant
Great work on the bow, I like the way you go about it. Always considered and with a certain respect, keep it up Paul.
Tiny update...
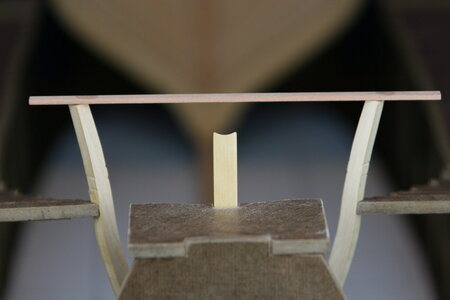
Prepared the stem to receive the bowsprit:
And then I continued my commitment to parts that I still have only modest confidence will end up on my model (pending their potential re-do if they don't fit right). Here are the decorative tops on the bollard timbers...
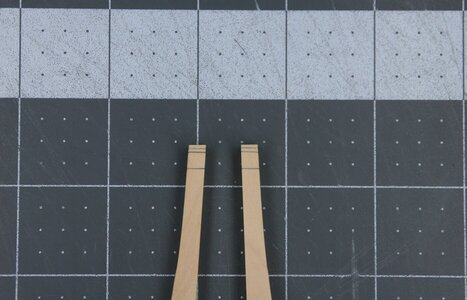
Layout lines:
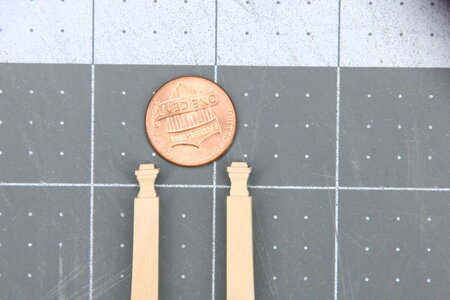
To represent the size...
And now a few viewing angles:
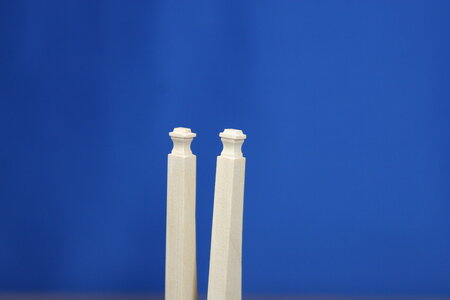
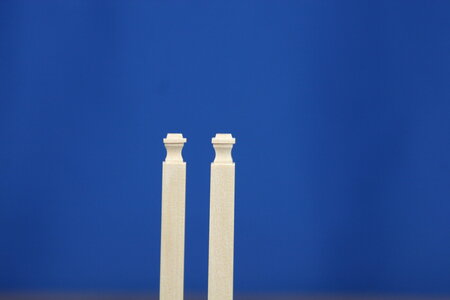
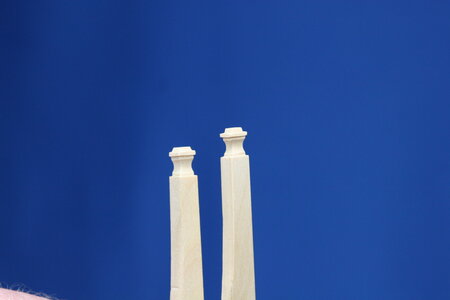
I'm probably going to shorten the bit at the very top - maybe it looks too tall now that I see these pictures. But I've run out of modeling time for today and I don't want to rush anything...
Thank you for taking the time away from your own builds to visit my build report.
Prepared the stem to receive the bowsprit:

And then I continued my commitment to parts that I still have only modest confidence will end up on my model (pending their potential re-do if they don't fit right). Here are the decorative tops on the bollard timbers...
Layout lines:

To represent the size...

And now a few viewing angles:


I'm probably going to shorten the bit at the very top - maybe it looks too tall now that I see these pictures. But I've run out of modeling time for today and I don't want to rush anything...
Thank you for taking the time away from your own builds to visit my build report.
That is exquisite carving Paul, I do hope the parts fit as you desire.Tiny update...
Prepared the stem to receive the bowsprit:
View attachment 372665
And then I continued my commitment to parts that I still have only modest confidence will end up on my model (pending their potential re-do if they don't fit right). Here are the decorative tops on the bollard timbers...
Layout lines:
View attachment 372666
To represent the size...
View attachment 372668
And now a few viewing angles:
View attachment 372670
View attachment 372669
View attachment 372667
I'm probably going to shorten the bit at the very top - maybe it looks too tall now that I see these pictures. But I've run out of modeling time for today and I don't want to rush anything...
Thank you for taking the time away from your own builds to visit my build report.
Hi Paul
Looking at your cant frames, do you not have a plan drawing showing the tops of the bow timbers? I would be looking at creating a thin plywood template that can be temporarily glued to the tops of the cant frames.It would need to incline slightly to match the shear.Drawing the bow timber positions on the template will give you the reference point you currently don't have.You would need to notch the template for the bollards as these obviously sit higher.
Just a thought and that would be my approach to your conundrum
Kind Regards
Nigel
Last edited:
Hi Paul,
These are certainly worth looking at from every side.
These are certainly worth looking at from every side.
This is all I have...Hi Paul
Looking at your cant frames, do you not have a plan drawing showing the tops of the bow timbers? I would be looking at creating a thin plywood template that can be temporarily glued to the tops of the cant frames.It would need to incline slightly to match the shear.Drawing the bow timber positions on the template will give you the reference point you currently don't have.You would need to notch the template for the bollards as these obviously sit higher.
Just a thought and that would be my approach to your conundrum
Kind Regards
Nigel
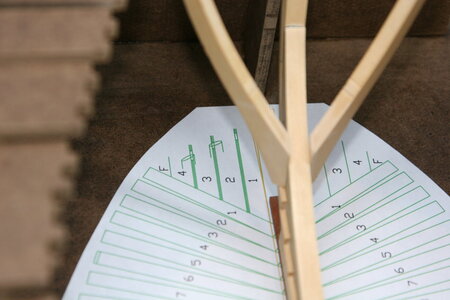
Just think of the ones that you don’t use as very fancy looking kindling .If you know what these are you also know my first-timer anxiety overfloweth...
View attachment 371399
Love the cantfames tops.
Kurt Konrath
Kurt Konrath
Paul, hard to believe these are not twins that were 3D printed. WOW to matching accuracy.Tiny update...
Prepared the stem to receive the bowsprit:
View attachment 372665
And then I continued my commitment to parts that I still have only modest confidence will end up on my model (pending their potential re-do if they don't fit right). Here are the decorative tops on the bollard timbers...
Layout lines:
View attachment 372666
To represent the size...
View attachment 372668
And now a few viewing angles:
View attachment 372670
View attachment 372669
View attachment 372667
I'm probably going to shorten the bit at the very top - maybe it looks too tall now that I see these pictures. But I've run out of modeling time for today and I don't want to rush anything...
Thank you for taking the time away from your own builds to visit my build report.
- Joined
- Oct 23, 2018
- Messages
- 548
- Points
- 353

The knight heads are looking really good.
- Joined
- Jan 9, 2020
- Messages
- 10,378
- Points
- 938

Dear Paul. The accuracy of your carpentry is just getting better and better all the time and when taken into account that you have already started off from what was a very high base, it is even more impressive. I have no doubt that you will get the parts to fit in the way that they should. At the same time, I understand 100% your trepidation as to whether or not you are right on the track. This type of "guesswork" seems to be part and parcel of most POF builds out there. Scant consolation is that the first one will be the hardest.


