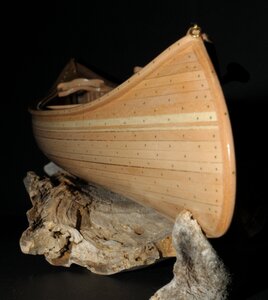
#9 Support: Applying finish

Here is the varnish I am using on these 17 and 19 inch canoes:
Varathane - Diamond Wood Finish - Water based - Interior, gloss.

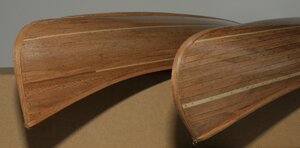
The canoe on the left is the 17-inch, the one on the right the 19-inch.
Both have the brass nails included in the construction, both are made from the same lumber (cherry) part of the lumber package from the "Lumberyard".
On the 19-inch vessel, the nails were installed, then carefully sanded using sand paper. The paper quickly saturated with a dark dust from the brass which eventually transferred into the wood pores and grain. Once the nails were been sanded flush with the planking, the light final sanding of the hull was done using 600 grit paper: this further spread the fine dust making it part of the un-finished surface.
On the 17-inch vessel, the nails were installed in the same way but filed down using a fine file. In this case no dark dust is rubbed into the wood, instead, it can just be blown off. The light final sanding was done using 320 grit paper resulting in the production of some dust but minimal amount.

Here is a comparison image clearly showing the difference: the result on the canoe on the right (19-inch) is a weathered look with increased patina: sort of antiquing.

_DSC1855 aa.jpg

The photo was taken after the second coat was applied:
Having prepared the surface of the 19 inch canoe with 600 grit paper, means that the raw surface is more polished resulting is a smooth glass like surface once the first 2 coats of vanish were applied.
On the other hand, the 17-inch vessel will surely needs a fine sanding after the second coat to smooth the surface that, at this point, feels a bit rough (I think the photo shows that). As a result, it will needs an extra couple of coats.

This varnish is quite thin and dries very fast. The gloss finish is built up through the application of a number of thin coats (brushed on): my canoes normally get between 5 to 9 coats (on the outside).
Varnishing takes at least 3 days: 1 coat in the morning, 1 in the afternoon with ample time to let the varnish harden in between applications.

This is a representation of my own experience as I follow methods that I am used to.
I do not pretend that this is the best and only way to proceed.

G.
 
Last edited:
The second coat was dry before bed time last night so a very light sanding was applied before the 3rd coat. For that I use a 1500 grit paper just to get rid of imperfection I could feel by just running my hand along and across the planking: mostly dust as I took care of most tiny cracks or gaps in the joints between planks prior to even applying the first coat.

So, as of now, the 4th coat was applied this morning and is basically dry enough to carefully handle the canoes. As result I will be able to apply # 5 and 6 by tonight (2nd day in the finishing process of the outside of the planking).
The finish is getting much better as again the gloss is achieved by building up the layers.

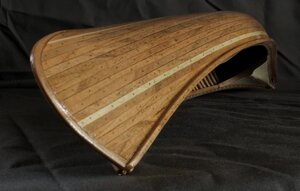
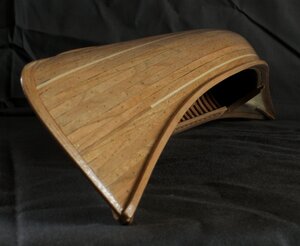
Here is a photo of each canoe as of this morning after the 4th coat of varnish.
On a side note, for anyone interested, the photos were taken using - Nikon body - Nikkor 35mm f1.8 lens. Camera settings as follows - Manual mode, f22, 15 second exposure at Iso 200.
These photo also show the difference in the treatment of the nails after installation and the difference in the resulting look of each model: something that may be worth considering. Again, the nails for the 19-inch vessels were sanded down, the nails on the 17-inch were filed.

19-inch model

_DSC1877 aa.jpg

17-inch model
Note relative to this canoe: unlike the 19-inch model, the gunwales were left pretty much as is after installation. I only slightly reduced the thickness as opposed to applying a slight taper from top to bottom over their entire length to make them look smaller, finer and as a result, more to scale: which is also something for other builders to consider.

_DSC1875 aa.jpg

As always, I do not pretend that this is the best and only way to proceed.

G.
 
Last edited:
Well the goal is to get a "polished" finish, with no cracks showing without having to go through the process of fiber glassing the model (which of course could be an option). This of course begins with laying the strips as tight as possible, but it is not always the case. I personally spend a lot of time going over the planking throughout the building process for the best results.
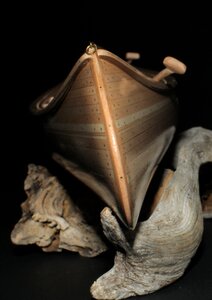
It is difficult to show the finish through photos but I will try.
Here are a couple:

_DSC2499 tiff aa.jpg

_DSC2503 tiff aa.jpg

G.
 
Well the goal is to get a "polished" finish, with no cracks showing without having to go through the process of fiber glassing the model (which of course could be an option). This of course begins with laying the strips as tight as possible, but it is not always the case. I personally spend a lot of time going over the planking throughout the building process for the best results.
It is difficult to show the finish through photos but I will try.
Here are a couple:

View attachment 178391

View attachment 178392

G.
Your variation in width and color/species of strips really is brought out with the careful and patient finish. PT-2
 
Your variation in width and color/species of strips really is brought out with the careful and patient finish. PT-2
Gilles, I recall that you mentioned earlier that you had tried mahogany but that it was too dark. I will be in the same position in the coming weeks and would like to know how you finished that canoe. My assumption at this point is to use the water based polyurethane as it doesn't darken the finish that much. Thanks for letting me know your recommendation. PT-2
 
Hi Richard,
Sorry for the delay and inactivity these past few days, but I am having some computer problems lately: and they must be resolved as I recently lost a lot of files representing weeks of translation work done in the past couple of months.
Anyways, I did use oil based varnish for the mahogany built canoes as I gave me the best looking "warm" finish, although it was very dark.
G.
 
Hi Richard,
Sorry for the delay and inactivity these past few days, but I am having some computer problems lately: and they must be resolved as I recently lost a lot of files representing weeks of translation work done in the past couple of months.
Terrible news - hope you could restore some or all data......
 
Hi Richard,
Sorry for the delay and inactivity these past few days, but I am having some computer problems lately: and they must be resolved as I recently lost a lot of files representing weeks of translation work done in the past couple of months.
Anyways, I did use oil based varnish for the mahogany built canoes as I gave me the best looking "warm" finish, although it was very dark.
G.
Thank you for your reply. I may try some experimental pieces before go the whole nine yards. I hope that your computer problems and recovery works out. These devices can be Jeckle and Hyde monsters. PT-2
 
The outside of the canoe's hull may be finished using "spar varnish".
As you have read, these days I tend to use a number of thin coats of water based varnish.

This is the latest canoe, #5, which is a 17-inch pear wood. It is in the final stages of construction.
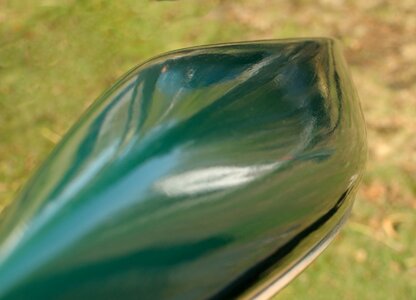
The outside is obviously painted green. Two coats of gloss spar varnish was applied with light sanding (600 grit paper) between coats. As this canoes still needs to be handled a bit for some detailing in the inside, a third coat, final coat, will be applied when everything is done and the canoe is ready for display. Two coat would probably be enough but I really want the finish to be "glass like": plus it gives the impression that "fiberglassing" is part of the finish.

In the end, whether 9 coats of water based varnish or 3 coats of oil based (or spar varnish) is used, the time needed to do this work is about the same: 3 to 4 days in order for the finish to properly "dry" and start the varnish curing process.

Here is a close-up view:

_DSC3287 copy aa.jpg

G.
 
The outside of the canoe's hull may be finished using "spar varnish".
As you have read, these days I tend to use a number of thin coats of water based varnish.

This is the latest canoe, #5, which is a 17-inch pear wood. It is in the final stages of construction.
The outside is obviously painted green. Two coats of gloss spar varnish was applied with light sanding (600 grit paper) between coats. As this canoes still needs to be handled a bit for some detailing in the inside, a third coat, final coat, will be applied when everything is done and the canoe is ready for display. Two coat would probably be enough but I really want the finish to be "glass like": plus it gives the impression that "fiberglassing" is part of the finish.

In the end, whether 9 coats of water based varnish or 3 coats of oil based (or spar varnish) is used, the time needed to do this work is about the same: 3 to 4 days in order for the finish to properly "dry" and start the varnish curing process.

Here is a close-up view:

View attachment 185610

G.
This is the highest mirror gloss sheen that I have seen on any of your previous canoes. It is almost hard to see the canoe in this perspective. Dedicated work as always on your part. PT-2
 
This is the highest mirror gloss sheen that I have seen on any of your previous canoes. It is almost hard to see the canoe in this perspective. Dedicated work as always on your part. PT-2
That would be because the outside of this last one is finished with gloss spar varnish.
The other 4 canoes (built since this "group project" was created) I used water based semi-gloss varnish throughout.
G.
 
I wonder if I am seeing your face mirrored on the bow. This view gives me a better impression of that finished canoe. . . although it is artistic license and not an actual replication of a canvas/panel stripper I think. An amazing finish. PT-2
 
I wonder if I am seeing your face mirrored on the bow. This view gives me a better impression of that finished canoe. . . although it is artistic license and not an actual replication of a canvas/panel stripper I think. An amazing finish. PT-2
It is mostly a reflection of my thumb but some of the hand can also be seen.
No canvas between wood / paint and the varnishing process. The joint between strips must very tight throughout as no filler was applied before painting the surface.
- 2 two coats of paint
- 3 coats of varnish.
G.
 
It is mostly a reflection of my thumb but some of the hand can also be seen.
No canvas between wood / paint and the varnishing process. The joint between strips must very tight throughout as no filler was applied before painting the surface.
- 2 two coats of paint
- 3 coats of varnish.
G.
You have strip planking joinery to a high level of excellence that I have not seen in any of the other builds with their layers of filler/paste to sand off for their painted finishes. I knew there was no canvas involved in your finish but was thinking about a finish on a full size canvas canoe if it would be similar to your mirror finish. PT-2
 
Back
Top