Really impressive work and a beautiful Victory Grant.
-

Win a Free Custom Engraved Brass Coin!!!
As a way to introduce our brass coins to the community, we will raffle off a free coin during the month of August. Follow link ABOVE for instructions for entering.
-

PRE-ORDER SHIPS IN SCALE TODAY!
The beloved Ships in Scale Magazine is back and charting a new course for 2026!
Discover new skills, new techniques, and new inspirations in every issue.
NOTE THAT OUR FIRST ISSUE WILL BE JAN/FEB 2026
You are using an out of date browser. It may not display this or other websites correctly.
You should upgrade or use an alternative browser.
You should upgrade or use an alternative browser.
HMS Victory Mantua 1:78 (first build) by Grant Tyler [COMPLETED BUILD]
- Thread starter GrantTyler
- Start date
- Watchers 102
Good morning. Had a few hours to play yesterday- jumping jack as usual.
Served some more shrouds for the main mast and fitted- off the ship rigging to mast is just so much easier.
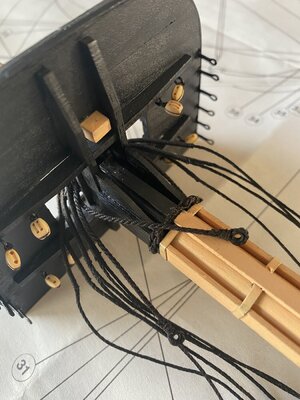
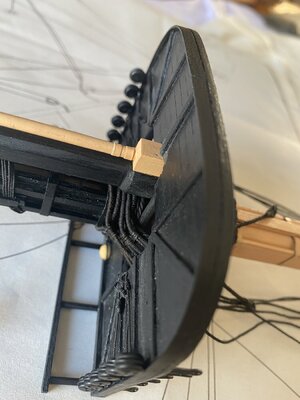
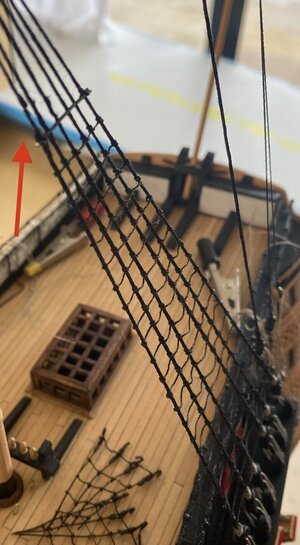
Cut off my Mizzen futtock shrouds the other day and removed the stave - nearly created a disaster as I clearly applied too much CA mainly due to 3 different knots from different ropes coming onto the stave at the same point. When taking off this mess I snicked the fore port shroud.... as per arrow. I applied a little CA glue to the damage and I am hoping that this will not unwind. My shrouds became fuzzy again were they where manipulated. A little “fire” will sort that out
I started rigging the Mizzen cross Jack-
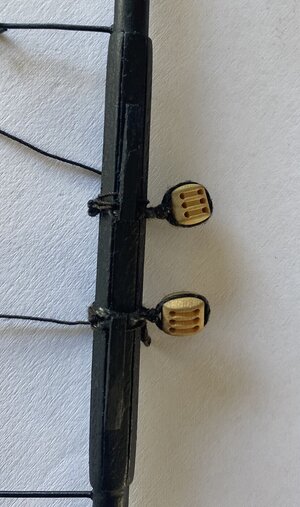
The 1st photo below shows:
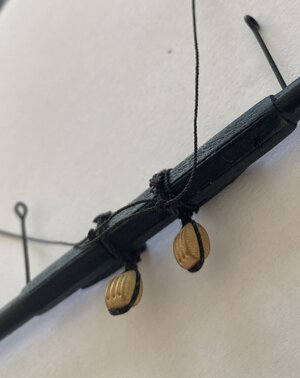
1. The jeer blocks. These are lashed to yard 2nd photo down.
2. Sling (I was going to seize this however the space going through the crows nest I made 1 mm and too small for siezed sling) - happens when bashing kit and being pretty clueless at same time.
3. The lines for the “down haul “ (term to be found). These will be looped through each other then around the aft of the mast and down through block and tackle to base of mast. 3rd photo down.
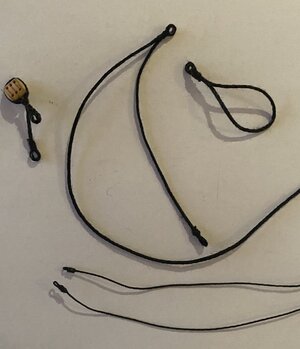
Next :
The topping lift block (5mm)and topmast sheet block (5mm) are joined together- interesting to make. The brace block pendants which hang off the yard are also attached (5mm).
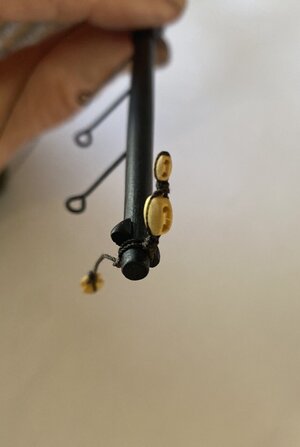
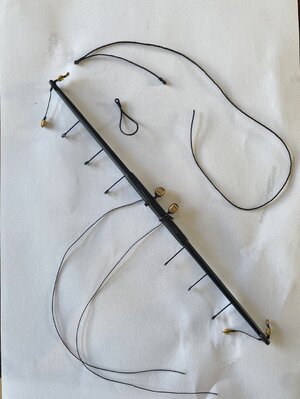
WIP to date on the yard : Cheers Grant
Served some more shrouds for the main mast and fitted- off the ship rigging to mast is just so much easier.


Cut off my Mizzen futtock shrouds the other day and removed the stave - nearly created a disaster as I clearly applied too much CA mainly due to 3 different knots from different ropes coming onto the stave at the same point. When taking off this mess I snicked the fore port shroud.... as per arrow. I applied a little CA glue to the damage and I am hoping that this will not unwind. My shrouds became fuzzy again were they where manipulated. A little “fire” will sort that out

I started rigging the Mizzen cross Jack-
The 1st photo below shows:
1. The jeer blocks. These are lashed to yard 2nd photo down.
2. Sling (I was going to seize this however the space going through the crows nest I made 1 mm and too small for siezed sling) - happens when bashing kit and being pretty clueless at same time.
3. The lines for the “down haul “ (term to be found). These will be looped through each other then around the aft of the mast and down through block and tackle to base of mast. 3rd photo down.


Next :
The topping lift block (5mm)and topmast sheet block (5mm) are joined together- interesting to make. The brace block pendants which hang off the yard are also attached (5mm).

WIP to date on the yard : Cheers Grant

I have been reading some interesting literature:
The art of rigging a ship from this era is way more complex and intriguing than what I am doing. What I do know, if you had to rig the Victory accurately according to these writings it would take years and years.You would have to be a skilled modeler way above my level for sure. I also do believe that it is impossible to actually achieve an exact replica of some of the intricacies due to scale.
Super interesting and if I do choose to give it a go (Historic accurate) a smaller, less complicated , large scale model will be purchased for sure.
Cheers Grant
Hi Grant. Nice ropes, but some of them are a bit "hairy"... A candle or some diluted glue would help, I think.
Hey Grant, your pre rigged assemblies is the best way to go along with a handheld Dremel drill.
Brilliant Grant. Your work on these details is simply fantastic.
Here's a link to an HMS Victory I stumbled across on the German forum while researching sail making. Prepare to be humbled: https://www.segelschiffsmodellbau.com/t7800f165-HMS-Victory-in-von-Manfred-Burkert.html
Dude worked on this ship for something like 40 years!
Here's a link to an HMS Victory I stumbled across on the German forum while researching sail making. Prepare to be humbled: https://www.segelschiffsmodellbau.com/t7800f165-HMS-Victory-in-von-Manfred-Burkert.html
Dude worked on this ship for something like 40 years!
Good morning Vladimir. I will run a candle flame through them. The thread from the kit does fuzz. The other rope I have bought. Cheers GrantHi Grant. Nice ropes, but some of them are a bit "hairy"... A candle or some diluted glue would help, I think.
Good morning Daniel. That Dremmel...is a dangerous little animal.Hey Grant, your pre rigged assemblies is the best way to go along with a handheld Dremel drill.
Good morning Paul. Yep this is an amazing Modeling feat for sure. I have looked at his build many times and decided not to any more (makes me depressedBrilliant Grant. Your work on these details is simply fantastic.
Here's a link to an HMS Victory I stumbled across on the German forum while researching sail making. Prepare to be humbled: https://www.segelschiffsmodellbau.com/t7800f165-HMS-Victory-in-von-Manfred-Burkert.html
Dude worked on this ship for something like 40 years!
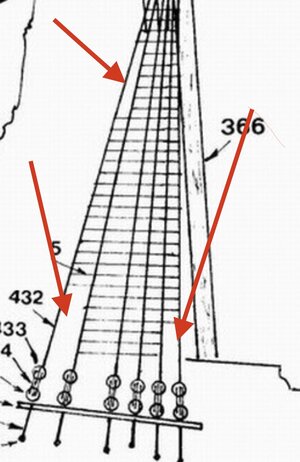
Good morning.....and Grants learning curve goes vertical. I am glad I made the call to practice and build the Mizzen as a practice as I am making many errors. Ratlines: Not only did I get the gap between the fades wrong, I also got the pattern wrong by “rattling“ across all shrouds. HMS Victory has an irregular pattern see below with arrows.
As with my Futtock shrouds I cut off my Ratlines and am starting to redo properly. Took a while to take these off.
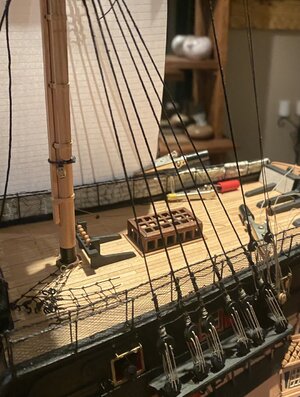
I did start the top shrouds with the correct gap 0.4mm for my Victory. Is correct and looks way better as well. Cheers Grant
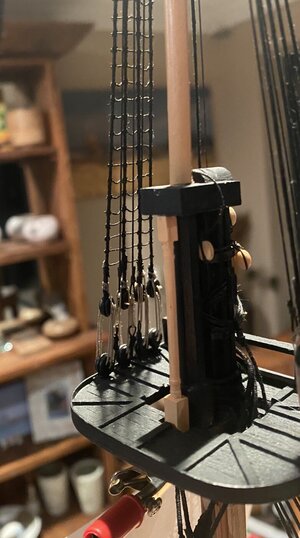

As with my Futtock shrouds I cut off my Ratlines and am starting to redo properly. Took a while to take these off.

I did start the top shrouds with the correct gap 0.4mm for my Victory. Is correct and looks way better as well. Cheers Grant

You have been busy Grant. Sorry about the futtock shrouds and ratline re-do's, but you gotta do what you gotta do. At least by hacking them down you take away any doubt about having to re-build them, and I'm sure you'll be pleased with your decision later on. Great work 

Good evening Heinrich. True story.... we just need to make sure our “happy” indicator is within our skill level or we would never settleThose top shrouds look excellent Grant! Never settle until you are happy to settle!
Good evening Mark. I think the only way I get myself to redo something is to just cut it off....or I don’t think I ever would....especially ratlines. But, hey, at least it is only the Mizzen, tiny compared to other two masts. CheersYou have been busy Grant. Sorry about the futtock shrouds and ratline re-do's, but you gotta do what you gotta do. At least by hacking them down you take away any doubt about having to re-build them, and I'm sure you'll be pleased with your decision later on. Great work
Maybe there should be forum points awarded for the number of redo’s we do.I think the only way I get myself to redo something

Jan
Good Morning Jan. Absolutely. I think I would be getting bonus points by now. CheersMaybe there should be forum points awarded for the number of redo’s we do.
Jan

- Joined
- May 17, 2022
- Messages
- 126
- Points
- 78

You are never too old for bikes , I started speedway riding at 50 and still ride a bmw r1200gs te at 65 cheers ianGood morning. While adding blocks to the masts I have made some progress to my Mizzen standing rigging.
My insomnia returned (well...I had a oops on the downhill whoops on my MTB 2 weeks ago.I got another small concussion and fractured a tiny bone in my wrist. Freak it’s been a mad 2 years. Been riding off road dirt bikes for 25 years and only had one injury....and now?? Anyone tell me I’m getting too old (like the rest of my family)....I know where you live
Anyway long story to say I have had some building hours-
View attachment 303440View attachment 303442View attachment 303443View attachment 303441
Good evening Ian. True story- we just need to stay on two wheels now days -We don’t pick ourselves up so well no more.You are never too old for bikes , I started speedway riding at 50 and still ride a bmw r1200gs te at 65 cheers ian
Good evening. Futtock shrouds redoing and ratlines. Some problems- I am having to dye all my rope. Use Indian ink and it is good except for ratlines as the learning experience has shown me. It makes the thread “not smooth” so the clove hitches don’t pull and tighten easily. I will need to change the dye process here.
The good thing is that it gives a really realistic tar effect.
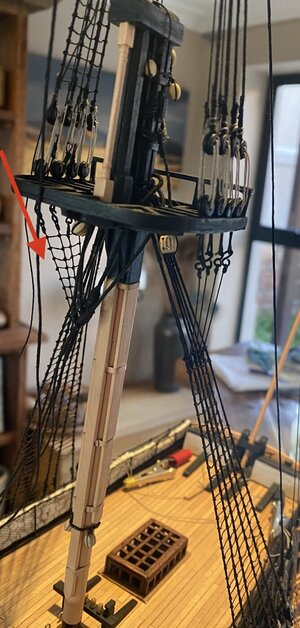
For the futtock shrouds redo I went for the alternate method (not realistic) as to try (for my skill level) the authentic approach, there was too much thread looped around the stave and it looked “blobby”. In addition the car thins still need to be added. Reason why I redid these. I did not like it...less is more. I also “ cheated” and only did one whipping using double half hitches. Just too much thread in small area otherwise.
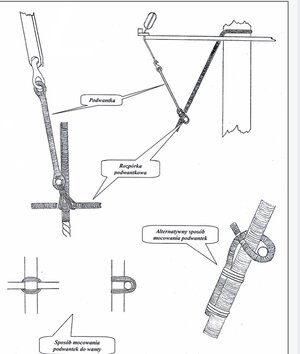
Progress on the ratlines. Everything I did not want, happened.....got to love this hobby


 . The arrow shows some lines I need to straighten. I only used a drop(still too much) on the start on Finnish so I can align those which are out.
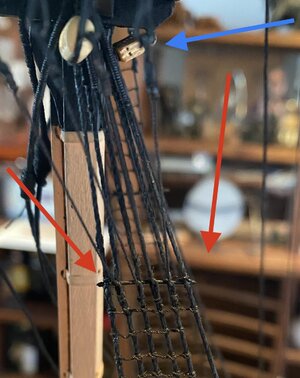
In this close up the method of fixing the futtock is shown.
The red arrows show what you don’t see with the normal eye- shroud came out of alignment (I can easily slide this across, and the stave cut off are irregular. Needle file should sort this. Blue arrow shows the old block which still needs to be replaced(what a difference good blocks make).
I am happy with the effect and will send pics once all ratlines on Mizzen done

Cheers Grant
The good thing is that it gives a really realistic tar effect.
For the futtock shrouds redo I went for the alternate method (not realistic) as to try (for my skill level) the authentic approach, there was too much thread looped around the stave and it looked “blobby”. In addition the car thins still need to be added. Reason why I redid these. I did not like it...less is more. I also “ cheated” and only did one whipping using double half hitches. Just too much thread in small area otherwise.

Progress on the ratlines. Everything I did not want, happened.....got to love this hobby


In this close up the method of fixing the futtock is shown.
The red arrows show what you don’t see with the normal eye- shroud came out of alignment (I can easily slide this across, and the stave cut off are irregular. Needle file should sort this. Blue arrow shows the old block which still needs to be replaced(what a difference good blocks make).
I am happy with the effect and will send pics once all ratlines on Mizzen done

Cheers Grant


