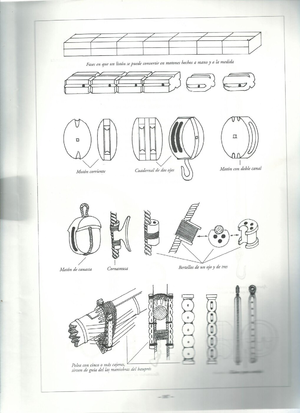
under this www. page you have a clear instructions of how to make.
-

Win a Free Custom Engraved Brass Coin!!!
As a way to introduce our brass coins to the community, we will raffle off a free coin during the month of August. Follow link ABOVE for instructions for entering.
-

PRE-ORDER SHIPS IN SCALE TODAY!
The beloved Ships in Scale Magazine is back and charting a new course for 2026!
Discover new skills, new techniques, and new inspirations in every issue.
NOTE THAT OUR FIRST ISSUE WILL BE JAN/FEB 2026
You are using an out of date browser. It may not display this or other websites correctly.
You should upgrade or use an alternative browser.
You should upgrade or use an alternative browser.
HMS Victory Mantua 1:78 (first build) by Grant Tyler [COMPLETED BUILD]
- Thread starter GrantTyler
- Start date
- Watchers 102
Then we have a different point of view, Poul Eric. That’s allowed on this forum.I do not totally agree, as with a ship without a sail, you have no running riggen mowing the sail, only the riggen mowing the yards up or down and sidewards.,. with sails, you add more than 30% running riggen-the one mowing and main maintain the sails
Regards, Peter
Last edited:
Thank you for this link. Cheers Grantunder this www. page you have a clear instructions of how to make.
Good morning Vladimir. True story. One would think I’m building Noah’s ark.- Pray, are lambs a part of the ship? I have read the Marine Dictionary until the pages have begun to come out, to understand the actions; but I do not remember any lambs.
- They may well be. There are horses, fishes, cats, dogs and mice in their barbarous jargon; and bears; so I dare say there are lambs, rams, ewes, wethers and tegs. But these particular animals are for your nourishment: they are literally lambs.
(c) Post Captain by Patrick O'Brian.
Good morning. You are probably correct. To my understanding they all seem to fit and make sense however I am in junior school when it comes to these ships. Cheers Granti do agree with you. there are varius mistakes and wrong riggen limes-as far i can see from the photos.
The mesh I assume you are referring to the netting. There is netting around the entire ship in a U shape. They put their hammocks in these to dry and for protection against shot during battle. Some guys don’t include the hammocks, some individually show each hammock and I represent the hammocks covered with canvas. See my post #1934- #1955 (pages 97 and 98) where the guys gave some great advice. I also made reference to a thesis on these. In post #2006 I used a painting and decided to cover these. (Page 101) Cheers GrantHi Grant,
I hope you don't mind me asking but I noticed that in the mesh you have going around the outer edge of the ship is what looks like continues bundles of white material.
The reason I ask this Is I will soon be trying to make these for 'my little Victory' (See my build log) and was lead to believe that the sailors put there individual rolled up hammocks in there to air so that they will not start to rot.
So I am now a little unsure what the mesh is for.
Or is this something that you are planning to do at a later date.
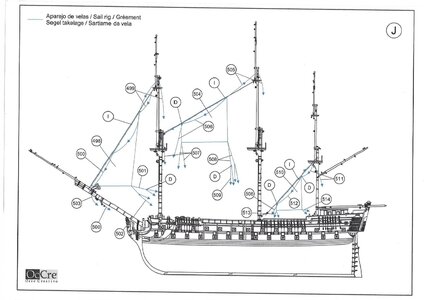
Good morning. Thank you for this it is brilliant. Looking at the pictures you have sent, my lines follow this pretty much 100%. I did not include the bowlines and there are some belay points which differ. The block and detail is different- this is due to limitations of resource and my skill level will not achieve such detail. Love your feedback . Cheers Granthere are a few images from my huge collection. I have en fat the completete riggen- both standing-running riggen yards and finally running riggen maintaining the sails
here are some pic,
View attachment 343991
View attachment 343994
View attachment 343997
View attachment 343998
View attachment 343999
View attachment 344000
Good morning Thomas. Thank you. Yep I gave up on the monkey fist and went with your previous post. I am super happy how these have come out and will post when I have the time. Cheers GrantView attachment 344117
Just to show how difficult it is to knot a "monkey fist" using 3 mm blocks as an example. In Rochefort I bought my youngest daughter earrings with this knot. They are 10 mm in size and therefore huge. It is no wonder that my dear friend Grant has massive problems to reproduce this knot in minature in its small scale.
Best regards
Thomas
Good morning. Ah yes….to include these lines or not. Personal choice I think. I love how they have added “mayhem” to my Victory and I have had so much fun reading and seeing what they do and how they go. I am extremely happy I included them. Cheers GrantI do not totally agree, as with a ship without a sail, you have no running riggen mowing the sail, only the riggen mowing the yards up or down and sidewards.,. with sails, you add more than 30% running riggen-the one mowing and main maintain the sails
Thank you a cool reference.
Good morning Peter. True story. I’m not building a perfect ship and it is Grants Victory after all. Poul Eric knows his stuff no doubt and I certainly appreciate his knowledge and valued input. I have had so much fun adding all these running lines- hey they all work and are correctly functional. Maybe one day I will attempt a model exactly how it should be. For now I want a cool model for my pub. Cheers GrantThen we have a different point of view, Poul Eric. That’s allowed on this forum.It all depends on which lines you ad. But you are correct when it’s about the lines on the inside of the sail themselves.
Regards, Peter
Good morning- I digress: FIFA World Cup. (I am a sports nut). I couldn’t help but think of all the nationalities on this forum and we are down to the last 8 now.
To my USA friends : sorry guys just not good enough.
To my Australian friends : ditto
To my Dutch Friends : Nice but I think you have been lucky. Argentina next so get your tissue boxes out.
To my French Friends : Gilbert and Co- must be super excited the lads are on fire and must be a sure bet for the final- although you play the English next.
To my English Friends. (My team- Victory’s influence) : Looking so good but up against your old foe the French next. I don’t see a Victory in the line up so I think it’s Tissue boxes your us as well.
Spain and Portugal- let’s see if you get through to the last 8- you should do however like the Dutch you guys are looking scratchy.
Sorry guys (all of us)- Brazil is looking sooo good. Not a great sea faring nation or huge ships to build but these guys are the king of soccer/football! Must be the odds on favourite.
Not everyone’s cup of tea, but has been brilliant so far
Cheers Grant
- Joined
- Dec 3, 2022
- Messages
- 1,547
- Points
- 488

Hello SOS
My first log. I realized that attempting the Victory as a first boat is silly ambitious. I decided to give it a go anyway.
Those three sentences have hooked me. I will now have to read all 120+ pages of this build to find out how you won through all of the difficulties. I cheated and looked at the last pages and it's clear that you have been 'Victory-ous'
The Mantua kit has had loads of criticism from those who have built it for its lack of reality and other issues. After working on it for 3 months I have loved it. I am not going to attempt a replication of this majestic and famous battle ship, just try make a good model.
I'm building the OcCre Beagle which is very similar. It is built down to a price and has some inaccuracies to correct. I am loving my Beagle too. I don't think it will look perfect when I have finished but I will have learned a lot and most importantly will have had a lot of fun.
As you will see my skills are beginner so these do not look like those kits where these are almost supplied (or like Y.T.'s whose work on this ship is brilliant) but hey _ I made them which in my view is the whole point.
This is another reason for me to read all of your thread. I will learn more from your mistakes than I would from the 'perfect' builds of the experts, who are just too advanced for me to copy at this point in my shipbuilding. It also encourages me to write about my mistakes without embarrassment so that other beginners can learn from me (and maybe I'll come up with something for the experts too).
I like the way your planking improved from the first layer to the second.
I also used a dremel tool to drill holes and cut the gun ports. This went relatively easy.
View attachment 259939
So many gun ports, so many guns! This would drive me crazy so I salute your persistence, Grant. How do you keep your concentration doing the same operations over and over again?
When I applied a thin layer of poly to the hull many planks lifted and shrank?? I thought they would expand as the planks were so dry. Old kit I guess. Any way some wood glue and pins rectified this. In addition cracks between my planks which occurred when the poly was applied and I had to repair with with some woodfiller. This annoyed me as I really wanted to plank without any filler as I will not be coppering the hull. I lightly sanded the hull. To my disappointment the walnut filler was pinkish...ouch.
View attachment 259942
Repaired my mess up at the stern.
View attachment 259943
It looks like the varnish you used was water based? Maybe that was the problem. I've been using 'sanding sealer' which is shellac dissolved in alcohol with some additional filling material. It soaks into the wood and really makes the grain figure GLOW, but the alcohol evaporates out quickly and doesn't seem to cause any problems with shrinkage or swelling.
I really did not like the etching provided by the kit. I was not disappointed as I knew what to expect. I really did not like the flat stern and while members achieved a good result, I wanted to get more volume and look through with the stern. Risk taker Grant came out and I took my dremel to the stern and cut it open. I had vision of the outcome and so gave it a go. I cut "doors into the bulkhead and opening's at the top to let light in. I knew these would not be seen once the stern cabins are completed.
I like this risk taking approach, which we might not be doing if we were working on those top level expensive kits...
I painted the etching provided and put on some thin planks to give it some volume. I also added some light blue to the interior and painted the floor and bulkhead white. I took some hard wood strips bent them and CA glued them to the inside of the side cabin etching parts supplied to give the sides of the cabin a curve. The balustrade is still a problem. I have no idea what to do and my painting skills will just mess this up. Any suggestions?
The colour choice of my Victory is not the yellow ochre which seems to be the finally agreed by the colour debate. I had my wife and daughter decide and they told me to go for the more the salmon pink (which so many photos of the victory show (clearly changes depending on the time of day and sun) . As the model (if I do a good enough job) will be in my lounge, the ladies of the house had the final say. Apologies to all the Victory experts out there.
View attachment 259947
I then bent each wale and glued it with wood glue and using CA glue as nails...so to speak.
I thought the salmon pink had been confirmed as the true colour of the Victory in Nelson's day. Didn't they find traces of it during restoration work? Anyway, it doesn't really matter when we are trying to make a great looking model rather than a perfect replica (which is impossible anyway). Delegating the decision to the ladies was a brilliant idea. Keep them involved and they will give us more time to build!
I don't know yet what you did with those balustrades but to my eye, they look fine in the contrasting colour. It adds interest.
I also made the stand which has come under huge criticism from many members. I love it. it is simple and does not detract from the shape and appearance of the ship. There is enough "bling" on this kit and an understated (almost dry dock look) appealed to me. Awesome.
View attachment 260117
I am a messy builder and each phase of the build means I have to redo paint work somewhere on the build.
I'm a messy builder too and should accept the fact instead of blaming myself so much.
By this stage the hull looks superb. Not messy now!
the Mantua kit once again gave me the license to play.
Grant, you gave yourself the licence to play - well done.
How often we talk about 'working' on our 'project' as though we were getting paid to do something we really would prefer not to be doing. I'm retired and try to avoid work as much as possible (though I still have to wash the dishes). I prefer to think of my time at the bench as playing with my toys.
I realise that this is a big reply to that first big post of yours. I'll try not to flood your thread with comments on stuff from the distant past as I work my way through the rest of it.
- Joined
- Dec 3, 2022
- Messages
- 1,547
- Points
- 488

I don't know if anyone knows a measuring technic to achieve in line canons. I used the jig provided in kit, drilled a 1mm pilot hole and then used my Dremel 3mm. To insert the canons I use some Prestik on a kebab stick and lined them up using my judgement. They are coming out ok.
Personally I think the slight misalignment that will result from not using a jig will add 'soul' to the model and will actually be more realistic too. From my time in the military, I doubt that the guns were often arranged 'inch perfect' apart from the occasional Royal Inspections.
The style is a typical Wolfram zu Mondfeld sketch - but I can be wrongNo, what book is this page from?
View attachment 344122
Howzit Grant, I've been away for six weeks on the KwaZulu-Natal South Coast, and hence very much out of the loop with everyone's build logs, but as I was about to depart South Africa again I noticed this shop in Joburg airport which reminded me of you, can't imagine why, and I felt compelled to post it on the forum ...


I don't WANTS TO GO INTO A FIGHT HERE( IN FACT I HAME BEEN a MEMBER 4 YEARS PLUS, AND HAVE BUILS MORE THAN 30 MODELS ONER MY 50 YEARS OF BUILBING ) APART FROM SAILOR AND NAVY LIFE. BORN ON THE NORTHWEST COAST OF DENMARK. I HAVE HAD SHIPS AROUND ME MY. TO . ONE THE NEARLY 80 YEARS OF LIFEThen we have a different point of view, Poul Eric. That’s allowed on this forum.It all depends on which lines you ad. But you are correct when it’s about the lines on the inside of the sail themselves.
Regards, Peter
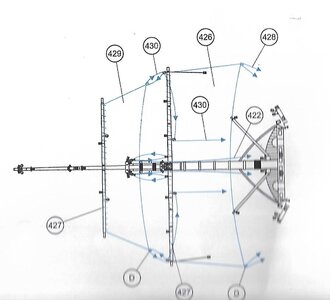
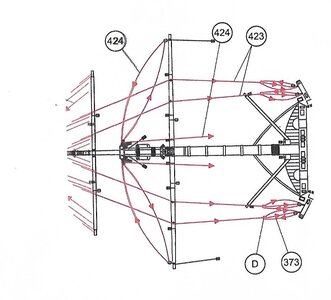
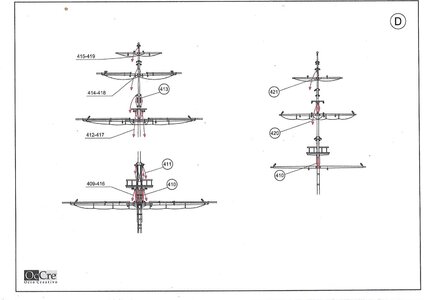
TO MY THERE ARE TWO VERY DIFFERNTS RUNNING RIGGEN_ONE WHICH ARE ONLY MOWING -UP OR DOWN-SIDEWARDS THE YARDS
THE OTHER ONE IS THE ONE WHICH MOWE, SET FAST AND MANY OTHER THINGS- BUT NOT MIXED DIRECTLY WITH THE YARDS. WILL ADD -IN THIS CASE, THE BOWSPRIT -THE ONE MOWING THE YARDS "RED COLOUR AND THE MOWING THE SAILS IS IN BLUE. IN A FEW DAYS I WILL HAVE THE REST. THERE ABOUT 35 PIC ENDING UP WITH THE FASTING POINT ACCORDING TO THE COLOUR.
- Joined
- Dec 3, 2022
- Messages
- 1,547
- Points
- 488

Good morning. (Here in SA). I went through my waterline work and found this error. Any advice to rectify is appreciated.
My line didn’t follow onto my rudder, this I can fix and line up, however the paint seeped into the planking lines - 3 spots(probably as these planks are vertical) When I repaint the corrected line it will improve. Is there a way to ensure it doesn’t happen again
Yes there is.
Let's assume you want to paint black paint over a white background which is already applied.
- First apply the masking tape over the white and press it down firmly.
- Then paint over the edge of the tape with white paint. This seals any gaps and any white paint which flows under the tape won't be visible against the existing white.
- Then paint the black.
Keep the layers of paint as thin as possible so that you don't get a ridge developing and be careful peeling off the masking tape so that you don't flake off the black. (Pull the tape back against itself instead of straight upwards.)
Oooooooo, please don't do that in Grants build log, Poul Eric!!! Unless Grant appreciates it. (I don't need them.)IN A FEW DAYS I WILL HAVE THE REST. THERE ABOUT 35 PIC ENDING UP WITH THE FASTING POINT ACCORDING TO THE COLOUR.
I am deeply sorry that I was stepping on ............. well, my excuses that this happens in your build-log, Grant.
Regards, Peter
Last edited:


