• LUCZORAMA SHIPWRECK SCAVENGER HUNT GIVEAWAY. 4 Weeks of Fun • 1 Legendary Prize ((OcCre’s Fram Ship)) • Global Crew Welcome!
    **VIEW THREAD HERE**

My planking is splitting...what can I do

Joined
Sep 3, 2021
Messages
138
Points
103

Location
Lake Macquarie, NSW, Australia
Hi,
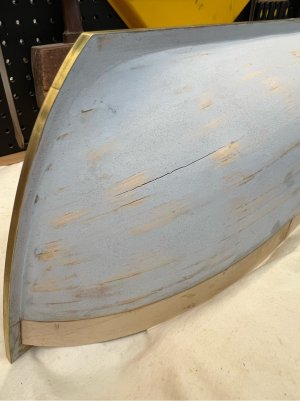
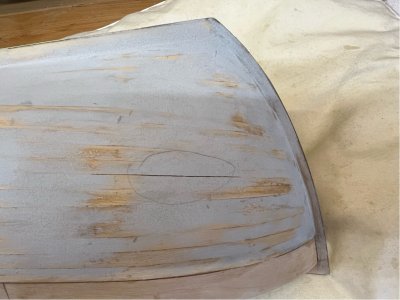
I'm building Billing's Mary Ann, a POB build. I finished the the planking at the end of May, and it has been coated with two part epoxy on the inside, and sanded and filled on the outside two weeks ago. I was just finalising a few things before starting the prime and paint stage, but when I went out to have a look at her today I find 6 or 7 longitudinal splits in the planking - the planks have separated. Yesterday was an unusually hot day here - I'm in Australia, so still winter, but 29C and a very dry wind. The hull was indoors, and out of direct sunlight, but I assume that the combo of heat and low humidity has caused my problem.

Here's a couple of photos...
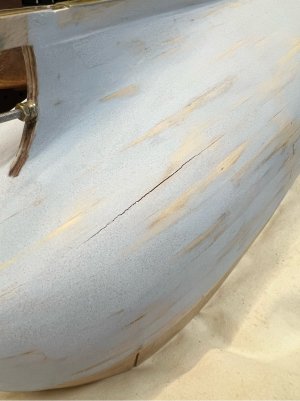
1724918294188.jpeg

1724918323397.jpeg

It is a single layer of planking. The timber is called Obechi in the Billing parts list. It was soaked before bending, and allowed to dry while pinned on the frame before being glued. I've used slow CA glue to the bulkheads and along the edges of the plank. Although the kit is a static display model, I am building it as functional RC model, so it will need to be watertight. I'm not sure what to do from here, other than to sand back the affected sections and capillary glue before continuing on.

Thanks for any suggestions...
 
It is the combination of high temperatures and low humidity that has caused the problem, not your fault and not really the fault of the material - it;s just doing what wood will do under fairly extreme conditions. I would try filling the cracks with epoxy and reinforcing the on the outside with strips of the lightest weight model aircraft tissue paper you can find, also fixed down with epoxy. The thin tissue should vanish under a coat of paint and help to stop the cracks re-appearing. Others may have better ideas.
 
It looks to me that it has split along a joint between 2 planks which to me indicates no glue between the planks at that point. Presss on the joint to see if it is because the wood planks have come away from the bulkheads or if it is because the wood has just shrunk away from each other).

If it has come away from the bulkheads to split, I would try to put some slow CA in the gap and then put plastic wrap around it (to prevent it from sticking to things to hold it together during curing). After the plastic wrap, I would put a square piece of wood (you might have to pre-shape it to match the curve of the hull along the length) right over the crack and clamp it down to try to close the gap.

If it has split due to the wood shrinking, I believe all you can probably do is to fill the gap and re-surface. One of the things I've done on RC planes to fill and resurface is to put some slow CA in the gap and hit the surface with some sandpaper. the sanding dust will mix with the glue and give a good strong finish with a decent surface. Yes, it will also destroy the sand paper where you use it to sand. :)
 
Last edited:
Thanks Alan & Jeff for the replies. The splits are definitely between the plank joins, and all are between bulkheads, so I think you are right in saying I didn't edge glue well enough (a handy lesson learnt for this beginner). Fortunately all of the splits appear to have just pulled away from one another, rather than popped out to create a bulge...so I think I'll do as suggested and force some glue into the cracks and re-surface. I'll try both suggested techniques for finishing (tissue and sanding dust) and see what works for me. I guess I can only cross my fingers that it doesn't happen elsewhere after painting.
 
Thanks Alan & Jeff for the replies. The splits are definitely between the plank joins, and all are between bulkheads, so I think you are right in saying I didn't edge glue well enough (a handy lesson learnt for this beginner). Fortunately all of the splits appear to have just pulled away from one another, rather than popped out to create a bulge...so I think I'll do as suggested and force some glue into the cracks and re-surface. I'll try both suggested techniques for finishing (tissue and sanding dust) and see what works for me. I guess I can only cross my fingers that it doesn't happen elsewhere after painting.

Brother Pete:
Wood swells across the grain as its moisture content increases. In this case, you attached the planks after soaking and they were then subjected to low humidity air resulting in lower moisture content and shrinkage across the grain. As each of the planks shrank a little bit, the accumulated tension across the planks caused failure at the weakest glue joint in the area. I would be inclined to try thin CA glue in the cracks built up as needed with sanding dust. The thin glue would provide better penetration through the cracks than the thicker type. If you were to use a laminate, whether tissue or fiberglass, I would apply it to the entire hull to avoid odd patches. The most common practice with RC boats is fiberglass and epoxy lamination on the entire outside of the hull. Please keep us apprised of your progress. And send along more pictures. Fair winds!
 
Thanks Andy. The thin CA is a good idea for penetration…but I’d already tried the thick & slow CA technique before reading your comment. I decided on the slow CA and sand across it as it dries…because it was simple, and I had everything at hand. It worked very well on the first crack and I just kept going. I first cleaned each split with the back side of a scalpel blade, to open it up a little at the surface, but not actually cut anything out, then used the nozzle of the slow CA against the opening and I think I got pretty good penetration, I then gave it a quick wipe at the surface, then sanded across it with 180 grit. This appears to have filled the slot nicely. I let it dry naturally. In a few cases I gave it a second coat to better fill to the surface.

I’m sure that the epoxy and glass mat approach over the entire hull would be best in the long term, but I’m not comfortable in my ability to get a good finish at this point, so that will have to wait until a future model.

Here are a couple of photos. Also note that yesterday was even hotter, and equally dry, as the day that the splitting occurred and I didn’t get any further splitting, so hopefully we’re now below the point at which any residual stresses will create more splits.

Split ‘opened’ a little with a blade…
1725084788087.jpeg

After filling and some re-finishing…
1725085109712.jpeg

Thanks to everyone for your help.
 
Looks like you have things under control. FWIW, I agree with @AndyA in that soaking the planks and applying wet was the source of the problem. Not that it will help with this model, but for future hulls, I'd recommend investing in a plank bending tool. That way you can use far less water, and the bonus (if you're using a hot iron type plank bender) is that they'll cook a lot of the moisture out of the wood during the bending process. The challenge with wet planking is that the woods will all swell up, and it takes quite a while for the moisture to fully dry out of them. I have oak flooring in both levels of my home, and after 20+ years, I have joints that have opened up between some of those planks... even though they were factory kiln dried to a low moisture content. Calgary has atrociously dry winters, and so what little humidity still existed in that oak had further evaporated over time... shrunk... and cracks open up. But yeah... plank bending tool for the next hull. And congratulations for finding a workable solution to your existing hull.
 
I guess how you plan to finish the hull could also play a role. My experience is that if you only use wood stains then applying glue will prevent the stain from peneyrating the glue and you will see white lines.

I always only stain my models for a more natural look and for that purpose I use wood filler for such issues. Use one as close to the original plank colour and then the filler will not be seen after staining. If you look at my Victory model you will see how I used stain for a more natural look.

Trust this helps
 
what type of glue was used to do the planking?... pva or ca?

ca glues out gas and may cause a reaction with the epoxy.

the other cause may be water under the epoxy. was the planking job fully dry before finishing was done?
 
what type of glue was used to do the planking?... pva or ca?

ca glues out gas and may cause a reaction with the epoxy.

the other cause may be water under the epoxy. was the planking job fully dry before finishing was done?
It was slow CA. The planking had been finished for about 8 weeks before any external finishing was started (it hasn't been epoxied), although the internal epoxy was applied in sections about a week after each area had been planked.

I think I'd go with the suggested theory that the difference between the moisture content of the wood at the time it was glued (it looked dry on the surface but probably wasn't internally) and the later very low humidity levels caused a build up of stress that eventually caused the splits at points where I may not have been diligent in my edge glueing - all the failures were at the edges and between bulkheads, not over any.
 
Looks like you have things under control. FWIW, I agree with @AndyA in that soaking the planks and applying wet was the source of the problem. Not that it will help with this model, but for future hulls, I'd recommend investing in a plank bending tool. That way you can use far less water, and the bonus (if you're using a hot iron type plank bender) is that they'll cook a lot of the moisture out of the wood during the bending process. The challenge with wet planking is that the woods will all swell up, and it takes quite a while for the moisture to fully dry out of them. I have oak flooring in both levels of my home, and after 20+ years, I have joints that have opened up between some of those planks... even though they were factory kiln dried to a low moisture content. Calgary has atrociously dry winters, and so what little humidity still existed in that oak had further evaporated over time... shrunk... and cracks open up. But yeah... plank bending tool for the next hull. And congratulations for finding a workable solution to your existing hull.
Thanks sea deep. I did use a planking hot iron for areas that needed anything more than a gentle arc, but always after soaking in cold water overnight. I then pinned the planks on the frame and waited at least a day before glueing...but you're probably right saying that the inner moisture level of the wood was still quite high (even though it felt dry) relative to the later low humidity weather we've been having.

As it turns out, I have recently been doing some bending with the planking iron where I only 'wet' the surface rather than soak and have found it almost as effective. I've also done a few using a hot air gun. I'll keep this in mind for future builds, thanks.
 
I guess how you plan to finish the hull could also play a role. My experience is that if you only use wood stains then applying glue will prevent the stain from peneyrating the glue and you will see white lines.

I always only stain my models for a more natural look and for that purpose I use wood filler for such issues. Use one as close to the original plank colour and then the filler will not be seen after staining. If you look at my Victory model you will see how I used stain for a more natural look.

Trust this helps
I'm a bit fortunate in that my hull is going to painted (it's a fishing trawler), so I can fill with almost anything provided it is paintable. However the wheel house and decks are timber and will either be sealed in their original colour or stained and sealed, so I plan on being super careful with any filling or over-gluing that would spoil that type of finish.
 
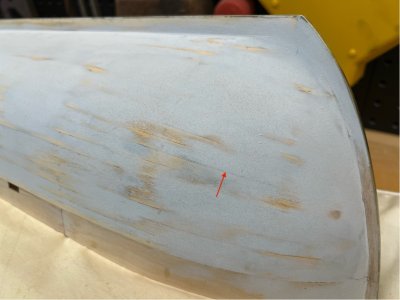
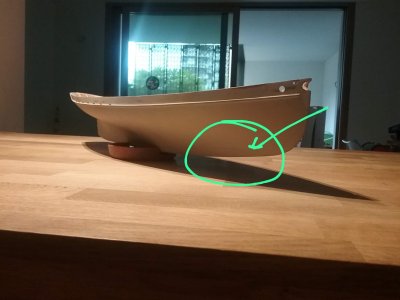
The sole effective method to stabilize the planking over the years and to achive a perfect smooth surface without evidence of coaming between the wooden strakes is to laminate a thin (30-50 g/m2) cloth o fiberglass on it. Once primed, you will get somethin' near to plastic moulded object. For the very semi-hull in my avatar, plank on bulkhead made, I adopted that solution. The same with my last completed project - the Americas cupper "Puritan", you can work out here on SOS. Cheers! Alberto
PS. I checked out that pic rappresenting a big shake in Puritan's planking before fiberglassing.

IMG-20240902-WA0001.jpg
 
Last edited:
Back
Top