• LUCZORAMA SHIPWRECK SCAVENGER HUNT GIVEAWAY. 4 Weeks of Fun • 1 Legendary Prize ((OcCre’s Fram Ship)) • Global Crew Welcome!
    **VIEW THREAD HERE**

A fibreglassing question...how to lay the fabric

Joined
Sep 3, 2021
Messages
138
Points
103

Location
Lake Macquarie, NSW, Australia
Hi,
I'm building Billing's Mary Ann, as an RC model, and it has been suggested that I should epoxy/fibreglass the hull to prevent future splitting of the planked hull (I had a recent post showing this problem). I’m seriously considering this (fabric is on order) but I have a question about how to lay the fabric.

My concern is at the stern. This hull has a lovely rounded stern (see photos below)…there is no transom with a hard edge to finish the fabric edge against. I plan to use a very fine fabric weight (30g/m or 0.88oz/yd).

I can see three potential options…
1) Do each side separately, with a join (or overlap??) at the centre of the stern
2) Try and do a wrap from bow to stern, around and back up the other side, ie wrap a single strip…I can’t see that going well though
3) Do it in three pieces…stern up to the prop shaft exit, then each side with a join/overlap.

I suspect that option 1, the conventional approach, is the most practical. I’m assuming that this weight of fabric is so thin that it will not be too difficult to either mould the shape without creases, and the resulting fabric overlap won’t be too hard to hide with appropriate filling and sanding after the epoxy coats.

I have very limited experience with epoxy other than simple gluing and coating the interior, have never used fabric. I’ve watched many YouTubes and other posts, but I’m not finding other examples with a rounded stern. I’ll probably make up a foam shape to run a practice on, but I’d appreciate thoughts from others who have coated a similar shaped hull.
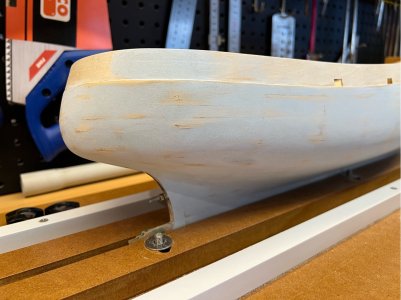
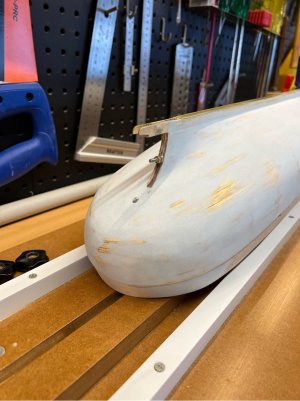
1725583175216.jpeg

1725583192756.jpeg

Thanks
 
First I'd go with option 1. Two piece and overlap.

This of course comes from my many years fiberglassing RC model aircraft'
However if I read your post I believe you are going to use epoxy?
Epoxy and I never got along very well as its thicker consistency tended to pull the lightweight fabric when applying.

All of mine were done with 3/4 oz cloth and POLYESTER resin. That's probably why I'm brain dead from the polyester fumes. :rolleyes:
My method was to lay the cloth then apply the resin by brush. For the first coat of resin I thinned the resin with ~ 10 % thinner.
Being thinned out you can brush the thinned resin onto the cloth with no pulling of the fabric. The thinned resin does take longer to cure than straight from the can consistency. Very little 'brushing' is required as the thinned resin really flows across the fabric.
After curing I would LIGHTLY sand off any strings that may be left and also sand the overlap. When sanding be careful to only sand down to the cloth and not through it. No course grit sandpaper at this point!
My second coat was brushed on full strength, allowed to cure and then repeated the sanding.This time I would sand the entire surface not just the strings etc, Again just down to the cloth and not through it.
Two cots of resin was all that was generally required and then I would spray on a heavy bodied primer which was then wet sanded down. Any remaining pin holes, dings etc. were filled with an automotive spotting filler. Again wet sanded most of the primer off resulting in a nice smooth surface ready for painting. Of course with model aircraft we were always concerned with weight, something which probably doesn't concern boats/ships.

I know others use epoxy but it never worked well for me. Also the polyester resulted in a much harder surface when full cured. IMHO
Some people can't stand to smell of polyester resin and it should be applied in a well ventilated area.
Hi rtibbs, thanks for the advice. I am planning on using epoxy, because I already have some, but also because I have read that it is stronger than polyester resin, particularly for the bond to wood. The epoxy I have doesn't 'feel' too thick, and it can also be thinned if needed...but that's something that I'll check out on a test piece first.

Do you think the fabric will mould to the shape of stern without needing any additional cuts?
It should. I always used .75 oz and moulded just fine.
 
I also used the .75 oz glass and it goes around corners very well. Make sure the epoxy you use is long cure (like 30 min) and work in small batches. Don't lay the epoxy on heavy. Pour some on where you will place the glass and them lay the glass down and pour a little more epoxy on top. Then use a piece of plastic (an old credit card works great) as a squeegee to move the epoxy around. Make sure the epoxy saturates the glass mat. Don't try to fill the weave with the epoxy. That you will do with a sandable primer.
 
Shape and cut out a slightly redundant template in one piece with some cotton fabric or other stuff opened just at the bow. Glass cloth will be adapting perfectly to hull's contour because of capillar tension if not too soaked. Cheers!
 
Last edited:
I have seen a Ladies Stocking/Panty hose used instead of cloth. This is stretched over the model so the opening is above the deck and the material is tied so it stretches to follow the hull. Resin is then applied once the material is in position.

Never tried it myself but I have seen excellent results from others work.
Thanks Nigel, the stocking idea appeals for its ability to conform to the shape, but I have doubts that it would significantly enhance the strength of the epoxy due to its stretchiness over short distances. I'm hoping to reduce the likelihood of the plankings separating at the edge joins, in addition to making it watertight. But it would be an interesting comparison test to do one day...glass fabric vs nylon stocking.
 
I have seen a Ladies Stocking/Panty hose used instead of cloth. This is stretched over the model so the opening is above the deck and the material is tied so it stretches to follow the hull. Resin is then applied once the material is in position.

Never tried it myself but I have seen excellent results from others work.

Thats a great idea Nigel, and would give a great result.
 
Pete,
This thread is truly interesting. I have done several fiberglass hulls in the distant past, but they were done as was done in the shipyard. A hull was made as a plug, then it was used to make a mold with gel coat first then glass and resin so more than one hull could be made. The mold was then used to make the hulls with gel coat followed by glass and resin. I did find that non-woven cloth worked better than woven material as the weave tended to show in a not so attractive way and creasing was never an issue. As you are just covering the hull with glass to waterproof, I am curious to see the appearance of having a layer of glass without gel coat. Please post photos for us to see as it could be a big help for anyone of us that wants to give it a try.

I'm with RTIbbs, go with resin made to be used with fiberglass. Outdoors is a good idea though.

Allan
 
Just one thought. You stated "I’ll probably make up a foam shape to run a practice on". In my experience foam and resin or epoxy do not work together well. The foam tends to melt. I would experiment on a piece of foam with the resin/epoxy before you go too far.

I also think the resin would be a better idea than the epoxy.

Rob
Polyester resin melts styrofoam. Epoxy resin does not. Also, epoxy is available in various viscosities. Lower viscosities products are used for this sort of laminating.
 
Hi,
I'm building Billing's Mary Ann, as an RC model, and it has been suggested that I should epoxy/fibreglass the hull to prevent future splitting of the planked hull (I had a recent post showing this problem). I’m seriously considering this (fabric is on order) but I have a question about how to lay the fabric.

My concern is at the stern. This hull has a lovely rounded stern (see photos below)…there is no transom with a hard edge to finish the fabric edge against. I plan to use a very fine fabric weight (30g/m or 0.88oz/yd).

I can see three potential options…
1) Do each side separately, with a join (or overlap??) at the centre of the stern
2) Try and do a wrap from bow to stern, around and back up the other side, ie wrap a single strip…I can’t see that going well though
3) Do it in three pieces…stern up to the prop shaft exit, then each side with a join/overlap.

I suspect that option 1, the conventional approach, is the most practical. I’m assuming that this weight of fabric is so thin that it will not be too difficult to either mould the shape without creases, and the resulting fabric overlap won’t be too hard to hide with appropriate filling and sanding after the epoxy coats.

I have very limited experience with epoxy other than simple gluing and coating the interior, have never used fabric. I’ve watched many YouTubes and other posts, but I’m not finding other examples with a rounded stern. I’ll probably make up a foam shape to run a practice on, but I’d appreciate thoughts from others who have coated a similar shaped hull.

View attachment 469539

View attachment 469540

Thanks
Cap'n Pete:
One possible problem here is that epoxy might not adhere well to the areas of the hull with fairing material, depending on what the fairing material is made of. On full-size boats, epoxy and fiberglass is laminated only over raw wood and previously epoxied surfaces. Fairing is usually done over the lamination. Laminations may fail on painted surfaces. Perhaps you could do a test patch to investigate adhesion. Fair winds!
 
I have seen a Ladies Stocking/Panty hose used instead of cloth. This is stretched over the model so the opening is above the deck and the material is tied so it stretches to follow the hull. Resin is then applied once the material is in position.

Never tried it myself but I have seen excellent results from others work.
That would be a good idea, except the fact WWII ended eighty yaers ago and glass is now available, cheap and more suitable than a polyester rag... ROTF
 
Thanks Nigel, the stocking idea appeals for its ability to conform to the shape, but I have doubts that it would significantly enhance the strength of the epoxy due to its stretchiness over short distances. I'm hoping to reduce the likelihood of the plankings separating at the edge joins, in addition to making it watertight. But it would be an interesting comparison test to do one day...glass fabric vs nylon stocking.

The glass covering is only there two consolidate and moisture proof the hull. The planking is the structural element.Planks spitting at their joins on a model is down to the changes in moisture content in the timber. The planks swell and contract if not sealed on both sides if not properly sealed on a working model.

If you have missed the joins with glue in any area, then the epoxy should soak into these cracks when you cover the model
 
I covered something similar and it worked out very well. Don't be afraid of overlapping fiberglass or adding pieces to fill towards the stern, it sands down to an invisible seam. I made a video on the fiberglass, resin and paint application, you can check it out here if you like. Good luck with the project!!

Jarod.


Hi,
I'm building Billing's Mary Ann, as an RC model, and it has been
 
From what I know about WWII there was a shortage of woman's stocking! Not sure if they had fiberglass cloth then?
Woman's stokings were made of silk, just like parachutes. That why they were hardly available. Polyester and poliammide (nylon) were intended as cheaper sobstitute of silk. Nylon was patented by Dupont in 1937, GRP in 1936.
 
From what I know about WWII there was a shortage of woman's stocking! Not sure if they had fiberglass cloth then?
Fiberglass fabric was introduced at an industrial expo in France in 1725. It's not to much of a stretch that in the ensuing years someone substituted fiberglass cloth for canvas in the old fashioned coating of canvas and white lead paint for cabin trunks and decks. In ww2 several uses for composites came forth with all sorts of plastics including Bakelite, and several fabrics.
 
Cap'n Pete:
One possible problem here is that epoxy might not adhere well to the areas of the hull with fairing material, depending on what the fairing material is made of. On full-size boats, epoxy and fiberglass is laminated only over raw wood and previously epoxied surfaces. Fairing is usually done over the lamination. Laminations may fail on painted surfaces. Perhaps you could do a test patch to investigate adhesion. Fair winds!
Thanks Andy. I was wondering about the filler...I think I need to test that as well. Although it adheres well to the wood, it is just a filler rather than a glue/filler mix. I may have to sand it back and expose more of the wood before adding the glass layer.
 
Back
Top