Hi, completely new to this hobby but I have been seduced by some of the amazing images I find on the web. I am a complete and utter novice and don't even know where to start. Well, actually that's a slight lie - I'm starting with an AL Jolie Brise kit. The first of many questions -which glue to use to stick metal to wood? I've tried superglues of different strengths and nothing held. Many thanks in anticipation.
-

Win a Free Custom Engraved Brass Coin!!!
As a way to introduce our brass coins to the community, we will raffle off a free coin during the month of August. Follow link ABOVE for instructions for entering.
-

PRE-ORDER SHIPS IN SCALE TODAY!
The beloved Ships in Scale Magazine is back and charting a new course for 2026!
Discover new skills, new techniques, and new inspirations in every issue.
NOTE THAT OUR FIRST ISSUE WILL BE JAN/FEB 2026
You are using an out of date browser. It may not display this or other websites correctly.
You should upgrade or use an alternative browser.
You should upgrade or use an alternative browser.
Epoxy is a good choice. Cyanoacrylates (super glues) can work but no matter what you try, be sure both the wood and metal are clean. Paint, oils from your hands, and other things can prohibit good bonding.which glue to use to stick metal to wood?
Allan
The quick answer is don't do it.how to glue painted surfaces to wood
Allan
welcome to the forums !
We just had this come up a short time ago for the brass on wood.
Firstly, as Allan said, both surfaces need to be clean
Second, you should scuff up the surface of the brass to be glued with some light sand paper. That gives the glue something to "grab".
Next, don't use the thin CA glue, you need to use the medium or thick glues. Unlike the thin glue, the thicker ones will fill a slight gap.
With painted surfaces, you need to remove the paint where the parts attach for the best glue joint.
Kurt Konrath
Kurt Konrath
Welcome aboard, and please do start a build log and post photos so we can see your issues.
The fine folks here are always eager to help out.
Have you tried doing a search on the ship kit, to see what others have done, often you can see if there are any problem areas to be aware of when you get along in the build.
The fine folks here are always eager to help out.
Have you tried doing a search on the ship kit, to see what others have done, often you can see if there are any problem areas to be aware of when you get along in the build.
- Joined
- Jun 29, 2024
- Messages
- 1,519
- Points
- 438

Metal parts should be secured with a mechanical fastener in addition to glue. A wire peg glued into both the metal part and a hole in the wood is sufficient. A set of small diameter (aka wire sized drills) and a pin vise to hold them should be part of your basic tool kit.
Roger
Roger
When gluing metal to anything I use 15 minute Araldite. Avoid those epoxy glues which come in two joined syringes - they pack up after being half used, but individual tubes don't. Just make sure you put the right caps back on the right tubes - been there, done that!
My friend you are in for a painful yet rewarding experience. Good luck and always ask a million questions.
Bill
Bill
- Joined
- Mar 17, 2019
- Messages
- 92
- Points
- 113

Welcome.Hi, completely new to this hobby but I have been seduced by some of the amazing images I find on the web. I am a complete and utter novice and don't even know where to start. Well, actually that's a slight lie - I'm starting with an AL Jolie Brise kit. The first of many questions -which glue to use to stick metal to wood? I've tried superglues of different strengths and nothing held. Many thanks in anticipation.
Pog these guys are the most knowledgeable group of ship model making people I know. You have come to the right place for help. I've been at this hobby for 6 years now, and I am but a rookie. Evety time I look at this forum or read through a book I learn something new.
good luck
Bill.
good luck
Bill.
Hello and welcome to the forum
Just take it real slow. I do 4 hours of research for 1 hour of actual work on the model. I read only enough about the ship's history to get the info I need to continue building. Decide exactly what era and what country you want to focus on.
Bill
Bill
- Joined
- Jan 23, 2021
- Messages
- 637
- Points
- 353

Welcome aboard!
Welcome Pog to the forums and greetings from Texas! Magic Mike
The quick answer is don't do it.You will be gluing wood to paint which the glue probably will not penetrate as happens when you glue wood to wood. When in doubt do test pieces to see what works best.
Allan
Roger's sound advice cannot be emphasized enough. Every piece should be either glued with a bare wood-to-wood joint or be otherwise mechanically fastened. This means with a metal pin or wooden peg in well-fitting drilled holes or, in some instances, even with a nail or screw. Many joints will be subject to surprisingly strong strains once the model starts to be rigged. This is especially true of eyebolts on masts and spars. Without a tenacious attachment, watching one joint pull apart while you are trying to fasten another will be maddening. Also keep in mind that many adhesives are much stronger in tension than they are in shear. They may hold if "pulled," but snap right off if bumped from the side. The mechanical fastening provides strength in to resist shear forces, and the increased surface area of the holes and pin provide additional adhesion surface for the joint. The mechanical fastening also permits joining parts with painted surfaces when the need arises.Metal parts should be secured with a mechanical fastener in addition to glue. A wire peg glued into both the metal part and a hole in the wood is sufficient. A set of small diameter (aka wire sized drills) and a pin vise to hold them should be part of your basic tool kit.
Roger
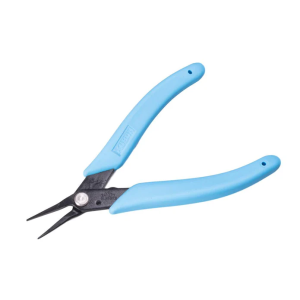
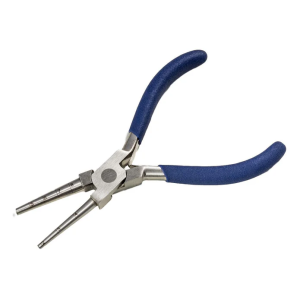
Your fastenings tool kit should include a pin vise, a set of numbered small bits, some (non-corroding) copper or brass wire for pin and eyebolt making, a jeweler's drawplate for making wooden pins, a cutter for the wire, a pair of quality needle-nosed pliers, and a stepped loop-forming pliers for making different sized eyebolts and similar fittings. You should only buy tools when you need them and then buy the best tools you can afford. Avoid impulse tool buying. (Do as I say, not as I do!) There is a wide range of quality and price, so you'll have to exercise your own judgment. Some of these tools can get expensive at the upper price points and are more in terms of quality than modelers really need, being designed for professional shop use. Beware of tools (and anything else!) from "hobby catalogs" like MicroMark and Model Expo. They have lots of interesting stuff in their catalogs and sometimes it's worth the price when they have big sales, but, generally speaking, your tool budget will be far better spent on a tool from one of the jewelry supply houses, dental or medical instrument suppliers, or eBay selling the same. Shop around to save money, but avoid the "Chineseium" stuff marketed to hobbyists.
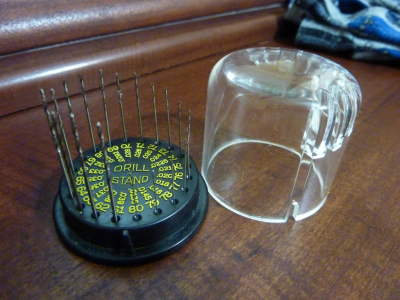
As for bits, I'd recommend starting with a Rogers bit set which comes in an indexed stand with a plastic protective cover. (Without the cover, if you drop the stand, I guarantee you'll be unable to find at least three of the bits that spill out all over the floor!) These bits are passible, but when you break one (as you will!) replace it with a quality bit from a machinists' or professional jewelers' supply house, not one of the "hobby catalogs." The good ones cost less in the long run because they last longer and break less often. I buy mine in packages of ten or a dozen, which is more economical. The point of buying the Rogers set in the beginning is that you get the nifty covered drill index with it.
Buyer Beware: Oddly, MicroMark is selling the Rogers bit set for $30.00 or with some sale offer. (https://micromark.com/products/The-Rogers-Drill-Bit-Set-61-80-Set-of-20) Amazon, on the other hand, is selling the Rogers bit set for $73.00. (https://www.amazon.ca/Excel-Assorted-Drill-Stand-20pcs/dp/B0006N7374) I have no idea what the reason for this discrepancy may be. I have seen knock-off "Rogers bit sets" for sale that are obvious counterfeits. The higher price for a genuine Rogers set is justified by the higher quality of the Made in USA (or used to be) Rogers brand bits in the bit index case. Quality small-sized, high-tolerance tooling is always expensive and the cut rate stuff if often next to useless. You might spring for the $30.00 set and if the bits are crappy, you can always use the index case and replace the lousy bits you use often with good ones from one of the machinists' tool houses.
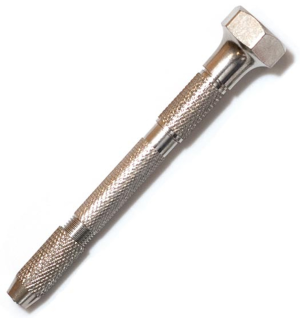
There are many types of pin vises and drills. One like this is inexpensive and plenty good for starters. There are two double-ended collets inside the body of this style vise so that the properly sized collet is provided for the entire range of #61 to #80 twist drill bits.
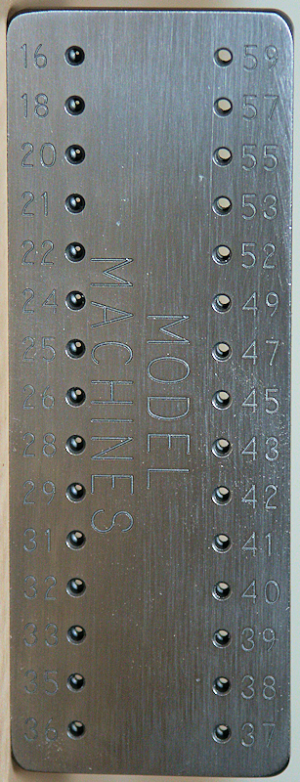
Drawplates are essential modeling tools for making mini-dowels and sizing wire. Good ones aren't cheap. Professional jewelers' supply houses like Otto Frei offer a wide range of sizes and shapes. (https://www.ottofrei.com/search?q=draw+plates) Get the best your wallet can accommodate up to the three figures. Above that is probably more quality than you'll need for modeling purposes. In the fine size range, Byrnes Model Machines makes an excellent one. https://byrnesmodelmachines.com/drawplate5.html
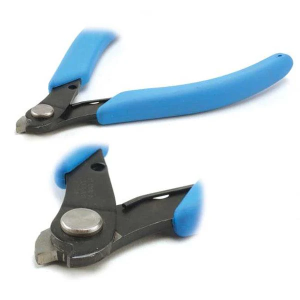
Hard wire cutters: https://www.ottofrei.com/products/xuron-2193-hard-wire-ring-shank-cutters
Needle-nosed pliers: https://www.ottofrei.com/products/xuron-450-tweezer-nose-needle-nose-pliers
Stepped loop-forming pliers: https://www.ottofrei.com/products/round-step-looping-pliers
(Sorry the pictures were so big. I couldn't figure how to downsize them on this platform.)
Last edited:
- Joined
- Jun 29, 2024
- Messages
- 1,519
- Points
- 438

Bob, sage advice from you as always! I get MicroMark catalogs from time to time but have not bought anything from them for a long time. When I saw them advertising Rogers drill bits, I couldn’t help but wondering if they were just using it in a generic, if misleading sense, like Kleenex. As an old guy most of my tools were bought before the Chinese invasion.
Roger
Roger
The original bits were pretty good quality. Havig choices is good. Jobber bits from industrial suppliers such as McMaster Carr are as good or better and with more choices. Wire gage sizes are run from about $1.7 to $5 depending on the size drill and available in black oxide high speed, stainless, and uncoated highspeed steel.
Allan
Allan
Last edited:
Bob. I'm 76 yrs old, big pictures are fine, trust me.Roger's sound advice cannot be emphasized enough. Every piece should be either glued with a bare wood-to-wood joint or be otherwise mechanically fastened. This means with a metal pin or wooden peg in well-fitting drilled holes or, in some instances, even with a nail or screw. Many joints will be subject to surprisingly strong strains once the model starts to be rigged. This is especially true of eyebolts on masts and spars. Without a tenacious attachment, watching one joint pull apart while you are trying to fasten another will be maddening. Also keep in mind that many adhesives are much stronger in tension than they are in shear. They may hold if "pulled," but snap right off if bumped from the side. The mechanical fastening provides strength in to resist shear forces, and the increased surface area of the holes and pin provide additional adhesion surface for the joint. The mechanical fastening also permits joining parts with painted surfaces when the need arises.
Your fastenings tool kit should include a pin vise, a set of numbered small bits, some (non-corroding) copper or brass wire for pin and eyebolt making, a jeweler's drawplate for making wooden pins, a cutter for the wire, a pair of quality needle-nosed pliers, and a stepped loop-forming pliers for making different sized eyebolts and similar fittings. You should only buy tools when you need them and then buy the best tools you can afford. Avoid impulse tool buying. (Do as I say, not as I do!) There is a wide range of quality and price, so you'll have to exercise your own judgment. Some of these tools can get expensive at the upper price points and are more in terms of quality than modelers really need, being designed for professional shop use. Beware of tools (and anything else!) from "hobby catalogs" like MicroMark and Model Expo. They have lots of interesting stuff in their catalogs and sometimes it's worth the price when they have big sales, but, generally speaking, your tool budget will be far better spent on a tool from one of the jewelry supply houses, dental or medical instrument suppliers, or eBay selling the same. Shop around to save money, but avoid the "Chineseium" stuff marketed to hobbyists.
As for bits, I'd recommend starting with a Rogers bit set which comes in an indexed stand with a plastic protective cover. (Without the cover, if you drop the stand, I guarantee you'll be unable to find at least three of the bits that spill out all over the floor!) These bits are passible, but when you break one (as you will!) replace it with a quality bit from a machinists' or professional jewelers' supply house, not one of the "hobby catalogs." The good ones cost less in the long run because they last longer and break less often. I buy mine in packages of ten or a dozen, which is more economical. The point of buying the Rogers set in the beginning is that you get the nifty covered drill index with it.
Buyer Beware: Oddly, MicroMark is selling the Rogers bit set for $30.00 or with some sale offer. (https://micromark.com/products/The-Rogers-Drill-Bit-Set-61-80-Set-of-20) Amazon, on the other hand, is selling the Rogers bit set for $73.00. (https://www.amazon.ca/Excel-Assorted-Drill-Stand-20pcs/dp/B0006N7374) I have no idea what the reason for this discrepancy may be. I have seen knock-off "Rogers bit sets" for sale that are obvious counterfeits. The higher price for a genuine Rogers set is justified by the higher quality of the Made in USA (or used to be) Rogers brand bits in the bit index case. Quality small-sized, high-tolerance tooling is always expensive and the cut rate stuff if often next to useless. You might spring for the $30.00 set and if the bits are crappy, you can always use the index case and replace the lousy bits you use often with good ones from one of the machinists' tool houses.
View attachment 500661
There are many types of pin vises and drills. One like this is inexpensive and plenty good for starters. There are two double-ended collets inside the body of this style vise so that the properly sized collet is provided for the entire range of #61 to #80 twist drill bits.
View attachment 500662
Drawplates are essential modeling tools for making mini-dowels and sizing wire. Good ones aren't cheap. Professional jewelers' supply houses like Otto Frei offer a wide range of sizes and shapes. (https://www.ottofrei.com/search?q=draw+plates) Get the best your wallet can accommodate up to the three figures. Above that is probably more quality than you'll need for modeling purposes. In the fine size range, Byrnes Model Machines makes an excellent one. https://byrnesmodelmachines.com/drawplate5.html
View attachment 500667
Hard wire cutters: https://www.ottofrei.com/products/xuron-2193-hard-wire-ring-shank-cutters
View attachment 500668
Needle-nosed pliers: https://www.ottofrei.com/products/xuron-450-tweezer-nose-needle-nose-pliers
View attachment 500669
Stepped loop-forming pliers: https://www.ottofrei.com/products/round-step-looping-pliers
View attachment 500670
(Sorry the pictures were so big. I couldn't figure how to downsize them on this platform.)
Yep, I'll bet that's the case. I've seen bit sets that look exactly like the original Rogers' ones, except that they have different labels. One is by an outfit called "Gyros." Amazon prices it at $51.58. https://www.amazon.ca/Gyros-45-1201...b33-9b69-b6d6831ab3c7&pd_rd_i=B000SKRR76&th=1 as well as only $19,00 ... same thing. Go figure! https://www.amazon.com/Storage-Carb...&hvlocphy=&hvtargid=pla-4584413735899210&th=1Bob, sage advice from you as always! I get MicroMark catalogs from time to time but have not bought anything from them for a long time. When I saw them advertising Rogers drill bits, I couldn’t help but wondering if they were just using it in a generic, if misleading sense, like Kleenex. As an old guy most of my tools were bought before the Chinese invasion.
Roger
I caught a sale years ago and bought tubes of a dozen twist drill bits in every size between #61 and #80 and those keep my Rogers drill index filled, but I can't see paying $75.00 for one. Just for grins, I checked TEMU and, unsurprisingly they have a set with the same range of numbered bits, and index, and a pin vise drill for only $6.29. At that price, you don't have to be picky. Better get them before there's some kind of tariff on them and the price goes up, though!
Last edited:


