Kingfisher 1770 1:48 POF

Over the years, my mistake box has more parts than all my models I have made put together. Your model is outstanding and it is great for us to see how you fix things up. We all have learned so much following your build log. Thanks
My thanks, Geoff!

Clamps are friends, but also enemies. I cannot tell you how many times the work was partially destroyed because of a slipped-out clamp. But you have recovered well.
Thanks for checking in on me, Jim!

As always, great work!! The gallery is just awesome!
Much appreciated, Sergey!

I look forward to seeing how you stain/color/paint/decorate this area!!
Me too, Brad. Me too!
 
Wow. It’s all been said by others. I feel your breakage pain and wonder why it’s always a part that has required so much time to fabricate that gets lost or breaks.
I wouldn’t be surprised if the repaired version is better than the first.
Michael

Take no notice of my flag change, I’m an Australian currently in Austria, Salzburg.
Thanks, Michael!
 
Hi Paul,

it seems you did the caprail orthogonal to the taffrail (as sooo many) but it should "follow the line of the hull" ... damn hard to explain for me ... I try with an image.

View attachment 506042

cheers Dirk
Thank you for this post, Dirk. I am always open to criticism and correction.

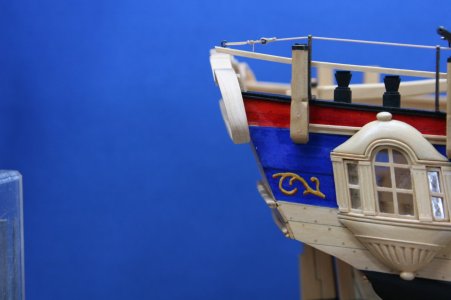
I did attempt to install the capping rail parallel with the keel of the ship. As I look at it again it seems that I am off a bit - but it is definitely not perpendicular (90 degrees) to the face of the taffrail. That would have been far easier! But I did TRY to do it the correct way!

IMG_0860.JPG

IMG_0861.JPG
 
I'd say that's pretty close following that line.

On the other end of the talent scale. I built my first balsa wood airplane this past week. I have never worked with balsa before. I'm more used to oak, walnut, cherry, and other hardwoods.

This balsa model project suffered a lot of broken pieces as I had to learn to "finger pinch" instead of "whole hand pinch. Several times while holding a piece to dry with fingers I'd unknowingly squeeze the opposite side and ...snap! For awhile I would go from one snap to another! I'm working on a second one now (Sopwith by Guillow). I learned a lot from that ham-handed work last week.

I guess I need to practice patting my head and rubbing my tummy at the same time?
 
Last edited:
I'd say that's pretty close following that line.

On the other end of the talent scale. I built my first balsa wood airplane this past week. I have never worked with balsa before. I'm more used to oak, walnut, cherry, and other hardwoods.

This balsa model project suffered a lot of broken pieces as I had to learn to "finger pinch" instead of "whole hand pinch. Several times while holding a piece to dry with fingers I'd unknowingly squeeze the opposite side and ...snap! For awhile I would go from one snap to another! I'm working on a second one now (Sopwith by Guillow). I learned a lot from that ham-handed work last week.

I guess I need to practice patting my head and rubbing my tummy at the same time?
Did you happen to use wax paper and a cork board as your base?
 
And during that single week I managed to snap off the end of the quarter rail, broke off one swivel gun, and also somehow lost two of the handles on the ship's wheel.
:eek: :eek: - swear jar full……..no doubt!!
Hello Friends (sorry for the overly chatty post that follows),

About a week ago my attention turned to the structures of the stern. And during that single week I managed to snap off the end of the quarter rail, broke off one swivel gun, and also somehow lost two of the handles on the ship's wheel. How the swivel gun and ship's wheel handles were broken off I cannot say - but a clamp flipped off of what it was holding accounting for the destruction of the quarter rail.

Let's just say I need to be more careful.

On the stern of the ship the upper and lower counters, a few molding pieces, and the gallery lights (windows) had been roughed in previously. It was now time to add the upper structures (tafferel) along with the quarter pieces that flank the gallery. These last elements are festooned with carvings depicting mythological creatures and such.

My guiding resource (The Fully Framed Model - Antscherl and Herbert) largely depicts the Pegasus. As a result, there are certain Pegasusy features to my model. But to continue to refer to my ship as the Kingfisher it seemed that I would now need to embrace the unique features of THAT swan class ship - particularly here at the stern where she deviates significantly from what is shown in TFFM.

I do have copies of the Kingfisher NMM plans - but to say they are difficult for me to interpret is an understatement. To that end I will exercise a certain amount of creative license. Mea culpa.

The stern of the ship is curved port to starboard so the tafferel obviously needs to reflect that shape. I had hoped this would be a time when I could use the kit-supplied parts but for some reason the tafferel components were offered flat. I did try to bend the kit parts but failed.

My solution was to make up my own tafferel using a curved form and thin layers of boxwood:

View attachment 505389

View attachment 505390

View attachment 505391

The NMM drawings clearly show a capping rail covering the top and sides of the tafferel - but it is no small request to fabricate this molding on such an ornate element. Making matters worse, the capping rail also needed to reflect the curvature of the tafferel left to right.

I used some overly wide left-over boxwood from the kit and carefully pieced together the rail:

View attachment 505392

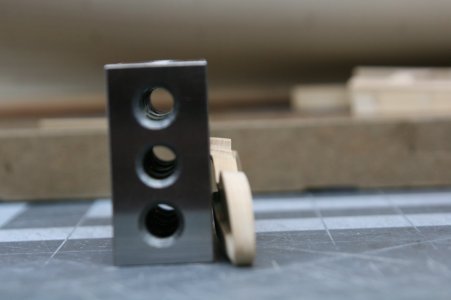
Temporarily in place so that I could place the rail parallel to the keel (and moments before the quarter rail was broken...):

View attachment 505393

And now with the capping rail cleaned up:

View attachment 505394

On the inboard side:

View attachment 505395

And from above:

View attachment 505396

And now just sitting loosely in place for a photo:

View attachment 505397

View attachment 505398

View attachment 505399

I can see from these photos that I need to increase the camber of the lower edge of the tafferel.

To be continued...
Good afternoon Paul. Very clever construction of the tafferel. As for the cap rail that is extraordinary - Impressive scratch building. I’m very happy to hear I’m not the only one to break fitted parts which took a long time to build. I feel so much better now.ROTF.Cheers Grant
 
Thank you for this post, Dirk. I am always open to criticism and correction.

I did attempt to install the capping rail parallel with the keel of the ship. As I look at it again it seems that I am off a bit - but it is definitely not perpendicular (90 degrees) to the face of the taffrail. That would have been far easier! But I did TRY to do it the correct way!

View attachment 506090

View attachment 506091
Looks mighty close to me Paul. Nice !
 
Well, it's time for something new.

Ship modeling asks a lot of us: learning how to read plans, learning a new lexicon, working in wood / metal / textiles / plastic, working at drastically reduced scales... on and on it goes. In the case of the two models I have built/am building (Vasa and Kingfisher) there are also decorative elements (wood carvings). On the Vasa at 1:64 scale I was happy to use the metal castings and paint them in a color scheme I took from the 1:10 model at the Vasa Museum.

On the Kingfisher there are many fewer carvings (over-against the Vasa), but the swan class ships were still rather ornate given their small size and utilitarian function. I chose to try my hand at carving - others might choose 3D modeling with subsequent printing or CNC milling. I suspect with adequate training and experience the best results would come about with the 3D modeling approach. But working with my hands (not my computer) is the part of the hobby I am drawn to.

Anyway, this is my first attempt at wood carving. Of course, I searched far and wide on our forum (and elsewhere) trying to pick up whatever I could learn from others. Some prefer chisel/gouge carving, others prefer handpiece carving. Some use both. Notably (here on our forum) I found the work of @Maarten, @Ptèr, and @Steef66 to be quite helpful. Of course, Ivan has set the standard, but he only shows the finished result (when you have a museum dedicated to your work you get to do whatever you want :)). In addition, Bill Short has written an excellent tutorial on handpiece carving that I would commend to you (a link can be found with the advertiser's banners).

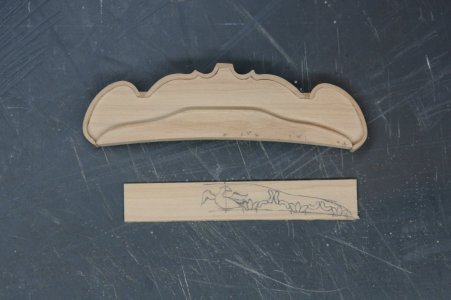
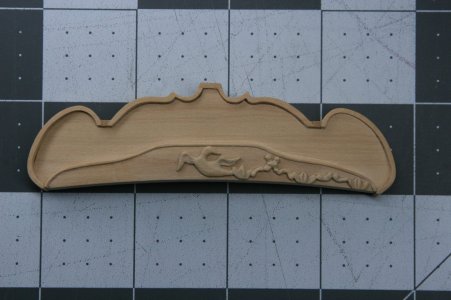
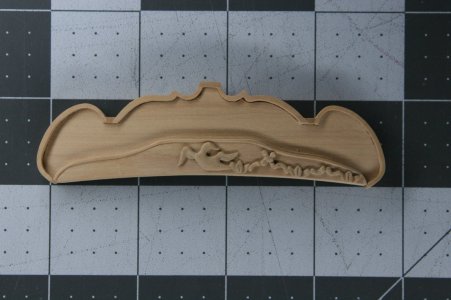
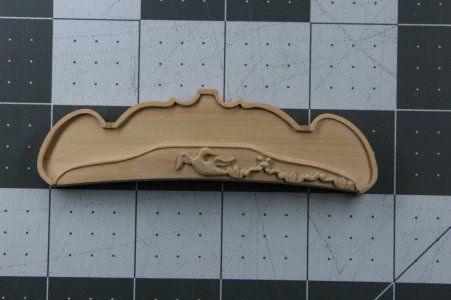
After a bit of practice on scrap pieces I took a shot at the decoration on the lower portion of the tafferel. It is a relief carving of a bird (presumably a Kingfisher bird) and some leaves and other swirly-gigs.

IMG_0865.JPG

IMG_0866.JPG

IMG_0867.JPG

The current state of things under different lightings:

IMG_0870.JPG

IMG_0872.JPG

IMG_0874.JPG

IMG_0876.JPG

I'll need to get better ROTF...

But it was fun to work on this piece, so I think I keep at it for a while longer and see if I can learn this new skill.

Thanks for stopping by!
 
Well, it's time for something new.

Ship modeling asks a lot of us: learning how to read plans, learning a new lexicon, working in wood / metal / textiles / plastic, working at drastically reduced scales... on and on it goes. In the case of the two models I have built/am building (Vasa and Kingfisher) there are also decorative elements (wood carvings). On the Vasa at 1:64 scale I was happy to use the metal castings and paint them in a color scheme I took from the 1:10 model at the Vasa Museum.

On the Kingfisher there are many fewer carvings (over-against the Vasa), but the swan class ships were still rather ornate given their small size and utilitarian function. I chose to try my hand at carving - others might choose 3D modeling with subsequent printing or CNC milling. I suspect with adequate training and experience the best results would come about with the 3D modeling approach. But working with my hands (not my computer) is the part of the hobby I am drawn to.

Anyway, this is my first attempt at wood carving. Of course, I searched far and wide on our forum (and elsewhere) trying to pick up whatever I could learn from others. Some prefer chisel/gouge carving, others prefer handpiece carving. Some use both. Notably (here on our forum) I found the work of @Maarten, @Ptèr, and @Steef66 to be quite helpful. Of course, Ivan has set the standard, but he only shows the finished result (when you have a museum dedicated to your work you get to do whatever you want :)). In addition, Bill Short has written an excellent tutorial on handpiece carving that I would commend to you (a link can be found with the advertiser's banners).

After a bit of practice on scrap pieces I took a shot at the decoration on the lower portion of the tafferel. It is a relief carving of a bird (presumably a Kingfisher bird) and some leaves and other swirly-gigs.

View attachment 507091

View attachment 507092

View attachment 507093

The current state of things under different lightings:

View attachment 507094

View attachment 507095

View attachment 507096

View attachment 507097

I'll need to get better ROTF...

But it was fun to work on this piece, so I think I keep at it for a while longer and see if I can learn this new skill.

Thanks for stopping by!
That’s looking good, Paul. Very clear: a bird with nicely shaped wings.
Regards, Peter
 
Not bad for a first attempt. What did you use? Chisel or rotary carving?

Did you ever visit or see this one? https://shipsofscale.com/sosforums/threads/an-easy-introduction-to-making-wood-ornaments-by-stephan-kertész-steef66.16094/#post-419508
Mostly rotary carving with cutting bits but also with sanding bits (white stones). I used a few chisels (and XActo) to clean up some junctions. The details are lacking, and I found it's hard to control the handpiece in some places. I ordered some different carving bits (flame shaped) but those need to travel from Ali.

I saw that tutorial but forgot about it. I'll check it out again. I'd be happy to hear your suggestions for improving...
 
After a career of shaping crowns and fillings, I would imagine that rotary handpieces would feel right at home in your hands.

That carving is beautiful. I wish you were my dentist!
Thanks, Russ. Unfortunately, I'm an orthodontist so shaping fillings and crowns is about 35 years ago. But your point is well-taken - I feel very comfortable holding a handpiece and doing 3D shaping. I just need to figure out this new medium (wood).
 
Mostly rotary carving with cutting bits but also with sanding bits (white stones). I used a few chisels (and XActo) to clean up some junctions. The details are lacking, and I found it's hard to control the handpiece in some places. I ordered some different carving bits (flame shaped) but those need to travel from Ali.

I saw that tutorial but forgot about it. I'll check it out again. I'd be happy to hear your suggestions for improving...
The 7901 dental bur is perfect for detail. It is a finishing bur and it will not be jumping like a normal bur, perfect for the last details. And don't be afraid to go deep in your carving. A piece like yours can be made of multiple pieces of wood. So mess things up is no problem. Practise and trying things. I will see if I can give an example of the leafs. But like I said, not bad at all.
 
Back
Top