Air Brush / Paint brush

Joined
Dec 23, 2024
Messages
86
Points
58

Folks,
I am seeking your knowledge re: using an air brush against using paint brushes please.
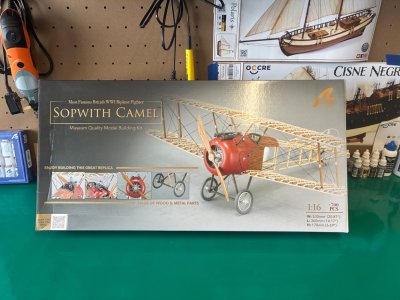
I am about to embark on building Artesania Latinas Sopwith Camel biplane which has some parts that will need painting.
Do I purchase an Air Brush kit to carry out the painting or do I stick to conventional paint brushes. I believe an air brush kit can be bought at a reasonable price on eBay.
But I have never used one before so would need a bit of practice before committing to paint the aircraft parts, plus I would imagine it uses a lot more paint and you would get a lot of wastage therefore I would need to purchase more paint.
Maybe I am wrong.
What are your thoughts please.
Dennis
 
I have no experience building this kit, but from pictures it appears that is intended to be finished without its fabric cover in order to show the wooden structure.

If I am correct, then why bother with an airbrush? The remaining parts such a the engine cowling can be easily painted with a brush.

If on the other hand you intend to cover it with Silkspan then an air brush would be ideal; first for spraying water to shrink the fabric then later to paint it.

Roger
 
You can do a proper paint job with brushes, if you use correct brushes.

An airbrush is not hard to learn to use, just need practice and a good compressor. Use of canned air with an airbrush is a waste of time, as it causes pressure to change coming out of can as it is used and gets cooled.
Thanks Kurt, I know nothing about airbrush painting, so avoid cheap canned air kits but only use a kit with a compressor. Makes sense.
Question now is what constitutes GOOD paint brushes, do you go for the most expensive or is a guide for good and bad brushes ?
 
I have no experience building this kit, but from pictures it appears that is intended to be finished without its fabric cover in order to show the wooden structure.

If I am correct, then why bother with an airbrush? The remaining parts such a the engine cowling can be easily painted with a brush.

If on the other hand you intend to cover it with Silkspan then an air brush would be ideal; first for spraying water to shrink the fabric then later to paint it.

Roger
Hi Roger,
No the kit is not intended to be covered the build is meant to be with all the spars and bodywork exposed as per the attached photo.

IMG_3854.jpeg
 
From the box art it doesn't appear there are many parts requiring painting. You may be able to avoid the expense and learning curve of an airbrush and compressor by using cans of spray paint from a local hardware store. The machine guns can be painted by hand and the cowl sprayed a shade of red.
 
From the box art it doesn't appear there are many parts requiring painting. You may be able to avoid the expense and learning curve of an airbrush and compressor by using cans of spray paint from a local hardware store. The machine guns can be painted by hand and the cowl sprayed a shade of red.
Hi Quint,
Thanks for the reply, I hear what you say, but anything spray painted does look the business. I also know you can get quite good at using spray cans with practice.
If I go the route of an air spray kit that will do for future builds as well when I need painting to be done. I don’t relish using paint brushes, even expensive good ones.
For this hobby I have bought lots of new small tools so a few pounds for an air spray kit will not break the bank.
But thanks for your thoughts and taking the time to post.
Regards
Dennis
 
a few pounds for an air spray kit will not break the bank...

...but it might break your heart. A cheap airbrush is as much fun as shaving in cold water with a disposable razor and no soap.

In the early 1980s I had a hankering to paint the Luftwaffe camouglage patterns on my plastic aircraft models. Modelling was a solitary vice back then with only the occasional cryptic article in the Airfix Magazine to guide me but I knew I needed to spray paint those misty blue aircraft. I bought a cheap Humbrol external mix spray gun and a can of propellant, later superseded by a lorry tyre inflated to 'bursting point and then let a bit of air out'. The cheap tool was almost as hopeless as my optimistic ignorance and after some months of trying to get it to work properly' I threw it away and went back to the prehistoric hairy ended stick method. All I accomplished was paint on the carpet, desk, curtains, fumes everywhere and half a dozed ruined kits.

Twenty years later, I had found a club with one or two members who used airbrushes and whose models were jaw-droppingly good. They advised me to get the proper gear but I didn't want to spend much on painting equipment - I'd rather buy more kits. I bought a cheapish Badger airbrush and a compressor that could have driven a road drill! Well, how was I to know that compressors came in small sizes? The Badger wasn't a bad tool but it wasn't designed to be easy to use and was very difficult to keep clean. I did manage to paint some models with it but it was always trouble. It would suffer complete stoppages over a speck of dust, it splattered, orange peeled, spidered, leaked, blew back spectacularly and I became reluctant to use it at all.

A year or so later I saw a demonstration at a model show of an Iwata airbrush and associated compressor. Oh my! In five minutes I learned so much from simply watching how it was done. Carried away by the excitement and carrying my credit card (always dangerous at a show) I bought the brush and the compressor, a cleaning kit, hose, and all the optional extras. Iwata are top quality tools from Japan. Now I was shaving with a warm katana! I had made my bank account hemorrhage, but this precision tool was an absolute joy to use. It took some weeks to really get the hang of it but my models began to look like competition quality.

Of course, it had limitations as all tools do. I always wanted finer and finer lines and the nozzle was very small and required a spanner to remove it. This was fiddly for my big fingers and I spent many unhappy hours looking for the thing on the carpet. One time I gave up and decided to send away for another one, only to find it in my shoe when I stood up and it pieced my foot. I had occasional problems due to my inability to keep it as clean as was needed. It struggled to spray an even, wide pattern which I wanted for applying the final 'varnish' and sometimes choked on primer.

Being too stupid to learn from my experiences to this point, I thought it would be a good idea to buy a cheap Chinese knock off just for priming and finishing. I used that thing a couple of times and then threw it out. It had air-leaks around the poorly cut threads, the action was 'crunchy' the chromed finish was incomplete making it very difficult to clean. Trash.

At another model show some time later, I saw the Harder and Steenbeck range of airbrushes demonstrated. This is German Tech from the land of Leica, and it was a tad more expensive than the Iwata. However, it had been designed not only to deliver a 'good shave' but to be as pleasant to use as possible, now I’m shaving with hot towels and soap. The nozzle for example, is about a centimeter long and 10mm in diameter, easy to hold, easy to clean. Of course the INTERNAL diameter is tiny, and I own needle and nozzle sets in 0.15mm, 0.2mm and 0.4mm for different purposes which is a lot better than owning three airbrushes. I use the 0.15 for detail work, the 0.2 for general purposes and the 0.4 for primer and varnish on plastic kits and for general painting on wooden kits. Swapping over takes seconds.

I can strip my H&S airbrush for cleaning, without tools and blindfold, in about five seconds. (Ex-military, I just had to try it. ;) ) Cleaning takes 30 seconds and reassembly about ten. A clean airbrush is a reliable airbrush. I can use it for hours without cramping. It sprays perfectly all the time and the only problem with it is that there's a new and improved model just been released, which I will happily spend a small fortune on as soon as I can scrape up the readies.

TLDR? As with all tools, but ESPECIALLY with precision equipment like cameras, razors, parachutes and airbrushes, always buy the best that you can afford.
 
Last edited:
The air brush is only as good as the air source. You need a reliable source of clean, dry air delivered at a controlled pressure usually 25 -30 psi. Ideally, this is a compressor with air storage tank, pressure regulator, and moisture trap.

There are other solutions; canned air, portable tanks filled at your local gas station, even a car tire. None of these are recommended.

There are also air brushes that have a very small built in air tank. I do not know if or how these work.

This kit is by my scratch building standards, quite expensive. Unless you have a foolproof air brushing system that you have thoroughly tested, don’t risk ruining it with a system that dies or sputters while painting.

Roger

Smithy’s post that arrived while I was typing says it better than mine does.
 
Last edited:
The master craftsmen of yesteryear achieved amazing results with what we would consider to be primitive paints and sable brushes. I have nothing against airbrushing - I have in fact done a lot of paint-spraying in the past - but in a domestic setting you have to be prepared for the compressor noise, the inevitable dust and -depending on your choice of paint - the smell. I think these are all important considerations, as is the time you will spend messing with an airbrush rather than working on your model.
 
the time you will spend messing with an airbrush rather than working on your model.

That is very true. It takes time to master and for wooden models only, may not be worth the money, time and space it will cost you.

Dust and smell aren't a problem though, as it's quite easy to build a spray bay to extract both. (Spraying indoors without extraction is just about slow suicide in my opinion.)
 
Last edited:
Roger, Alan and Smithy, thanks guys for your contributions.
Smithy, I just died laughing at your recollections and your many tries with different makes. Ever thought of writing a book ?

Between you all you have made stop and think. Painting on my model is a little way off at the moment but I am giving it lots of thought.
Thanks guys
 
Smithy, I just died laughing at your recollections and your many tries with different makes. Ever thought of writing a book ?

I aim to make people spit coffee into their keyboards. ROTF I have written some books, with other people, but I doubt that you've read any of them. There was the bestselling 'Victor K2 Maintenance Procedures' and the laugh a minute, 'Hawk Safety and Maintenance Notes (Simple English Version)' which nearly won the Booker Prize, except for not being entered. ;)
I'm building an Avro Anson with a log on here and I'll be airbrushing that soon-ish. I'll make a point of describing my painting procedures because the subject often comes up.
 
Last edited:
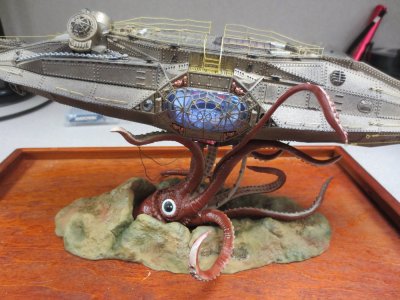
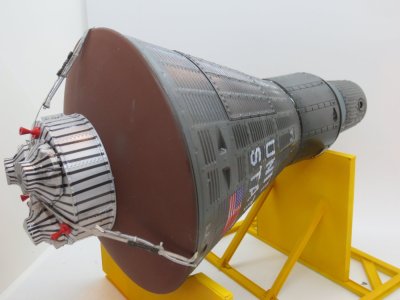
As the owner of 2 Iwata air brushes a compressor and a spraybooth, my opinion for this Sopwish is to just use a rattle can paint like Rustoleum. It come in a amazing selection of colors and can get you a great finish on that cowling. Here is a mercury capsule heat shield and the submarine Nautilus both painted with Rustoleum directly from the can.

IMG_2447.JPGIMG_1020.JPG

As Smithy said if you choose a airbrush at a later point, buy a good one. There is a you tube series by Paul Budzik that I highly recommend to anyone thinking of getting an airbush (the rest of his videos are well worth watching also!). As an aside an alternative to a compressor is a tank of nitrogen or carbon dioxide from a compressed air supplier which they can replace as needed. One tank will last a very long time.

Rob

 
What they said." There's no such thing as an "inexpensive" airbrush system. Close-tolerance precision tools are always expensive, and bargain-basement versions are almost always a waste of money. Regardless of what the salesmen tell you, it is near impossible to get any sort of scale model quality paint finish out of a "rattle can." Plastic spray nozzles, as much as they've been improved over time, are inherently incapable of delivering the same level of even, controllable, application a good airbrush can. One does need to learn to use an airbrush, but if you have a decent one, it's not a difficult thing to master if you can read and follow directions. I am always somewhat mystified by the frequent trepidation expressed about learning to use an airbrush, expecially the double-action models. Just fill the thing with water and play with it spraying the water on some absorbent cardboard or paper toweling until you get the hang of it.

Practical tip on buying airbrushes: Check the manufacturers' direct online purchase websites. These frequently will have discounts and package deals and are generally the least expensive sources. Notably, some manufacturers offer "seconds" which will only have cosmetic defects at substantial discounts. If you can live with a small scratch on the handle, you can often cut the price by a third to a half!

The same goes for paintbrushes. Caring for expensive brushes is a necessary skill which many seem to ignore. In my experience, there are instances where the use of a brush is dictated and others where an airbrush is the better tool, so one actually needs both if they don't want to be limited by their tools in creating the best model they can.

The one thing that is seemingly most ignored is paint. If one masters conditioning their own paints and other coatings, they can easily get as good a brushed finish as they can a sprayed one. At this time, given the "dumbing down" of canned paints and coatings due to (often overblown) "environmental concerns," many serious miniaturists have gone to high quality tubed artists' oils and acrylics which they condition for brushing and spraying. Not only does this enable using the finest pigments and an infinite range of custom colors but also effects a substantial savings in materials costs over tiny bottles of "pre-mixed" hobby paint. Whether one is using an airbrush or a bristle brush, achieving a quality finish is going require conditioning the coating material to the proper consistency for scale application. By adjusting the amount of thinning, retarding, or accelerating agents in your coating, its consistency, "leveling" characteristics, and "drying" or curing rate can be easily adjusted to suit the requirements of your job.
 
Last edited:
Back
Top