• Win a Free Custom Engraved Brass Coin!!!
    As a way to introduce our brass coins to the community, we will raffle off a free coin during the month of August. Follow link ABOVE for instructions for entering.

Constructing the Building Board

Joined
Aug 4, 2023
Messages
11
Points
8

This will be my first attempt at scratch building. The project is the Hayling Hoy using David Antscherl's plans and book. I'm definitely in the planning stage, gathering materials and information. Regarding the building board, what type of adhesive do you use to stick the plans on the board. I have made several copies of the plans and want to copy on the board to assist with most aspects of the build. But I don't want the plans to stretch or alter and it needs to be perfectly flat. Is there a specific glue type I should be using?

Thanks,
Dave
 
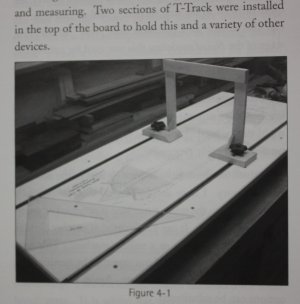
Further to your question about attaching the plans to the building board, the board itself can be a huge help in the construction of a right side up build. The best board I have ever seen and now use is the set up I learned from Ed Tosti which I believe he first designed when building the Naiad and writing the books on her.

I would not use rubber cement as it is a mess to remove the plans and glue when getting ready for the next build. Diluted white glue PVA or better, matte medium right out of the bottle works really well and cleans up without too much fuss.
Allan
Photo from Volume I of the Naiad Frigate by Ed Tosti.
1753185758832.jpeg
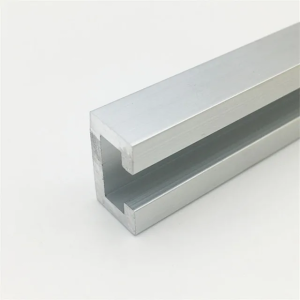
When I made my board I had a friend with a router cut the grooves for the metal C rails for sliding the gantry.

C Rail
1753185948016.png
 
Thank you Allen. Using a diluted glue - any issues with the plans stretching slightly out of true? I know I have to lay them very carefully and keep them true to scale.

Dave
 
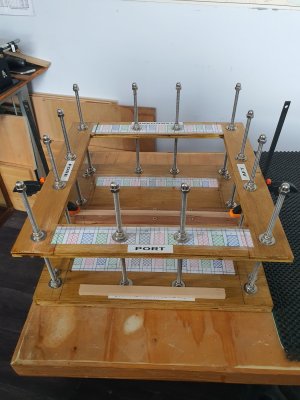
BTW - that gantry looks awesome. I can see so many uses for it and it doesn’t look real hard to make!
 
any issues with the plans stretching slightly out of true
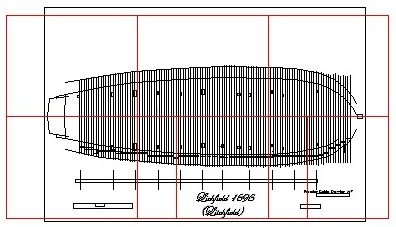
This is always a potential problem if care is not taken. The next time, if they are plans I have redrawn from contemporary plans I will divide it up into rectangles the same size as sheets of label paper which can be stuck to the board without stretching and removed with relative ease. If you have a set of plans already and to give this sticky paper a try , you can do the same thing by scanning sections of your plans on your home printer/scanner then printing each section on label paper. If anyone has already done this, I for one am curious to know how well it worked.

An example with red lines showing six sheets of 8.5"X11" label paper is below.

Allan

1753206560386.jpeg
 
I’ll give that some thought. Best to have the plans as perfect as possible. I’ll let you know if I try it. Thanks Allan
 
That looks really cool and tidy. Thank you for that. Do you mind if I ask what ship you’re building?
 
This will be a mid section of L'Aurore 1784 a French Slave Ship, at 1/36 scale. Plans are from www.ancre.fe so far I have built keel and first 4 of 14 double frames. I know I need to start a build log.
 
This will be my first attempt at scratch building. The project is the Hayling Hoy using David Antscherl's plans and book. I'm definitely in the planning stage, gathering materials and information. Regarding the building board, what type of adhesive do you use to stick the plans on the board. I have made several copies of the plans and want to copy on the board to assist with most aspects of the build. But I don't want the plans to stretch or alter and it needs to be perfectly flat. Is there a specific glue type I should be using?

Thanks,
Dave
Modge Podge works well for gluing plans to wood, especially stable wood like MDF or similar. There are a lot of YouTube vudeos.

 
If you use rubber cement, I would recommend buying thinner. I used the product for years way back in the Dark Ages. I had a quart can with a plastic cone shaped top that was sold in craft or art supply stores. Inside the can was a bent wire to run the 1”- 2” brush against. With the thinner you will be able to make a nice thin mixture for coating your paper. You coat and let it dry on the back of your drawing and you will be able to reposition it on your board. I was putting it on smooth surfaced illustration board at the time. On a rougher surface you will probably need to coat both surfaces. Kind of like Contact Cement but without the final it’s down and can’t be moved issue.

I Googled the containers. Plastic and glass ones came up with brushes attached to lids. What is nice about the containers, if you don’t use the product for a while it gets gummy and you can’t use it. Just put some thinner in the container, wait a couple hours or a day and you are back in action.

If the cement is fighting you as you are brushing, stop and thin the mixture. It should go on like a coat of paint.
Hi Paul, what type of thinners do you recommend?
 
Hi Paul, what type of thinners do you recommend?
Hi Gary,
There was a rubber cement thinner from the same manufacturer as the cement. I never looked into using an alternative.

I reread what I posted and should also mention I used a 5 or 6 inch rubber roller to burnish down the paper. The roller was from the woodcut print section in art stores.
 
There was a rubber cement thinner from the same manufacturer as the cement. I never looked into using an alternative.

I reread what I posted and should also mention I used a 5 or 6 inch rubber roller to burnish down the paper. The roller was from the woodcut print section in art stores.
I believe the generic solvent for rubber cement ("contact cement") is acetone, available at any paint or hardware store. As Allan said above, rubber cement is messy stuff. Thinning it is a good idea, but I have found that it discolors paper, turning a light brown color, dries out, hardens, and loses its adhesion over time.

There is an inherent problem in copying plans. Copy machines use lenses to project the image and this introduces what is called "spherical aberration." This is an error in the accuracy of copy caused by the curvature of the lens, similar to, but to a much lesser extent, the effect one sees in photographs taken with a "fisheye" lens. This will often cause the lines on sectioned copies not to match up exactly when you try to paste them all together again. This imaging error is not noticeable at a glance but becomes apparent when you try to assemble pieces of a large print from several copies. Commercial "blueprint" copying services do use much larger format copy machines which minimize the effects of spherical aberration significantly over smaller "office size" copiers. (Additionally, reportedly, most copiers intentionally have such inaccuracies built into them to thwart the machines being used to counterfeit currency.)

Movement in the size of a drawing, particularly one of larger size due to changes in the ambient humidity will occur. Securely mounting the drawing can minimize this greatly, but one can never be sure. For the foregoing reasons, professional craftsmen such as machinists who must work from plans with a high degree of accuracy never scale work from the drawings. This is a hard and fast rule because the size of the drawing cannot be trusted due not only to the inherent movement of the paper, but also the possibility of errors in the drawing itself. This level of accuracy may not be an issue in the case of many models that aren't that exact, but it should be a consideration of some importance in the case of highly detailed models the builder wishes to exhibit a high degree of accuracy. To erroneous measurements, scaling should always be done from the notations, not the drawings. In other words, if the drawing's measurement notation says something is two inches long, two inches should be picked up from a rule with a pair of dividers and that distance transferred with the dividers to the workpiece, rather than picking up the line on the drawing representing that two-inch length. A quality rule can be trusted to be accurate. The line on the drawing cannot.
I have also found that placing a copy of a plan on the surface of a building board exposes the copy to a lot of wear and staining over time. You may want to cover the drawing with some sort of clear coat, such as shellac, to give it some "wearability," or even cover it with clear plastic if you want to have a plan attached directly to your board.

What the foregoing means in terms of constructing a building board and its attendant fixtures, to me, at least, is that where the accuracy of measurements is a consideration, I do not paste a paper copy of the plan on the board at all. Rather, I draw an accurately centered centerline on the board, together with transverse lines normal to the centerline at 1" intervals for the entire width of the board, or similar lines at each section station of the hull drawing, taking care that their layout is accurate. I then work from this grid, using the "gantry" and a drafting tee square and triangles to position the measurement points relative to the benchmark grid as the build progresses. I have found that a smooth board surface similar to a "white board" material, (which is readily available where sheet goods are sold, often already surfacing plywood or chipboard sheeting,) is a very convenient material to cover the top of a building board because a fine point "whiteboard" marker can be used to make notes and mark the measurement points from the measurements taken from the plans' notations as required and then later simply wiped off. Thinking of the building board as a drafting table with a tee square and triangles and using machinists' "123 blocks" or wide based machinists' squares and a surface gauge for vertical measurements is a very efficient way to "draft" the model in three dimensions. I don't know if this would be so with someone who was not familiar with manual drafting procedures because the younger generations seem not to have had the opportunity to learn mechanical drawing in school, but for those of us who did, the techniques are second nature.
 
Back
Top