-

Win a Free Custom Engraved Brass Coin!!!
As a way to introduce our brass coins to the community, we will raffle off a free coin during the month of August. Follow link ABOVE for instructions for entering.
-

PRE-ORDER SHIPS IN SCALE TODAY!
The beloved Ships in Scale Magazine is back and charting a new course for 2026!
Discover new skills, new techniques, and new inspirations in every issue.
NOTE THAT OUR FIRST ISSUE WILL BE JAN/FEB 2026
You are using an out of date browser. It may not display this or other websites correctly.
You should upgrade or use an alternative browser.
You should upgrade or use an alternative browser.
If this is for what masking tape is used for, why the masking tape from a Dollar store would not be used. It is cheap.
The one at the nearest store.What do you recommend for masking tape
Allan
Tamyia tape is great. However I often cover large surfaces by putting a strip of Tamiya tape along the edge I want painted and using 3M painters tape to cover the rest of the surface.
Rob
Rob
I use the Frog tape for delicate surfaces.
3M blue tape used by painters gives excellent resultsWhat do you recommend for masking tape? Is there anything better that Tamiya?
- Joined
- Jun 23, 2025
- Messages
- 59
- Points
- 58

I agree 100% Rob. Painters masking tape if left on too long will peel off some primer and surface paints, in order to eliminate this I use a lacquer based top coat, especially where I will be using painters tape, I also use colored stick on tape (1/16", 1/8", 1/4") for window and under hull rub rails, trim lines, and waterlines. Once Testers dull clear coat is sprayed on the stick line tape will not pull off, Tamyia tape can cover it if need be temporally. DarrylTamyia tape is great. However I often cover large surfaces by putting a strip of Tamiya tape along the edge I want painted and using 3M painters tape to cover the rest of the surface.
Rob
No matter the brand you use, there is the potential for bleed through under the edge. Unless the surface is as smooth as glass, literally, any imperfection will create a chance for bleeding under the tape. Narrow tape is better for following a sheer line then the balance can be covered with wider tape. Once it is all taped up, apply a clear coat with spray or brush to seal the edge. Once dry, paint with brush or spray. The clear will help prevent bleeding of the paint under the tape. Learned the hard way......I use it to create a clean line primarily on ship hulls
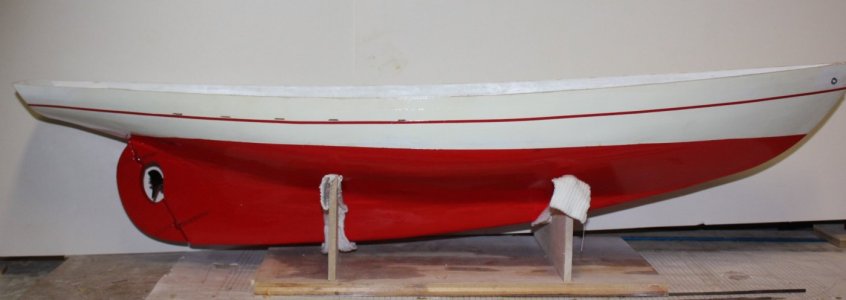
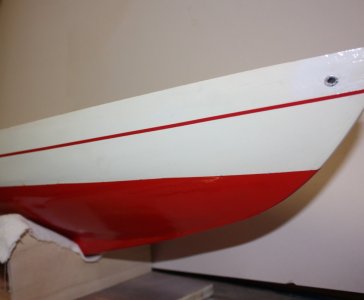
If I have to make a very narrow stripe, pinstriping tape is a great choice instead of paint. The pics below shows both.
Allan
Last edited:
My cousins are third-generation painters and decorators and have long operated a family business doing large scale commercial painting and decorating work. I've learned a lot from them about finishing and about masking tape. Not all masking tape is created equal. There are many different tapes for many different purposes. Here's a quick primer as it applies to model ship finishing:
1. Masking tape should be stored in air-tight zip-lock plastic bags at all times, especially if you are going to work from a roll over a protracted period of time. A roll should never be laid down on its side on any surface, but rather always kept in its plastic bag when not directly in use. The reason a roll should never be laid on its side is because if it is, it will pick up bits of dust and dirt that will contaminate the entire edge of the roll, thereby preventing a good seal along the edge and promoting the coating's seeping under the tape edge due to capillary action. Keeping tape in a closed container after opening the initial packaging also prevents its adhesive's drying out, which can render the tape less than effective, if not entirely useless, and the adhesive's hardening, rendering the tape impossible to remove from the rolls.
2. Most commonly seen "painter's tapes" are not intended to be left on the workpiece for more than a day or three, especially if the tape is exposed to direct sunlight that will "bake it on" and require a tremendous amount of work to scrape the tape off and clean the residue using highly volatile solvents such as straight acetone. There are, however, specialized masking tapes designed for long term application, which, at no surprise, can be purchased for a premium price. The longer you leave masking tape on a painted or varnished surface, the greater the likelihood of it pulling the coating beneath it off!
3. The four main masking tapes modelers will require are:
A. Ordinary painter's masking tapes. There are several to choose from. As painful as it may be, buy the good stuff. There is a big difference. Buy the top name-brand tape. In the U.S. those are basically the products made by 3M. The "white (cream colored) tape" is bottom of the line junk. Don't waste your money on it. The "blue tape" is professional grade painter's tape for general purposes masking. It's fine for covering "wide open spaces" on a model or in conjunction with "fine line tape" for achieving razor sharp paint separation lines. "Blue tape" isn't much good for masking razor sharp separation lines on models. You can use it to get something that looks like a sharp line at fifty feet on a house painting job, but not on a model from a foot away.
B. Lacquer-proof tapes. The 3M version is bright lime green colored. This tape has specially formulated adhesive that is impervious to aggressive solvents such as acetone, lacquer thinner, and such. It must be used for any masking when using "hot solvents," lacquers, and polyester and epoxy resins. It is a little better at producing a sharp line than the "blue tape," but not really suitable for the job on a model where the edge must be absolutely perfect.
C. "Fine line" tapes: These tapes, sometimes called "auto body and fender tape," are for masking to achieve perfectly razor-sharp edged paint separation. "Fine line" tape is not made of a sort of crepe paper like the other masking tapes. It's made of flexible polypropylene plastic so it can be stretched over irregular surfaces and still lay flat. It's also a lot more expensive than your garden variety masking tapes. Tamiya markets a version, colored yellow, that is packaged for modelers and over-priced accordingly. It's colored yellow and works just fine. I prefer to use the 3M "218" version, colored a light dull green, available online or at auto body and fender paint supply houses and finer art supply stores. The 3M version comes in a variety of widths from an eighth of an inch to an inch or more. I use the 3M "218" Fine Line Premium quarter inch because it costs less and is as often as not the size I need for modeling. (See: https://www.amazon.com/3M-TALC-218-...a4-8a2a-c34289fa7244&pd_rd_i=B0065GVEZ8&psc=1) I use the "fine line" tape to define the separation line and then apply regular "blue tape" on top of it to mask the rest of the area if I'm airbrushing. If just brushing, a quarter inch is plenty to be sure I "stay between the lines." 3M now also offers an "indigo blue" "471+" vinyl Fine Line tape which is about half the price of their "218" Fine Line tape. I'm not familiar with this version and have no idea why it costs so much less. The jury's still out on that one. (See: https://www.amazon.com/3M-Masking-S...d7a-a36e-5ed352959abc&pd_rd_i=B0082LHX3G&th=1)
D. Frisket film and fluid: Which isn't a tape but rather is sold in the form of flexible sheets of material basically the same as "fine line" tape, or as a masking fluid coating that can be applied with a brush and allowed to dry and then can be peeled off after use. Frisket film and masking fluid is sold in art supply stores and online. Either version is kind of pricy, but it is very effective if you need it. This material is designed for airbrushing. The transparent Frisket sheet is applied after being cut to shape, or it can be applied cut oversized and the desired masked edge "traced" with an X-acto knife, and the excess peeled off to yield a very highly detailed masked edge. The masking fluid is brushed on like paint. After drying, it can be trimmed in the same manner as Frisket film, or not, if you are a steady "fist" with a paintbrush.
As most ship modelers know, applying an absolutely perfect paint finish is probably the most important skill required to build a good model. Topsides that are not perfectly smooth with a finish like a Steinway piano, appear glaringly out-of-scale and destroy any hope of a "compelling impression of reality in miniature." There are a lot of tricks to obtaining a fine finish. (And, believe it or not, one doesn't have to use an airbrush, but an airbrush does make it a lot easier.) Most all full-hull models require at least a single line of paint color separation at the waterline. Don't even bother trying to get a proper razor-sharp line on a paint job without using "fine line" tape, Frisket film, or masking fluid. You might come "close" trying that on occasion, but "close" only counts in horseshoes and hand grenades.
Last edited:
I often wondered how the artisans managed to build their models in the 17th and 18th century without an airbrush, or ELECTRICITY!(And, believe it or not, one doesn't have to use an airbrush,
Great post on the types of tape Bob! The fine line tape you are referring to sounds like the pin striping tape I find to be a great way to go.
Allan
Frog tape here as well. Not the stickiest, but leaves no residue.I use the Frog tape for delicate surfaces.
The fine line tape you are referring to sounds like the pin striping tape I find to be a great way to go.
It's sometimes called pin striping tape, I believe. There used to be a type of thin line tape that was pre-cut so that there was a 1/8" "perforated" strip down the middle of perhaps a 3/8" wide roll. The 3/8" wide tape would be laid down, then the 1/8" strip down the middle peeled up so that there would be left a uniformly wide 1/8" unmasked strip to paint.
Actually, however, freehand pinstriping is where it's at for "the good stuff." The ship modeling artisans of old, and the pin striping artists of the '50's, used specially designed brushes and highly skilled, very steady hands holding specialty brushes in a particular way and specialty paint to achieve their masterpieces. This skill takes considerable practice, but is not beyond the reach of ship modelers.
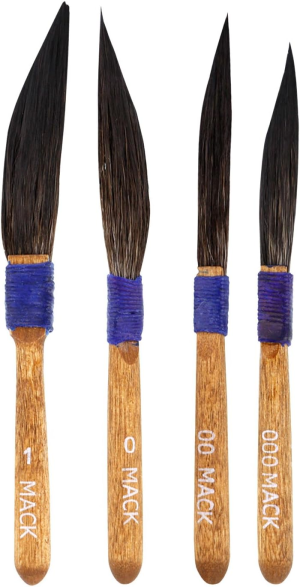
The leading sign painting and striping paint brand in the U.S. is "One Shot." It's been around forever and it's not cheap. It averages about $800 U.S. per gallon, depending upon the color, and is mercifully packaged in amounts as small as quarter-pint cans. This paint is so costly because it has a very high pigment content in order to cover covers extremely well without requiring repeated applications for sufficient opacity, hence the brand name: "One Shot." The brushes have long, supple bristles often made of blue squirrel hair and designed to hold a lot of paint so a long line can be "pulled" (as it's called in the trade) with a minimum of recharging the brush and having join strokes in the middle. A good striping brush will hold enough paint to permit pulling a 1/8" wide line as much as thirty feet long without lifting the brush from the painted surface. (The brushes with metal ferrules provided with the below "combination deal" package are cheap-o's. Note the higher quality of the hand-tied bristles on the brushes pictured in the next picture below them.)
Amazon.com: One-Shot 5-Color Lettering and Pinstripe Paint 1/4 Pint Cans with Bonus Striping Brush Kit Colors: Bright Red, Lemon Yellow, Emerald Green, Reflex Blue and Black
Shop 1 Shot at the Amazon Arts, Crafts & Sewing store. Free Shipping on eligible items. Save on everyday low prices.
www.amazon.com
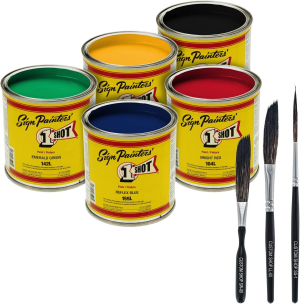
Below: Pinstriping brushes: About $66.00 USD for the set.
Amazon.com: Mack Sword Pinstripe/Pinstriping Brush 10-1,0,00,000
Shop Mack at the Amazon Arts, Crafts & Sewing store. Free Shipping on eligible items. Save on everyday low prices.
www.amazon.com
Glen Weisberger is one of the top freehand sign painters practicing in the United States today. (See: https://www.youtube.com/results?search_query=Glem+Weisberger)
Modelers need not be hopelessly intimidated by Weisberger's superhuman skills, though. There are alternatives. One is the Beugler Pro pinstriping tool. It is a (somewhat pricy) "pen" with a roller head that accepts various sized "wheels" than are rolled over the workpiece, leaving a uniform stripe. Beugler makes a wide selection of accessories for use with their pinstriping machine system. (See: https://www.beugler.com/shop/professional-kit/)
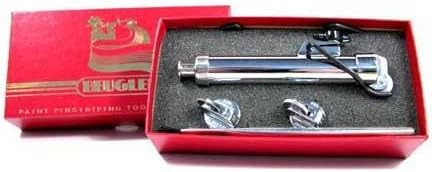
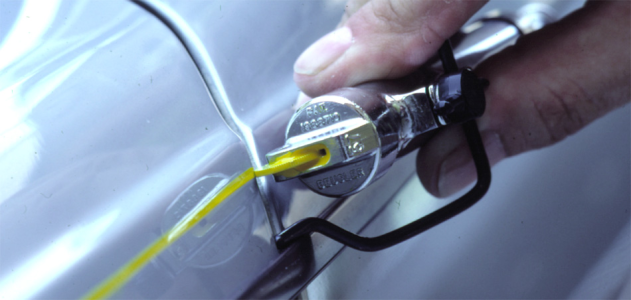
Last, but not least, the "old school" manual drafting instrument industry offers a large selection of "ruling" and "dotting" (dotted line drawing) pens that are designed to draw long straight, curved, and circular lines of set widths using ink or paint. Many of these are out of production now but may be found on eBay or in antique stores on occasion. The smaller "straight line" ruling pens are often included in the classic "three bow" drafting instrument sets. (Keuffel and Esser's Paragon "Red Dot" and "White Dot" and Dietzgen's Gem Union lines are the most commonly encountered top quality instruments. I was fortunate to complete my collection before manual drafting instruments became "collectable" and shot up in price and down in availability. There are, however, a lot of partial sets and "parted out" sets offering ruling pens singly on the online "classifieds" sites.)
Note that most "ruling pens" are not filled by dipping their points into the ink or paint. Most are "filled," such as they are, by adding a drop of the drawing medium to the side of the nib between the nib arms with an eye dropper or by drawing a filled paintbrush across the sides of the nib arms to transfer the medium between them. Search YouTube for instructions on the proper way to fill a ruling pen. If the medium isn't kept between the nib arms and ends up outside the nib arms, you'll have paint or ink everywhere except where you wanted it.
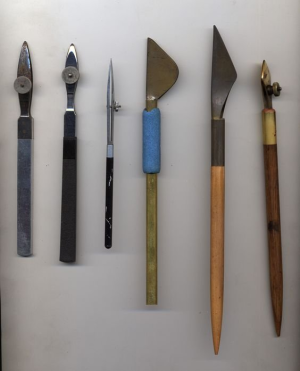
Below, L to R: Two adjustable linewidth "detail pens" which hold a large amount of medium, a standard adjustable linewidth ruling pen as found in most drafting instrument sets, two fixed linewidth patent "detail" or "border" pens," and a smaller adjustable linewidth detail pen.
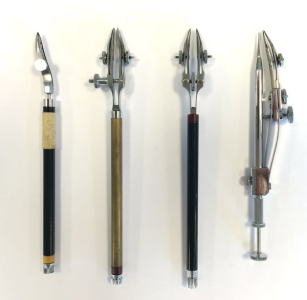
Below L to R: A swivel head adjustable linewidth ruling pen for drawing curves, two adjustable linewidth "railroad" or "highway" pens which draw two parallel lines with the separation between the two lines also adjustable, (These double-nibbed pens are also available in a "swivel headed" version for drawing curves.), a "drop point" or "rivet" compass for drawing very small circles with the interchangeable ruling pen attachment in place. (Note: Standard instrument sets usually include a ruling pen point attachment for use with the larger compass in the set and sometimes with a straight handle for it as well.)
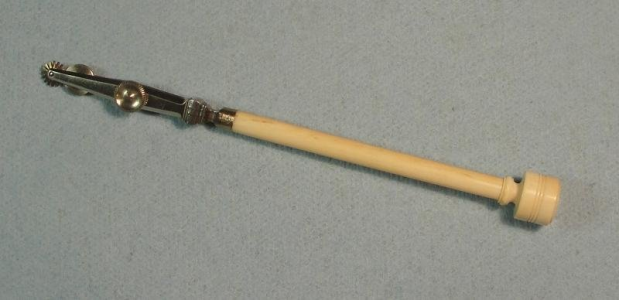
One old type of "dotting pen" which draws dotted lines, dashed lines, and combinations thereof. The image is made by interchangeable impression wheels which in this pen are contained in the drum at the end of the handle.
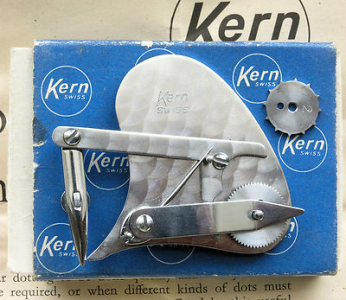
Below: A Kern (Swiss) dotting pen with interchangeable pattern wheels. Note the vertical ruling pen point at the left-hand side. The instrument is oriented as in use. As the guide point (left lower corner) is drawn along the straight edge or curve, a drive wheel is caused to turn which in turn causes the pattern wheel (gear disks as pictured in upper right hand corner) to rotate, causing the the spring-loaded armature holding the pen point to move up and down as the pattern wheel turns against it.
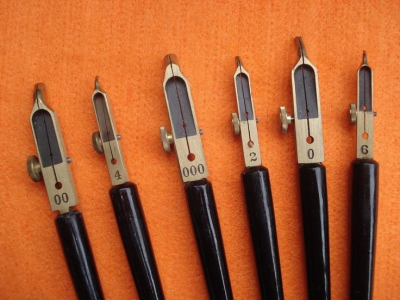
Below: Barch-Payzant brand fixed-width freehand lettering pens. These can also be used against a straight edge or curve (with care.) These pens are loaded by filling the tray above the nib kerf with an eye dropper. Rarely seen on eBay these days, if you come across one, or the entire set, they're worth grabbing. They hold a lot of ink or paint and they are relatively easy to clean compared to the alternatives.
For the sake of completeness, I will mention the Keuffel and Esser LEROY (always capitalized... nobody knows why) lettering template system. Before this system, draftsmen lettered freehand or used a number of stencil and tracing devices which weren't particularly popular. Although somewhat complicated to use, the LEROY system and its later imitators produces any wide selection of typefaces, trademark art, and even signatures with an exactitude equal to metal typeset printing. The fonts and other subjects are laid out on etched plastic templates, and the tracing pin on a variety of pantographic tracing plaquettes follow those etched templates to cause a technical pen to draw whatever is etched on the template. The slant and size of the drawn letters are determined by a combination of the size of the template masters and adjustments to the plaquettes. The fonts are determined by the template masters. There was a large variety of template alphanumeric fonts and subject matter, including templates for musical notation, foreign languages, electrical and plumbing schematic drawings, and so on. By far, the most common fonts templates to be found in circulation these days are the ASA engineering notation font in various sizes which came with all the basis LEROY boxed sets. Without further elaboration, the below videos explain the LEROY system. It may or may not be of use to ship modelers, but where there is a desire for a very small font to be painted or inked onto a model, and you happen to have come across a LEROY set and always wondered what to do with it, this may be helpful. I have found it very useful because, primarily as a collector, over the last twenty-five years or so I have acquired a fairly wide variety of alphanumeric fonts beyond the ASA standard engineering font. In fact, today's word processing technology runs ring around anything the LEROY lettering system could ever do, so don't feel deprived it you don't have one.
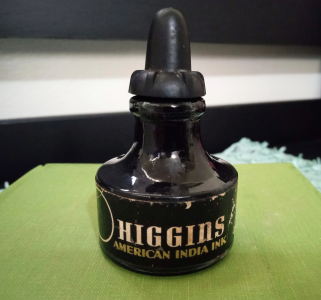
If you ever wondered why the classic India ink bottles came with eye droppers in the caps, now you know!
Below: And if you are ever lucky enough to come across one of these little cast iron gizmos made by Theo. Alteneder and Sons, an early American manufacturer and retailer of very high-quality drafting instruments, now you'll know what it's for and snag it.
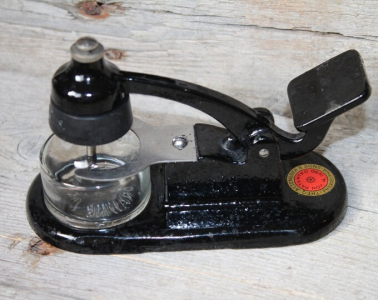
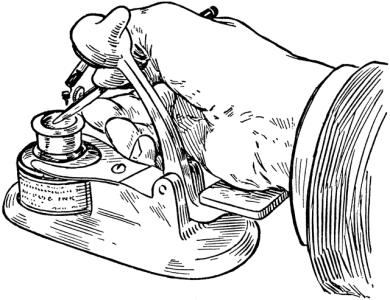
It makes using ruling pens so much easier and spilling ink so much less likely. As can be seen in the pen and ink drawing above, the ink bottle's eye dropper is replaced by a post with a wire spring at its end. The wire spring drops into the ink and when it is raised by the heel of the draftsman's hand, there will be a drop of ink that has run down the spring and is waiting for the side of the pen nib to be touched to it, so the drop transfers to the space between the two nib arms. All done singlehandedly! And, it does not require any batteries!
I'll mention in passing that around the middle of the last century there were also "technical fountain pens" once made by Koh-i-noor and Rapidograph that were very popular and in large measure replaced the pens described here. These are still made, although are being largely replaced by hard felt tipped pens over the last few decades. Technical fountain pens are very nice and serve to produce the "snap" of dark India ink lines that are favored by traditional draftsmen and pen and ink artists, but the price of their convenience in use is the time required to clean them after every use, lest the ink dry inside them. Removing dried permanent India ink is very difficult and near impossible to remove from the nibs of technical fountain pens which present tolerances similar to hypodermic needles. Aside from that, the close tolerances of technical fountain pens and the nature of heavily pigmented paint do not play well together. In short, paint clogs them up and I don't consider them suitable for anything other than ink and, that being the case, it's far more convenient to use any one of the felt tipped disposable pen options.
I hope this dissertation about line drawing and freehand lettering technology for ship modeling will be helpful to some who may be of such tender years as to not have been exposed to this now-antiquated technology. If you ever wondered how they laid out the deck seams and other fine detail on the magnificent "board room" builder's models of the late 1800's and first half of the 1900's and want to get that look, this is how they did it.
Last edited:
On an adequately prepared surface you can eliminate the potential for paint bleed entirely by re-spraying your base color again after masking. That seals the edges and ensures the next color doesn’t bleed.No matter the brand you use, there is the potential for bleed through under the edge. Unless the surface is as smooth as glass, literally, any imperfection will create a chance for bleeding under the tape. Narrow tape is better for following a sheer line then the balance can be covered with wider tape. Once it is all taped up, apply a clear coat with spray or brush to seal the edge. Once dry, paint with brush or spray. The clear will help prevent bleeding of the paint under the tape. Learned the hard way......
If I have to make a very narrow stripe, pinstriping tape is a great choice instead of paint. The pics below shows both.
Allan
View attachment 552539
View attachment 552540


