- Joined
- Jan 30, 2025
- Messages
- 27
- Points
- 48

Just a quick question for the group. Is there anyone that can tell me how many plates there is per sheet for mantua hms victory 1/98. Just trying to find cheapest way to copper my victory

 |
The beloved Ships in Scale Magazine is back and charting a new course for 2026! Discover new skills, new techniques, and new inspirations in every issue. NOTE THAT OUR NEXT ISSUE WILL BE July/August 2026 |
|
 |
As a way to introduce our brass coins to the community, we will raffle off a free coin during the month of August. Follow link ABOVE for instructions for entering. |
|

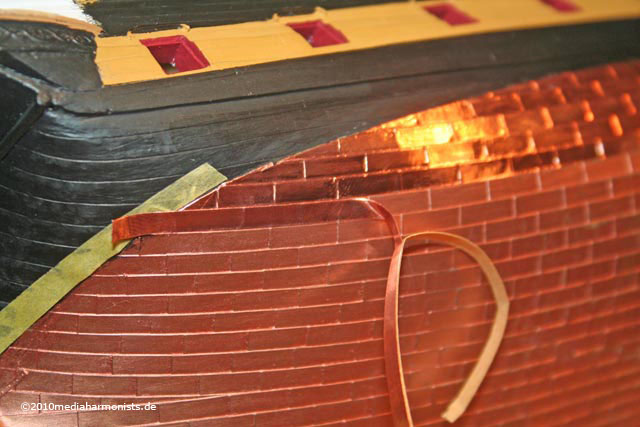
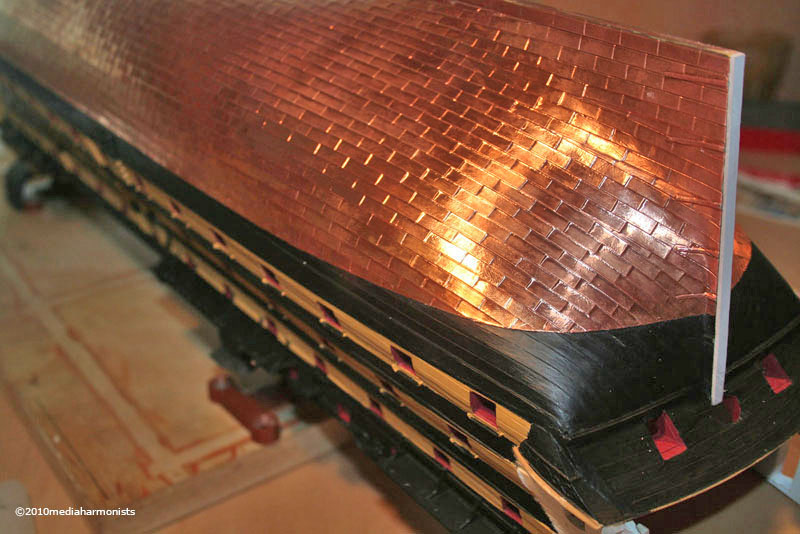
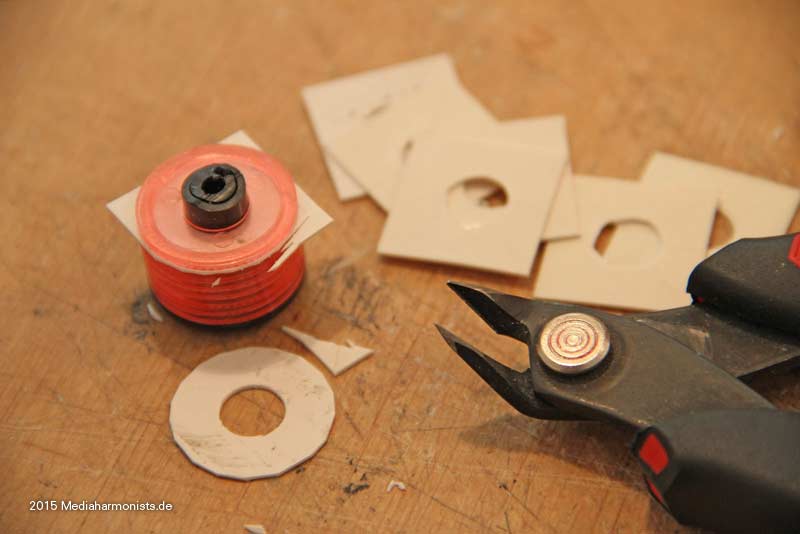
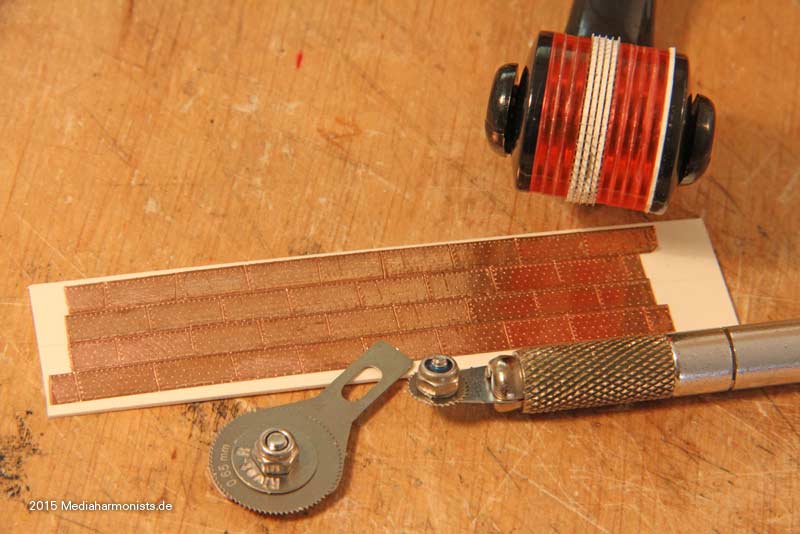
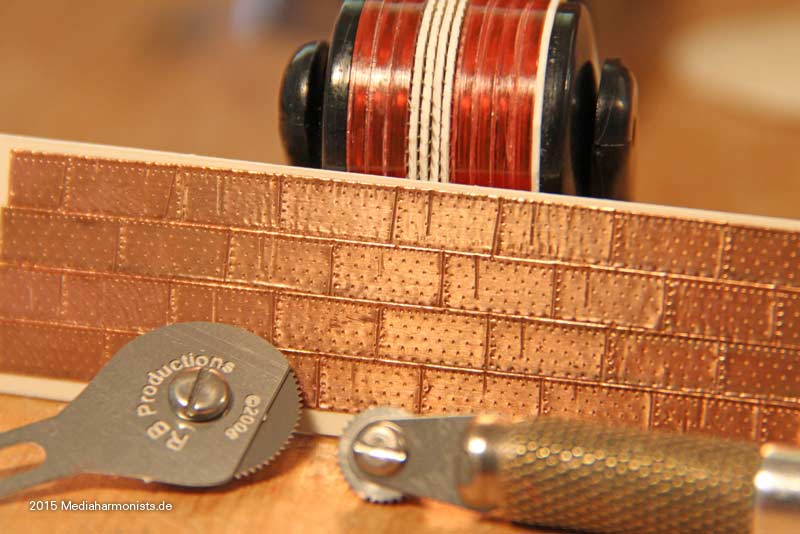
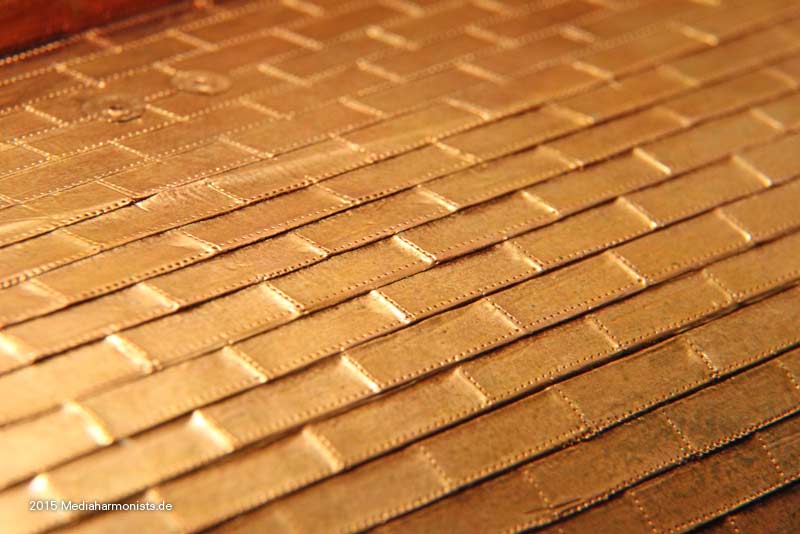
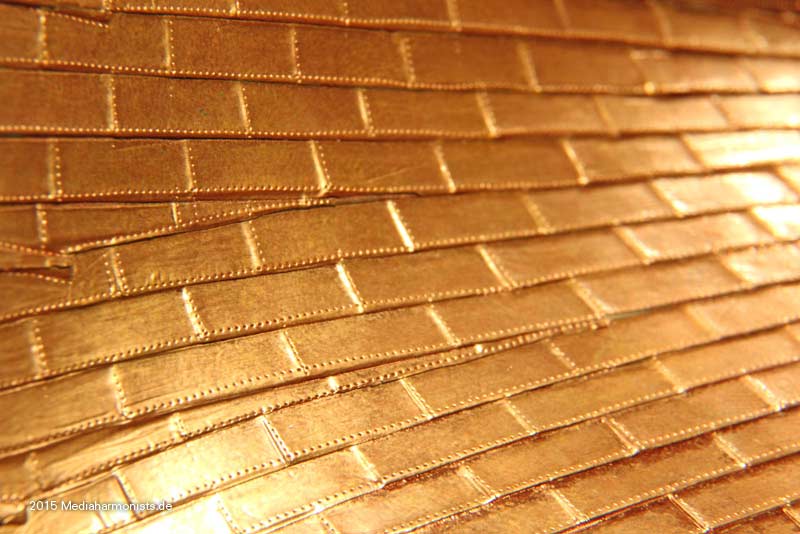
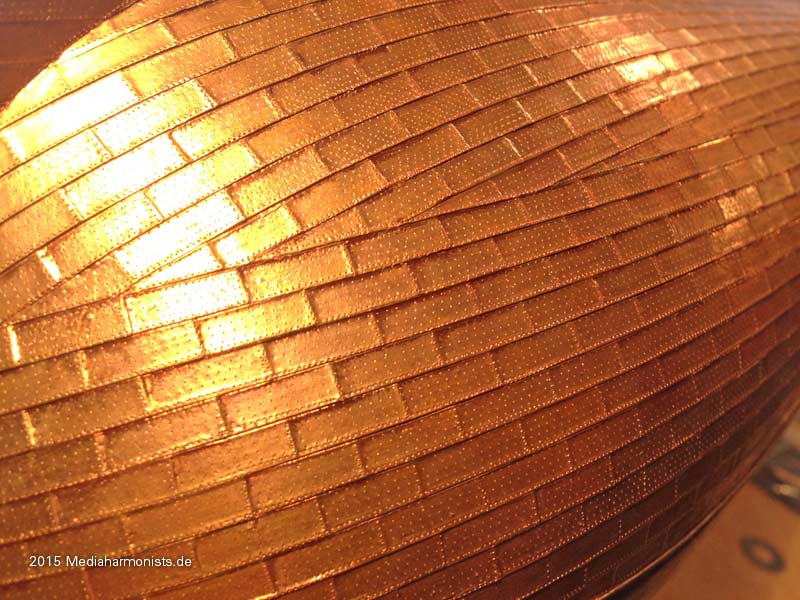
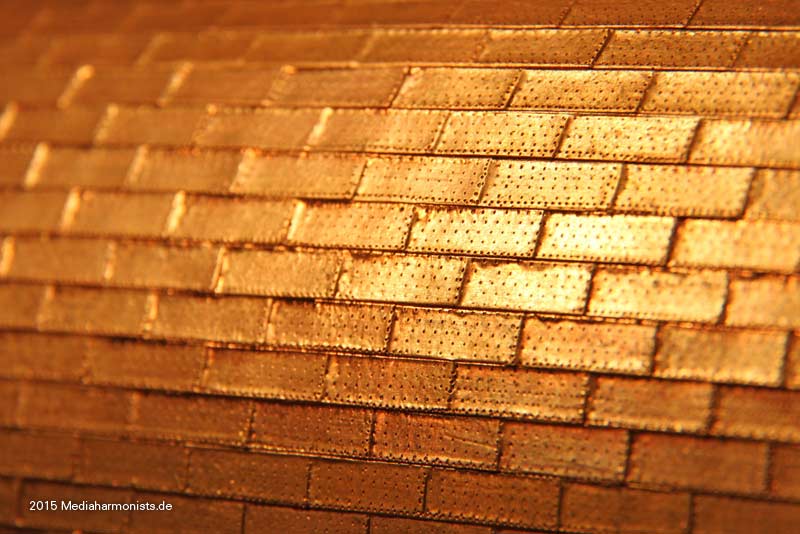
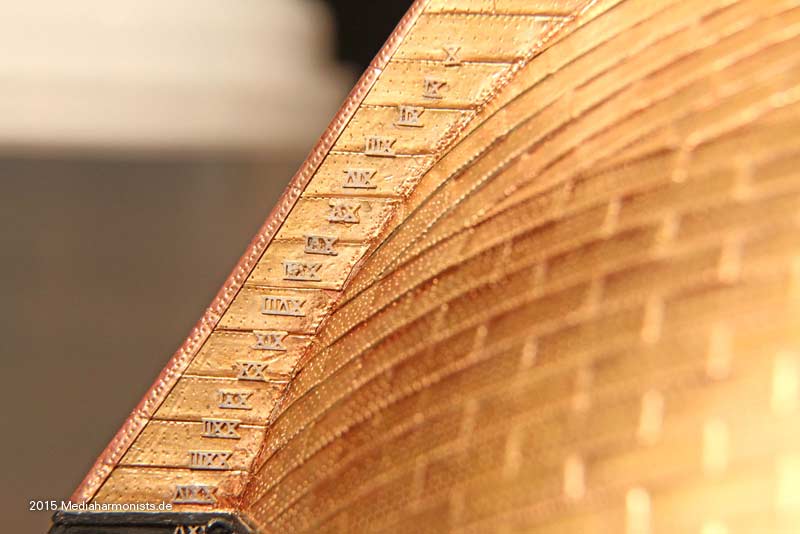
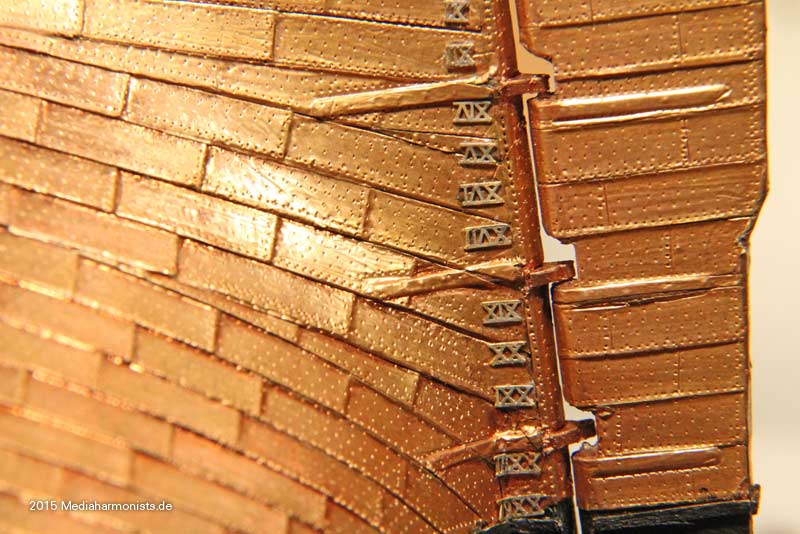
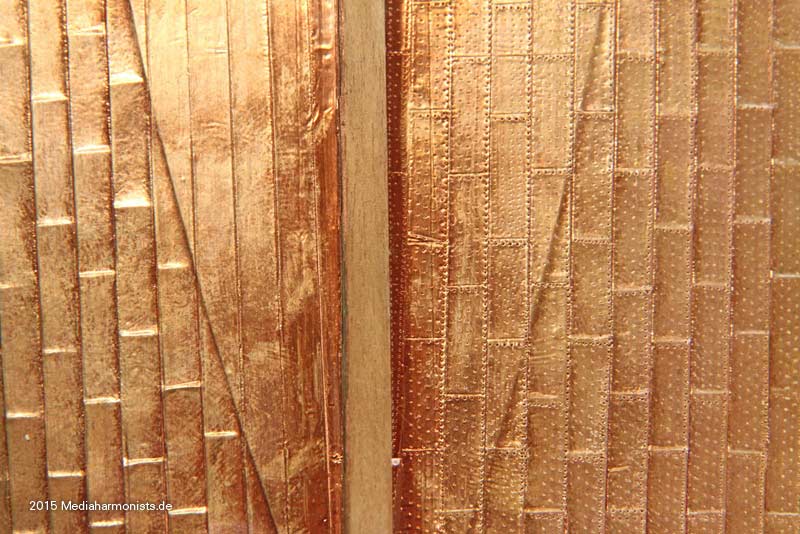
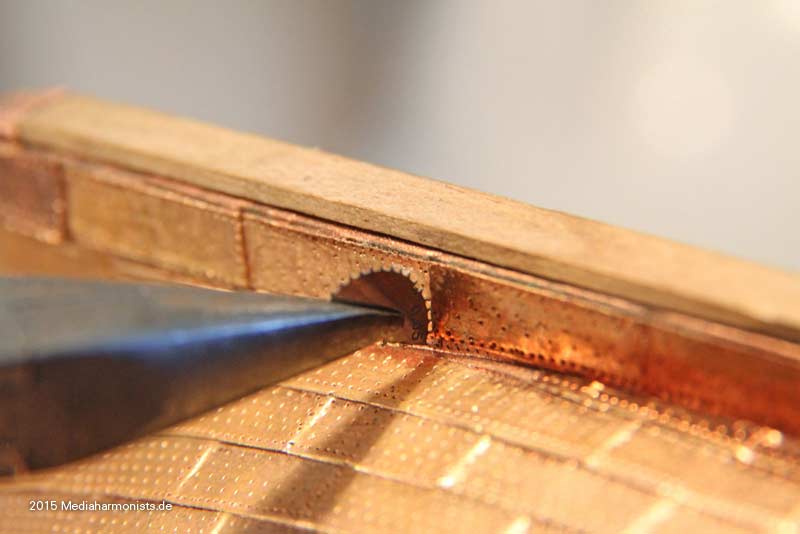
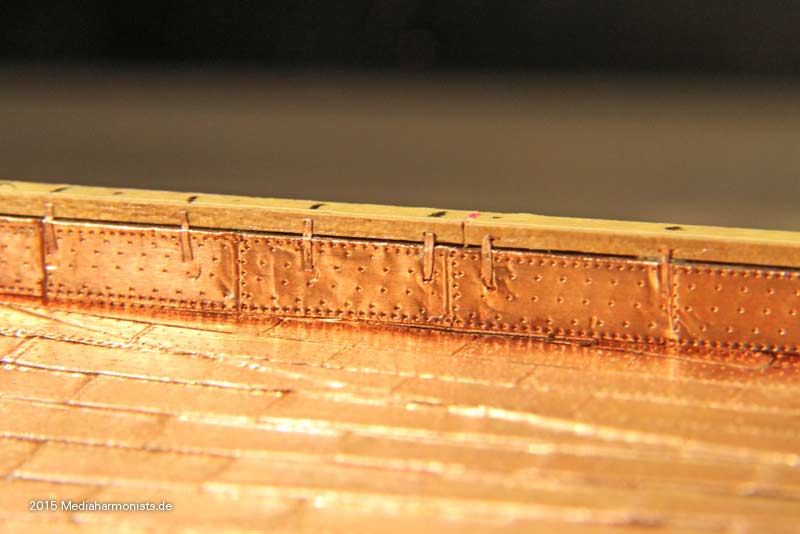
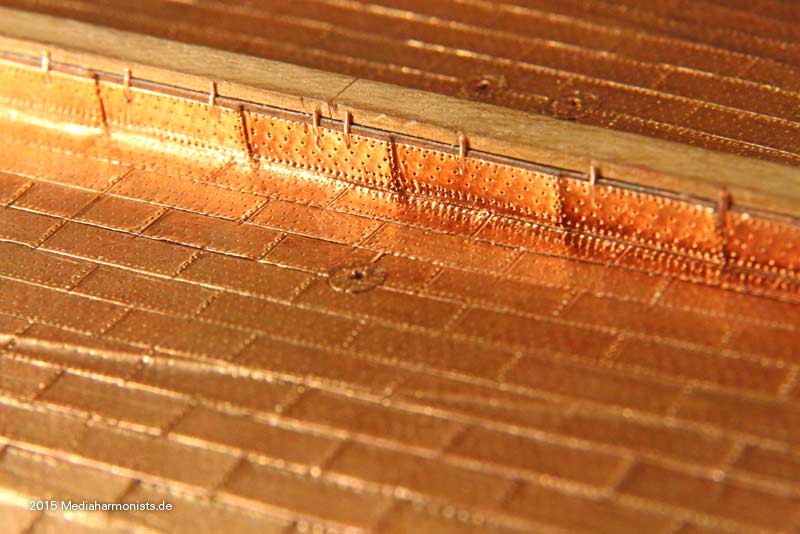
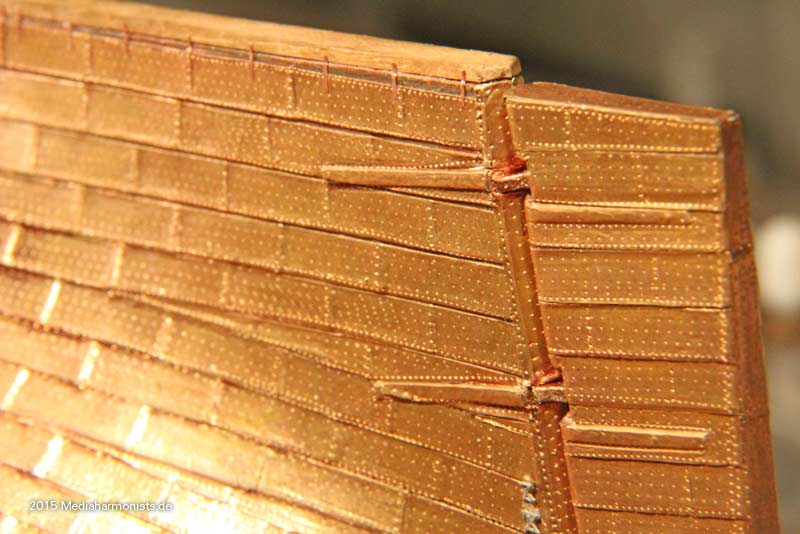
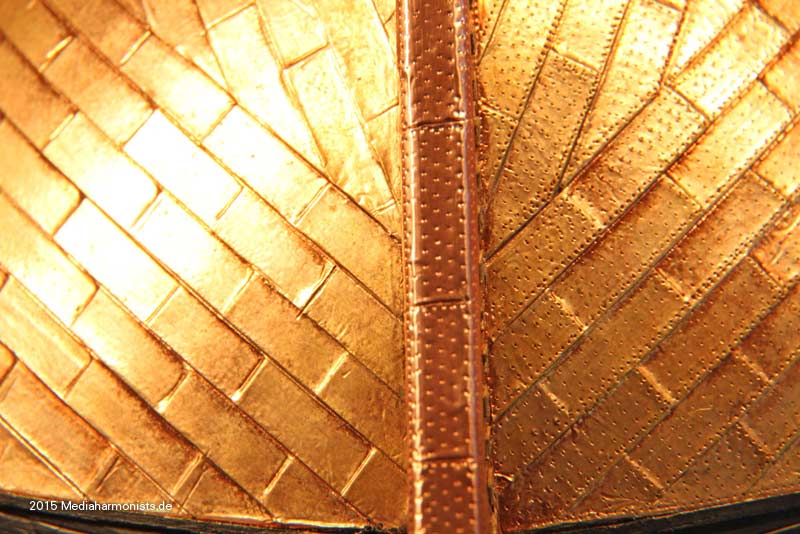
I believe that someone artistically inclined could produce a better-looking copper sheathing job this way than by using kit supplied materials.
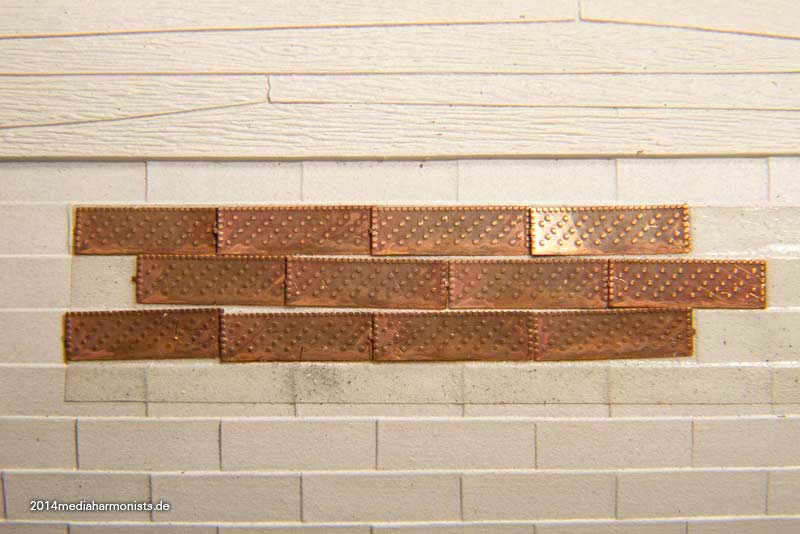
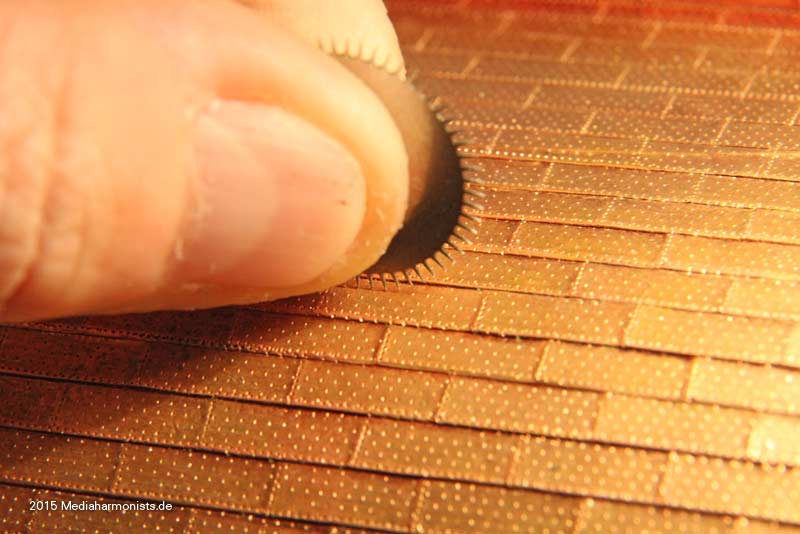
BTW there has been extensive discussion about showing nail heads on copper sheathing. Copper sheathing was secured with flat head nails. A round headed fastener would damage the sheathing. At scale viewing distance they would be invisible.
Love the idea. Keep in mind that if the paper is painted first, after the plates are cut there will be the white edge so maybe it's better to paint after cutting or just remember to touch up the edges which would likely be easier.You could then paint it with copper paint and cut it into plates.


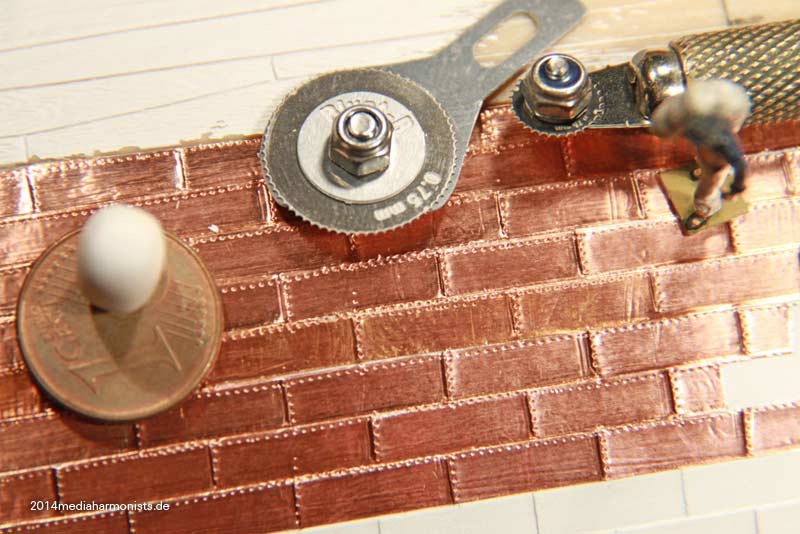
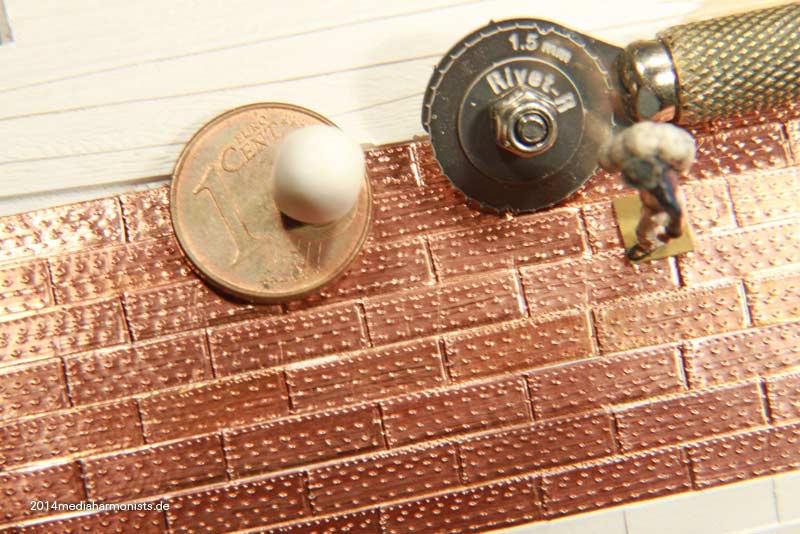
Cheers shipahoy any chance you can get me a link to this i have looked on ali express but can't find themtry copper tape with embossed nail heads. At 1/98 scale they will look great. Ali express has them. They come in a roll of approx. 500 units.
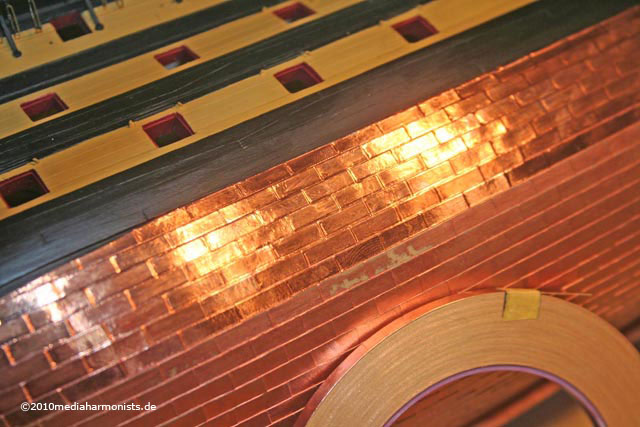
Yes, even 16lb paper is 0.0034" thick. Add the thickness of a thin coat of paint which would be about 0.0004-0.001" thick and it is much too thick for any of the plates. The idea of just painting as was done on most contemporary models makes sense.All readily available papers, including Silkspan, are too thick


")


Look under "copper sheathing ship " available in scales of 48, 75, 96. sold by a company called "nicetoy store"Cheers shipahoy any chance you can get me a link to this i have looked on ali express but can't find them
T.I.A
I’ve read in several places that copper did indeed inhibit the growth of marine life (animal and plant) on the ship’s hull. Copper apparently has a biocide effect on marine growth, but it also erodes as the ship moves through the water which means it’s constantly sloughing off anything that attaches to the hull. This erosion also meant that the copper maintained a salmon/pink color below the waterline. Apparently, copper only turns green when it’s not moving through the water.THE TECHNIQUES OF COPPER SHEATHING SHIP MODEL HULLS:
The thickness of copper sheathing plates for ship bottoms varies by the location and design of the plating on the hull. Generally, the thickness is:
- 32 oz per square foot at the bow. These plates are 0.043 inches thick. At 1:48 scale, these copper plates are ~0.001" thick.
- 28 oz per square foot for most of the sides. These plates are 0.028 inches thick. At 1:48 scale, these copper plates are ~0.0006" thick.
- 22 oz per square foot for the stern. These plates are 0.022 inches thick. At 1:48 scale, the copper plates are ~0.00046" thick.
- A standard piece of printer paper is typically about 0.002 to 0.004 inches thick.
- A standard index card of 100 pound cardstock is about 0.03 inches thick.
- A standard piece of tissue paper is typically between 0.01 and 0.035 inches thick.
- A piece of Silkspan is typically 0.002 inches thick.
- Very thin copper foil is approximately .001 inches thick.
- A standard piece of copper leaf is typically about 0.00003 inches thick.
So, if you want to put correctly scaled copper plates on your 1:48 scale ship model hull, you will have to use very thin copper foil. All readily available papers, including Silkspan, are too thick. Copper leaf, as anyone who has ever worked with gold, silver, or copper leaf knows, would be almost impossible to handle in small pieces placed exactly as in scale coppering and once the leaf is burnished, as is necessary, seams would be rendered invisible.
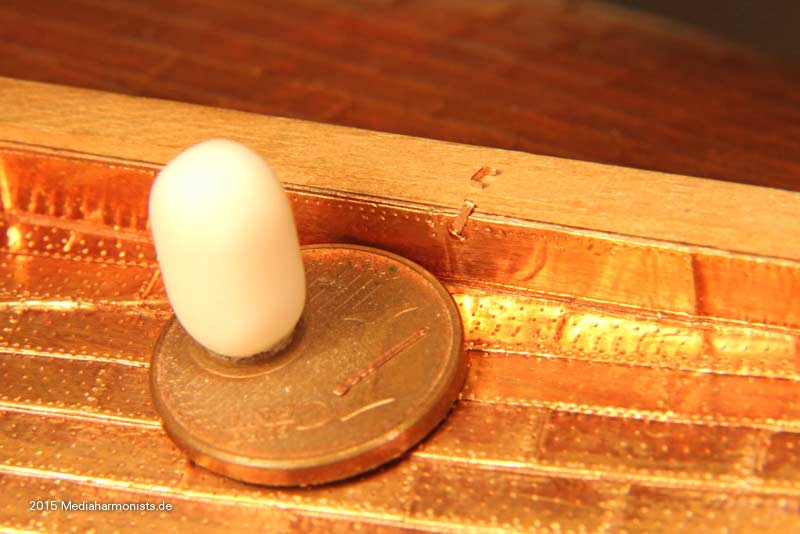
No coppered ship's bottom ever stayed "new penny shiny" for more than a few weeks, even if it were shiny when the plate was fastened. Depending upon the enviornmental conditions, it will develop a patina colored anywhere from verdigris (green) to dull brown, not unlike a copper penny. (Caveat for younger modelers: The copper content of U.S. pennies was reduced in 1982 when the Mint transitioned to a composition of 97.5% zinc and 2.5% copper. This change was made due to rising copper prices and was intended to save on material costs. The composition remained stable until 1985, when it was permanently changed to 97.5% zinc and 2.5% copper.)
Any coppered bottom submerged for any length of time thereafter would have accumulated a substantial encrustation of marine growth shortly after launching colored in patches of black, brown, and green, depending upon the depth of the growth relative to the sunlight reaching it and the temperature and salinity of the water in which it sailed. Copper sheathing provided a physical barrier to teredo infestation with reduced electrolytic deterioration to iron fastenings but did not materially inhibit the growth of plant or animal life which attached itself to the exposed surface of the copper sheathing. It was only in 1914 that ablative antifouling paint containing cuprous oxide was invented that a coating became available that inhibited growth on the surface of a ship's bottom and, thereafter, copper sheathed bottoms were additionally coated with antifouling paint colored by the cuprous oxide to produce the now familiar reddish-brown "bottom paint" color.
THE ART OF COPPER SHEATHING SHIP MODEL HULLS:
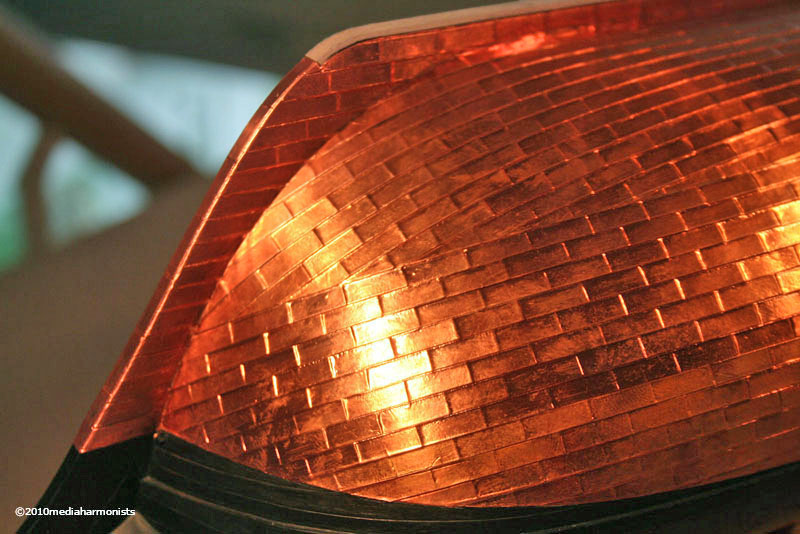
It remains up to the modeler to determine the level of detail they wish to depict consistent with the limitations of the scale in which they are building and the scale viewing distance of their model. However, it would appear that at scale viewing distance of two or three feet for a 1:48 scale model, details such as copper sheathing seams, and certainly sheathing tacks, would not be visible.
As one looks at a model, the viewer's eye is drawn to certain details which "stand out" and this phenomenon may work to emphasize or "highlight" desired details or, on the other hand, to distract from the overall "compelling impression of reality" that a good scale model is intended to invite. To illustrate this point, on a wide expanse of otherwise perfectly smooth hull, the viewer's eye will immediately be drawn to a speck of dust or an unfair brush stroke which will cause the viewer's brain to lose the impression of accurate scale and ruin the impression of reality that a model is all about. When viewing a ship model, although the overall shape of the hull is of great importance, it must be viewed as a whole, while the important finer details are above the waterline on deck and aloft in the rigging. Care must be taken, then, to determine whether the modeler wishes to draw the viewer's attention to the important details above the waterline so as to emphasize these, or to detract from them by creating "distractions" below the waterline where "nothing much is happening." One response to this consideration is the "Navy Board Style" model which omits planking below the waterline to show stylized framing, thereby "balancing" the extent of detail above the waterline with the level of detail above the waterline. This occasions a lot of work but can be a very effective presentation artistically and it does serve to avoid "distractions" by emphasizing detail throughout the entire model and, more importantly, "lightening" the mass of the hull below the waterline when the model is viewed from a distance as a whole rather than being closely examined piecemeal. Arguably, this is not so with highly detailed copper sheathing on a model because placement of properly scaled copper plates results in a surface that does not present much detail at all and which is far more easily accomplished with a realistic paint job depicting the "weathered" bottom as it would actually appear at scale viewing distance. Alternately, as an artistic convention, scale model bottoms are painted a solid color throughout, which does not invite the eye to consider detail at all. For this reason, we see fine models of vessels prior to about 1775 (when coppering commenced) painted a uniform off-white to create the "impression" of the tallow and hair antifouling coating of the period, and after that a uniform "bottom paint red, or reddish-brown, and sometime verdigris, to depict an "impression" of copper sheathing or antifouling paint of later times. Such a treatment often does not depict the actual scale appearance of the hull below the waterline, but by its lack of detail "tricks the brain" to "record" a general impression of the hull below the waterline without distracting it with any fine detail at all and frees the eye to focus on the fine details of the model above the waterline.
Of course, none of these considerations apply to a model which is not intended to realistically depict a full-scale vessel presented at scale viewing distance. Artistic deviations as a matter of taste used to communicate the essence of a vessel, while certainly demanding highly developed artistic skill and judgment of their creators, certainly have their place as with the "bright" finished "Admiralty Style" models which rely on the natural finish of the woods used in their construction or the "Board Room Builder's Models" which often accent the metal fittings, sometimes even to the point of gold-plating them. All of these considerations, however, do emphasize that ship modeling of all types is indeed a form of artistic expression, just as with all other forms of representational art.
I’ve read in several places that copper did indeed inhibit the growth of marine life (animal and plant) on the ship’s hull. Copper apparently has a biocide effect on marine growth, but it also erodes as the ship moves through the water which means it’s constantly sloughing off anything that attaches to the hull. This erosion also meant that the copper maintained a salmon/pink color below the waterline. Apparently, copper only turns green when it’s not moving through the water.
This has all got my little brain, actually 'no brain' (when I had my craniotomy the surgeon was amazed at the complete emptiness found) very confused.I'd be interested to know the "several places" you've read that "... copper inhibits the growth of marine life (animal and plant) on a ship's hull."
Theoretically, copper sheathing may provide a less hospitable surface for the mechanical attachment of certain marine plants and animals, causing a sloughing off of such growth as the hull moves through the water. This is, however, only a meaningful characteristic of modern powered hulls which move at far higher speeds than sailing vessels. At the speeds of period sailing ships, this mechanical scrubbing process has little or no effect on the growth of subaquatic plants and animals. Copper does not have any herbicidal qualities. Copper is a natural antimicrobial material which does have fungicidal qualities and thus, to that extent is a biocide, but copper is not an effective biocide for any subaquatic organism above the microbial level.
I'd also be interested to know where you got the impression that copper "maintained a salmon/pink color below the waterline" and "only turns green when it's not moving through the water." Copper is a shiny orange colored metal that turns colors due to a process called oxidation. When exposed to moisture and air for a time, copper undergoes a chemical reaction with the oxygen in the air forming a layer of copper oxide on its surface that is typically reddish-brown in color. As the oxidation process continues, the copper oxide layer reacts further with carbon dioxide and water in the air to form a greenish compound called copper carbonate, commonly called patina or verdigris. The rate of brownish copper oxidation patination and the development of the secondary greenish copper carbonate patina can be affected by factors such as temperature, humidity and the presence of certain chemicals in the environment including, but not limited to, salt in the water.
For these reasons, copper sheathing on a hull submerged before the secondary layer of greenish copper carbonite forms, will only form a patina of copper oxide which is brown, the color of a well-circulated penny. The areas of the sheathed hull at the waterline and above that are exposed to the air will develop a green copper carbonite patina on top of the initial brown copper oxide patina because they have access to the oxygen necessary to do so.
 Relying on Artificial Intelligence will get you exactly what they advertise: artificial intelligence. Never trust it. Be sure to wear your critical thinking helmet at all times.
Antibiofouling
Main articles: Copper alloys in aquaculture and Copper sheathing
Copper is biostatic, meaning bacteria and many other forms of life will not grow on it. For this reason it has long been used to line parts of ships to protect against barnacles and mussels. It was originally used pure, but has since been superseded by Muntz metal and copper-based paint. Similarly, as discussed in copper alloys in aquaculture, copper alloys have become important netting materials in the aquaculture industry because they are antimicrobial and prevent biofouling, even in extreme conditions, and have strong structural and corrosion-resistant properties in marine environments.
Copper does not have any herbicidal qualities. Copper is a natural antimicrobial material which does have fungicidal qualities and thus, to that extent is a biocide, but copper is not an effective biocide for any subaquatic organism above the microbial level.
Fungicide: Copper is widely used as a wood preservative primarily because it is an effective fungicide against soft rot fungi while avoiding the significant environmental impact of chromium and arsenic based preservatives.<a href="https://en.wikipedia.org/wiki/Copper#cite_note-218"><span>[</span>218<span>]</span></a>


