• Ships of Scale has incorportated an extra level of security when you log In. Please follow on-screen prompts to acknowledge that you are not a robot via a "Check Box" or a "Pictorial Check Box Puzzle". This is needed due to higher level of AI Activity Security.
  • SUBSCRIBE TO SHIPS IN SCALE TODAY!

    The beloved Ships in Scale Magazine is back and charting a new course for 2026!
    Discover new skills, new techniques, and new inspirations in every issue.

    NOTE THAT OUR NEXT ISSUE WILL BE July/August 2026
  • Win a Free Custom Engraved Brass Coin!!!
    As a way to introduce our brass coins to the community, we will raffle off a free coin during the month of August. Follow link ABOVE for instructions for entering.

H.M.S Enterprise / Enterprize. 1:96 (Modelship Dockyard) by Fangorn

Joined
Dec 21, 2022
Messages
110
Points
88

Location
Bealeton, VA
Hi All,
I have the kit (boxwood) for a couple of weeks now. I have not started but have looked at the pieces.
For now, this is a placeholder for when I get started (soon!)
I am also going to build the 1:48 version at the same time (or near enough).
I am going with POF models and scratch for the most part now.
More in a bit.. Starting a log is the first thing for me.
Guy
 
what do you think of the 1:96 kit. There sure are a lot of pieces.
There are certainly a lot of small pieces, but this I expected at this scale 1/96
I have not looked deeply at the pieces on each billet. There are at least 34 billets. I have looked at past builds and there is no information on how to store the parts and just leave them in the billet as needed.. I have also not found any documentation yet on what is on each billet.. more to come! basically now it is char removal and build the frame.
I have looked at the instructions and for the most part tell you which sheet the part is on. The sheets are only labeled on one side A,B,C...1,2,3,5.. it could be easy to loose parts or find a part.. I need to look again at the other builds


Guy.
 
The ply parts were removed per the pictures as the instructions.
One MUST be very careful in the placement and gluing of A5 (the first part!) once it is glued you dont know which way you have it. I had to redo 2 times to make sure the lasered parts for the top of the boat were up where one could see them. Its easy to flip it upside down and this is not acceptible for me as I could not read the frames. So I re-did. With the videos and dry assembly I finally figured out the placement of A11. The instructions could be a LOT better. Pictures are here:https://photos.app.goo.gl/1wPu6Q4YbxXSeGqZA
There are 3 other people that I could find that had a log going. Ill bet they had a time with the jig.. but maybe not.

Now on to the keel. I have to find the parts and I think there is one part A13 that does not look right. On the board A13 has no stepping. I think the stepping is a separate part I have not found yet.

I will start placing pictures in the log once I get my logging software (https://obsidian.md/) running and I know how it works.

Guy
 
Hi Folks
While putting together the Stem and Cutwater, Stern and deadwood, and keel. I found myself hunting for parts on a billet.
1.) Has anyone put together a spreadsheet of what billet has what part? This would be really handy for finding the parts.
(If not I will be putting one together ) I think there are multiple Billets named the same with different parts.
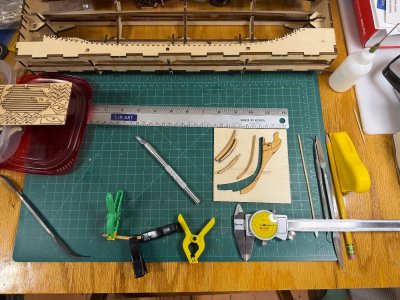
2.) Removing parts from the billet. Any suggestions here? I am putting together the boxwood version and the parts of the billet have just barely been cut throught the billet, making parts somewhat a chore to remove. the wood is very hard and difficult to remove the tabs holding the part in. I am using Xacto blades and even tried a surgical blade.. Patience is key.

I can see this will take me significant time to remove things from the billet, sand parts which is ok.. that is what I bought such a model for.. not one to simply place part a to b and then whalla a complete ship!

Guy
 
Removing parts from the billet. Any suggestions here? I am putting together the boxwood version and the parts of the billet have just barely been cut throught the billet, making parts somewhat a chore to remove. the wood is very hard and difficult to remove the tabs holding the part in. I am using Xacto blades and even tried a surgical blade
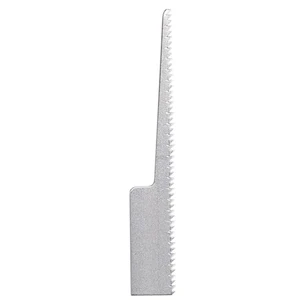
#15 Xacto key hole saw blades might work. Even a coping saw with the thinnest blades available might worth a try as well.
1788374637220.png
 
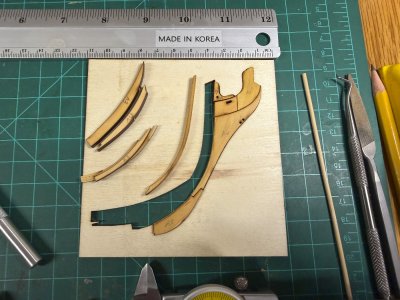
Hey Allan, Good day! Thanks. The small .5mm thick Xacto blade is what I am using. Even it is too thick. I am finding the thicker 4mm thick (thickest in kit) is the most trouble some.. the 2mm and below are fairly easy to remove. I am working on the cutwater and stem. Removing the char with some quality files (corradi). Just takes time and patience. Picture of stem so far below. I have purchased some black pva to assemble the unit after I get all the pieces cleaned up.
The cutwater stem is 4mm thick. (about 15 in thick scaled). I need to figure out what to taper it to (too thin and it will be fragile).

Here is a person who wishes everything were metric.. https://www.landfx.com/kb/autocad-fxcad/units-scale/6343-conversion-lists.html instead of having to bounce around at 1/96 to ~1/100 metric.

Guy

IMG_0344.JPG
IMG_0345.JPG
 
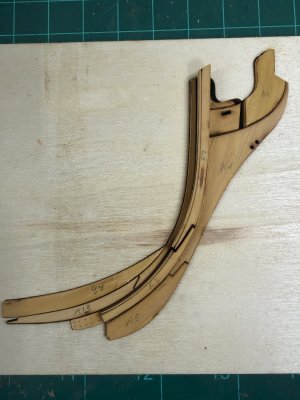
@neilm or other, How was the rabbet created? It needs to be about 1mm x 1mm in my thinking. I was thinking a small V shaped chisel I have. Also as a note for others. it appears the pieces as taken from the billets are a bit large (.25 mm) and after the char carefully removed they are still very tight, or wont fit properly in the template (Z5). I will carefully today sand down each section to fit. Picture below
F7/F3 (where the rabbet goes (see light line) sits proud.. This is interesting.

Guy
IMG_0346.JPG
 
@neilm or other, How was the rabbet created? It needs to be about 1mm x 1mm in my thinking. I was thinking a small V shaped chisel I have. Also as a note for others. it appears the pieces as taken from the billets are a bit large (.25 mm) and after the char carefully removed they are still very tight, or wont fit properly in the template (Z5). I will carefully today sand down each section to fit. Picture below
F7/F3 (where the rabbet goes (see light line) sits proud.. This is interesting.

Guy
View attachment 631665
If my memory serves me correctly, I think I just sanded everything prior to gluing.
Can’t remember doing anything too fancy with these pieces.
 
@neilm you are right nothing fancy. just sanding. or a scraper works as well.. its only about a mm down at an angle.. more in a bit as I have the keel just about done. I did not thin the stern or the stem as it was a bit to thin for my comfort (~2mm) easy to break.. but I will thin the 1/48 when I get the kit. there is a lot more to work with there.
Guy
 
One does not know just how small ~2" is in1/96. It is about .5mm
I am making the frames(I am working on the first one. Fragile things. tiny and one MUST have the overlaps between Futtocks correct. One can go blind or be on the wrong frame side (A or B) if you are not careful. A side on right faces the stern. B side on left faces the bow and there are .5 mm changes between futtocks..
There are 3 sizes of wood so far 3mm. 2.5mm and 2 mm.

It is very easy to make a mistake and have the sanding bevels on the wrong side.

This makes me glad I have the 1/48 version coming with a whopping 1mm between futtocks to play with.

4 hours so far on first frame.. I still get mixed up which overlap fits what direction. My kudos to all who have finished this. (I will bet.. that some frames were done incorrectly.. but thats just me.. it is HARD to tell)

Pics: https://photos.app.goo.gl/1wPu6Q4YbxXSeGqZA
Guy
 
Last edited:
Greeting Fangorn, I have the kit since release couple years ago. I did want to get more experience with POF build before tackling this little baby. Someone a while back mentioned that the scale is indeed a challenge. However, the end results should be quite nice. Displaying a ship this intricates at that scale should attract some wows.
 
Greeting Fangorn, I have the kit since release couple years ago. I did want to get more experience with POF build before tackling this little baby. Someone a while back mentioned that the scale is indeed a challenge. However, the end results should be quite nice. Displaying a ship this intricates at that scale should attract some wows.
Hello Loracs,
Yes indeed a challenge, A beautiful model, but my eyes are not quite right. I need to have another cataract fixed before I tackle more of this size.. .5mm is not a lot and I am a stickler for accuracy. If I cant do a good job then I wont.. We will see. I have the bigger 1/48 coming and I think this will be almost the smallest size for me.
The end results are indeed magnificent. Or... I continue to build the 1/72 POF Bluenose. I am deciding..
You are doing a wonderful job on the Bluenose and thanks for your log.
Guy
 
Back
Top