• Ships of Scale has incorportated an extra level of security when you log In. Please follow on-screen prompts to acknowledge that you are not a robot via a "Check Box" or a "Pictorial Check Box Puzzle". This is needed due to higher level of AI Activity Security.
  • SUBSCRIBE TO SHIPS IN SCALE TODAY!

    The beloved Ships in Scale Magazine is back and charting a new course for 2026!
    Discover new skills, new techniques, and new inspirations in every issue.

    NOTE THAT OUR NEXT ISSUE WILL BE July/August 2026
  • Win a Free Custom Engraved Brass Coin!!!
    As a way to introduce our brass coins to the community, we will raffle off a free coin during the month of August. Follow link ABOVE for instructions for entering.

HMS Surprise - Vanguard 1:64

Allan, you are getting buckets of advice. I have also got a model of HMS Alert - a cutter - and although the kit did not come with blocks for the gun tackles I requested single blocks to the correct scale and they were duly sent. I have seen several made-up models at Chris' premises and they were all displayed without gun tackles. I do not know what the case would be with the Surprise. Chris' instructions are very good but as far as I can rember he did not go into gun tackles. Can I suggest you contact him on <enquiries@vanguardmodels.com>. He is one of our members, so if there is anything else you need to know get in touch with me either on this forum or through our website.
 
Atkinson and Clarke
Fantastic, thank you very much for sharing this. As their Essay on Naval Tactics, Systematical and Historical was done in 1790, this is great information. I am convinced that the double and single seems to be the way to go at least when the Blomefields came into use about that time. I bet the gun crews appreciated it the most! It does make a lot of sense when you look at the weights of Blomefields compared to Armstrong Frederick pattern guns.
Allan
 
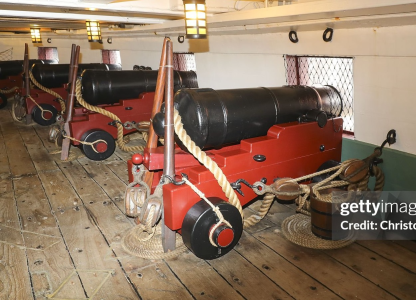
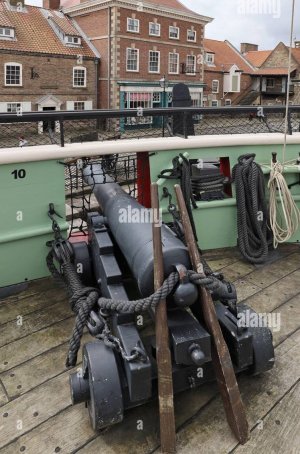
Allan, I have been looking at the gun running out tackles on the 18pdr Frigate HMS Trincomalee. She was built in Bombay in, I think, 1815. She lies in Hartleypool in the North of England - afloat following a magnificent restoration there. Her running out tackle is, as far as I can see consists of a double block on the carriage and probably a double on the bulwark. She would have been similarly armed to HMS Surprise. The tackles are not laid out as one would wish but coiled up, otherwise visitors would be tripping over them. Google HMS Trincomalee and see what you come up with; there are lots of images some of which are useful.

Ian.
 
Her running out tackle is, as far as I can see consists of a double block on the carriage and probably a double on the bulwark The tackles are not laid out as one would wish but coiled up
Thanks Ian

Regarding the Trincomalee a pair of double blocks is indeed unusual. Again, it seems nothing is 100% when it comes to ships in the age of sail!
Sadly we are learning that AI does not seem to be a good source for this kind of information. They show half their responses are sourced from ship model websites rather than contemporary sources.

Photos of the cannon that I could find seem to all show a single and double on the running out tackle. I have sent an email to them asking about this and hopefully will get a detailed response.

It is nice to see the frapped rigging in the second photo.

Thanks again for your help!

Allan

1789382272890.png
1789382272575.jpeg

1789382118564.jpeg
 
Last edited:
Allan, you are getting buckets of advice. I have also got a model of HMS Alert - a cutter - and although the kit did not come with blocks for the gun tackles I requested single blocks to the correct scale and they were duly sent. I have seen several made-up models at Chris' premises and they were all displayed without gun tackles. I do not know what the case would be with the Surprise. Chris' instructions are very good but as far as I can rember he did not go into gun tackles. Can I suggest you contact him on <enquiries@vanguardmodels.com>. He is one of our members, so if there is anything else you need to know get in touch with me either on this forum or through our website.
Chris's instructions don't include how to do the gun tackle and he specifically says that it is up to the modeler whether to put gun tackle on the gun deck guns since most of them can't be seen in detail. However, the ship design includes leaving part of the deck open so you can view the lower deck. But I am pretty certain the additional blocks needed for that many guns isn't included in the kit and would have to be purchased. I haven't decided yet how much tackle to include but will do at least the guns that can be seen from the top of the model. If I do all the guns I will probably use off the shelf blocks.
 
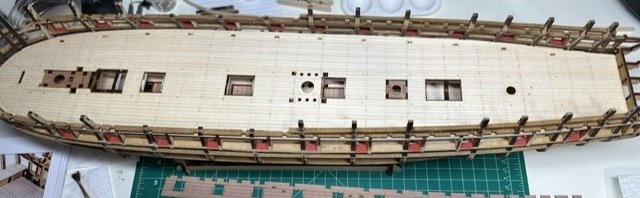
I had already glued the gun deck into place (Step 135) before we got into the discussion of whether the premade boarding by Vanguard was to consistent and light. One oddity about how Vanguard handled gluing this deck, they instruct you to "glue down the centre of the hull" which leaves the sides floating. Reading ahead into the steps makes me believe they plan to use the sideboard footer to hold the deck down in proper position then glue it. We will have to wait and see how that works out.

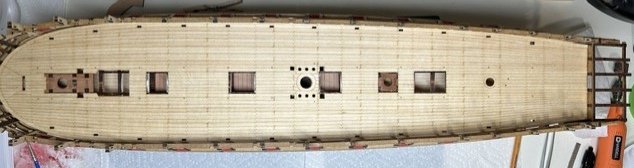
Now to the problem of is the deck boarding to light and to consistent. Here is a picture of the deck after mounting:
Step 135.jpg

I didn't want to risk any major changes since it would be near impossible to undo. I did test on scrap wood various stains and methods to see what could be used to create some contrast to the boards without overdoing it. I settled on just using a pencil to lightly put down some graphite to some boards at random. The put on a layer of "Natural Wood" stain which is almost clear. But it did darken the wood slightly. The final result is:
Gun Deck.jpg

It will be a little easier to do on the next decks since I can do it before they are installed.
 
My Society runs a monthly Zoom meeting at which we present our work, cover research projects and discuss tools, materials and techniques. Althought based in the UK, we have several members in the USA and Canada including two directors of the Nautical Research Guild. The meetings are at 1830 London time on the fourth Sunday of each month. Would you be prepared to join us as a guest and give us a talk on the build of this model? If you would please make contact through our website at <modelshipwrights.org>. I visited the owner of Vanguard Models last year and correspond with him regularly. He is working flat out at the moment trying to meet the demand for kits of HMS Surprise, but he should not be surprised by the demand for the Surprise.
I am not sure I have gotten far enough in my build to have much to present yet but would be glad too. Maybe toward the end of October.

Vanguard moved faster than I expected. While I bought the model early (but after pre-release), I had the impression nothing would ship before Oct 8th. So, I thought I had plenty of time to get prepared. But it showed up the end of August. I am also building the Panart HMS Royal Caroline. I am using it to get refamiliarize with working with wood as well as to troubleshoot problems before they come up on the Surprise. In particular I am going to use the Caroline to work out rigging problems and to test mounting sails. The Panart kit has a lot of problems including missing metal pieces (but I got it for free).

I also am waiting on additional parts I ordered from Vanguard. But Vanguard has some problems with shipping. They don't prepay all the Taxes and Tariffs that the US requires so delivery is an iffy operation. UPS doesn't seem to know quite what to do about handling those charges.
 
Well, I can add a little information regarding the import of a Vanguard model kit to North America with UPS. I took delivery of their similar frigate model HMS Sphinx about 3 weeks ago. Shipping stopped with UPS at their Stanstead aeroport facility and was held there until I paid the Canada Customs duties. UPS sent me an email informing me of the specific charges, itemized, and a link to pay them with my credit card. I paid and UPS completed delivery. Only 2 days from Stanstead to my front door in Montreal.

Otherwise, I look forward to your future posts as the Surprise takes shape. I still am working on my Ocre model of the J-class yacht Endeavour. When finished, I shall start on my Sphinx; essentially a slightly shorter version of Surprise with 24 long guns instead of 28. The model sizes differ only by mms in keel length.

Graham
 
Well, I can add a little information regarding the import of a Vanguard model kit to North America with UPS. I took delivery of their similar frigate model HMS Sphinx about 3 weeks ago. Shipping stopped with UPS at their Stanstead aeroport facility and was held there until I paid the Canada Customs duties. UPS sent me an email informing me of the specific charges, itemized, and a link to pay them with my credit card. I paid and UPS completed delivery. Only 2 days from Stanstead to my front door in Montreal.

Otherwise, I look forward to your future posts as the Surprise takes shape. I still am working on my Ocre model of the J-class yacht Endeavour. When finished, I shall start on my Sphinx; essentially a slightly shorter version of Surprise with 24 long guns instead of 28. The model sizes differ only by mms in keel length.

Graham
UPS did deliver to my house but required a check to driver for UPS to cover Texas sales tax plus whatever Trump's tariff of the week was. Came to an extra $227.68.
 
After putting in the gun deck the instructions move on to completing the interior siding and cabin. These steps introduced a few problems. Some were just omission. The instructions covered the port side in detail but sometimes left out doing the mirror items on the starboard side. The more serious problem occurred with the way these thin parts (0.8 mm Pear) took paint. I had a couple of problems with painting. First I used AK water-based paints diluted about 50% and brushed it on. This has two bad side effects. First the pear soaked up the water and warped badly. The long strips of siding got a distinct curl. The second was that using a brush tended to force paint down into the etchings covering up the detail that was put into the wood with lasers. Nail holes in particular had a tendency to get covered up. I had to finish the side pieces using brush for consistency but future painting on these thin sheets will be done with an airbrush. The airbrush painting tends to not get so much paint into the etchings so they show well and goes on drier so there is less warping.

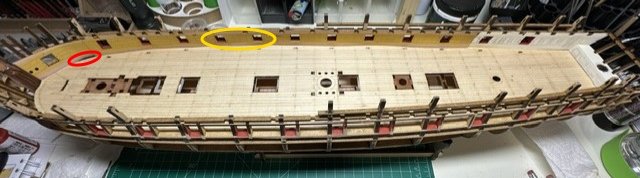
The next problem occurred when I got to the gluing step (143). Here Vanguard again uses their technique of "painting" diluted white glue onto the backs of the siding after clamping it into place. The problem is the water in the glue soaked into the pear wood making it soft and tending to change shape. In the picture below the spot circled in red resulted from it being an area without a support behind it but probably had to much pressure on it from the clamps so it sagged inward. I am pretty sure I can repair that when I add the footer board with rewetting the section.

A minor problem on the two gunports circled in yellow also occurred. For some reason the ports didn't line up with we interior wall on the right side. I am not sure why, but it can be corrected later by sanding.

This brings me up to step 147 where I start installing the "spirketting". Never heard that term before so googled it. A spirketting is a nautical term for the thick inside wooden planks on a ship, located near the deck or the lower bulwarks. The steps that follow also add this thicker planking above the gunports, referred to as "ledges". This I think is the first model I have built that added this detail.

Step 143.jpg
 
After putting in the gun deck the instructions move on to completing the interior siding and cabin. These steps introduced a few problems. Some were just omission. The instructions covered the port side in detail but sometimes left out doing the mirror items on the starboard side. The more serious problem occurred with the way these thin parts (0.8 mm Pear) took paint. I had a couple of problems with painting. First I used AK water-based paints diluted about 50% and brushed it on. This has two bad side effects. First the pear soaked up the water and warped badly. The long strips of siding got a distinct curl. The second was that using a brush tended to force paint down into the etchings covering up the detail that was put into the wood with lasers. Nail holes in particular had a tendency to get covered up. I had to finish the side pieces using brush for consistency but future painting on these thin sheets will be done with an airbrush. The airbrush painting tends to not get so much paint into the etchings so they show well and goes on drier so there is less warping.

The next problem occurred when I got to the gluing step (143). Here Vanguard again uses their technique of "painting" diluted white glue onto the backs of the siding after clamping it into place. The problem is the water in the glue soaked into the pear wood making it soft and tending to change shape. In the picture below the spot circled in red resulted from it being an area without a support behind it but probably had to much pressure on it from the clamps so it sagged inward. I am pretty sure I can repair that when I add the footer board with rewetting the section.

A minor problem on the two gunports circled in yellow also occurred. For some reason the ports didn't line up with we interior wall on the right side. I am not sure why, but it can be corrected later by sanding.

This brings me up to step 147 where I start installing the "spirketting". Never heard that term before so googled it. A spirketting is a nautical term for the thick inside wooden planks on a ship, located near the deck or the lower bulwarks. The steps that follow also add this thicker planking above the gunports, referred to as "ledges". This I think is the first model I have built that added this detail.

View attachment 637523

Hello,

Airbrush Vallejo acrylics are my go to. Found applying Minwax natural oil based stain first, and let dry, coats the fibers reducing water absorption.

“Diluted white glue” that’s a killer, thanks for pointing it out.

Good luck,

-Rich
 
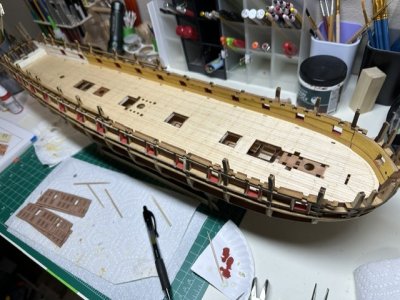
The enter siding of the gun deck has been completed which gets me through Step 152. Right now I am working my way through the instructions for windows and doors on the aft cabins to make sure I understand what I need to do before any painting or gluing. That area includes the rear where the Ivory paint is. It has two bulkhead walls as well as one room divider. Three windows in each bulkhead and door fittings.

Step 152.jpg
 
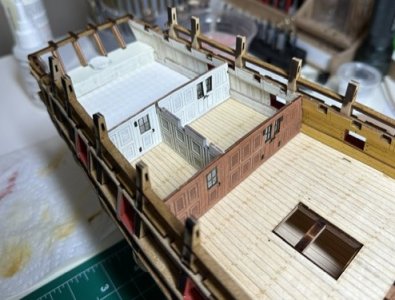
I have completed the rear gun deck cabins pictured below. Only substitution I made was using the tops of railroad spikes for door handles instead of the suggested eyebolts. Railroad spikes are "L" shaped and already come in black. I think they were for N scale. The chequered floor does show up well in the picture since it is so lightly shaded. Laser etching used on the pear wood gives a nice paneling effect.

I may get slowed down soon since I want to add lighting but my order from Vanguard got trapped in the UK mail system.
But this does bring me up to Step 163. Only a little over 500 steps to go. But some of those are of the type "now rig the masts" which are pretty open ended.
cStep 163.jpg
 
Back
Top