


Good call. Who would even notice the differenceGiven the scale that I'm working in, with even smaller blocks than those supplied by the MS kit, I will be stropping and seizing line, wherever Becket blocks are called for

-

SUBSCRIBE TO SHIPS IN SCALE TODAY!
The beloved Ships in Scale Magazine is back and charting a new course for 2026!
Discover new skills, new techniques, and new inspirations in every issue.
NOTE THAT OUR NEXT ISSUE WILL BE July/August 2026 -

Win a Free Custom Engraved Brass Coin!!!
As a way to introduce our brass coins to the community, we will raffle off a free coin during the month of August. Follow link ABOVE for instructions for entering.
You are using an out of date browser. It may not display this or other websites correctly.
You should upgrade or use an alternative browser.
You should upgrade or use an alternative browser.
USS Constitution - Model Shipways
- Thread starter Der Alte Rentner
- Start date
- Watchers 24

and if anyone shows up with a magnifying glass and vernier caliper, I'm sending them packing!Good call. Who would even notice the difference

I'm up against I'm up against it now.
I've been substituting the Syren Ship Model blocks for the MS kit blocks. These are decidedly smaller than the stock blocks, but with selective drilling, I've been able to use these replacements without much difficulty. I do like the way they look, so I'm glad I was able to do that. However, now I'm attempting to rig the jig tackle for the halliards and have gotten to the point where I'm dealing with the 3/32" blocks.
They are so small that:
a) I can't even get .008" (.2 mm) scale rope through the sheaves.
and
b) attempting to widen these holes, even a little bit, results in a broken block.
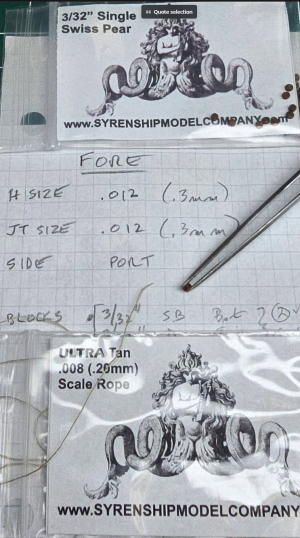
I stiffened the end of the .2mm line with CA glue and trimmed it to point, and still can't get it through the hole in the block.
Using successfully larger bits to check the size of the holes in the block, I've determined that they are .39 mm in diameter.
As I said, attempting widen the opening to the next size drill, .49 mm, destroys the block.
I'm going to have to substitute 1/8" blocks going forward. My supply of which is insufficient - requiring a re-order. I am also awaiting delivery of several sizes of tan line from ropes of scale.
Bottom line? rigging is off the table for the time being.
I've been substituting the Syren Ship Model blocks for the MS kit blocks. These are decidedly smaller than the stock blocks, but with selective drilling, I've been able to use these replacements without much difficulty. I do like the way they look, so I'm glad I was able to do that. However, now I'm attempting to rig the jig tackle for the halliards and have gotten to the point where I'm dealing with the 3/32" blocks.
They are so small that:
a) I can't even get .008" (.2 mm) scale rope through the sheaves.
and
b) attempting to widen these holes, even a little bit, results in a broken block.
I stiffened the end of the .2mm line with CA glue and trimmed it to point, and still can't get it through the hole in the block.
Using successfully larger bits to check the size of the holes in the block, I've determined that they are .39 mm in diameter.
As I said, attempting widen the opening to the next size drill, .49 mm, destroys the block.
I'm going to have to substitute 1/8" blocks going forward. My supply of which is insufficient - requiring a re-order. I am also awaiting delivery of several sizes of tan line from ropes of scale.
Bottom line? rigging is off the table for the time being.

Sorry you're hitting some roadblcoks, but it seems you have a plan to overcome them. Your build continues to impress, whatever the difficulties!
Hi Peter
You really should give the UV resin thing a try. Unlike CA, it does not increase the diameter of the line. I used 2mm blocks (3D printed) for my gun tackle. These blocks have holes that are .013" (.33mm) which are smaller than what you have. Like you, I also used the Syren .008" rope and I had no trouble threading these
You really should give the UV resin thing a try. Unlike CA, it does not increase the diameter of the line. I used 2mm blocks (3D printed) for my gun tackle. These blocks have holes that are .013" (.33mm) which are smaller than what you have. Like you, I also used the Syren .008" rope and I had no trouble threading these
Preparing the rigging for the royals and the mizzen top gallant halliards, and their jig tackle, wasn't bad. I thought I would move on to Preparing the remaining halyard/jig tackle pairs and immediately ran into a roadblock.
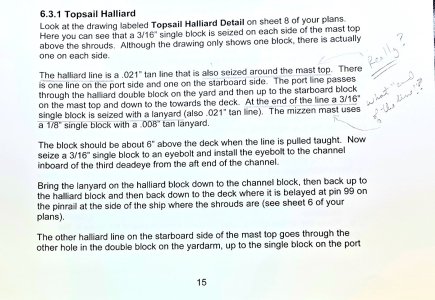
On page 15 chapter 6 of the hunt practicum on rigging the Constitution, we have this text:
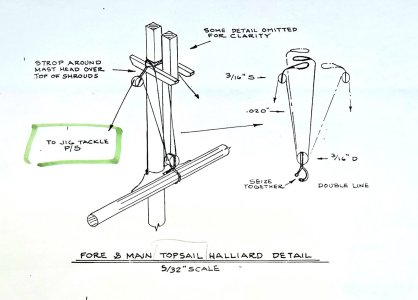
Here's a picture of the top sale halyard detail on sheet 8 of the MS plans:
And here's my attempt at calculating the lengths of the halliards that I'll need running from the top block of the jig tackle on the port side to the top block of the jig tackle on the starboard side.
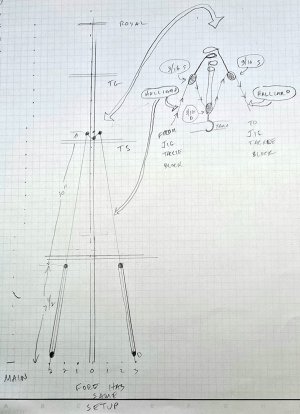
And here's how the blocks in the jig tackle are rigged:
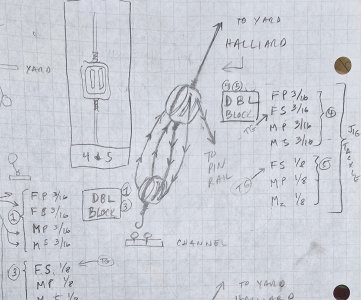
Seems to me that the only way to do this in advance is to strop every block and rig everything running from the hook at the channel on the port side to the hook at the channel on the starboard side. My measurements will have to be pretty accurate. I can drop the slings over the mast later, and any slack will need to be taken up by the jig tackle when I wrap the end around the pin on the pin rail.
I think the block that is seized around the topsail yard needs to be supprted from above by the slings that wrap around the mast above the shrouds, in which case that block needs to be a double block.
Why Hunt specifies a single block there, I don't know. The plans call for a double. Did Hunt just omit the slings that carry the weight of the yard?
If I wait until the masts are in to rig this, I'll have to do some seizing of blocks with rigging already in place on the ship. I don't like that..
I'm so confused.
I think I may need to back burner the rigging and redirect my energy toward getting the lower masts installed and moving on to the ratlines.
On page 15 chapter 6 of the hunt practicum on rigging the Constitution, we have this text:
Here's a picture of the top sale halyard detail on sheet 8 of the MS plans:
And here's my attempt at calculating the lengths of the halliards that I'll need running from the top block of the jig tackle on the port side to the top block of the jig tackle on the starboard side.
And here's how the blocks in the jig tackle are rigged:
Seems to me that the only way to do this in advance is to strop every block and rig everything running from the hook at the channel on the port side to the hook at the channel on the starboard side. My measurements will have to be pretty accurate. I can drop the slings over the mast later, and any slack will need to be taken up by the jig tackle when I wrap the end around the pin on the pin rail.
I think the block that is seized around the topsail yard needs to be supprted from above by the slings that wrap around the mast above the shrouds, in which case that block needs to be a double block.
Why Hunt specifies a single block there, I don't know. The plans call for a double. Did Hunt just omit the slings that carry the weight of the yard?
If I wait until the masts are in to rig this, I'll have to do some seizing of blocks with rigging already in place on the ship. I don't like that..
I'm so confused.
I think I may need to back burner the rigging and redirect my energy toward getting the lower masts installed and moving on to the ratlines.


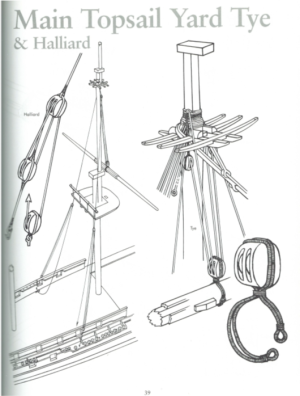
Thanks Jon, I have that book too. The rig on the right shows what I suspect is correct for the mast end of the rigging, and agrees with the MS plans. The introduction of a third block in the jig tackle on the left is different from the MS plans. So, I'll default to the the instructions in the kit - two blocks.
The difficulty in trying to piece together the bulk of the halliard and jig tackle off the ship is what I'm wrestling with. I'd have to be pretty much spot on with the lengths of the three major lines in question - the jig tackle pieces on either side and the halliard that connects these two together. You'll note that it's one continuous run from channel to channel, given the way the top jig tackle block is seized to both the jig tackle and halliard. I can't imagine doing this on the ship. I think the only way to do this is dry fit the mast and yard and assemble the rigging to fit - which seems to be the only way I could use clamping systems to do the seizing.
The difficulty in trying to piece together the bulk of the halliard and jig tackle off the ship is what I'm wrestling with. I'd have to be pretty much spot on with the lengths of the three major lines in question - the jig tackle pieces on either side and the halliard that connects these two together. You'll note that it's one continuous run from channel to channel, given the way the top jig tackle block is seized to both the jig tackle and halliard. I can't imagine doing this on the ship. I think the only way to do this is dry fit the mast and yard and assemble the rigging to fit - which seems to be the only way I could use clamping systems to do the seizing.
I got frustrated with the rigging research, and decided I'd shift gears to tackle the little that's left to do by way of fabrication - and that would be the crosstrees and trestle trees. (Hmmm, why is "crosstree" one word, and "trestle tree" two, at least in the MS plans?).
Yet again, I find myself disappointed by the MS plans and the Hunt Practicum.
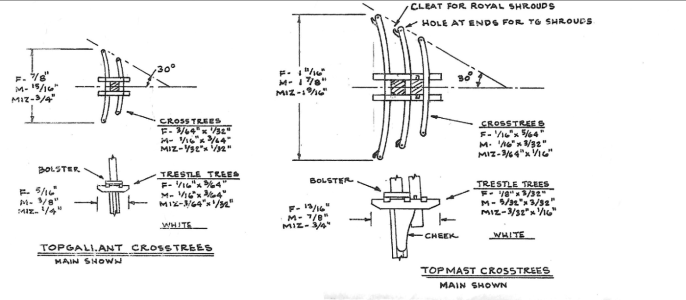
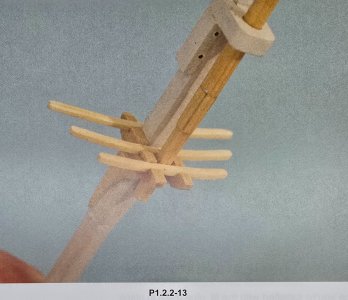
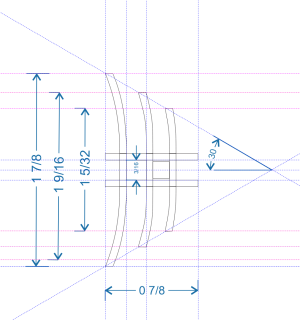
First up, the MS plans: In order to make the 1st and 2nd (counting from bow to stern) crosstree components any of the cross tree sets, I had to figure out a way to determine their lengths. (The lengths of only the third branch(?) for each crosstree is provided. The 30 degree angle defining the ends of all three branches seemed to be the most likely avenue to explore for a solution. So, I fired up Corel Draw and did what I could to create the shape of the third branch of the main crosstree, and scaled everything from that (see below)
MS plans (note the presence of chocks on the 2nd and 3rd branches).
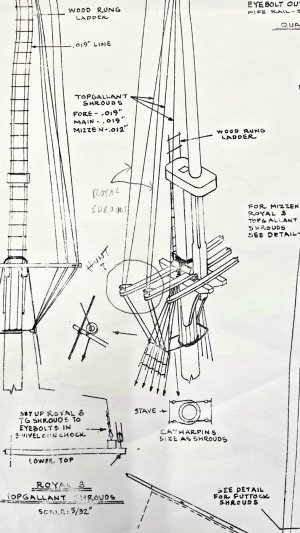
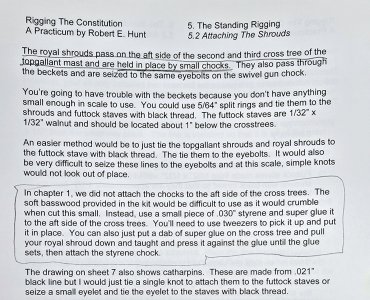
and note their absence here in Chapter 1 of Hunt's Rigging Practicum.
But wait, there's more... A reference in Chapter 5!
So, here's my first attempt to whip up scaled patterns from which to cut the crosstree components out of boxwood.
I could have simply used these patterns and started fabrication, but had to double check the dimensions for the openings for the masts.
Here's where I have a small problem. The MS plans show dimensions for the cross-sections of the masts, but there seems to be disagreement between the numbers. Look at the dimensions of the topmast at the shoulder where the crosstrees and cross trestle would sit.
F 5/32"
M 3/16"
Miz 1/8"
Compare that to any of these dimensions for the base of the topgallant mast.
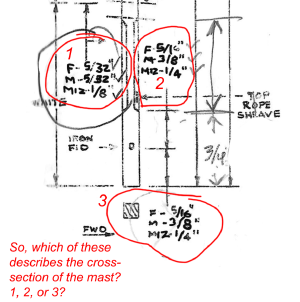
I'm pretty sure I went on a rant about this a long time ago when I made the masts. There was a note in the addendum that came with the MS kit's inventory list with dimensions that supersede one of this group of three.
"Fore, main and mizzen Topgallant/royal masts Should read:
F - 3/16"
M - 1/4"
Miz - 1/8" "
Great, but I never knew which values these were replacing.
Judging by the actual measurements of the cross-sections at these two points, I went with those at the shoulder on the topmast. But now that I'm making the crosstrees, I see that the matching mast sections should be the same dimension, which is not the case. Fortunately, the difference for the main crosstree openings are only off by 1/32". Both openings should either be 3/16" or 5/32". I suppose I could add material to the 5/32" end of the topgallant mast to bring it to 3/16", but I can probably just live with a little bit of slack here. The other crosstree openings will pair with the same sized mast segments. Fore mast TS mast at shoulder is 5/32" square, as is the bottom of the topgallant mast. Ditto for the 1/8" square segments of the mizzen masts.
I revisited Corel Draw to prepare a more accurate rendering for the patterns, but wearying of the effort, I called it quits after demonstrating how I got the basic dimensions for the 1st and 2nd trees.
Construction will have to wait until Monday...
Have a nice weekend all.
Yet again, I find myself disappointed by the MS plans and the Hunt Practicum.
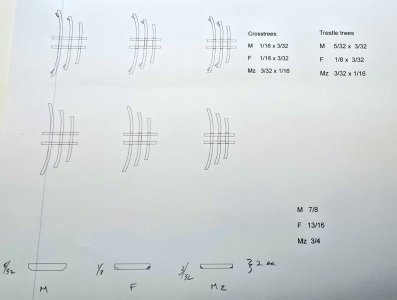
First up, the MS plans: In order to make the 1st and 2nd (counting from bow to stern) crosstree components any of the cross tree sets, I had to figure out a way to determine their lengths. (The lengths of only the third branch(?) for each crosstree is provided. The 30 degree angle defining the ends of all three branches seemed to be the most likely avenue to explore for a solution. So, I fired up Corel Draw and did what I could to create the shape of the third branch of the main crosstree, and scaled everything from that (see below)
MS plans (note the presence of chocks on the 2nd and 3rd branches).
and note their absence here in Chapter 1 of Hunt's Rigging Practicum.
But wait, there's more... A reference in Chapter 5!
So, here's my first attempt to whip up scaled patterns from which to cut the crosstree components out of boxwood.
I could have simply used these patterns and started fabrication, but had to double check the dimensions for the openings for the masts.
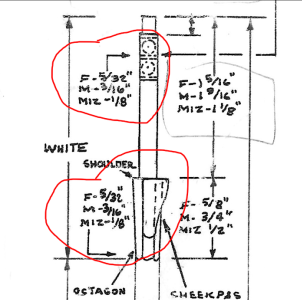
Here's where I have a small problem. The MS plans show dimensions for the cross-sections of the masts, but there seems to be disagreement between the numbers. Look at the dimensions of the topmast at the shoulder where the crosstrees and cross trestle would sit.
F 5/32"
M 3/16"
Miz 1/8"
Compare that to any of these dimensions for the base of the topgallant mast.
I'm pretty sure I went on a rant about this a long time ago when I made the masts. There was a note in the addendum that came with the MS kit's inventory list with dimensions that supersede one of this group of three.
"Fore, main and mizzen Topgallant/royal masts Should read:
F - 3/16"
M - 1/4"
Miz - 1/8" "
Great, but I never knew which values these were replacing.
Judging by the actual measurements of the cross-sections at these two points, I went with those at the shoulder on the topmast. But now that I'm making the crosstrees, I see that the matching mast sections should be the same dimension, which is not the case. Fortunately, the difference for the main crosstree openings are only off by 1/32". Both openings should either be 3/16" or 5/32". I suppose I could add material to the 5/32" end of the topgallant mast to bring it to 3/16", but I can probably just live with a little bit of slack here. The other crosstree openings will pair with the same sized mast segments. Fore mast TS mast at shoulder is 5/32" square, as is the bottom of the topgallant mast. Ditto for the 1/8" square segments of the mizzen masts.
I revisited Corel Draw to prepare a more accurate rendering for the patterns, but wearying of the effort, I called it quits after demonstrating how I got the basic dimensions for the 1st and 2nd trees.
Construction will have to wait until Monday...
Have a nice weekend all.
Last edited:
It turns out that I (once again) misread the directions. The correct width of the main and fore crosstrees is 3/32", not 1/16" as pictured above. So, I returned to Corel Draw, which is perhaps not the best tool to use to create to-size templates.
Here's today's effort to redraw the templates for the main and fore cross and trestle trees.
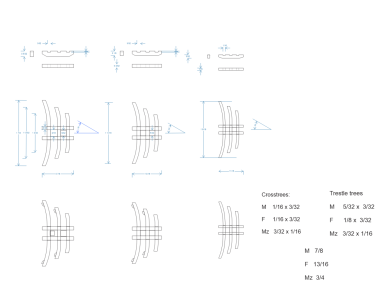
I haven't decided yet if I'm going to make small cleats to glue on after the fact for the shrouds, or do them on the fly when I'm cutting the crosstrees on the scroll saw.
Here's today's effort to redraw the templates for the main and fore cross and trestle trees.
I haven't decided yet if I'm going to make small cleats to glue on after the fact for the shrouds, or do them on the fly when I'm cutting the crosstrees on the scroll saw.
Last edited:
I have an alternate method for making very very small, strong metal cleats and are relatively simple to make. See Post #38, Pinnace Cleats. I originally devised this method when I was building the Rattlesnake and have since used it numerous times since. The Pinnace was was the first time I used it on the Conny build.I haven't decided yet if I'm going to make small cleats to glue on after the fact for the shrouds, or do them on the fly when I'm cutting the crosstrees on the scroll saw.
Jon
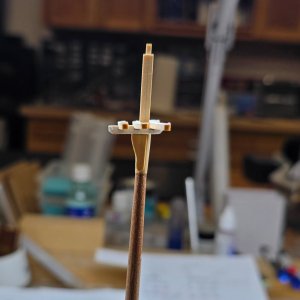
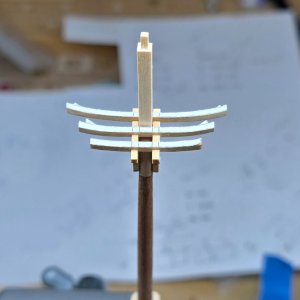
Mizzen topmast crosstree well under way.
Last edited:
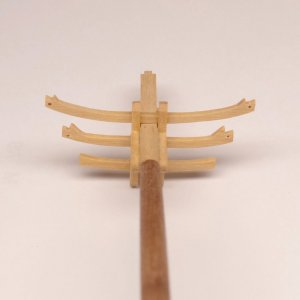
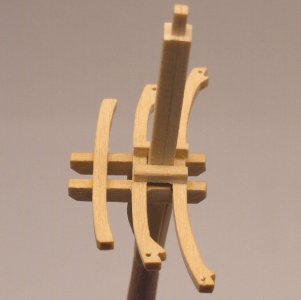
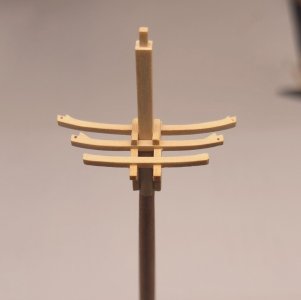
Slow day at the shipyard. Had to confirm no blocks or eyebolts necessary on the mizzen crosstrees, and that only two were needed on the, now captured, mast cap..
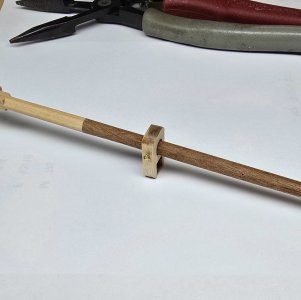


Good looking crosstrees, Peter!


Premium work on the crosstrees, Peter. You know I appreciate the precise woodworking!

Your hard work is paying off Peter. Everything is looking great.
Thanks Paul,Premium work on the crosstrees, Peter. You know I appreciate the precise woodworking!
As Mustafa pointed out to me, however, my precision in this case was slightly lacking.
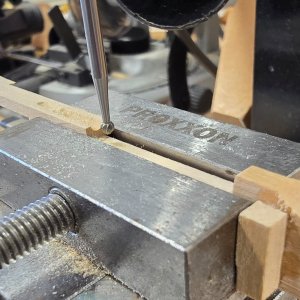
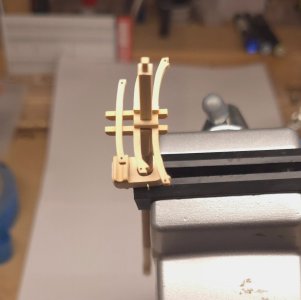
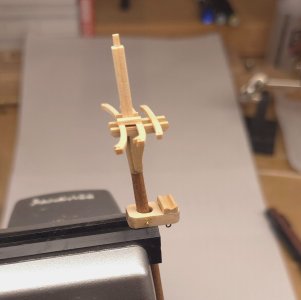
I did go back and drill the missing holes, and I built the little sling saddle that goes on top of the mast cap. As well as doing the research on how many eye bolts the mast cap requires. This opened up a whole new can of worms, which has me, once again, sidetracked.

- Joined
- Oct 9, 2020
- Messages
- 2,547
- Points
- 538

At least your sidetracking is productive. Mine takes me into delving into theory about a very specific rope making machine. lol
At the rate I am going, I don't see an end to this project. But as they say, who is in a hurry. Good job btw. Your boat is looking really nice.

At the rate I am going, I don't see an end to this project. But as they say, who is in a hurry. Good job btw. Your boat is looking really nice.
Amen brother!At the rate I am going, I don't see an end to this project
- Joined
- Oct 9, 2020
- Messages
- 2,547
- Points
- 538
did you use a jewelry saw and files to cutout your crosstrees?